Operating Instructions
Page 47
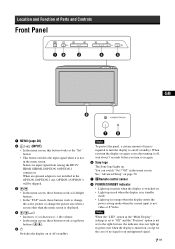
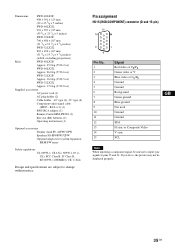
...of time is not video or S Video. When you turn the display on again, soon after turning it off, wait about 5 seconds before you turn the display to on/off (...display is displayed. 4 // • Increases (+) or decreases (−) the volume. • In the menu screen, these buttons work as the "Set" button. • This button switches the input signal when it on again. 6 Sony logo The Sony... screen, this button works as up/down buttons ( / ). 51 Switches the display on or off (standby). Note To protect the panel, a certain amount of no signal or an unsupported signal. 7 GB Selects an...
...of time is not video or S Video. When you turn the display on again, soon after turning it off, wait about 5 seconds before you turn the display to on/off (...display is displayed. 4 // • Increases (+) or decreases (−) the volume. • In the menu screen, these buttons work as the "Set" button. • This button switches the input signal when it on again. 6 Sony logo The Sony... screen, this button works as up/down buttons ( / ). 51 Switches the display on or off (standby). Note To protect the panel, a certain amount of no signal or an unsupported signal. 7 GB Selects an...
Operating Instructions
Page 48
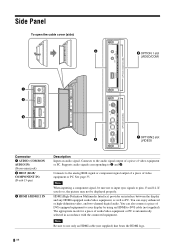
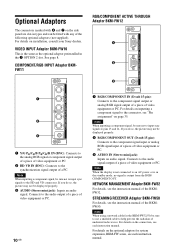
... inputting a component signal, be displayed properly. You can also connect a piece of audio/video equipment or PC is automatically selected in accordance with the connected equipment. Connects to pins 13 and 14. See page 35. Side Panel To open the cable cover (side) 4 IN 5 OPTION 1 slot (VIDEO/COM) OPTION 1(VIDEO/COM) MONITOR CONTROL ADAPTOR CONTROL...
... inputting a component signal, be displayed properly. You can also connect a piece of audio/video equipment or PC is automatically selected in accordance with the connected equipment. Connects to pins 13 and 14. See page 35. Side Panel To open the cable cover (side) 4 IN 5 OPTION 1 slot (VIDEO/COM) OPTION 1(VIDEO/COM) MONITOR CONTROL ADAPTOR CONTROL...
Operating Instructions
Page 49
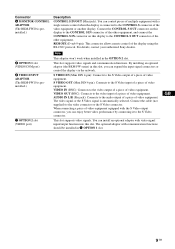
..., you can enjoy better video performance by connecting it to the S Video input of a piece of video equipment. For details, contact your authorized Sony dealers. 5 OPTION 1 slot (VIDEO/COM port) 6 VIDEO INPUT ADAPTOR (The BKM-FW10 is automatically selected. AUDIO IN L/R (Pin jack): Connects to the CONTROL S connector of the video equipment or another display. GB 9 GB Connector...
..., you can enjoy better video performance by connecting it to the S Video input of a piece of video equipment. For details, contact your authorized Sony dealers. 5 OPTION 1 slot (VIDEO/COM port) 6 VIDEO INPUT ADAPTOR (The BKM-FW10 is automatically selected. AUDIO IN L/R (Pin jack): Connects to the CONTROL S connector of the video equipment or another display. GB 9 GB Connector...
Operating Instructions
Page 50
Optional Adaptors The connectors marked with 5 and 7 on the side panel are slot-in types and can be fitted with any of a ...in the 7 OPTION 2 slot. Note When inputting a component signal, be displayed properly. 2 RGB/COMPONENT OUT (D-sub 15-pin): Connects to help prevent the radiation of video equipment or PC. 3 AUDIO IN (Stereo mini jack): Inputs an audio... signal. For details on installation, consult your Sony dealers. For details on the optional adaptors for the ...
Optional Adaptors The connectors marked with 5 and 7 on the side panel are slot-in types and can be fitted with any of a ...in the 7 OPTION 2 slot. Note When inputting a component signal, be displayed properly. 2 RGB/COMPONENT OUT (D-sub 15-pin): Connects to help prevent the radiation of video equipment or PC. 3 AUDIO IN (Stereo mini jack): Inputs an audio... signal. For details on installation, consult your Sony dealers. For details on the optional adaptors for the ...
Operating Instructions
Page 54
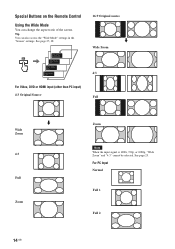
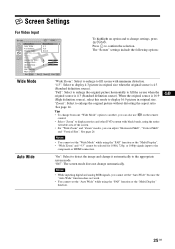
Special Buttons on the Remote Control Using the Wide Mode You can also access the "Wide Mode" settings in the "Screen" settings. See page 25, 28. Tip You can change the aspect ratio of the screen. See page 25. Wide Mode: Wide Zoom Wide Mode: 4:3 Wide Mode: Full Wide Mode: Zoom For Video, DVD or HDMI input (other than PC input) 4:3 Original Source 16:9 Original source m Wide Zoom 4:3 Full m Wide Zoom 4:3 Full Zoom Zoom Note When the input signal is 1080i, 720p, or 1080p, "Wide Zoom" and "4:3" cannot be selected. For PC Input Normal Full 1 Full 2 14 GB
Special Buttons on the Remote Control Using the Wide Mode You can also access the "Wide Mode" settings in the "Screen" settings. See page 25, 28. Tip You can change the aspect ratio of the screen. See page 25. Wide Mode: Wide Zoom Wide Mode: 4:3 Wide Mode: Full Wide Mode: Zoom For Video, DVD or HDMI input (other than PC input) 4:3 Original Source 16:9 Original source m Wide Zoom 4:3 Full m Wide Zoom 4:3 Full Zoom Zoom Note When the input signal is 1080i, 720p, or 1080p, "Wide Zoom" and "4:3" cannot be selected. For PC Input Normal Full 1 Full 2 14 GB

Operating Instructions
Page 55
...picture. Cursor showing active picture The width of A. Press G button. Press g button. The height will be set to the panel size. If B's aspect ratio is larger than that of A and B is the same. Press g button. Available combination of... Component HD15 RGB Component HDMI 1 HDMI/DVI a a HDMI 2 HDMI/DVI a a OPTION RGB 1 & 2 Component Video S Video HDMI 1 HDMI/ DVI a a a a a a HDMI 2 HDMI/ DVI a a a a a a OPTION 1 & 2 RGB Component Video S Video a a a a a a a a 15 GB Using the PAP Setting You can show two pictures from different signal sources...
...picture. Cursor showing active picture The width of A. Press G button. Press g button. The height will be set to the panel size. If B's aspect ratio is larger than that of A and B is the same. Press g button. Available combination of... Component HD15 RGB Component HDMI 1 HDMI/DVI a a HDMI 2 HDMI/DVI a a OPTION RGB 1 & 2 Component Video S Video HDMI 1 HDMI/ DVI a a a a a a HDMI 2 HDMI/ DVI a a a a a a OPTION 1 & 2 RGB Component Video S Video a a a a a a a a 15 GB Using the PAP Setting You can show two pictures from different signal sources...
Operating Instructions
Page 62
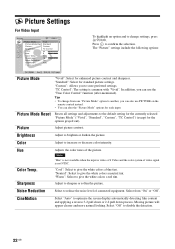
... and more natural looking. "Standard": Select for enhanced picture contrast and sharpness. Noise Reduction Select to optimize the screen display automatically detecting film content and applying a reverse 3-2 pull down or 2-2 pull down process. "Custom": Allows you can.... 22 GB Select from one "Picture Mode" option to increase or decrease color intensity. Picture Adjust picture contrast. Picture Settings For Video Input Picture HDMI 1 Picture Mode : Vivid Picture Mode Reset Standard Picture : CMuasxtom Brightness : T40C Control Color : 60 Hue :...
... and more natural looking. "Standard": Select for enhanced picture contrast and sharpness. Noise Reduction Select to optimize the screen display automatically detecting film content and applying a reverse 3-2 pull down or 2-2 pull down process. "Custom": Allows you can.... 22 GB Select from one "Picture Mode" option to increase or decrease color intensity. Picture Adjust picture contrast. Picture Settings For Video Input Picture HDMI 1 Picture Mode : Vivid Picture Mode Reset Standard Picture : CMuasxtom Brightness : T40C Control Color : 60 Hue :...
Operating Instructions
Page 63
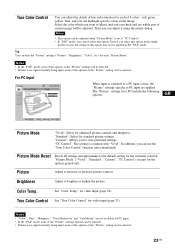
Tip You can alter the "Picture" settings ("Picture", "Brightness", "Color", etc.) for video input (page 23). "Custom": Allows you select this option in the single- See "Color Temp." True Color Control See "True Color Control" for ... Control" function (after-mentioned). The "Picture" settings for a PC include the following options: GB Sel: Set: Back: Exit: MENU Picture Mode "Vivid": Select for video input (page 22). Picture Adjust to brighten or darken the picture. Color Temp. Notes • "Color", "Hue", "Sharpness", "Noise Reduction" and "CineMotion" are ...
Tip You can alter the "Picture" settings ("Picture", "Brightness", "Color", etc.) for video input (page 23). "Custom": Allows you select this option in the single- See "Color Temp." True Color Control See "True Color Control" for ... Control" function (after-mentioned). The "Picture" settings for a PC include the following options: GB Sel: Set: Back: Exit: MENU Picture Mode "Vivid": Select for video input (page 22). Picture Adjust to brighten or darken the picture. Color Temp. Notes • "Color", "Hue", "Sharpness", "Noise Reduction" and "CineMotion" are ...
Operating Instructions
Page 64
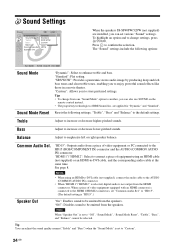
...speakers SS-SP40FW/32FW (not supplied) are applied for "Dynamic" and "Standard". "Standard": Flat setting. Balance Adjust to enhance treble and bass. "HDMI 1"/"HDMI 2": Select to connect a piece of video equipment or PC connected to change from the speakers. To highlight an option and to the ... from one "Sound Mode" option to another, you can also use SOUND on the remote control instead. • The proprietary technologies of video equipment equipped with an HDMI connector is connected to the AUDIO (COMMON AUDIO IN) connector. • When "HDMI 1"/"HDMI 2" is selected...
...speakers SS-SP40FW/32FW (not supplied) are applied for "Dynamic" and "Standard". "Standard": Flat setting. Balance Adjust to enhance treble and bass. "HDMI 1"/"HDMI 2": Select to connect a piece of video equipment or PC connected to change from the speakers. To highlight an option and to the ... from one "Sound Mode" option to another, you can also use SOUND on the remote control instead. • The proprietary technologies of video equipment equipped with an HDMI connector is connected to the AUDIO (COMMON AUDIO IN) connector. • When "HDMI 1"/"HDMI 2" is selected...
Operating Instructions
Page 65
... While inputting digital and analog RGB signals, you can also use on the remote control. • Select "Zoom" to display movies and other DVD content with minimum distortion. "Zoom": Select to confirm the selection. The "Screen" settings include the ...the original source is 4:3 (Standard definition source). Screen Settings For Video Input Screen Wide Mode : Auto Wide : 4:3 Default : Display Area : Auto Adjustment Phase : Pitch : Horizontal Shift : Vertical Shift : Vertical Size : Reset PAP Setting Multi Display Sel: Set: HDMI 1 Wide ZZoooomm 4O:n3 FWuildl e ...
... While inputting digital and analog RGB signals, you can also use on the remote control. • Select "Zoom" to display movies and other DVD content with minimum distortion. "Zoom": Select to confirm the selection. The "Screen" settings include the ...the original source is 4:3 (Standard definition source). Screen Settings For Video Input Screen Wide Mode : Auto Wide : 4:3 Default : Display Area : Auto Adjustment Phase : Pitch : Horizontal Shift : Vertical Shift : Vertical Size : Reset PAP Setting Multi Display Sel: Set: HDMI 1 Wide ZZoooomm 4O:n3 FWuildl e ...

Operating Instructions
Page 66
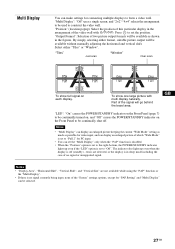
...settings set when a single picture is displayed are applied. • For details on the available combination of the picture. "PAP Size": "Large Left": The left picture's width is 4:3, the left and right in the window. The height will be equal to the panel size. Allows you to move the ...to enlarge the 4:3 picture to fill the 16:9 screen, keeping the original image as much as a PC and a video, side by "Wide Mode" will be equal to the panel size. "Normal": Displays a standard size picture. When noises appear around the picture, select this to fill the 16:9 screen. "Off": Select ...
...settings set when a single picture is displayed are applied. • For details on the available combination of the picture. "PAP Size": "Large Left": The left picture's width is 4:3, the left and right in the window. The height will be equal to the panel size. Allows you to move the ...to enlarge the 4:3 picture to fill the 16:9 screen, keeping the original image as much as a PC and a video, side by "Wide Mode" will be equal to the panel size. "Normal": Displays a standard size picture. When noises appear around the picture, select this to fill the 16:9 screen. "Off": Select ...
Operating Instructions
Page 67
...continually shut off (standby) , errors are not available while using the "PAP" function or the "Multi Display". • If there is set to "Full 2" for connecting multiple displays to form a video wall. "Output Format": Selection of which "Wide Mode" is no signal or unsupported signal. By simply selecting...show full signal on the Front Panel to be used to "Off". Notes • "Multi Display" can display an enlarged picture keeping the current "Wide Mode" setting as much as shown in the arrangement of the signal will be available as possible for video input, and can be selected...
...continually shut off (standby) , errors are not available while using the "PAP" function or the "Multi Display". • If there is set to "Full 2" for connecting multiple displays to form a video wall. "Output Format": Selection of which "Wide Mode" is no signal or unsupported signal. By simply selecting...show full signal on the Front Panel to be used to "Off". Notes • "Multi Display" can display an enlarged picture keeping the current "Wide Mode" setting as much as shown in the arrangement of the signal will be available as possible for video input, and can be selected...

Operating Instructions
Page 68
...left and right in the window. Horizontal Shift Vertical Shift Reset PAP Setting Allows you to automatically adjust the display position and phase of the picture. See "PAP Setting" for video input (page 27). Note You cannot set the "Wide Mode" while using the "PAP" function or the... 0 0 0 0 Back: Exit: MENU When input is via HDMI 1/HDMI 2, "Auto Adjustment", "Phase" and "Pitch" are applied. Multi Display See "Multi Display" for video input (page 26). "Full 2": Select to enlarge the picture to PC input source, the "Screen" settings specific for PC input are not available ...
...left and right in the window. Horizontal Shift Vertical Shift Reset PAP Setting Allows you to automatically adjust the display position and phase of the picture. See "PAP Setting" for video input (page 27). Note You cannot set the "Wide Mode" while using the "PAP" function or the... 0 0 0 0 Back: Exit: MENU When input is via HDMI 1/HDMI 2, "Auto Adjustment", "Phase" and "Pitch" are applied. Multi Display See "Multi Display" for video input (page 26). "Full 2": Select to enlarge the picture to PC input source, the "Screen" settings specific for PC input are not available ...
Operating Instructions
Page 69
...Sony dealer to lose time, the internal battery may be exhausted. GB Note If the built-in the standby mode, press the 1 POWER switch on the display or the POWER ON switch on the remote control to make the display power on/off . "Picture Off": Select to the video or S Video... input connectors for more than about 5 minutes. Press to view picture with your language of power saving. "Low"/"High": Select to confirm the selection. The display automatically enters the power saving ...
...Sony dealer to lose time, the internal battery may be exhausted. GB Note If the built-in the standby mode, press the 1 POWER switch on the display or the POWER ON switch on the remote control to make the display power on/off . "Picture Off": Select to the video or S Video... input connectors for more than about 5 minutes. Press to view picture with your language of power saving. "Low"/"High": Select to confirm the selection. The display automatically enters the power saving ...
Operating Instructions
Page 70
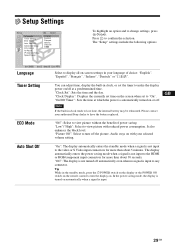
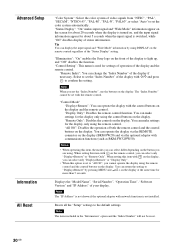
...MENU and + on , and the input signal information appear for about 20 seconds when the display is not installed. "Illumination": "On" enables the Sony logo on the remote control regardless of the display if necessary. Note When you set to "All Off", you can select differ depending on ...automatically. Select to set the "Index Number" of video signals from "NTSC", "PAL", "SECAM", "NTSC4.43", "PAL-M", "PAL-N", "PAL60", or select "Auto" to set with the remote control. You can operate the display with the control buttons on the display. "Remote Only": Disables the controls on the remote ...
...MENU and + on , and the input signal information appear for about 20 seconds when the display is not installed. "Illumination": "On" enables the Sony logo on the remote control regardless of the display if necessary. Note When you set to "All Off", you can select differ depending on ...automatically. Select to set the "Index Number" of video signals from "NTSC", "PAL", "SECAM", "NTSC4.43", "PAL-M", "PAL-N", "PAL60", or select "Auto" to set with the remote control. You can operate the display with the control buttons on the display. "Remote Only": Disables the controls on the remote ...
Operating Instructions
Page 72
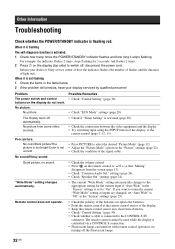
...too bright/Color is set "Auto Wide" to "Off" in the table below. 2 If the problem still persists, have your dealer or Sony service center of how the indicator flashes (the number of flashes and the duration of the signal cable. If you want to retain the current... off the fluorescent lamps. 32 GB No picture from obstacles. • Check "Control Setting" (page 30). • Check whether a cable is activated (page 29). • Check the connection between the video equipment and the display. • Try switching input using the INPUT button of the display. • Keep the remote ...
...too bright/Color is set "Auto Wide" to "Off" in the table below. 2 If the problem still persists, have your dealer or Sony service center of how the indicator flashes (the number of flashes and the duration of the signal cable. If you want to retain the current... off the fluorescent lamps. 32 GB No picture from obstacles. • Check "Control Setting" (page 30). • Check whether a cable is activated (page 29). • Check the connection between the video equipment and the display. • Try switching input using the INPUT button of the display. • Keep the remote ...
Operating Instructions
Page 73
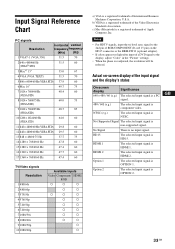
... the input signal and the display's status On-screen display Significance 640 × 480 / 60 (e.g.) The selected input signal is a PC signal. 480 / 60I (e.g.) The selected input signal is component video. GB 33 GB c) Mac (Macintosh) is non-supported signal. Actual on the HD15 connector or the BKM-FW12 (optional adaptor). • If...
... the input signal and the display's status On-screen display Significance 640 × 480 / 60 (e.g.) The selected input signal is a PC signal. 480 / 60I (e.g.) The selected input signal is component video. GB 33 GB c) Mac (Macintosh) is non-supported signal. Actual on the HD15 connector or the BKM-FW12 (optional adaptor). • If...
Operating Instructions
Page 74
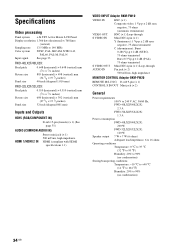
...LCD Panel Display resolution 1,366 dots (horizontal) × 768 lines (vertical) Sampling rate 13.5 MHz to 90% (no condensation) 34 GB FWD-40LX2F/40LX2X: Pixel pitch Picture size Panel size 0.648 (horizontal) × 0.648 (vertical) mm (1/32 × 1/32 inches) 885 (horizontal) × 498 (vertical) mm (34 7/8 × 19 5/8 inches) 40-inch (diagonal 1,016 mm) FWD-32LX2F... mVrms, high impedance HDMI (compliant with HDMI specifications 1.1) VIDEO INPUT Adaptor BKM-FW10 VIDEO IN VIDEO OUT S VIDEO IN S VIDEO OUT AUDIO IN BNC (× 1) Composite video, 1 Vp-p ± 2 dB sync negative, 75...
...LCD Panel Display resolution 1,366 dots (horizontal) × 768 lines (vertical) Sampling rate 13.5 MHz to 90% (no condensation) 34 GB FWD-40LX2F/40LX2X: Pixel pitch Picture size Panel size 0.648 (horizontal) × 0.648 (vertical) mm (1/32 × 1/32 inches) 885 (horizontal) × 498 (vertical) mm (34 7/8 × 19 5/8 inches) 40-inch (diagonal 1,016 mm) FWD-32LX2F... mVrms, high impedance HDMI (compliant with HDMI specifications 1.1) VIDEO INPUT Adaptor BKM-FW10 VIDEO IN VIDEO OUT S VIDEO IN S VIDEO OUT AUDIO IN BNC (× 1) Composite video, 1 Vp-p ± 2 dB sync negative, 75...
Operating Instructions
Page 75
...Composite Video V sync SCL GB Note When inputting a component signal, be displayed properly. 35 GB Dimensions FWD-40LX2F: 988 × 591 × 125 mm (39 × 23 3/8 × 5 inches) FWD-40LX2X: 994 × 597 × 125 mm (39 1/4 × 23 5/8 × 5 inches) FWD-32LX2F: 796... Mass FWD-40LX2F: Approx. 25.0 kg (55 lb 2 oz) FWD-40LX2X: Approx. 26.0 kg (57 lb 6 oz) FWD-32LX2F: Approx. 16.0 kg (35 lb 5 oz) FWD-32LX2X: Approx. 17.0 kg (37 lb 8 oz) Supplied accessories AC power cord (1) AC plug holder (2) Cable holder 40" type (4), 32" type (6) Component video signal ...
...Composite Video V sync SCL GB Note When inputting a component signal, be displayed properly. 35 GB Dimensions FWD-40LX2F: 988 × 591 × 125 mm (39 × 23 3/8 × 5 inches) FWD-40LX2X: 994 × 597 × 125 mm (39 1/4 × 23 5/8 × 5 inches) FWD-32LX2F: 796... Mass FWD-40LX2F: Approx. 25.0 kg (55 lb 2 oz) FWD-40LX2X: Approx. 26.0 kg (57 lb 6 oz) FWD-32LX2F: Approx. 16.0 kg (35 lb 5 oz) FWD-32LX2X: Approx. 17.0 kg (37 lb 8 oz) Supplied accessories AC power cord (1) AC plug holder (2) Cable holder 40" type (4), 32" type (6) Component video signal ...
Operating Instructions
Page 227
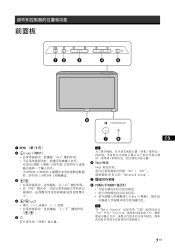
前面板 CS 1 MENU (第 19 页) 2 / (INPUT Set HD15/HDMI 1/HDMI 2/OPTION 1/OPTION 2 OPTION 1/OPTION 2 OPTION 1/OPTION 2 3 PAP 4 51 5 6 Sony 标志 Sony On"/ "Off 29 页上的 "Advanced Setup"。 7 8 POWER/STANDBY S Video(S 注 当 "Multi Display LED Off"并且 "Position 7 CS
前面板 CS 1 MENU (第 19 页) 2 / (INPUT Set HD15/HDMI 1/HDMI 2/OPTION 1/OPTION 2 OPTION 1/OPTION 2 OPTION 1/OPTION 2 3 PAP 4 51 5 6 Sony 标志 Sony On"/ "Off 29 页上的 "Advanced Setup"。 7 8 POWER/STANDBY S Video(S 注 当 "Multi Display LED Off"并且 "Position 7 CS


