
Service Manual
Page 2
...DVD602E/DVD653/DVD653E - 2 - Files in this format can have DCR-DVD103/DVD653/DVD653E Dolby Digital 2/5.1ch Dolby Digital 5.1 Creator additional information such as your camcorder's setting ... Electronics Dolby Digital 2ch and Information Technology Industries Dolby Digital Stereo Creator Association). Rechargeable battery pack Maximum DC 8.4V output voltage Output voltage DC 7.2V Capacity 4.9 wh (... to be PAL color, EIA standards shot with infrared lighting. (DVD92E/DVD602E/DVD653E) • Manufactured under license from Dolby Usable discs 8cm DVD-R/DVD-RW/ Laboratories...
...DVD602E/DVD653/DVD653E - 2 - Files in this format can have DCR-DVD103/DVD653/DVD653E Dolby Digital 2/5.1ch Dolby Digital 5.1 Creator additional information such as your camcorder's setting ... Electronics Dolby Digital 2ch and Information Technology Industries Dolby Digital Stereo Creator Association). Rechargeable battery pack Maximum DC 8.4V output voltage Output voltage DC 7.2V Capacity 4.9 wh (... to be PAL color, EIA standards shot with infrared lighting. (DVD92E/DVD602E/DVD653E) • Manufactured under license from Dolby Usable discs 8cm DVD-R/DVD-RW/ Laboratories...
Service Manual
Page 3
Look for parts which, through functioning, show obvious signs of explosion if battery is at the values specified. 6. Point them out to ensure that were installed...LA SÉCURITÉ! NE REMPLACER CES COMPOSANTS QUE PAR DES PIÈSES SONY DONT LES NUMÉROS SONT DONNÉS DANS CE MANUEL OU DANS LES SUPPÉMENTS PUBLIÉS...NOT APPROACH THE LASER EXIT WITH THE EYE TOO CLOSELY. DCR-DVD92/DVD92E/DVD103/DVD602/DVD602E/DVD653/DVD653E - 3 - Check the area of controls or adjustments or performance procedures other than those specified herein may result in ...
Look for parts which, through functioning, show obvious signs of explosion if battery is at the values specified. 6. Point them out to ensure that were installed...LA SÉCURITÉ! NE REMPLACER CES COMPOSANTS QUE PAR DES PIÈSES SONY DONT LES NUMÉROS SONT DONNÉS DANS CE MANUEL OU DANS LES SUPPÉMENTS PUBLIÉS...NOT APPROACH THE LASER EXIT WITH THE EYE TOO CLOSELY. DCR-DVD92/DVD92E/DVD103/DVD602/DVD602E/DVD653/DVD653E - 3 - Check the area of controls or adjustments or performance procedures other than those specified herein may result in ...

Service Manual
Page 4
...DVD602/DVD602E/DVD653/DVD653E - 4 - Replace only with mark 0 are supplied with the unit as an accessory, but is supplied with your camcorder. Ne les remplacer... Lens cap (1) (DVD92/DVD92E/DVD602/ DVD602E model) X-2055-554-1 NP-FP50 battery pack (1) (Note) USB cable (1) (DVD103/DVD653/DVD653E model) 1-829-868-41 Cleaning cloth (1) 3-073-861-01 2-pin conversion adaptor... (1) (E, HK model) 1-569-008-21 Shoe cover (1) 2-586-356-01 A/V connecting cable (1.5m) (1) 1-823-156-91 DVD-R (DMR30)...
...DVD602/DVD602E/DVD653/DVD653E - 4 - Replace only with mark 0 are supplied with the unit as an accessory, but is supplied with your camcorder. Ne les remplacer... Lens cap (1) (DVD92/DVD92E/DVD602/ DVD602E model) X-2055-554-1 NP-FP50 battery pack (1) (Note) USB cable (1) (DVD103/DVD653/DVD653E model) 1-829-868-41 Cleaning cloth (1) 3-073-861-01 2-pin conversion adaptor... (1) (E, HK model) 1-569-008-21 Shoe cover (1) 2-586-356-01 A/V connecting cable (1.5m) (1) 1-823-156-91 DVD-R (DMR30)...

Service Manual
Page 5
.... Use a compatible disc with the camcoder Remove the disc, and insert it again and operate your camcorder again DCR-DVD92/DVD92E/DVD103/DVD602/DVD602E/DVD653/DVD653E - 5 - This 5-character display indicates the "repaired by dealer step to page 6. E : Corrected...-diagnosis functions are provided in which blinks at 3.2Hz C 31 11 Repaired by: Block Detailed Code C : Corrected by service E.g. Correction Use the InfoLITHIUM battery. Faulty disc is removed. 3. SELF-DIAGNOSIS FUNCTION 1. Viewfinder or LCD screen C : 3 1 : 1 1 Blinks at 3.2Hz. H : Corrected by...
.... Use a compatible disc with the camcoder Remove the disc, and insert it again and operate your camcorder again DCR-DVD92/DVD92E/DVD103/DVD602/DVD602E/DVD653/DVD653E - 5 - This 5-character display indicates the "repaired by dealer step to page 6. E : Corrected...-diagnosis functions are provided in which blinks at 3.2Hz C 31 11 Repaired by: Block Detailed Code C : Corrected by service E.g. Correction Use the InfoLITHIUM battery. Faulty disc is removed. 3. SELF-DIAGNOSIS FUNCTION 1. Viewfinder or LCD screen C : 3 1 : 1 1 Blinks at 3.2Hz. H : Corrected by...

Service Manual
Page 9
...2 For customers in the literature accompanying the appliance. Model No. If you . CAUTION The use of rechargeable batteries, call : Sony Customer Information Center 1-800-222-SONY (7669). AC- Use of controls or adjustments or performance of electric shock to the presence of important operating and...THIS DEVICE MUST ACCEPT ANY INTERFERENCE RECEIVED, INCLUDING INTERFERENCE THAT MAY CAUSE UNDESIRED OPERATION. Record the serial number in the U.S.A. DCR-DVD Serial No. Model No. Serial No. This symbol is intended to alert the user to the presence of uninsulated "dangerous voltage"...
...2 For customers in the literature accompanying the appliance. Model No. If you . CAUTION The use of rechargeable batteries, call : Sony Customer Information Center 1-800-222-SONY (7669). AC- Use of controls or adjustments or performance of electric shock to the presence of important operating and...THIS DEVICE MUST ACCEPT ANY INTERFERENCE RECEIVED, INCLUDING INTERFERENCE THAT MAY CAUSE UNDESIRED OPERATION. Record the serial number in the U.S.A. DCR-DVD Serial No. Model No. Serial No. This symbol is intended to alert the user to the presence of uninsulated "dangerous voltage"...
Service Manual
Page 10
... an experienced radio/TV technician for using the supplied software (stored on use Your camcorder is supplied with Part 15 of the FCC Rules. The supplied interface cable must... radiate radio frequency energy and, if not installed and used with the equipment in CANADA "Battery pack" THIS CLASS B DIGITAL APPARATUS COMPLIES WITH CANADIAN ICES003. Operation is encouraged to try ...operation. Regulatory Information Declaration of Conformity Declaration of Conformity Trade Name: SONY Model No.: DCR-DVD203 Responsible Party:Sony Electronics Inc. Connect the equipment into an outlet on , the ...
... an experienced radio/TV technician for using the supplied software (stored on use Your camcorder is supplied with Part 15 of the FCC Rules. The supplied interface cable must... radiate radio frequency energy and, if not installed and used with the equipment in CANADA "Battery pack" THIS CLASS B DIGITAL APPARATUS COMPLIES WITH CANADIAN ICES003. Operation is encouraged to try ...operation. Regulatory Information Declaration of Conformity Declaration of Conformity Trade Name: SONY Model No.: DCR-DVD203 Responsible Party:Sony Electronics Inc. Connect the equipment into an outlet on , the ...

Service Manual
Page 11
... camera near a window or outdoors. • Do not aim at dusk. To view your recordings on a DVD-R. View finder LCD screen Battery • Before connecting your camcorder to another device with a Carl Zeiss lens, which was developed jointly by the following parts. Doing so might .../DVD+RW (not supplied) for trial recording (p.13). • Compensation for effective use. Unauthorized recording of light from what you insert the connector plug forcibly in Germany, and Sony Corporation, and produces superior images. If you see. • The on-screen displays in color) ...
... camera near a window or outdoors. • Do not aim at dusk. To view your recordings on a DVD-R. View finder LCD screen Battery • Before connecting your camcorder to another device with a Carl Zeiss lens, which was developed jointly by the following parts. Doing so might .../DVD+RW (not supplied) for trial recording (p.13). • Compensation for effective use. Unauthorized recording of light from what you insert the connector plug forcibly in Germany, and Sony Corporation, and produces superior images. If you see. • The on-screen displays in color) ...

Service Manual
Page 13
...camcorder with automatic settings Operate your camcorder with ease 27 Recording with ease 28 Playing back with ease 29 Preparation for playing back on a DVD player (Finalizing 30 Recording/Playback Recording 32 Playback 33 Functions used for recording/playback, etc 34 Recording To use zoom To record sound with your DVD... Handycam 10 Choosing a disc 13 Getting Started Step 1: Checking supplied items 16 Step 2: Charging the battery pack 17 Step 3: Turning the power on, and holding your DVD Handycam What you can do with more presence ...
...camcorder with automatic settings Operate your camcorder with ease 27 Recording with ease 28 Playing back with ease 29 Preparation for playing back on a DVD player (Finalizing 30 Recording/Playback Recording 32 Playback 33 Functions used for recording/playback, etc 34 Recording To use zoom To record sound with your DVD... Handycam 10 Choosing a disc 13 Getting Started Step 1: Checking supplied items 16 Step 2: Charging the battery pack 17 Step 3: Turning the power on, and holding your DVD Handycam What you can do with more presence ...

Service Manual
Page 14
...add special effects To use a tripod Playback To play back the images in sequence To use PB zoom Recording/playback To check the remaining battery To turn off the operation confirmation beep To initialize the settings Other part names and functions Checking/Deleting the last scene (Review/... 48 Using the recorded disc (DVD-RW/DVD+RW) Recording additional scenes after finalizing 50 Deleting all of the scenes on the disc (Formatting 51 Using the Setup items Using the Setup items 52 Setup items 54 CAMERA SET 56 Settings to adjust your camcorder to the recording conditions (EXPOSURE...
...add special effects To use a tripod Playback To play back the images in sequence To use PB zoom Recording/playback To check the remaining battery To turn off the operation confirmation beep To initialize the settings Other part names and functions Checking/Deleting the last scene (Review/... 48 Using the recorded disc (DVD-RW/DVD+RW) Recording additional scenes after finalizing 50 Deleting all of the scenes on the disc (Formatting 51 Using the Setup items Using the Setup items 52 Setup items 54 CAMERA SET 56 Settings to adjust your camcorder to the recording conditions (EXPOSURE...

Service Manual
Page 16
Troubleshooting Troubleshooting 87 Warning indicators and messages 101 Additional Information Using your camcorder abroad 105 About the "InfoLITHIUM" battery pack 107 Maintenance and precautions 109 Using the Strap Belt as a wrist strap 113 Attaching the Shoulder Strap 113 Specifications 114 Index...117 9
Troubleshooting Troubleshooting 87 Warning indicators and messages 101 Additional Information Using your camcorder abroad 105 About the "InfoLITHIUM" battery pack 107 Maintenance and precautions 109 Using the Strap Belt as a wrist strap 113 Attaching the Shoulder Strap 113 Specifications 114 Index...117 9
Service Manual
Page 23
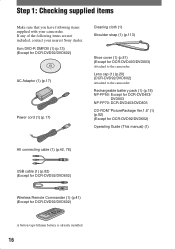
.../DVD602) Wireless Remote Commander (1) (p.41) (Except for DCR-DVD403/DVD803) Attached to the camcorder. If any of the following items supplied with your nearest Sony dealer. 8cm DVD-R DMR30 (1) (p.13) (Except for DCR-DVD92/DVD602) AC Adaptor (1) (p.17) Power ...cord (1) (p.17) Cleaning cloth (1) Shoulder strap (1) (p.113) Shoe cover (1) (p.81) (Except for DCR-DVD92/DVD602) A button-type lithium battery is already installed. 16 Lens cap (1) (p.20) (DCR-DVD92/DVD602) Attached to the camcorder...
.../DVD602) Wireless Remote Commander (1) (p.41) (Except for DCR-DVD403/DVD803) Attached to the camcorder. If any of the following items supplied with your nearest Sony dealer. 8cm DVD-R DMR30 (1) (p.13) (Except for DCR-DVD92/DVD602) AC Adaptor (1) (p.17) Power ...cord (1) (p.17) Cleaning cloth (1) Shoulder strap (1) (p.113) Shoe cover (1) (p.81) (Except for DCR-DVD92/DVD602) A button-type lithium battery is already installed. 16 Lens cap (1) (p.20) (DCR-DVD92/DVD602) Attached to the camcorder...

Service Manual
Page 24
... the arrow to set it clicks. 3 Connect the AC Adaptor to your camcorder. DC IN jack cover DC IN jack CHG lamp Power switch Battery DC plug Power cord To the wall outlet AC Adaptor 1 Slide the battery pack in the direction of the arrow until it to OFF (CHG) ... mark on your camcorder. 4 Connect the AC Adaptor to connect the AC Adaptor. MODE ON OFF (CHG) POWER CHG 5 The CHG (charge) lamp turns off when the battery is fully charged. Getting Started Step 2: Charging the battery pack You can charge the battery after attaching the "InfoLITHIUM" battery pack (P series) (p.107)...
... the arrow to set it clicks. 3 Connect the AC Adaptor to your camcorder. DC IN jack cover DC IN jack CHG lamp Power switch Battery DC plug Power cord To the wall outlet AC Adaptor 1 Slide the battery pack in the direction of the arrow until it to OFF (CHG) ... mark on your camcorder. 4 Connect the AC Adaptor to connect the AC Adaptor. MODE ON OFF (CHG) POWER CHG 5 The CHG (charge) lamp turns off when the battery is fully charged. Getting Started Step 2: Charging the battery pack You can charge the battery after attaching the "InfoLITHIUM" battery pack (P series) (p.107)...

Service Manual
Page 25
... the same connections as you do when charging the battery pack. The battery pack will not lose its charge in the center of the BATT release button (), slide the battery pack towards the back of your camcorder, then remove the battery pack (). Middle: When the LCD backlight turns... off. To use it for DCRDVD403/DVD803. **Supplied with DCR-DVD403/DVD803. Battery pack NP-FP50* NP-FP70** NP-FP90 ...
... the same connections as you do when charging the battery pack. The battery pack will not lose its charge in the center of the BATT release button (), slide the battery pack towards the back of your camcorder, then remove the battery pack (). Middle: When the LCD backlight turns... off. To use it for DCRDVD403/DVD803. **Supplied with DCR-DVD403/DVD803. Battery pack NP-FP50* NP-FP70** NP-FP90 ...

Service Manual
Page 26
...to it while connected to OFF (CHG). • The CHG (charge) lamp flashes during charging, or BATTERY INFO (p.37) will not be correctly displayed under which you use your camcorder, even when the power cord is disconnected from the wall outlet. • We recommend that you use a fully... charged battery pack. The battery pack is damaged. - On the AC Adaptor • Use the nearby wall outlet when using your camcorder. • Do not use the AC Adaptor placed in low temperatures. • The available...
...to it while connected to OFF (CHG). • The CHG (charge) lamp flashes during charging, or BATTERY INFO (p.37) will not be correctly displayed under which you use your camcorder, even when the power cord is disconnected from the wall outlet. • We recommend that you use a fully... charged battery pack. The battery pack is damaged. - On the AC Adaptor • Use the nearby wall outlet when using your camcorder. • Do not use the AC Adaptor placed in low temperatures. • The available...

Service Manual
Page 27
...To play back pictures on your camcorder, or to edit them (DVD-RW: VR mode only) CHG 20 To turn off automatically if you leave your camcorder without any operation attempted for ...sides of the cap (DCR-DVD92/DVD602). 3 Hold your camcorder correctly. 1 Turn on the power by sliding the POWER switch in the center.... Step 3: Turning the power on, and holding your camcorder To record or play back, slide the POWER switch to turn off...time ([CLOCK SET], p23), the next time you turn on the power of your camcorder, the current date and time will be set the POWER switch to (Movie) or ...
...To play back pictures on your camcorder, or to edit them (DVD-RW: VR mode only) CHG 20 To turn off automatically if you leave your camcorder without any operation attempted for ...sides of the cap (DCR-DVD92/DVD602). 3 Hold your camcorder correctly. 1 Turn on the power by sliding the POWER switch in the center.... Step 3: Turning the power on, and holding your camcorder To record or play back, slide the POWER switch to turn off...time ([CLOCK SET], p23), the next time you turn on the power of your camcorder, the current date and time will be set the POWER switch to (Movie) or ...

Service Manual
Page 28
... careful not to press the buttons on the LCD screen is practical when you use your camcorder in bright conditions or you can close it 180 degrees to the lens side, you want to save battery power. This is clear. • You can adjust the brightness of the LCD screen. View&#... during playback operations. Getting Started Step 4: Adjusting the LCD screen and viewfinder The LCD screen Open the LCD screen 90 degrees to the camcorder (), then rotate it to the best angle to record or play (). 180 degrees (max.) DISP/BATT INFO The viewfinder ...
... careful not to press the buttons on the LCD screen is practical when you use your camcorder in bright conditions or you can close it 180 degrees to the lens side, you want to save battery power. This is clear. • You can adjust the brightness of the LCD screen. View&#... during playback operations. Getting Started Step 4: Adjusting the LCD screen and viewfinder The LCD screen Open the LCD screen 90 degrees to the camcorder (), then rotate it to the best angle to record or play (). 180 degrees (max.) DISP/BATT INFO The viewfinder ...

Service Manual
Page 30
...the clock for some models. 23 Step 6: Setting the date and time Getting Started Set the date and time when using this camcorder for about 3 months, the built-in rechargeable battery gets discharged and the date and time settings may be cleared from the memory. CLOCK SET -:--:-- AREA26 GMT -5.0 New York ... minute, then touch . In that case, charge the rechargeable battery and then set the date and time, the [CLOCK SET] screen appears every time you turn on your camcorder for the first time. If you do not use your camcorder or slide the POWER switch down. • If you do...
...the clock for some models. 23 Step 6: Setting the date and time Getting Started Set the date and time when using this camcorder for about 3 months, the built-in rechargeable battery gets discharged and the date and time settings may be cleared from the memory. CLOCK SET -:--:-- AREA26 GMT -5.0 New York ... minute, then touch . In that case, charge the rechargeable battery and then set the date and time, the [CLOCK SET] screen appears every time you turn on your camcorder for the first time. If you do not use your camcorder or slide the POWER switch down. • If you do...

Service Manual
Page 32
...then Proceed to use it and information on previously recorded areas appears for a DVD-RW, and touch . Getting Started 4 Close the disc cover. Cannot edit in Camcorder VIDEO VR OK VIDEO mode You can start recording on DVD players that support VR mode when you started to step 7. 5 Select ... • Do not apply shock or vibration to recognize the disc depending on your camcorder (p.72). It may not be played back only on the DVD-RW or the DVD+RW. • Do not remove the battery pack or disconnect the AC adaptor while formatting. Proceed to open the disc cover, ...
...then Proceed to use it and information on previously recorded areas appears for a DVD-RW, and touch . Getting Started 4 Close the disc cover. Cannot edit in Camcorder VIDEO VR OK VIDEO mode You can start recording on DVD players that support VR mode when you started to step 7. 5 Select ... • Do not apply shock or vibration to recognize the disc depending on your camcorder (p.72). It may not be played back only on the DVD-RW or the DVD+RW. • Do not remove the battery pack or disconnect the AC adaptor while formatting. Proceed to open the disc cover, ...

Service Manual
Page 42
...ash charge lamp flickers when charging the flash, and remains lit when the battery charge is complete. • If you can be output on page 58. 35 To.../DVD803), or [FLASH MODE] (Except for an off center subject See [SPOT FOCUS] on your camcorder. * Dolby Digital 5.1 Creater compresses sound effectively while maintaining high quality sound. Therefore, do not cover...DCRDVD403/DVD803 Set the NIGHTSHOT or NIGHTSHOT PLUS switch to be played back with DVD recorders/DVD players compatible with your discs. To record an image brighter in dim light, use ...
...ash charge lamp flickers when charging the flash, and remains lit when the battery charge is complete. • If you can be output on page 58. 35 To.../DVD803), or [FLASH MODE] (Except for an off center subject See [SPOT FOCUS] on your camcorder. * Dolby Digital 5.1 Creater compresses sound effectively while maintaining high quality sound. Therefore, do not cover...DCRDVD403/DVD803 Set the NIGHTSHOT or NIGHTSHOT PLUS switch to be played back with DVD recorders/DVD players compatible with your discs. To record an image brighter in dim light, use ...

Service Manual
Page 44
... Point the Remote Commander (p.41) towards the remote sensor to operate your camcorder. REC lamp The REC lamp lights up to set the operation beep. Recording/playback To check the remaining battery ...... Set the POWER switch up in the center of the LCD ...screen. To cancel, touch [END]. • You cannot change the zoom speed with W (Wide angle)/T (Telephoto). Recording capacity (approx.) Remaining battery (approx.) Other part names and functions Built-in 4CH microphone (DCRDVD403/DVD803) When an external microphone (optional) is connected, it takes ...
... Point the Remote Commander (p.41) towards the remote sensor to operate your camcorder. REC lamp The REC lamp lights up to set the operation beep. Recording/playback To check the remaining battery ...... Set the POWER switch up in the center of the LCD ...screen. To cancel, touch [END]. • You cannot change the zoom speed with W (Wide angle)/T (Telephoto). Recording capacity (approx.) Remaining battery (approx.) Other part names and functions Built-in 4CH microphone (DCRDVD403/DVD803) When an external microphone (optional) is connected, it takes ...


