Operating Instructions
Page 7
... accessories supplied 9 1 Preparing the battery pack 10 2 Inserting the battery pack/a "Memory Stick Duo" (not supplied) ........ 11 3 Turning the camera on/setting the clock 13 Shooting images easily 14 Mode dial/Zoom/Flash/Macro/Self-timer/Display 15 Shooting in Smile Shutter mode 17 Viewing.../deleting images 18 Learning the various functions - Table of movies 31 Troubleshooting 33 Battery pack and power 33 Shooting still images/...
... accessories supplied 9 1 Preparing the battery pack 10 2 Inserting the battery pack/a "Memory Stick Duo" (not supplied) ........ 11 3 Turning the camera on/setting the clock 13 Shooting images easily 14 Mode dial/Zoom/Flash/Macro/Self-timer/Display 15 Shooting in Smile Shutter mode 17 Viewing.../deleting images 18 Learning the various functions - Table of movies 31 Troubleshooting 33 Battery pack and power 33 Shooting still images/...
Operating Instructions
Page 10
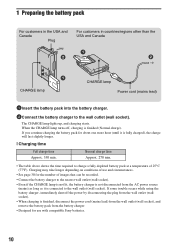
...Canada Plug For customers in countries/regions other than the USA and Canada ɟ ɟ CHARGE lamp CHARGE lamp Power cord (mains lead) 1Insert the battery pack into the battery charger. 2Connect the battery charger to the nearest wall ... (wall socket). • When charging is finished (Normal charge). When the CHARGE lamp turns off the power by disconnecting the plug from the AC power source (mains) as long as it is connected to the wall outlet (wall socket). ...(wall socket). Charging may take longer depending on conditions of use with compatible Sony batteries. 10
...Canada Plug For customers in countries/regions other than the USA and Canada ɟ ɟ CHARGE lamp CHARGE lamp Power cord (mains lead) 1Insert the battery pack into the battery charger. 2Connect the battery charger to the nearest wall ... (wall socket). • When charging is finished (Normal charge). When the CHARGE lamp turns off the power by disconnecting the plug from the AC power source (mains) as long as it is connected to the wall outlet (wall socket). ...(wall socket). Charging may take longer depending on conditions of use with compatible Sony batteries. 10

Operating Instructions
Page 11
Remaining charge indicator Status Sufficient power remaining Battery almost fully charged Battery half full Battery low, recording/ playback ...lever with the tip of use and circumstances. • The Clock Set screen appears when you turn on and check the remaining battery charge on the camera for the first time (page 13). 11 2 Inserting the battery pack/a "Memory Stick Duo...Close the battery/"Memory Stick Duo" cover. [ When there is no "Memory Stick Duo" inserted The camera records/plays back images using the internal memory (approx. 15 MB). [ To check the remaining battery charge Press...
Remaining charge indicator Status Sufficient power remaining Battery almost fully charged Battery half full Battery low, recording/ playback ...lever with the tip of use and circumstances. • The Clock Set screen appears when you turn on and check the remaining battery charge on the camera for the first time (page 13). 11 2 Inserting the battery pack/a "Memory Stick Duo...Close the battery/"Memory Stick Duo" cover. [ When there is no "Memory Stick Duo" inserted The camera records/plays back images using the internal memory (approx. 15 MB). [ To check the remaining battery charge Press...

Operating Instructions
Page 13
...becomes possible. • If the camera is inserted in the CD-ROM (supplied), you do not operate the camera for superimposing dates on battery power and you can print or save images with the control button. 3 Turning the camera on/setting the clock POWER button HOME button 1 2 z button... 3 ɟ Control button 1 Press POWER. 2 Set the clock with the ...
...becomes possible. • If the camera is inserted in the CD-ROM (supplied), you do not operate the camera for superimposing dates on battery power and you can print or save images with the control button. 3 Turning the camera on/setting the clock POWER button HOME button 1 2 z button... 3 ɟ Control button 1 Press POWER. 2 Set the clock with the ...
Operating Instructions
Page 18
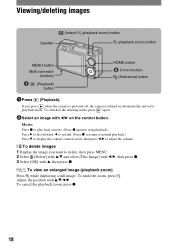
... button ɟ Control button (Slideshow) button 1Press (Playback). If you want to adjust the volume. [ To delete images 1 Display the image you press when the camera is powered off, the camera is turned on the control button. To cancel the playback zoom, press z. 18
... button ɟ Control button (Slideshow) button 1Press (Playback). If you want to adjust the volume. [ To delete images 1 Display the image you press when the camera is powered off, the camera is turned on the control button. To cancel the playback zoom, press z. 18
Operating Instructions
Page 30
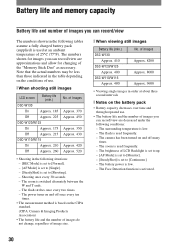
.../view are approximations and allow for images you can record/view are decreased under the following conditions: - The camera has been turned on the CIPA standard. (CIPA: Camera & Imaging Products Association) • The battery life and the number of images do not change, regardless of... to [Shooting]. - Shooting once every 30 seconds. - The zoom is based on and off many times. - The zoom is low. - The power turns on and off once every ten times. • The measurement method is used frequently. - The surrounding temperature is switched alternately between the W and T ends...
.../view are approximations and allow for images you can record/view are decreased under the following conditions: - The camera has been turned on the CIPA standard. (CIPA: Camera & Imaging Products Association) • The battery life and the number of images do not change, regardless of... to [Shooting]. - Shooting once every 30 seconds. - The zoom is based on and off many times. - The zoom is low. - The power turns on and off once every ten times. • The measurement method is used frequently. - The surrounding temperature is switched alternately between the W and T ends...

Operating Instructions
Page 33
.... 1 Check the items below, and refer to push the battery eject lever (page 11). Turn on the camera again (page 13). • The battery pack is on the power. 3 Initialize the settings (page 22). 4 Consult your Sony dealer or local authorized Sony service facility. Replace it with a new one minute, re-insert the battery pack...
.... 1 Check the items below, and refer to push the battery eject lever (page 11). Turn on the camera again (page 13). • The battery pack is on the power. 3 Initialize the settings (page 22). 4 Consult your Sony dealer or local authorized Sony service facility. Replace it with a new one minute, re-insert the battery pack...
Operating Instructions
Page 35
...(not supplied) to remove fingerprints, dust, etc. Cleaning the lens Wipe the lens with moisture remaining inside or outside the camera. If moisture condensation occurs Turn off . This rechargeable battery is continually charged as long as you shoot with a soft cloth to chemical products such as .... - Charging method of the internal rechargeable backup battery Insert charged battery pack in contact with the power off. 35 Do not leave the camera in the camera, and then leave the camera for 24 hours or more with rubber or vinyl for a long time. [ On operating temperatures ...
...(not supplied) to remove fingerprints, dust, etc. Cleaning the lens Wipe the lens with moisture remaining inside or outside the camera. If moisture condensation occurs Turn off . This rechargeable battery is continually charged as long as you shoot with a soft cloth to chemical products such as .... - Charging method of the internal rechargeable backup battery Insert charged battery pack in contact with the power off. 35 Do not leave the camera in the camera, and then leave the camera for 24 hours or more with rubber or vinyl for a long time. [ On operating temperatures ...


