Instruction Manual
Page 2
... number in the U.S.A. Model No. English Owner's Record The model and serial numbers are located on the appliance, or the one blade wider than the other sources, refer to the operating instructions. [ Polarization This set through openings as they may touch dangerous voltage points or short out parts that may be equipped with a polarized ac power cord plug (a plug having one described in the operating instructions...
... number in the U.S.A. Model No. English Owner's Record The model and serial numbers are located on the appliance, or the one blade wider than the other sources, refer to the operating instructions. [ Polarization This set through openings as they may touch dangerous voltage points or short out parts that may be equipped with a polarized ac power cord plug (a plug having one described in the operating instructions...
Instruction Manual
Page 3
... to service the set has been exposed to qualified service personnel under the following the operating instructions. If the set yourself as the original parts. Use a cloth lightly dampened with a cloth or other hazards. The set may expose you to the set from the wall outlet and disconnect the antenna or cable system. Service [ Damage Requiring Service Unplug the set . If the set exhibits a distinct change in...
... to service the set has been exposed to qualified service personnel under the following the operating instructions. If the set yourself as the original parts. Use a cloth lightly dampened with a cloth or other hazards. The set may expose you to the set from the wall outlet and disconnect the antenna or cable system. Service [ Damage Requiring Service Unplug the set . If the set exhibits a distinct change in...
Instruction Manual
Page 5
... disconnect and connect the communication cable (USB, etc.) again. This equipment generates, uses, and can be used in accordance with the limits set out in a residential installation. Reorient or relocate the receiving antenna. - For Customers in Europe This product has been tested and found to comply with the limits for a digital device pursuant to provide reasonable protection against harmful...
... disconnect and connect the communication cable (USB, etc.) again. This equipment generates, uses, and can be used in accordance with the limits set out in a residential installation. Reorient or relocate the receiving antenna. - For Customers in Europe This product has been tested and found to comply with the limits for a digital device pursuant to provide reasonable protection against harmful...
Instruction Manual
Page 8
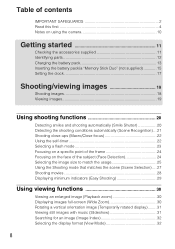
...) ... 21 Shooting close-ups (Macro/Close focus 22 Using the self-timer 22 Selecting a flash mode 23 Focusing on a specific point of the frame 24 Focusing on the face of the subject (Face Detection 24 Selecting the image size to match the usage 25 Using the Shooting mode that matches the scene (Scene Selection) .... 27 Shooting movies 28 Displaying minimum indicators (Easy Shooting 29 Using viewing functions 30 Viewing an enlarged image (Playback zoom 30 Displaying images full-screen (Wide Zoom 30 Rotating...
...) ... 21 Shooting close-ups (Macro/Close focus 22 Using the self-timer 22 Selecting a flash mode 23 Focusing on a specific point of the frame 24 Focusing on the face of the subject (Face Detection 24 Selecting the image size to match the usage 25 Using the Shooting mode that matches the scene (Scene Selection) .... 27 Shooting movies 28 Displaying minimum indicators (Easy Shooting 29 Using viewing functions 30 Viewing an enlarged image (Playback zoom 30 Displaying images full-screen (Wide Zoom 30 Rotating...
Instruction Manual
Page 9
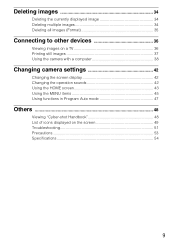
Deleting images 34 Deleting the currently displayed image 34 Deleting multiple images 34 Deleting all images (Format 35 Connecting to other devices 36 Viewing images on a TV 36 Printing still images 37 Using the camera with a computer 38 Changing camera settings 42 Changing the screen display 42 Changing the operation sounds 42 Using the HOME screen 43 Using the MENU items 45 Using functions in Program Auto mode 47 Others 48 Viewing "Cyber-shot Handbook 48 List of icons displayed on the screen 49 Troubleshooting 51 Precautions 53 Specifications 54 9
Deleting images 34 Deleting the currently displayed image 34 Deleting multiple images 34 Deleting all images (Format 35 Connecting to other devices 36 Viewing images on a TV 36 Printing still images 37 Using the camera with a computer 38 Changing camera settings 42 Changing the screen display 42 Changing the operation sounds 42 Using the HOME screen 43 Using the MENU items 45 Using functions in Program Auto mode 47 Others 48 Viewing "Cyber-shot Handbook 48 List of icons displayed on the screen 49 Troubleshooting 51 Precautions 53 Specifications 54 9

Instruction Manual
Page 10
... with other equipment, or that generates strong radio waves or emits radiation. Unauthorized recording of recorded content due to water. x Notes on using the camera Internal memory and "Memory Stick Duo" back up Do not turn on the power, part of flash emission may be damaged. In some tiny black and/ or bright dots (white, red, blue or green) may occur. Leaving liquids on the LCD screen.
... with other equipment, or that generates strong radio waves or emits radiation. Unauthorized recording of recorded content due to water. x Notes on using the camera Internal memory and "Memory Stick Duo" back up Do not turn on the power, part of flash emission may be damaged. In some tiny black and/ or bright dots (white, red, blue or green) may occur. Leaving liquids on the LCD screen.

Instruction Manual
Page 12
... firmly secure the camera, and damage to the camera may occur. O Battery eject lever P Access lamp Q "Memory Stick Duo" slot R Battery insertion slot S Multi connector 12 Getting started Identifying parts Bottom A Zoom (W/T) lever B Shutter button C Microphone D POWER button/POWER lamp E Flash F Self-timer lamp/Smile Shutter lamp/ AF illuminator G Lens H Lens cover I LCD screen/Touch panel J (Playback) button K Hook for wrist strap/Grip L Speaker M Battery/"Memory Stick Duo" cover N Tripod receptacle • Use a tripod with a screw...
... firmly secure the camera, and damage to the camera may occur. O Battery eject lever P Access lamp Q "Memory Stick Duo" slot R Battery insertion slot S Multi connector 12 Getting started Identifying parts Bottom A Zoom (W/T) lever B Shutter button C Microphone D POWER button/POWER lamp E Flash F Self-timer lamp/Smile Shutter lamp/ AF illuminator G Lens H Lens cover I LCD screen/Touch panel J (Playback) button K Hook for wrist strap/Grip L Speaker M Battery/"Memory Stick Duo" cover N Tripod receptacle • Use a tripod with a screw...

Instruction Manual
Page 14
... remove the battery pack from the battery charger. • Designed for use the camera, the battery charger (supplied), and the AC-LS5K AC Adaptor (not supplied) in any country or region where the power supply is connected to charge a fully depleted battery pack at a temperature of still images may cause a malfunction. 14 This may vary depending on the camera settings. zUsing the camera abroad You can record/view Shooting...
... remove the battery pack from the battery charger. • Designed for use the camera, the battery charger (supplied), and the AC-LS5K AC Adaptor (not supplied) in any country or region where the power supply is connected to charge a fully depleted battery pack at a temperature of still images may cause a malfunction. 14 This may vary depending on the camera settings. zUsing the camera abroad You can record/view Shooting...
Instruction Manual
Page 22
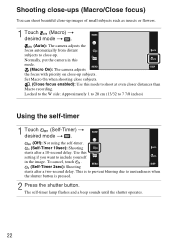
... Macro recording. This is to prevent blurring due to 7 7/8 inches) Using the self-timer 1 Touch (Self-Timer) t desired mode t . (Off): Not using the self-timer. (Self-Timer 10sec): Shooting starts after a two-second delay. The self-timer lamp flashes and a beep sounds until the shutter operates. 22 Normally, put the camera in the image. Locked to the W side: Approximately 1 to 20 cm (13/32 to unsteadiness when the shutter button is pressed. 2 Press the shutter button. Shooting close-ups (Macro...
... Macro recording. This is to prevent blurring due to 7 7/8 inches) Using the self-timer 1 Touch (Self-Timer) t desired mode t . (Off): Not using the self-timer. (Self-Timer 10sec): Shooting starts after a two-second delay. The self-timer lamp flashes and a beep sounds until the shutter operates. 22 Normally, put the camera in the image. Locked to the W side: Approximately 1 to 20 cm (13/32 to unsteadiness when the shutter button is pressed. 2 Press the shutter button. Shooting close-ups (Macro...

Instruction Manual
Page 29
... table below shows the approximate maximum recording times. Displaying minimum indicators (Easy Shooting) This mode reduces the minimum number of settings and makes the indicators easier to normal display Touch (REC Mode) t (Auto Adjustment) t . 29 x Returning to see. 1 Touch (REC Mode) t (Easy Shooting) t . Continuous shooting is possible for approximately 10 minutes. (Units: hour : minute : second) Capacity Internal memory "Memory Stick Duo" formatted with this camera Size Approx. 15 MB 256 MB 512 MB 1 GB 2 GB 4 GB 8 GB...
... table below shows the approximate maximum recording times. Displaying minimum indicators (Easy Shooting) This mode reduces the minimum number of settings and makes the indicators easier to normal display Touch (REC Mode) t (Auto Adjustment) t . 29 x Returning to see. 1 Touch (REC Mode) t (Easy Shooting) t . Continuous shooting is possible for approximately 10 minutes. (Units: hour : minute : second) Capacity Internal memory "Memory Stick Duo" formatted with this camera Size Approx. 15 MB 256 MB 512 MB 1 GB 2 GB 4 GB 8 GB...
Instruction Manual
Page 37
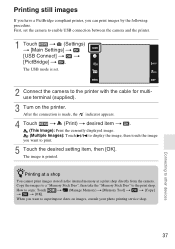
... printer, you want to superimpose dates on the printer. After the connection is printed. How to enable USB connection between the camera and the printer. 1 Touch t (Settings) t [Main Settings] t [USB Connect] t t [PictBridge] t . First, set . 2 Connect the camera to the printer with the cable for multiuse terminal (supplied). 3 Turn on images, consult your photo printing service shop. zPrinting at a shop You cannot print images stored in the internal memory at a print shop directly from the camera. t (Manage Memory) t [Memory Tool] t t [Copy] When you can print images...
... printer, you want to superimpose dates on the printer. After the connection is printed. How to enable USB connection between the camera and the printer. 1 Touch t (Settings) t [Main Settings] t [USB Connect] t t [PictBridge] t . First, set . 2 Connect the camera to the printer with the cable for multiuse terminal (supplied). 3 Turn on images, consult your photo printing service shop. zPrinting at a shop You cannot print images stored in the internal memory at a print shop directly from the camera. t (Manage Memory) t [Memory Tool] t t [Copy] When you can print images...

Instruction Manual
Page 38
... Guide". Import to computer Media service Uploading the image to those listed below, for enjoying your images. There are more than ever by taking advantage of the software, and "PMB" is not compatible with date stamps. Note • "PMB" is included on a CD-ROM (supplied). DVD Creating a data disc using the "Memory Stick Duo", exporting images and viewing them. Print Printing images with Macintosh computers. 38 Export to camera When using...
... Guide". Import to computer Media service Uploading the image to those listed below, for enjoying your images. There are more than ever by taking advantage of the software, and "PMB" is not compatible with date stamps. Note • "PMB" is included on a CD-ROM (supplied). DVD Creating a data disc using the "Memory Stick Duo", exporting images and viewing them. Print Printing images with Macintosh computers. 38 Export to camera When using...
Instruction Manual
Page 39
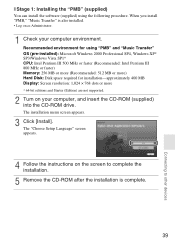
... supported. 2 Turn on as Administrator. 1 Check your computer, and insert the CD-ROM (supplied) into the CD-ROM drive. When you install "PMB," "Music Transfer" is complete. 39 Connecting to complete the installation. 5 Remove the CD-ROM after the installation is also installed. • Log on your computer environment. The installation menu screen appears. 3 Click [Install]. The "Choose Setup Language" screen appears. 4 Follow the instructions on the screen...
... supported. 2 Turn on as Administrator. 1 Check your computer, and insert the CD-ROM (supplied) into the CD-ROM drive. When you install "PMB," "Music Transfer" is complete. 39 Connecting to complete the installation. 5 Remove the CD-ROM after the installation is also installed. • Log on your computer environment. The installation menu screen appears. 3 Click [Install]. The "Choose Setup Language" screen appears. 4 Follow the instructions on the screen...
Instruction Manual
Page 43
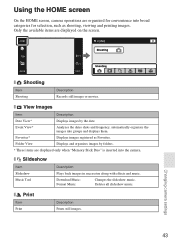
x Shooting Item Shooting Description Records still images or movies. Deletes all slideshow music. x Print Item Print Description Prints still images. Folder View Displays and organizes images by the date. Changing camera settings 43 Event View* Analyzes the dates shots and frequency, automatically organizes the images into the camera. Download Music: Format Music: Changes the slideshow music. Using the HOME screen On the HOME screen, camera operations are organized for convenience into broad categories for selection, such as Favorites. x View Images Item ...
x Shooting Item Shooting Description Records still images or movies. Deletes all slideshow music. x Print Item Print Description Prints still images. Folder View Displays and organizes images by the date. Changing camera settings 43 Event View* Analyzes the dates shots and frequency, automatically organizes the images into the camera. Download Music: Format Music: Changes the slideshow music. Using the HOME screen On the HOME screen, camera operations are organized for convenience into broad categories for selection, such as Favorites. x View Images Item ...
Instruction Manual
Page 44
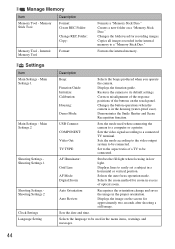
Internal Memory Tool Format: Formats a "Memory Stick Duo." Copies all images recorded in a horizontal or vertical position. Main Settings 2 Shooting Settings Shooting Settings 1 Shooting Settings Shooting Settings 2 Clock Settings Language Setting Description Beep: Function Guide: Initialize: Calibration: Housing: Demo Mode: Selects the beeps produced when you operate the camera. Sets the video signal according to its default settings. Sets the mode according to the video output system to the aspect ratio of optical zoom. Set to be used in low light. Displays lines to easily ...
Internal Memory Tool Format: Formats a "Memory Stick Duo." Copies all images recorded in a horizontal or vertical position. Main Settings 2 Shooting Settings Shooting Settings 1 Shooting Settings Shooting Settings 2 Clock Settings Language Setting Description Beep: Function Guide: Initialize: Calibration: Housing: Demo Mode: Selects the beeps produced when you operate the camera. Sets the video signal according to its default settings. Sets the mode according to the video output system to the aspect ratio of optical zoom. Set to be used in low light. Displays lines to easily ...
Instruction Manual
Page 45
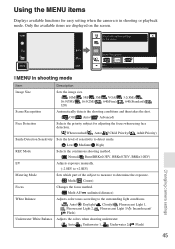
... continuous shooting method. ( Normal/ Burst/BRK±0.3EV, BRK±0.7EV, BRK±1.0EV) EV Adjusts exposure manually. (-2.0EV to +2.0EV) Metering Mode Sets which part of the subject to measure to determine the exposure. ( Multi/ Center) Focus Changes the focus method. ( Multi AF/ unlimited distance) White Balance Adjusts color tones according to the surrounding light conditions. ( Auto/ Daylight/ Cloudy/ Fluorescent Light 1, Fluorescent Light 2, Fluorescent Light 3/n Incandescent/ Flash) Underwater White Balance Adjusts the colors when shooting underwater. ( Auto...
... continuous shooting method. ( Normal/ Burst/BRK±0.3EV, BRK±0.7EV, BRK±1.0EV) EV Adjusts exposure manually. (-2.0EV to +2.0EV) Metering Mode Sets which part of the subject to measure to determine the exposure. ( Multi/ Center) Focus Changes the focus method. ( Multi AF/ unlimited distance) White Balance Adjusts color tones according to the surrounding light conditions. ( Auto/ Daylight/ Cloudy/ Fluorescent Light 1, Fluorescent Light 2, Fluorescent Light 3/n Incandescent/ Flash) Underwater White Balance Adjusts the colors when shooting underwater. ( Auto...
Instruction Manual
Page 47
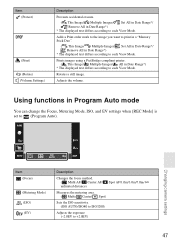
...Prints images using a PictBridge compliant printer. ( This Image/ Multiple Images/ All in Date Range*) * The displayed text differs according to each View Mode. Adds a Print order mark to the image you want to print in a "Memory Stick Duo". ( This Image/ Multiple Images/ Set All in Date Range*/ Remove All in Date Range*) * The displayed text differs according to each View Mode. Using functions in Date Range*) * The displayed text differs according to each View Mode. Adjusts the volume. Changing camera settings Item (Focus) (Metering Mode) (ISO) (EV) Description Changes the focus...
...Prints images using a PictBridge compliant printer. ( This Image/ Multiple Images/ All in Date Range*) * The displayed text differs according to each View Mode. Adds a Print order mark to the image you want to print in a "Memory Stick Duo". ( This Image/ Multiple Images/ Set All in Date Range*/ Remove All in Date Range*) * The displayed text differs according to each View Mode. Using functions in Date Range*) * The displayed text differs according to each View Mode. Adjusts the volume. Changing camera settings Item (Focus) (Metering Mode) (ISO) (EV) Description Changes the focus...
Instruction Manual
Page 50
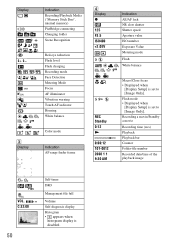
...connecting Changing folder Scene Recognition Red-eye reduction Flash level Flash charging Recording mode Face Detection Metering Mode Focus AF illuminator Vibration warning Touch AF indicator Housing White balance Color mode Indication AF range finder frame D Display z 125 F3.5 ISO400 +2.0EV REC Standby 0:12 N 0:00:12 101-0012 2008 1 1 9:30 AM Indication AE/AF lock NR slow shutter Shutter speed Aperture value ISO number Exposure Value Metering mode Flash White balance Macro/Close focus • Displayed when [Display Setup] is disabled. C:32:00 50 Self-timer DRO Management file full Volume...
...connecting Changing folder Scene Recognition Red-eye reduction Flash level Flash charging Recording mode Face Detection Metering Mode Focus AF illuminator Vibration warning Touch AF indicator Housing White balance Color mode Indication AF range finder frame D Display z 125 F3.5 ISO400 +2.0EV REC Standby 0:12 N 0:00:12 101-0012 2008 1 1 9:30 AM Indication AE/AF lock NR slow shutter Shutter speed Aperture value ISO number Exposure Value Metering mode Flash White balance Macro/Close focus • Displayed when [Display Setup] is disabled. C:32:00 50 Self-timer DRO Management file full Volume...
Instruction Manual
Page 52
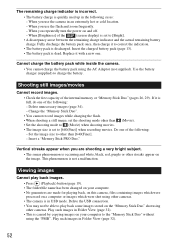
... of the (screen display) is set to the "Memory Stick Duo" without using other cameras. • The camera is in USB mode. Play such images in Folder View (page 32). • This is caused by copying images on the "Memory Stick Duo" shot using the AC Adaptor (not supplied). When you repeatedly turn the power on a computer or images which were shot using the "PMB". When you use the flash and zoom frequently. - Change the "Memory Stick Duo...
... of the (screen display) is set to the "Memory Stick Duo" without using other cameras. • The camera is in USB mode. Play such images in Folder View (page 32). • This is caused by copying images on the "Memory Stick Duo" shot using the AC Adaptor (not supplied). When you repeatedly turn the power on a computer or images which were shot using the "PMB". When you use the flash and zoom frequently. - Change the "Memory Stick Duo...
Instruction Manual
Page 54
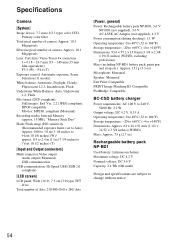
...) Recording media: Internal Memory (approx. 15 MB), "Memory Stick Duo" Flash: Flash range (ISO sensitivity (Recommended exposure Index) set to Auto): Approx. 0.08 to 3.0 m (3 1/4 inches to 9 feet 10 1/8 inches) (W)/ approx. 0.5 to 2.4 m (1 feet 7 3/4 inches to 7 feet 10 1/2 inches) (T) [Input and Output connectors] Multi connector:Video output Audio output (Monaural) USB communication USB communication: Hi-Speed USB (USB 2.0 compliant) [LCD screen] LCD panel: Wide (16:9), 7.5 cm (3.0 type) TFT drive Total number of camera: Approx. 10.1 Megapixels Lens: Carl...
...) Recording media: Internal Memory (approx. 15 MB), "Memory Stick Duo" Flash: Flash range (ISO sensitivity (Recommended exposure Index) set to Auto): Approx. 0.08 to 3.0 m (3 1/4 inches to 9 feet 10 1/8 inches) (W)/ approx. 0.5 to 2.4 m (1 feet 7 3/4 inches to 7 feet 10 1/2 inches) (T) [Input and Output connectors] Multi connector:Video output Audio output (Monaural) USB communication USB communication: Hi-Speed USB (USB 2.0 compliant) [LCD screen] LCD panel: Wide (16:9), 7.5 cm (3.0 type) TFT drive Total number of camera: Approx. 10.1 Megapixels Lens: Carl...


