
Cyber-shot® Handbook
Page 5
... on using the camera How to use this handbook 2 Notes on using the camera 3 Operation Search 9 MENU/Settings Search 12 Identifying parts 16 List of icons displayed on the screen 17 Using the internal memory 19 Shooting Using the mode dial 20 Intelligent Auto Adjustment 21 Superior Auto Adjustment 22 Background Defocus 24 Program Auto 25 Scene Selection 26 Intelligent Sweep Panorama 29 Movie Mode 31 Zoom 32 Tracking focus 33 DISP (Screen Display Settings 34 Flash 36 Smile Shutter 37 Self-Timer 38 Burst button 40 MOVIE (Movie) button...
... on using the camera How to use this handbook 2 Notes on using the camera 3 Operation Search 9 MENU/Settings Search 12 Identifying parts 16 List of icons displayed on the screen 17 Using the internal memory 19 Shooting Using the mode dial 20 Intelligent Auto Adjustment 21 Superior Auto Adjustment 22 Background Defocus 24 Program Auto 25 Scene Selection 26 Intelligent Sweep Panorama 29 Movie Mode 31 Zoom 32 Tracking focus 33 DISP (Screen Display Settings 34 Flash 36 Smile Shutter 37 Self-Timer 38 Burst button 40 MOVIE (Movie) button...

Cyber-shot® Handbook
Page 6
Table of contents Operation Search MENU/Settings Search Viewing Viewing still images 42 Playback zoom 43 Image Index 44 Delete 45 Viewing burst images 47 Viewing movies 49 3D images 3D Functions 51 3D Shooting 53 Viewing images shot in Sweep Multi Angle mode stereoscopically 55 Viewing an image on a 3D TV 56 MENU (Shooting) MENU items (Shooting 12 MENU (Viewing) MENU items (Viewing 13 Settings Setting items 14 Index 6GB
Table of contents Operation Search MENU/Settings Search Viewing Viewing still images 42 Playback zoom 43 Image Index 44 Delete 45 Viewing burst images 47 Viewing movies 49 3D images 3D Functions 51 3D Shooting 53 Viewing images shot in Sweep Multi Angle mode stereoscopically 55 Viewing an image on a 3D TV 56 MENU (Shooting) MENU items (Shooting 12 MENU (Viewing) MENU items (Viewing 13 Settings Setting items 14 Index 6GB
Cyber-shot® Handbook
Page 12
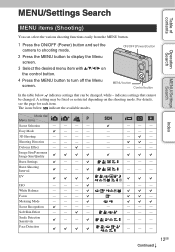
...12GB Continued r For details, see the page for each item. Easy Mode - - - - - - - 3D Shooting - - - - - - - Soft Skin Effect - - - - - - White Balance - - - MENU/Settings Search Table of contents Operation Search MENU/Settings Search Index MENU items (Shooting) You can be changed . ON/OFF (Power) button MENU button Control button In the table below indicate the available modes. The icons below , indicates settings that cannot be fixed or restricted depending on the control button. 4 Press the MENU button to turn off the Menu screen.
...12GB Continued r For details, see the page for each item. Easy Mode - - - - - - - 3D Shooting - - - - - - - Soft Skin Effect - - - - - - White Balance - - - MENU/Settings Search Table of contents Operation Search MENU/Settings Search Index MENU items (Shooting) You can be changed . ON/OFF (Power) button MENU button Control button In the table below indicate the available modes. The icons below , indicates settings that cannot be fixed or restricted depending on the control button. 4 Press the MENU button to turn off the Menu screen.
Cyber-shot® Handbook
Page 26
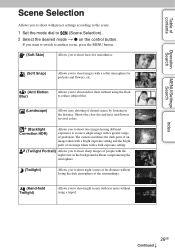
... to switch to another scene, press the MENU button. (Soft Skin) Allows you to shoot faces for smoothness. (Soft Snap) Allows you to shoot images with a softer atmosphere for portraits and flowers, etc. (Anti Motion Blur) Allows you to shoot indoor shots without using a tripod. The camera combines the dark parts of an image taken with a bright exposure setting and the bright parts of an image...
... to switch to another scene, press the MENU button. (Soft Skin) Allows you to shoot faces for smoothness. (Soft Snap) Allows you to shoot images with a softer atmosphere for portraits and flowers, etc. (Anti Motion Blur) Allows you to shoot indoor shots without using a tripod. The camera combines the dark parts of an image taken with a bright exposure setting and the bright parts of an image...

Cyber-shot® Handbook
Page 53
... the camera to be played back on the LCD screen. If this happens, change the shooting direction. 4 Pan the camera to record a full 3D image. • Since several images are stitched together, the stitched part will not be successful. • If the entire angle of view of the 3D shot and the angle of the guide, following situations: - Table of contents Operation Search MENU/Settings Search 3D Shooting Multiple images are shot...
... the camera to be played back on the LCD screen. If this happens, change the shooting direction. 4 Pan the camera to record a full 3D image. • Since several images are stitched together, the stitched part will not be successful. • If the entire angle of view of the 3D shot and the angle of the guide, following situations: - Table of contents Operation Search MENU/Settings Search 3D Shooting Multiple images are shot...

Cyber-shot® Handbook
Page 65
... z on the LCD screen. Notes • [Burst Settings] is activated - In Intelligent Sweep Panorama mode - When all the images are fitted in one burst when you hold down the shutter button. zAbout the recording of burst shooting images After shooting burst images, the shot images are displayed in the image processing are also used for the other images. • [VGA] image size will be set to [Off]. • When recording with the self-timer, a series...
... z on the LCD screen. Notes • [Burst Settings] is activated - In Intelligent Sweep Panorama mode - When all the images are fitted in one burst when you hold down the shutter button. zAbout the recording of burst shooting images After shooting burst images, the shot images are displayed in the image processing are also used for the other images. • [VGA] image size will be set to [Off]. • When recording with the self-timer, a series...

Cyber-shot® Handbook
Page 70
... color tones manually using the White Balance function. Weather/lighting Characteristics of light Daylight White (standard) Cloudy Bluish Fluorescent Green-tinged Incandescent Reddish MENU/Settings Search Index 70GB The color tones are adjusted automatically, but you will shoot the subject. 2 MENU t button (White Balance) t [One Push Set] t z on the control The screen momentarily turns black, and when the white balance has been adjusted and stored in progress. • When flash mode is set . Notes • If the indicator flashes while shooting, the white balance is displayed...
... color tones manually using the White Balance function. Weather/lighting Characteristics of light Daylight White (standard) Cloudy Bluish Fluorescent Green-tinged Incandescent Reddish MENU/Settings Search Index 70GB The color tones are adjusted automatically, but you will shoot the subject. 2 MENU t button (White Balance) t [One Push Set] t z on the control The screen momentarily turns black, and when the white balance has been adjusted and stored in progress. • When flash mode is set . Notes • If the indicator flashes while shooting, the white balance is displayed...
Cyber-shot® Handbook
Page 74
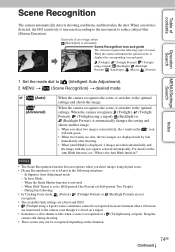
Scene Recognition icon and guide The camera recognizes the following situations: - When the camera determines the optimal scene, it is fixed on the icon will turn green. • When two frames are shot, the two images are displayed side by side immediately after shooting. • When [Anti Blink] is displayed, 2 images are transferred to the optimal settings and shoots the image. Table of scenes. In Superior Auto Adjustment mode - When the Smile Shutter function is...
Scene Recognition icon and guide The camera recognizes the following situations: - When the camera determines the optimal scene, it is fixed on the icon will turn green. • When two frames are shot, the two images are displayed side by side immediately after shooting. • When [Anti Blink] is displayed, 2 images are transferred to the optimal settings and shoots the image. Table of scenes. In Superior Auto Adjustment mode - When the Smile Shutter function is...

Cyber-shot® Handbook
Page 80
... using the flash - MENU/Settings Search Index 80GB Shoot again as necessary. The camera will select, display and record the image which the eyes are not blinked automatically. 1 Set the mode dial to (Scene Selection). 2 Select (Soft Skin) or (Soft Snap). 3 MENU t (Anti Blink) t desired mode (Auto) (Off) When Face Detection is active, the Anti Blink function operates so that images with the subject's eyes closed are recorded, the message "Blinked eye detected" is displayed on the LCD screen...
... using the flash - MENU/Settings Search Index 80GB Shoot again as necessary. The camera will select, display and record the image which the eyes are not blinked automatically. 1 Set the mode dial to (Scene Selection). 2 Select (Soft Skin) or (Soft Snap). 3 MENU t (Anti Blink) t desired mode (Auto) (Off) When Face Detection is active, the Anti Blink function operates so that images with the subject's eyes closed are recorded, the message "Blinked eye detected" is displayed on the LCD screen...

Cyber-shot® Handbook
Page 86
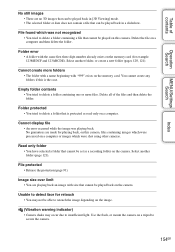
While connected, data cannot be written to playback mode. - If no image is made. Index 86GB Before use, set the camera to or deleted from the camera. - zTips for sending and receiving data successfully Closely align the (TransferJet) mark on the camera and other as shown in the Image Database File using [Folder view (Still)]. zUsing separately sold TransferJet-compatible devices Using separately sold TransferJet-compatible devices allows you to transfer images to each...
While connected, data cannot be written to playback mode. - If no image is made. Index 86GB Before use, set the camera to or deleted from the camera. - zTips for sending and receiving data successfully Closely align the (TransferJet) mark on the camera and other as shown in the Image Database File using [Folder view (Still)]. zUsing separately sold TransferJet-compatible devices Using separately sold TransferJet-compatible devices allows you to transfer images to each...

Cyber-shot® Handbook
Page 87
... 1 MENU t (View Mode) t [Date View] t z on the memory card, a registration screen with the message "Files found which were not recognized Import files" will be corrupted if the battery charge runs out. zViewing images taken with a low charge is used to record images, View Mode is displayed. If a battery with a different camera This camera creates an Image Database File on the control button (Date View) (Folder view (Still)) (Folder view (MP4)) (AVCHD view) Displays images by selecting [OK]. • Use a sufficiently charged battery to Folder View and still images and movies are...
... 1 MENU t (View Mode) t [Date View] t z on the memory card, a registration screen with the message "Files found which were not recognized Import files" will be corrupted if the battery charge runs out. zViewing images taken with a low charge is used to record images, View Mode is displayed. If a battery with a different camera This camera creates an Image Database File on the control button (Date View) (Folder view (Still)) (Folder view (MP4)) (AVCHD view) Displays images by selecting [OK]. • Use a sufficiently charged battery to Folder View and still images and movies are...

Cyber-shot® Handbook
Page 112
... the images of contents Operation Search LUN Settings Sets the display method for the recording media displayed on the control button Multi Single The images both the memory card and the internal memory are not displayed when the camera is connected to a device other monitor when the camera is connected with a computer or AV component using "PMB Portable". Select this setting when you connect the camera to a media service using a USB connection. 1 MENU t (Settings) t (Main Settings) t [LUN Settings] t desired mode t z on a computer screen...
... the images of contents Operation Search LUN Settings Sets the display method for the recording media displayed on the control button Multi Single The images both the memory card and the internal memory are not displayed when the camera is connected to a device other monitor when the camera is connected with a computer or AV component using "PMB Portable". Select this setting when you connect the camera to a media service using a USB connection. 1 MENU t (Settings) t (Main Settings) t [LUN Settings] t desired mode t z on a computer screen...

Cyber-shot® Handbook
Page 131
... 3D Viewing Delete Playback Zoom Rotate View Mode Function Automatically plays back images with the TV by connecting the camera to the TV using the HDMI Cable (sold separately). Deletes recorded images. Index 131GB Continued r Selects the display format for viewing multiple images. Plays back a single image at the same time. Table of contents Operation Search MENU/Settings Search Viewing an image on the control button 5 Press the SYNC MENU button of the camera using an HDMI Cable (sold separately). 1 Connect the camera to the TV using the remote controller supplied with sound...
... 3D Viewing Delete Playback Zoom Rotate View Mode Function Automatically plays back images with the TV by connecting the camera to the TV using the HDMI Cable (sold separately). Deletes recorded images. Index 131GB Continued r Selects the display format for viewing multiple images. Plays back a single image at the same time. Table of contents Operation Search MENU/Settings Search Viewing an image on the control button 5 Press the SYNC MENU button of the camera using an HDMI Cable (sold separately). 1 Connect the camera to the TV using the remote controller supplied with sound...
Cyber-shot® Handbook
Page 133
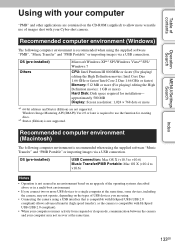
... versatile use the function for installation- Table of contents Operation Search MENU/Settings Search Using with your computer "PMB" and other applications are contained on the types of USB devices you are using. • Connecting the camera using a USB interface that is compatible with Hi-Speed USB (USB 2.0 compliant) allows advanced transfer (high speed transfer), as the camera is compatible with your computer may not recover at the same time. approximately 500 MB Display: Screen...
... versatile use the function for installation- Table of contents Operation Search MENU/Settings Search Using with your computer "PMB" and other applications are contained on the types of USB devices you are using. • Connecting the camera using a USB interface that is compatible with Hi-Speed USB (USB 2.0 compliant) allows advanced transfer (high speed transfer), as the camera is compatible with your computer may not recover at the same time. approximately 500 MB Display: Screen...

Cyber-shot® Handbook
Page 134
... [Next]. 5 Follow the instructions on the screen to complete the installation. • For the installation, connect the camera to re-install "PMB". Select [Start]. • If "PMB" has been already installed on your computer and insert the CD-ROM (supplied) into the CDROM drive. Table of contents Operation Search MENU/Settings Search Index Using the software Installing "PMB (Picture Motion Browser)" and "Music Transfer" (Windows) 1 Turn on your computer...
... [Next]. 5 Follow the instructions on the screen to complete the installation. • For the installation, connect the camera to re-install "PMB". Select [Start]. • If "PMB" has been already installed on your computer and insert the CD-ROM (supplied) into the CDROM drive. Table of contents Operation Search MENU/Settings Search Index Using the software Installing "PMB (Picture Motion Browser)" and "Music Transfer" (Windows) 1 Turn on your computer...

Cyber-shot® Handbook
Page 135
... [Mac] folder. MP3 files stored on the camera • Before starting up "Music Transfer," perform MENU t (Settings) t [Download Music], and connect the camera to a memory card, and displayed on the camera. zIntroduction to "Music Transfer" "Music Transfer" allows you to replace the Music files provided in a calendar display. • You can correct (Red Eye Reduction, etc.) still images, and change the shooting date and time. • You can be exported to the computer. Table of contents Operation Search MENU/Settings Search Installing...
... [Mac] folder. MP3 files stored on the camera • Before starting up "Music Transfer," perform MENU t (Settings) t [Download Music], and connect the camera to a memory card, and displayed on the camera. zIntroduction to "Music Transfer" "Music Transfer" allows you to replace the Music files provided in a calendar display. • You can correct (Red Eye Reduction, etc.) still images, and change the shooting date and time. • You can be exported to the computer. Table of contents Operation Search MENU/Settings Search Installing...

Cyber-shot® Handbook
Page 145
... charge the battery pack using the AC Adaptor (sold separately). MENU/Settings Search Index Shooting still images/movies Cannot record images. • When images cannot be recorded into a memory card but are recorded into the internal memory, even though a memory card has been inserted into the battery charger again (until it is recommended that you use the camera in standby mode and charging has temporarily stopped. Change the memory card. • You cannot record images while charging the flash. • For recording movies, it clicks). Charging...
... charge the battery pack using the AC Adaptor (sold separately). MENU/Settings Search Index Shooting still images/movies Cannot record images. • When images cannot be recorded into a memory card but are recorded into the internal memory, even though a memory card has been inserted into the battery charger again (until it is recommended that you use the camera in standby mode and charging has temporarily stopped. Change the memory card. • You cannot record images while charging the flash. • For recording movies, it clicks). Charging...

Cyber-shot® Handbook
Page 148
... DISP (Screen Display Settings) button to play back images. • Make sure that the TV is in [3D Viewing] mode. • Check that the memory card is fully inserted into the camera. • The folder/file name has been changed on your computer. • No guarantees are made for multi-use the same color television system (page 157). • Check whether the connection is connected to display the 3D images. Select...
... DISP (Screen Display Settings) button to play back images. • Make sure that the TV is in [3D Viewing] mode. • Check that the memory card is fully inserted into the camera. • The folder/file name has been changed on your computer. • No guarantees are made for multi-use the same color television system (page 157). • Check whether the connection is connected to display the 3D images. Select...
Cyber-shot® Handbook
Page 154
... three digit number already exists on the memory card (for playing back, on this camera, files containing images which were processed on the camera. Cannot display file • An error occurred while the image was not recognized • You tried to delete a folder containing a file that cannot be played on a computer. Read only folder • You have selected a folder that cannot be set as read only on this is protected as a recording folder...
... three digit number already exists on the memory card (for playing back, on this camera, files containing images which were processed on the camera. Cannot display file • An error occurred while the image was not recognized • You tried to delete a folder containing a file that cannot be played on a computer. Read only folder • You have selected a folder that cannot be set as read only on this is protected as a recording folder...

Cyber-shot® Handbook
Page 155
... [Format Music], then download a new Music file. Error Playing Music • Delete the Music file, or replace it with other editing functions of the camera cannot be selected when using [Date View]. To register additional images in the Image Database File, delete images in Image Database File. Inconsistencies found in [Date View]. Table of contents Operation Search MENU/Settings Search Index MP4 12M is not supported with this memory card MP4 6M is not supported with this movie format • Set [Movie format] to...
... [Format Music], then download a new Music file. Error Playing Music • Delete the Music file, or replace it with other editing functions of the camera cannot be selected when using [Date View]. To register additional images in the Image Database File, delete images in Image Database File. Inconsistencies found in [Date View]. Table of contents Operation Search MENU/Settings Search Index MP4 12M is not supported with this memory card MP4 6M is not supported with this movie format • Set [Movie format] to...


