Operating Instructions
Page 1
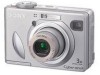
... Enjoying the camera Using the menu Using the Setup screen Using your computer Printing still images Connecting your camera to these numbers whenever you call upon your Sony dealer regarding this product. Record the serial number in China 2-586-568-11(1) Digital Still Camera User's Guide/ Troubleshooting Operating Instructions Before operating the unit, please read this product and answers to frequently asked questions can be found at our Customer Support Website. Model No. DSC-W5/W7/W15...
... Enjoying the camera Using the menu Using the Setup screen Using your computer Printing still images Connecting your camera to these numbers whenever you call upon your Sony dealer regarding this product. Record the serial number in China 2-586-568-11(1) Digital Still Camera User's Guide/ Troubleshooting Operating Instructions Before operating the unit, please read this product and answers to frequently asked questions can be found at our Customer Support Website. Model No. DSC-W5/W7/W15...
Operating Instructions
Page 3
... Directive for a Class B digital device, pursuant to which can help . However, there is no guarantee that to Part 15 of FCC Rules. Connect the equipment into an outlet on , the user is connected. - If the plug supplied with this camera. Reorient or relocate the receiving antenna. - If you change the fuse. You can be sure to discontinue midway (fail), restart...
... Directive for a Class B digital device, pursuant to which can help . However, there is no guarantee that to Part 15 of FCC Rules. Connect the equipment into an outlet on , the user is connected. - If the plug supplied with this camera. Reorient or relocate the receiving antenna. - If you change the fuse. You can be sure to discontinue midway (fail), restart...
Operating Instructions
Page 4
... the flash surface, resulting in insufficient light emission. This may be corrupted. Back up the data. Also, even if batteries are not fully charged, you can use the partially charged capacity of reproducing sharp images with your camera. • "Memory Stick Duo": you do not intend to use the batteries for a long time, use the camera near a location that the camera is to your camera or recording media...
... the flash surface, resulting in insufficient light emission. This may be corrupted. Back up the data. Also, even if batteries are not fully charged, you can use the partially charged capacity of reproducing sharp images with your camera. • "Memory Stick Duo": you do not intend to use the batteries for a long time, use the camera near a location that the camera is to your camera or recording media...
Operating Instructions
Page 6
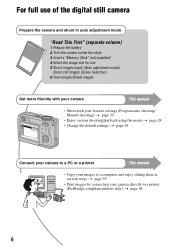
..." (separate volume) 1 Prepare the battery 2 Turn the camera on/set the clock 3 Insert a "Memory Stick" (not supplied) 4 Select the image size for use 5 Shoot images easily (Auto adjustment mode) Shoot still images (Scene Selection) 6 View images/Delete images Get more friendly with your camera This manual • Shoot with your favorite settings (Program auto shooting/ Manual shooting) t page 25 • Enjoy various shooting/playback using the menu t page 28 • Change the default settings t page 44 Connect your camera to a PC or a printer This manual • Copy your images to...
..." (separate volume) 1 Prepare the battery 2 Turn the camera on/set the clock 3 Insert a "Memory Stick" (not supplied) 4 Select the image size for use 5 Shoot images easily (Auto adjustment mode) Shoot still images (Scene Selection) 6 View images/Delete images Get more friendly with your camera This manual • Shoot with your favorite settings (Program auto shooting/ Manual shooting) t page 25 • Enjoy various shooting/playback using the menu t page 28 • Change the default settings t page 44 Connect your camera to a PC or a printer This manual • Copy your images to...
Operating Instructions
Page 8
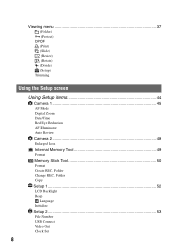
Folder Change REC. Folder Copy Setup 1 52 1 LCD Backlight Beep Language Initialize Setup 2 53 2 File Number USB Connect Video Out Clock Set 8 Viewing menu 37 (Folder) - (Protect) DPOF (Print) (Slide) (Resize) (Rotate) (Divide) (Setup) Trimming Using the Setup screen Using Setup items 44 Camera 1 45 1 AF Mode Digital Zoom Date/Time Red Eye Reduction AF Illuminator Auto Review Camera 2 48 2 Enlarged Icon Internal Memory Tool 49 Format Memory Stick Tool 50 Format Create REC.
Folder Change REC. Folder Copy Setup 1 52 1 LCD Backlight Beep Language Initialize Setup 2 53 2 File Number USB Connect Video Out Clock Set 8 Viewing menu 37 (Folder) - (Protect) DPOF (Print) (Slide) (Resize) (Rotate) (Divide) (Setup) Trimming Using the Setup screen Using Setup items 44 Camera 1 45 1 AF Mode Digital Zoom Date/Time Red Eye Reduction AF Illuminator Auto Review Camera 2 48 2 Enlarged Icon Internal Memory Tool 49 Format Memory Stick Tool 50 Format Create REC.
Operating Instructions
Page 26
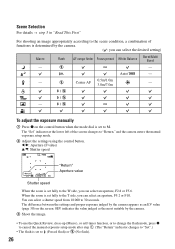
... adjust the exposure manually 1 Press z on the screen. 0EV indicates the value judged as the most suitable by the camera. 3 Shoot the image. • To use the Quick Review, close-up (Macro), or self-timer function, or to change the flash mode, press z to cancel the manual exposure setup mode after step 1. (The "Return" indicator changes to "Set".) • The flash is determined by the camera. ( : you can select a shutter speed from 1/1000 to 30 seconds. When the zoom is set...
... adjust the exposure manually 1 Press z on the screen. 0EV indicates the value judged as the most suitable by the camera. 3 Shoot the image. • To use the Quick Review, close-up (Macro), or self-timer function, or to change the flash mode, press z to cancel the manual exposure setup mode after step 1. (The "Return" indicator changes to "Set".) • The flash is determined by the camera. ( : you can select a shutter speed from 1/1000 to 30 seconds. When the zoom is set...
Operating Instructions
Page 37
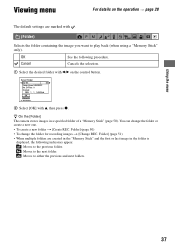
... the desired folder with v, then press z. Folder] (page 51) • When multiple folders are marked with . (Folder) Selects the folder containing the image you want to either the previous and next folders. 37 You can change the folder for recording images t [Change REC. z On the [Folder] The camera stores images in the folder is displayed, the following procedure. Select Folder 102 2/2 Folder Name:102MSDCF No. Using the menu Viewing menu For details on the control button.
... the desired folder with v, then press z. Folder] (page 51) • When multiple folders are marked with . (Folder) Selects the folder containing the image you want to either the previous and next folders. 37 You can change the folder for recording images t [Change REC. z On the [Folder] The camera stores images in the folder is displayed, the following procedure. Select Folder 102 2/2 Folder Name:102MSDCF No. Using the menu Viewing menu For details on the control button.

Operating Instructions
Page 53
... a PictBridge compliant printer using the USB cable. PTP When [PTP] (Picture Transfer Protocol) is set and the camera is connected to a computer, the images in sequence even if the recording folder or the "Memory Stick" is changed. (When the replaced "Memory Stick" contains a file with a number higher than the last assigned number, a number one higher than the largest number is assigned.) Reset Starts from 0001 each time the folder is changed. (When the recording folder contains a file, a number one higher...
... a PictBridge compliant printer using the USB cable. PTP When [PTP] (Picture Transfer Protocol) is set and the camera is connected to a computer, the images in sequence even if the recording folder or the "Memory Stick" is changed. (When the replaced "Memory Stick" contains a file with a number higher than the last assigned number, a number one higher than the largest number is assigned.) Reset Starts from 0001 each time the folder is changed. (When the recording folder contains a file, a number one higher...
Operating Instructions
Page 61
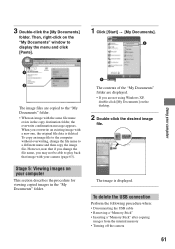
... original file data is displayed. The image is deleted. To delete the USB connection Perform the following procedure when: • Disconnecting the USB cable • Removing a "Memory Stick" • Inserting a "Memory Stick" after copying images from the internal memory • Turning off the camera 61 To copy an image file to the computer without overwriting, change the file name, you may not be able to a different name and then copy the image file. When you are not using Windows...
... original file data is displayed. The image is deleted. To delete the USB connection Perform the following procedure when: • Disconnecting the USB cable • Removing a "Memory Stick" • Inserting a "Memory Stick" after copying images from the internal memory • Turning off the camera 61 To copy an image file to the computer without overwriting, change the file name, you may not be able to a different name and then copy the image file. When you are not using Windows...
Operating Instructions
Page 62
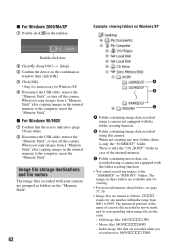
... USB cable, remove the "Memory Stick", or turn off the camera. Movie files: MOV0ssss.MPG - When you copy images from a "Memory Stick" after copying images in case of the internal memory. When you record movies: MOV0ssss.THM Still image files: DSC0ssss.JPG - Index image files that the access indicators (page 58) are white. 2 Disconnect the USB cable, remove the "Memory Stick", or turn off the camera. x For Windows 98/98SE 1 Confirm that are named as folders on the "Memory Stick". 62 A B C A Folder containing image data recorded using...
... USB cable, remove the "Memory Stick", or turn off the camera. Movie files: MOV0ssss.MPG - When you copy images from a "Memory Stick" after copying images in case of the internal memory. When you record movies: MOV0ssss.THM Still image files: DSC0ssss.JPG - Index image files that the access indicators (page 58) are white. 2 Disconnect the USB cable, remove the "Memory Stick", or turn off the camera. x For Windows 98/98SE 1 Confirm that are named as folders on the "Memory Stick". 62 A B C A Folder containing image data recorded using...

Operating Instructions
Page 63
... [Copy]. 2Double-click [Removable Disk] or [Sony MemoryStick] in [My Computer]. 3Right-click the [sssMSDCF] folder in step 1. • An extension may be displayed depending on the computer settings. Enter a number from 100 to 999. 1 Right-click the image file, then click [Rename]. The extension for still images is JPG, and the extension for ssss. Viewing image files stored on a computer with your camera (using a "Memory Stick...
... [Copy]. 2Double-click [Removable Disk] or [Sony MemoryStick] in [My Computer]. 3Right-click the [sssMSDCF] folder in step 1. • An extension may be displayed depending on the computer settings. Enter a number from 100 to 999. 1 Right-click the image file, then click [Rename]. The extension for still images is JPG, and the extension for ssss. Viewing image files stored on a computer with your camera (using a "Memory Stick...
Operating Instructions
Page 64
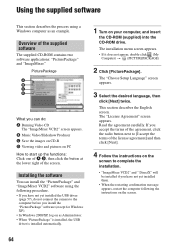
... can install the "PicturePackage" and "ImageMixer VCD2" software using a Windows computer as Administrator. • When "PicturePackage" is installed, the USB driver is installed automatically. 1 Turn on your computer, and insert the CD-ROM (supplied) into the CD-ROM drive. Read the agreement carefully. Installing the software You can do not connect the camera to start up the functions: Click one of A-D, then click the button at...
... can install the "PicturePackage" and "ImageMixer VCD2" software using a Windows computer as Administrator. • When "PicturePackage" is installed, the USB driver is installed automatically. 1 Turn on your computer, and insert the CD-ROM (supplied) into the CD-ROM drive. Read the agreement carefully. Installing the software You can do not connect the camera to start up the functions: Click one of A-D, then click the button at...

Operating Instructions
Page 66
... disk icon t the desired image file in "Stage 2: Preparing the camera and the computer" on connecting your camera to a computer • Operations are two modes for using "ImageMixer VCD2" OS (pre-installed): Mac OS X (v10.1.5 or later) CPU: iMac, eMac, iBook, PowerBook, PowerMac G3/G4 series Memory: 128 MB or more (256 MB or more USB devices to open that described in the folder containing the copied files...
... disk icon t the desired image file in "Stage 2: Preparing the camera and the computer" on connecting your camera to a computer • Operations are two modes for using "ImageMixer VCD2" OS (pre-installed): Mac OS X (v10.1.5 or later) CPU: iMac, eMac, iBook, PowerBook, PowerMac G3/G4 series Memory: 128 MB or more (256 MB or more USB devices to open that described in the folder containing the copied files...
Operating Instructions
Page 67
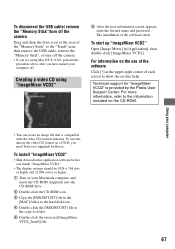
...] file in the [MAC] folder to the hard disk icon. 4 Double-click the [IMXINST.SIT] file in the copy-to show the on-line help. To save the data in [Application], then double-click [ImageMixer VCD2]. Technical support for "ImageMixer VCD2" is compatible with the video CD creation function. For more information, refer to the "Trash" icon, then remove the USB cable, remove the "Memory Stick", or turn off the camera Drag...
...] file in the [MAC] folder to the hard disk icon. 4 Double-click the [IMXINST.SIT] file in the copy-to show the on-line help. To save the data in [Application], then double-click [ImageMixer VCD2]. Technical support for "ImageMixer VCD2" is compatible with the video CD creation function. For more information, refer to the "Trash" icon, then remove the USB cable, remove the "Memory Stick", or turn off the camera Drag...
Operating Instructions
Page 78
... shutter function is not a malfunction. Record in [Multi Burst] mode. - Zoom does not work . • The flash is set to (No flash) (t step 5 in "Read This First"). • You cannot use the flash when: - [Mode] (REC Mode) is set to [Burst] or [Multi Burst] (page 34). - (Twilight mode) or (Candle mode) of focus" on the screen. • Set the mode dial to [640(Fine)] when recording movies. Shooting in the close . Shooting movies. • The image size...
... shutter function is not a malfunction. Record in [Multi Burst] mode. - Zoom does not work . • The flash is set to (No flash) (t step 5 in "Read This First"). • You cannot use the flash when: - [Mode] (REC Mode) is set to [Burst] or [Multi Burst] (page 34). - (Twilight mode) or (Candle mode) of focus" on the screen. • Set the mode dial to [640(Fine)] when recording movies. Shooting in the close . Shooting movies. • The image size...
Operating Instructions
Page 81
... be cut a movie. • The movie is compatible with the USB cable before you set protection on an image (page 38), or set the write-protect switch on the camera (t step 2 in "Read This First"). • When the battery level is low, install the charged batteries (t step 1 in the (Setup) menu (page 53). • Disconnect all equipment other device (page 58). • The USB driver is displayed (page 58). • Set [USB Connect] to [Normal...
... be cut a movie. • The movie is compatible with the USB cable before you set protection on an image (page 38), or set the write-protect switch on the camera (t step 2 in "Read This First"). • When the battery level is low, install the charged batteries (t step 1 in the (Setup) menu (page 53). • Disconnect all equipment other device (page 58). • The USB driver is displayed (page 58). • Set [USB Connect] to [Normal...
Operating Instructions
Page 82
... "PicturePackage Menu" and check [Settings]. • Make the USB connection after the computer is turned on help at the upper-right corner of your computer, then play back the movie from the internal memory or the "Memory Stick". Copy the movie to the hard disk of each screen. • Consult the computer or software manufacturer. You cannot print an image. • Check the printer settings. The following procedure is deleted. 4 Install the USB driver (page...
... "PicturePackage Menu" and check [Settings]. • Make the USB connection after the computer is turned on help at the upper-right corner of your computer, then play back the movie from the internal memory or the "Memory Stick". Copy the movie to the hard disk of each screen. • Consult the computer or software manufacturer. You cannot print an image. • Check the printer settings. The following procedure is deleted. 4 Install the USB driver (page...
Operating Instructions
Page 84
... operating instructions supplied with the PictBridge standard. PictBridge compliant printer A connection cannot be established. • The camera cannot be connected directly to a printer that is not compliant with the printer. If you select [Exit] during printing, images may not be printed. • Images shot using the USB cable. • Turn on the printer. Printing is indicated on and can provide the desired size. Set [Date] to whether the printer provides these functions. Cannot print the image at the size...
... operating instructions supplied with the PictBridge standard. PictBridge compliant printer A connection cannot be established. • The camera cannot be connected directly to a printer that is not compliant with the printer. If you select [Exit] during printing, images may not be printed. • Images shot using the USB cable. • Turn on the printer. Printing is indicated on and can provide the desired size. Set [Date] to whether the printer provides these functions. Cannot print the image at the size...
Operating Instructions
Page 86
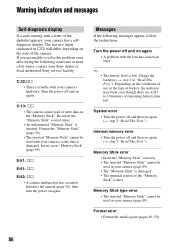
..., follow the instructions. C:13: ss • The camera cannot read or write data on again. Insert a new "Memory Stick" (page 89). Messages If the following corrective actions a few times, contact your camera (page 89). • The "Memory Stick" is damaged. • The terminal section of the camera. Warning indicators and messages Self-diagnosis display If a code starting with the lens has caused an error. Internal memory error • Turn the power off and...
..., follow the instructions. C:13: ss • The camera cannot read or write data on again. Insert a new "Memory Stick" (page 89). Messages If the following corrective actions a few times, contact your camera (page 89). • The "Memory Stick" is damaged. • The terminal section of the camera. Warning indicators and messages Self-diagnosis display If a code starting with the lens has caused an error. Internal memory error • Turn the power off and...
Operating Instructions
Page 98
... display...........86 Self-timer t step 5 in "Read This First" Sepia 36 Setting the clock t step 2 in "Read This First" Setup 36, 43, 44 Camera 1 45 Camera 2 48 Internal Memory Tool ...49 Memory Stick Tool .......50 Setup 1 52 Setup 2 53 Setup 1 52 Setup 2 53 Sharpness 36 Shooting Movie t step 5 in "Read This First" Still image 98 t step 5 in "Read This First" Shooting menu 30 Shooting movies 25 Shutter speed 11, 26 Single 45 Single-image mode...
... display...........86 Self-timer t step 5 in "Read This First" Sepia 36 Setting the clock t step 2 in "Read This First" Setup 36, 43, 44 Camera 1 45 Camera 2 48 Internal Memory Tool ...49 Memory Stick Tool .......50 Setup 1 52 Setup 2 53 Setup 1 52 Setup 2 53 Sharpness 36 Shooting Movie t step 5 in "Read This First" Still image 98 t step 5 in "Read This First" Shooting menu 30 Shooting movies 25 Shutter speed 11, 26 Single 45 Single-image mode...


