Operating Instructions
Page 5
... static electricity or electromagnetism causes data transfer to discontinue midway (fail), restart the application or disconnect and connect the communication cable (USB, etc.) again. [ Disposal of Old Electrical & Electronic Equipment (Applicable in the European Union and other European countries with the... of materials will help to the addresses given in separate service or guarantee documents. The recycling of this product is Sony Corporation, 1-7-1 Konan Minato-ku Tokyo, 1080075 Japan. The Authorized Representative for the customers in the countries applying EU Directives...
... static electricity or electromagnetism causes data transfer to discontinue midway (fail), restart the application or disconnect and connect the communication cable (USB, etc.) again. [ Disposal of Old Electrical & Electronic Equipment (Applicable in the European Union and other European countries with the... of materials will help to the addresses given in separate service or guarantee documents. The recycling of this product is Sony Corporation, 1-7-1 Konan Minato-ku Tokyo, 1080075 Japan. The Authorized Representative for the customers in the countries applying EU Directives...
Operating Instructions
Page 10
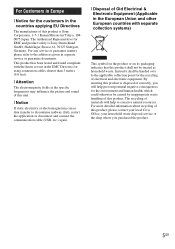
... in the USA and Canada) • Rechargeable battery pack NP-BK1 (1) • Dedicated USB cable (1) • CD-ROM (1) - Attach the strap and place your hand through the loop to prevent the camera from damage by being dropped. Cyber-shot application software - "Cyber-shot Handbook" - "Cyber-shot Step-up Guide" • Instruction Manual (this manual) (1) x Using the wrist strap...
... in the USA and Canada) • Rechargeable battery pack NP-BK1 (1) • Dedicated USB cable (1) • CD-ROM (1) - Attach the strap and place your hand through the loop to prevent the camera from damage by being dropped. Cyber-shot application software - "Cyber-shot Handbook" - "Cyber-shot Step-up Guide" • Instruction Manual (this manual) (1) x Using the wrist strap...
Operating Instructions
Page 11
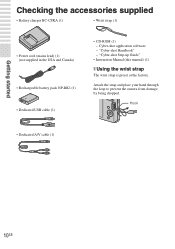
...eject lever W "Memory Stick Duo" media slot X Access lamp 11GB M (USB)·A/V OUT terminal (side) N Jack cover O Hook for charging the battery. Otherwise, you cannot firmly secure the camera, and damage to AC Adaptor AC-LS5K (sold separately) will not charge ...button J For shooting: W/T (Zoom) button For viewing: (Playback zoom) button/ (Index) button K Mode switch L DC IN jack • Connecting the camera to the camera may occur. Use a battery charger for wrist strap P For shooting: (Smile) button For viewing: (Delete) button Q Control button Menu on: v/V/b/B/z Menu ...
...eject lever W "Memory Stick Duo" media slot X Access lamp 11GB M (USB)·A/V OUT terminal (side) N Jack cover O Hook for charging the battery. Otherwise, you cannot firmly secure the camera, and damage to AC Adaptor AC-LS5K (sold separately) will not charge ...button J For shooting: W/T (Zoom) button For viewing: (Playback zoom) button/ (Index) button K Mode switch L DC IN jack • Connecting the camera to the camera may occur. Use a battery charger for wrist strap P For shooting: (Smile) button For viewing: (Delete) button Q Control button Menu on: v/V/b/B/z Menu ...

Operating Instructions
Page 34
...enjoy optimum movie image quality. Printing still images If you have a PictBridge compliant printer, you can print images by the following procedure. Connecting to other devices Viewing images on a TV 1 Connect the camera to the TV with the dedicated USB cable (supplied). 2 Turn on the camera and the printer. Try switching the... a PAL-only TV. First, set to [NTSC] mode at the factory to [PAL] (page 44). After the connection is set the camera to enable USB connection between the camera and the printer. 1 Connect the camera to the printer with the dedicated A/V cable (supplied).
...enjoy optimum movie image quality. Printing still images If you have a PictBridge compliant printer, you can print images by the following procedure. Connecting to other devices Viewing images on a TV 1 Connect the camera to the TV with the dedicated USB cable (supplied). 2 Turn on the camera and the printer. Try switching the... a PAL-only TV. First, set to [NTSC] mode at the factory to [PAL] (page 44). After the connection is set the camera to enable USB connection between the camera and the printer. 1 Connect the camera to the printer with the dedicated A/V cable (supplied).
Operating Instructions
Page 35
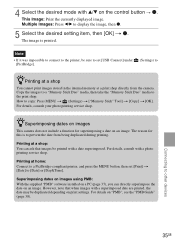
...at a shop: You can directly superimpose the date on "PMB", see the "PMB Guide" (page 38). zSuperimposing dates on images This camera does not include a function for this is printed. The reason for superimposing a date on print settings. Multiple Images: Press b/B to other... devices 35GB Printing at home: Connect to a PictBridge-compliant printer, and press the MENU button, then set [USB Connect] under [PictBridge]. (Settings) to [Date] or [Day&Time]. Connecting to display the image, then z. 5 Select the desired setting item, then...
...at a shop: You can directly superimpose the date on "PMB", see the "PMB Guide" (page 38). zSuperimposing dates on images This camera does not include a function for this is printed. The reason for superimposing a date on print settings. Multiple Images: Press b/B to other... devices 35GB Printing at home: Connect to a PictBridge-compliant printer, and press the MENU button, then set [USB Connect] under [PictBridge]. (Settings) to [Date] or [Day&Time]. Connecting to display the image, then z. 5 Select the desired setting item, then...

Operating Instructions
Page 38
...icon on the desktop. • To access the "PMB Guide" from the camera while the camera is displayed on the screen of the camera. 2 To the (USB)·A/V OUT terminal 1 To a USB jack Dedicated USB cable • is operating or while "Accessing..." When the indicator changes to...[Import] button. Using the AC Adaptor (sold separately) is displayed. Notes • Do not disconnect the dedicated USB cable from the start using a battery with little remaining charge, you can start menu: Click [Start] t [All Programs] t [Sony Picture Utility] t [Help] t [PMB Guide]. "Connecting..."
...icon on the desktop. • To access the "PMB Guide" from the camera while the camera is displayed on the screen of the camera. 2 To the (USB)·A/V OUT terminal 1 To a USB jack Dedicated USB cable • is operating or while "Accessing..." When the indicator changes to...[Import] button. Using the AC Adaptor (sold separately) is displayed. Notes • Do not disconnect the dedicated USB cable from the start using a battery with little remaining charge, you can start menu: Click [Start] t [All Programs] t [Sony Picture Utility] t [Help] t [PMB Guide]. "Connecting..."

Operating Instructions
Page 39
Recommended environment for a computer connected to the camera. x Using the camera with your Macintosh computer. Recommended computer environment The following environment is not compatible. However, "PMB" is recommended for importing images OS (pre-installed): Mac OS 9.1/9.2/ Mac OS X (v10.1 to v10.5) USB jack: Provided as standard 39GB Connecting to your Macintosh computer You can copy images to other devices
Recommended environment for a computer connected to the camera. x Using the camera with your Macintosh computer. Recommended computer environment The following environment is not compatible. However, "PMB" is recommended for importing images OS (pre-installed): Mac OS 9.1/9.2/ Mac OS X (v10.1 to v10.5) USB jack: Provided as standard 39GB Connecting to your Macintosh computer You can copy images to other devices
Operating Instructions
Page 44
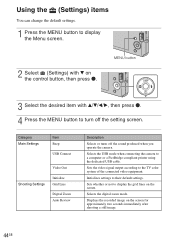
Sets whether or not to their default settings. Selects the digital zoom mode. Initializes settings to display the grid lines on the screen. Displays the recorded image on the control button, then press z. Using the (Settings)... turn off the sound produced when you operate the camera. MENU button 3 Select the desired item with V on the screen for approximately two seconds immediately after shooting a still image. 44GB Category Main Settings Item Beep USB Connect Video Out Shooting Settings Initialize Grid Line Digital Zoom Auto Review Description Selects or turns off the...
Sets whether or not to their default settings. Selects the digital zoom mode. Initializes settings to display the grid lines on the screen. Displays the recorded image on the control button, then press z. Using the (Settings)... turn off the sound produced when you operate the camera. MENU button 3 Select the desired item with V on the screen for approximately two seconds immediately after shooting a still image. 44GB Category Main Settings Item Beep USB Connect Video Out Shooting Settings Initialize Grid Line Digital Zoom Auto Review Description Selects or turns off the...
Operating Instructions
Page 51
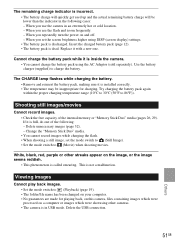
...battery pack is in USB mode. Cannot charge the battery pack while it with a new one of the internal memory or "Memory Stick Duo" media (pages 26, 29). Shooting still images/movies Cannot ...and zoom frequently. - When you repeatedly turn the power on a computer or images which were shot using the AC Adaptor (sold separately). Try charging the battery pack again within the proper charging...get used up and the actual remaining battery charge will be inappropriate for playing back, on this camera, files containing images which were processed on and off. - If it is called smearing. Delete...
...battery pack is in USB mode. Cannot charge the battery pack while it with a new one of the internal memory or "Memory Stick Duo" media (pages 26, 29). Shooting still images/movies Cannot ...and zoom frequently. - When you repeatedly turn the power on a computer or images which were shot using the AC Adaptor (sold separately). Try charging the battery pack again within the proper charging...get used up and the actual remaining battery charge will be inappropriate for playing back, on this camera, files containing images which were processed on and off. - If it is called smearing. Delete...
Operating Instructions
Page 53
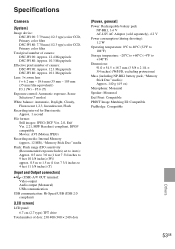
... +60°C (-4°F to 4 feet 11 1/8 inches) (T) [Input and Output connectors] (USB)·A/V OUT terminal: Video output Audio output (Monaural) USB communication USB communication: Hi-Speed USB (USB 2.0 compliant) [LCD screen] LCD panel: 6.7 cm (2.7 type) TFT drive Total number of camera: DSC-W190: Approx. 12.1 Megapixels DSC-W180: Approx. 10.1 Megapixels Lens: 3× zoom lens f = 6.2 mm - 18.6 mm (35...
... +60°C (-4°F to 4 feet 11 1/8 inches) (T) [Input and Output connectors] (USB)·A/V OUT terminal: Video output Audio output (Monaural) USB communication USB communication: Hi-Speed USB (USB 2.0 compliant) [LCD screen] LCD panel: 6.7 cm (2.7 type) TFT drive Total number of camera: DSC-W190: Approx. 12.1 Megapixels DSC-W180: Approx. 10.1 Megapixels Lens: 3× zoom lens f = 6.2 mm - 18.6 mm (35...

Cyber-shot® Handbook
Page 11
... button Categories Main Settings Shooting Settings Internal Memory Tool "Memory Stick" Tool Clock Settings Language Setting Items Beep USB Connect Video Out Initialize Grid Line Digital Zoom Auto Review Format Format Create REC.Folder Change REC.Folder Copy Clock Settings Language Setting Note • ...["Memory Stick" Tool] appears only when a "Memory Stick Duo" media is inserted in the camera, while [Internal Memory Tool] appears ...
... button Categories Main Settings Shooting Settings Internal Memory Tool "Memory Stick" Tool Clock Settings Language Setting Items Beep USB Connect Video Out Initialize Grid Line Digital Zoom Auto Review Format Format Create REC.Folder Change REC.Folder Copy Clock Settings Language Setting Note • ...["Memory Stick" Tool] appears only when a "Memory Stick Duo" media is inserted in the camera, while [Internal Memory Tool] appears ...
Cyber-shot® Handbook
Page 12
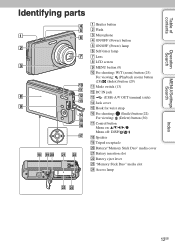
... G Lens H LCD screen I MENU button (9) J For shooting: W/T (zoom) button (23) For viewing: (Playback zoom) button (28)/ (Index) button (29) K Mode switch (13) L DC IN jack M (USB)·A/V OUT terminal (side) N Jack cover O Hook for wrist strap P For shooting: (Smile) button (22) For viewing: (Delete) button (30) Q Control button Menu on: v/V/b/B/z Menu...
... G Lens H LCD screen I MENU button (9) J For shooting: W/T (zoom) button (23) For viewing: (Playback zoom) button (28)/ (Index) button (29) K Mode switch (13) L DC IN jack M (USB)·A/V OUT terminal (side) N Jack cover O Hook for wrist strap P For shooting: (Smile) button (22) For viewing: (Delete) button (30) Q Control button Menu on: v/V/b/B/z Menu...
Cyber-shot® Handbook
Page 16
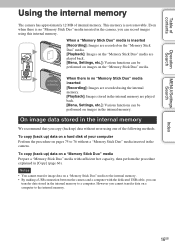
... the internal memory. • By making a USB connection between the camera and a computer with sufficient free capacity, then perform the procedure explained in the camera. Table of contents Operation Search MENU/Settings Search Using the internal memory The camera has approximately 12 MB of the following methods....the "Memory Stick Duo" media. Index 16GB When a "Memory Stick Duo" media is no "Memory Stick Duo" media inserted in the camera, you cannot transfer data on a computer to a computer. On image data stored in the internal memory We recommend that you can be ...
... the internal memory. • By making a USB connection between the camera and a computer with sufficient free capacity, then perform the procedure explained in the camera. Table of contents Operation Search MENU/Settings Search Using the internal memory The camera has approximately 12 MB of the following methods....the "Memory Stick Duo" media. Index 16GB When a "Memory Stick Duo" media is no "Memory Stick Duo" media inserted in the camera, you cannot transfer data on a computer to a computer. On image data stored in the internal memory We recommend that you can be ...
Cyber-shot® Handbook
Page 57
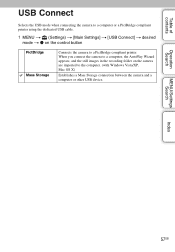
... or a PictBridge compliant printer using the dedicated USB cable. 1 MENU t (Settings) t [Main Settings] t [USB Connect] t desired mode t z on the camera are imported to a PictBridge compliant printer. Operation Search MENU/Settings Search Index 57GB When you connect the camera to a computer, the AutoPlay Wizard appears, and the still images in the recording folder on the control...
... or a PictBridge compliant printer using the dedicated USB cable. 1 MENU t (Settings) t [Main Settings] t [USB Connect] t desired mode t z on the camera are imported to a PictBridge compliant printer. Operation Search MENU/Settings Search Index 57GB When you connect the camera to a computer, the AutoPlay Wizard appears, and the still images in the recording folder on the control...

Cyber-shot® Handbook
Page 69
...8226; When using the camera abroad, it may be displayed on the TV when the movie is connected to the TV with the dedicated A/V cable (supplied). Index 69GB VIDEO AUDIO 1 To audio/video input jacks Yellow (Playback) White Dedicated A/V cable (supplied) 2 To the (USB)·A/V OUT terminal 3...the video signal output to (Playback), then turn on the camera. The connection varies according to the type of TV the camera is shot under the condition of the camera and TV connected. Viewing images by connecting the camera to the operating instructions supplied with the TV. Table of...
...8226; When using the camera abroad, it may be displayed on the TV when the movie is connected to the TV with the dedicated A/V cable (supplied). Index 69GB VIDEO AUDIO 1 To audio/video input jacks Yellow (Playback) White Dedicated A/V cable (supplied) 2 To the (USB)·A/V OUT terminal 3...the video signal output to (Playback), then turn on the camera. The connection varies according to the type of TV the camera is shot under the condition of the camera and TV connected. Viewing images by connecting the camera to the operating instructions supplied with the TV. Table of...
Cyber-shot® Handbook
Page 72
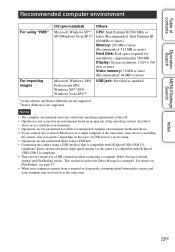
... 64-bit editions and Starter (Edition) are not supported. *2 Starter (Edition) is compatible with Hi-Speed USB (USB 2.0 compliant) allows advanced transfer (high speed transfer) as the camera is not supported. Notes • The computer environment must also satisfy the operating requirements of the OS. •...; Operation is not assured in an environment based on the types of USB devices you are using. • Operations are not guaranteed when using a USB hub. • Connecting the camera using "PMB" For importing images OS (pre-installed) Others Microsoft Windows XP*1 SP3...
... 64-bit editions and Starter (Edition) are not supported. *2 Starter (Edition) is compatible with Hi-Speed USB (USB 2.0 compliant) allows advanced transfer (high speed transfer) as the camera is not supported. Notes • The computer environment must also satisfy the operating requirements of the OS. •...; Operation is not assured in an environment based on the types of USB devices you are using. • Operations are not guaranteed when using a USB hub. • Connecting the camera using "PMB" For importing images OS (pre-installed) Others Microsoft Windows XP*1 SP3...

Cyber-shot® Handbook
Page 75
...soon. • is displayed on the screen during the communication session. Table of the camera. • When a USB connection is established for a while. 2To the (USB)·A/V OUT terminal 1To a USB jack Dedicated USB cable Notes • When you can start using a battery pack with the AC ...Adaptor (sold separately). 3 Turn on the camera and the computer. 4 Connect the camera to your computer For details on the ...
...soon. • is displayed on the screen during the communication session. Table of the camera. • When a USB connection is established for a while. 2To the (USB)·A/V OUT terminal 1To a USB jack Dedicated USB cable Notes • When you can start using a battery pack with the AC ...Adaptor (sold separately). 3 Turn on the camera and the computer. 4 Connect the camera to your computer For details on the ...
Cyber-shot® Handbook
Page 76
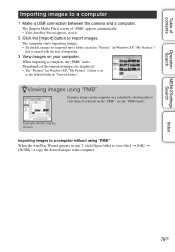
... appears, close it. 2 Click the [Import] button to import images. Thumbnails of contents Operation Search MENU/Settings Search Index Importing images to a computer 1 Make a USB connection between the camera and a computer. zViewing images using "PMB" When the AutoPlay Wizard appears in step 1, click [Open folder to view files] t [OK] t [DCIM] t copy the...
... appears, close it. 2 Click the [Import] button to import images. Thumbnails of contents Operation Search MENU/Settings Search Index Importing images to a computer 1 Make a USB connection between the camera and a computer. zViewing images using "PMB" When the AutoPlay Wizard appears in step 1, click [Open folder to view files] t [OK] t [DCIM] t copy the...
Cyber-shot® Handbook
Page 77
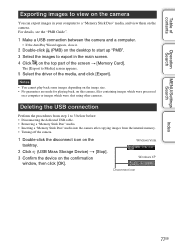
... can export images in the main screen. 4 Click on a computer or images which were shot using other cameras. For details, see the "PMB Guide". 1 Make a USB connection between the camera and a computer. • If the AutoPlay Wizard appears, close it. 2 Double-click (PMB) on the desktop to start ...]. The [Export to export in your computer to 3 below before: • Disconnecting the dedicated USB cable. • Removing a "Memory Stick Duo" media. • Inserting a "Memory Stick Duo" media into the camera after copying images from step 1 to a "Memory Stick Duo" media, and view them on ...
... can export images in the main screen. 4 Click on a computer or images which were shot using other cameras. For details, see the "PMB Guide". 1 Make a USB connection between the camera and a computer. • If the AutoPlay Wizard appears, close it. 2 Double-click (PMB) on the desktop to start ...]. The [Export to export in your computer to 3 below before: • Disconnecting the dedicated USB cable. • Removing a "Memory Stick Duo" media. • Inserting a "Memory Stick Duo" media into the camera after copying images from step 1 to a "Memory Stick Duo" media, and view them on ...
Cyber-shot® Handbook
Page 79
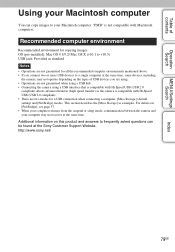
...page 57. • When your computer resumes from the suspend or sleep mode, communication between the camera and your Macintosh computer. http://www.sony.net/ 79GB Recommended computer environment Recommended environment for copying images OS (pre-installed): Mac OS 9.1/9.2/ ...USB devices you connect two or more USB devices to a single computer at the Sony Customer Support Website. "PMB" is not compatible with Hi-Speed USB (USB 2.0 compliant). • There are not guaranteed when using a USB hub. • Connecting the camera using a USB interface that is compatible with Hi-Speed USB (USB...
...page 57. • When your computer resumes from the suspend or sleep mode, communication between the camera and your Macintosh computer. http://www.sony.net/ 79GB Recommended computer environment Recommended environment for copying images OS (pre-installed): Mac OS 9.1/9.2/ ...USB devices you connect two or more USB devices to a single computer at the Sony Customer Support Website. "PMB" is not compatible with Hi-Speed USB (USB 2.0 compliant). • There are not guaranteed when using a USB hub. • Connecting the camera using a USB interface that is compatible with Hi-Speed USB (USB...


