Operating Instructions
Page 7
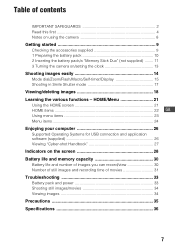
...accessories supplied 9 1 Preparing the battery pack 10 2 Inserting the battery pack/a "Memory Stick Duo" (not supplied) ........ 11 3 Turning the camera on the screen 28 Battery life and memory capacity 30 Battery life and number of images you can record/view 30 Number of still images ...Using menu items 23 Menu items 24 Enjoying your computer 26 Supported Operating Systems for USB connection and application software (supplied 26 Viewing "Cyber-shot Handbook 27 Indicators on /setting the clock 13 Shooting images easily 14 Mode dial/Zoom/Flash/Macro/Self-timer/Display 15 Shooting in ...
...accessories supplied 9 1 Preparing the battery pack 10 2 Inserting the battery pack/a "Memory Stick Duo" (not supplied) ........ 11 3 Turning the camera on the screen 28 Battery life and memory capacity 30 Battery life and number of images you can record/view 30 Number of still images ...Using menu items 23 Menu items 24 Enjoying your computer 26 Supported Operating Systems for USB connection and application software (supplied 26 Viewing "Cyber-shot Handbook 27 Indicators on /setting the clock 13 Shooting images easily 14 Mode dial/Zoom/Flash/Macro/Self-timer/Display 15 Shooting in ...
Operating Instructions
Page 8
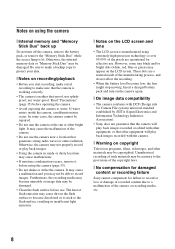
...materials may appear on using extremely high-precision technology so over 99.99% of the pixels are a normal result of the camera or recording media, etc. 8 Furthermore, the recording media may become discolored or to stick to record images. These dots... for damaged content or recording failure Sony cannot compensate for Camera File system) universal standard established by JEITA (Japan Electronics and Information Technology Industries Association). • Sony does not guarantee that the camera will play back images recorded with the camera. [ Warning on recording/playback &#...
...materials may appear on using extremely high-precision technology so over 99.99% of the pixels are a normal result of the camera or recording media, etc. 8 Furthermore, the recording media may become discolored or to stick to record images. These dots... for damaged content or recording failure Sony cannot compensate for Camera File system) universal standard established by JEITA (Japan Electronics and Information Technology Industries Association). • Sony does not guarantee that the camera will play back images recorded with the camera. [ Warning on recording/playback &#...
Operating Instructions
Page 9
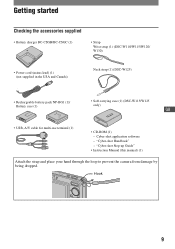
... (1)/ Battery case (1) • Soft carrying case (1) (DSC-W115/W125 only) GB • USB, A/V cable for multi-use terminal (1) • CD-ROM (1) - Hook 9 "Cyber-shot Handbook" - Cyber-shot application software - "Cyber-shot Step-up Guide" • Instruction Manual (this manual) (1) Attach the strap and place your hand through the loop to prevent the camera from damage by being dropped.
... (1)/ Battery case (1) • Soft carrying case (1) (DSC-W115/W125 only) GB • USB, A/V cable for multi-use terminal (1) • CD-ROM (1) - Hook 9 "Cyber-shot Handbook" - Cyber-shot application software - "Cyber-shot Step-up Guide" • Instruction Manual (this manual) (1) Attach the strap and place your hand through the loop to prevent the camera from damage by being dropped.

Operating Instructions
Page 11
... "Memory Stick Duo" (not supplied). 3 Insert the battery pack. 4 Close the battery/"Memory Stick Duo" cover. [ When there is no "Memory Stick Duo" inserted The camera records/plays back images using the internal memory (approx. 15 MB). [ To check the remaining battery charge Press POWER to turn on the...
... "Memory Stick Duo" (not supplied). 3 Insert the battery pack. 4 Close the battery/"Memory Stick Duo" cover. [ When there is no "Memory Stick Duo" inserted The camera records/plays back images using the internal memory (approx. 15 MB). [ To check the remaining battery charge Press POWER to turn on the...

Operating Instructions
Page 13
...power is turned on • Once the battery pack is inserted in the camera, it may take time before operation becomes possible. • If the camera is running on battery power and you do not operate the camera for superimposing dates on /setting the clock POWER button HOME button 1 2... z button 3 ɟ Control button 1 Press POWER. 2 Set the clock with v/V, then press z. 3 Select [OK], then press z. • The camera does not have a feature for about three minutes, the camera turns off automatically to prevent wearing down the battery pack (Auto power-off function). 13
...power is turned on • Once the battery pack is inserted in the camera, it may take time before operation becomes possible. • If the camera is running on battery power and you do not operate the camera for superimposing dates on /setting the clock POWER button HOME button 1 2... z button 3 ɟ Control button 1 Press POWER. 2 Set the clock with v/V, then press z. 3 Select [OK], then press z. • The camera does not have a feature for about three minutes, the camera turns off automatically to prevent wearing down the battery pack (Auto power-off function). 13
Operating Instructions
Page 14
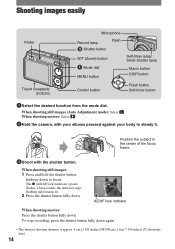
... the desired function from the lens). 14 When shooting still images: 1 Press and hold the shutter button halfway down . When shooting movies: Select . 2Hold the camera, with the shutter button.
... the desired function from the lens). 14 When shooting still images: 1 Press and hold the shutter button halfway down . When shooting movies: Select . 2Hold the camera, with the shutter button.
Operating Instructions
Page 15
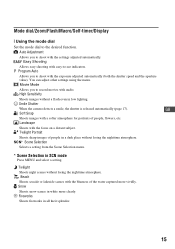
... in low lighting. Movie Mode Allows you to record movies with a softer atmosphere for portraits of the water captured more clearly. Smile Shutter When the camera detects a smile, the shutter is released automatically (page 17). GB Soft Snap Shoots images with audio. Twilight Shoots night scenes without losing the nighttime atmosphere...
... in low lighting. Movie Mode Allows you to record movies with a softer atmosphere for portraits of the water captured more clearly. Smile Shutter When the camera detects a smile, the shutter is released automatically (page 17). GB Soft Snap Shoots images with audio. Twilight Shoots night scenes without losing the nighttime atmosphere...
Operating Instructions
Page 16
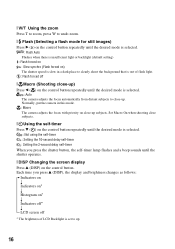
... a dark place to clearly shoot the background that is out of flash light. : Flash forced off * The brightness of LCD Backlight is selected. : Auto The camera adjusts the focus automatically from distant subjects to up. 16 Each time you press the shutter button, the self-timer lamp flashes and a beep sounds... is insufficient light or backlight (default setting) : Flash forced on : Slow synchro (Flash forced on) The shutter speed is slow in this mode. : Macro The camera adjusts the focus with priority on the control button.
... a dark place to clearly shoot the background that is out of flash light. : Flash forced off * The brightness of LCD Backlight is selected. : Auto The camera adjusts the focus automatically from distant subjects to up. 16 Each time you press the shutter button, the self-timer lamp flashes and a beep sounds... is insufficient light or backlight (default setting) : Flash forced on : Slow synchro (Flash forced on) The shutter speed is slow in this mode. : Macro The camera adjusts the focus with priority on the control button.
Operating Instructions
Page 17
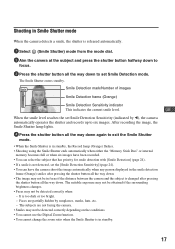
...shutter button all the way down. • The image may not be detected correctly depending on the conditions. • You cannot use the Digital Zoom function. • You cannot change the zoom ratio when the Smile Shutter is in standby. 17 The subjects are partially hidden by b), ... [Smile Detection] (page 24). • If a smile is not detected, set the [Smile Detection Sensitivity] (page 24). • You can have the camera shoot the image automatically when any person displayed in the smile detection frame (Orange) smiles after pressing the shutter button all the way down. It...
...shutter button all the way down. • The image may not be detected correctly depending on the conditions. • You cannot use the Digital Zoom function. • You cannot change the zoom ratio when the Smile Shutter is in standby. 17 The subjects are partially hidden by b), ... [Smile Detection] (page 24). • If a smile is not detected, set the [Smile Detection Sensitivity] (page 24). • You can have the camera shoot the image automatically when any person displayed in the smile detection frame (Orange) smiles after pressing the shutter button all the way down. It...
Operating Instructions
Page 18
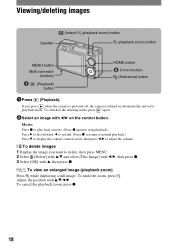
....) Press V to display the volume control screen, then press b/B to adjust the volume. [ To delete images 1 Display the image you press when the camera is powered off, the camera is turned on the control button. To undo the zoom, press . To cancel the playback zoom, press z. 18 Viewing/deleting images Speaker (Index...
....) Press V to display the volume control screen, then press b/B to adjust the volume. [ To delete images 1 Display the image you press when the camera is powered off, the camera is turned on the control button. To undo the zoom, press . To cancel the playback zoom, press z. 18 Viewing/deleting images Speaker (Index...
Operating Instructions
Page 19
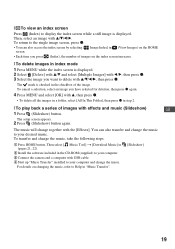
... z in step 2. [ To play back a series of images on changing the music, refer to Help in the CD-ROM (supplied) to your computer. 3 Connect the camera and a computer with USB cable. 4 Start up "Music Transfer" installed to the single image screen, press z. • You can also transfer and change the music...
... z in step 2. [ To play back a series of images on changing the music, refer to Help in the CD-ROM (supplied) to your computer. 3 Connect the camera and a computer with USB cable. 4 Start up "Music Transfer" installed to the single image screen, press z. • You can also transfer and change the music...
Operating Instructions
Page 20
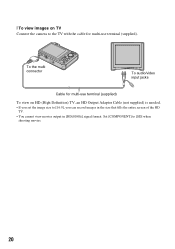
[ To view images on HD (High Definition) TV, an HD Output Adaptor Cable (not supplied) is needed. • If you can record images in the size that fills the entire screen of the HD TV. • You cannot view movies output in [HD(1080i)] signal format. To the multi connector To audio/video input jacks Cable for multi-use terminal (supplied) To view on TV Connect the camera to the TV with the cable for multi-use terminal (supplied). Set [COMPONENT] to [16:9], you set the image size to [SD] when shooting movies. 20
[ To view images on HD (High Definition) TV, an HD Output Adaptor Cable (not supplied) is needed. • If you can record images in the size that fills the entire screen of the HD TV. • You cannot view movies output in [HD(1080i)] signal format. To the multi connector To audio/video input jacks Cable for multi-use terminal (supplied) To view on TV Connect the camera to the TV with the cable for multi-use terminal (supplied). Set [COMPONENT] to [16:9], you set the image size to [SD] when shooting movies. 20
Operating Instructions
Page 21
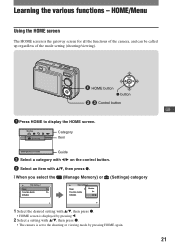
... - HOME button z button ɟ ɠ Control button GB 1 Press HOME to the shooting or viewing mode by pressing b. 2 Select a setting with v/V, then press z. • The camera is the gateway screen for all the functions of the camera, and can be called up regardless of the mode setting (shooting/viewing).
... - HOME button z button ɟ ɠ Control button GB 1 Press HOME to the shooting or viewing mode by pressing b. 2 Select a setting with v/V, then press z. • The camera is the gateway screen for all the functions of the camera, and can be called up regardless of the mode setting (shooting/viewing).
Operating Instructions
Page 26
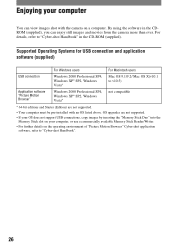
... a commercially available Memory Stick Reader/Writer. • For further details on the operating environment of "Picture Motion Browser" Cyber-shot application software, refer to "Cyber-shot Handbook". 26 OS upgrades are not supported. • Your computer must be pre-installed with the camera on your computer You can enjoy still images and movies from the...
... a commercially available Memory Stick Reader/Writer. • For further details on the operating environment of "Picture Motion Browser" Cyber-shot application software, refer to "Cyber-shot Handbook". 26 OS upgrades are not supported. • Your computer must be pre-installed with the camera on your computer You can enjoy still images and movies from the...

Operating Instructions
Page 27
... in the [GB] folder to copy. • When you click the [Cyber-shot Handbook] button, the screen for copying "Cyber-shot Handbook" appears. 2 Follow the on your computer, and insert the CD- Viewing "Cyber-shot Handbook" "Cyber-shot Handbook" in the CD-ROM (supplied) explains how to view it. [ ...For Windows users 1 Turn on the desktop. 27 Adobe Reader is complete, double-click "Handbook.pdf". click the shortcut created on your computer. 3 After copying is required to use the camera ...
... in the [GB] folder to copy. • When you click the [Cyber-shot Handbook] button, the screen for copying "Cyber-shot Handbook" appears. 2 Follow the on your computer, and insert the CD- Viewing "Cyber-shot Handbook" "Cyber-shot Handbook" in the CD-ROM (supplied) explains how to view it. [ ...For Windows users 1 Turn on the desktop. 27 Adobe Reader is complete, double-click "Handbook.pdf". click the shortcut created on your computer. 3 After copying is required to use the camera ...
Operating Instructions
Page 30
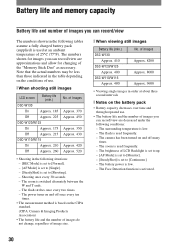
.... 370 Approx. 450 Approx. 350 Approx. 430 Approx. 420 Approx. 520 • Shooting in the table depending on the CIPA standard. (CIPA: Camera & Imaging Products Association) • The battery life and the number of images do not change, regardless of use . • The battery life and...in the following conditions: - The zoom is based on the conditions of image size. [ When viewing still images Battery life (min.) DSC-W130 Approx. 410 DSC-W120/W125 Approx. 400 DSC-W110/W115 Approx. 480 No. The zoom is low. - The battery power is switched alternately between the W and T ends. -...
.... 370 Approx. 450 Approx. 350 Approx. 430 Approx. 420 Approx. 520 • Shooting in the table depending on the CIPA standard. (CIPA: Camera & Imaging Products Association) • The battery life and the number of images do not change, regardless of use . • The battery life and...in the following conditions: - The zoom is based on the conditions of image size. [ When viewing still images Battery life (min.) DSC-W130 Approx. 410 DSC-W120/W125 Approx. 400 DSC-W110/W115 Approx. 480 No. The zoom is low. - The battery power is switched alternately between the W and T ends. -...
Operating Instructions
Page 31
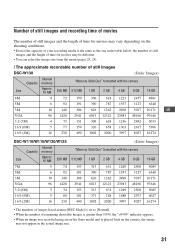
...from the menu (pages 23, 24). [ The approximate recordable number of still images DSC-W130 (Units: Images) Internal Capacity memory "Memory Stick Duo" formatted with the camera Size Approx. 15 MB 256 MB 512 MB 1 GB 2 GB 4 GB 8 ...74 16:9 (5M) 5 88 16:9 (2M) 16 238 (Units: Images) "Memory Stick Duo" formatted with the camera 512 MB 153 191 306 2941 153 181 490 1 GB 313 390 626 6013 313 371 1002 2 GB 631 787 ... indicator appears. • When an image was recorded using an earlier Sony model and is played back on the camera, the image may not appear in the actual image size. 31
...from the menu (pages 23, 24). [ The approximate recordable number of still images DSC-W130 (Units: Images) Internal Capacity memory "Memory Stick Duo" formatted with the camera Size Approx. 15 MB 256 MB 512 MB 1 GB 2 GB 4 GB 8 ...74 16:9 (5M) 5 88 16:9 (2M) 16 238 (Units: Images) "Memory Stick Duo" formatted with the camera 512 MB 153 191 306 2941 153 181 490 1 GB 313 390 626 6013 313 371 1002 2 GB 631 787 ... indicator appears. • When an image was recorded using an earlier Sony model and is played back on the camera, the image may not appear in the actual image size. 31

Operating Instructions
Page 32
... recordable time of time you can shoot continuously is about 10 minutes. (Units: hour : minute : second) Internal Capacity memory "Memory Stick Duo" formatted with the camera Size Approx. 15 MB 256 MB 512 MB 1 GB 2 GB 4 GB 8 GB 16 GB 640(Fine) - 0:02:50 0:06:00 0:12:30 0:25:10 0:49...:04:50 48:49:20 • Movies with the size set to [640(Fine)] can only be recorded on a "Memory Stick PRO Duo". • The camera does not support HD recordings or playbacks for movies. 32
... recordable time of time you can shoot continuously is about 10 minutes. (Units: hour : minute : second) Internal Capacity memory "Memory Stick Duo" formatted with the camera Size Approx. 15 MB 256 MB 512 MB 1 GB 2 GB 4 GB 8 GB 16 GB 640(Fine) - 0:02:50 0:06:00 0:12:30 0:25:10 0:49...:04:50 48:49:20 • Movies with the size set to [640(Fine)] can only be recorded on a "Memory Stick PRO Duo". • The camera does not support HD recordings or playbacks for movies. 32

Operating Instructions
Page 33
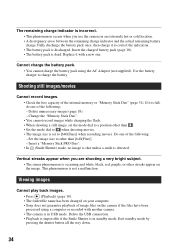
...Sony dealer or local authorized Sony service facility. Turn on , the camera turns off suddenly. • If you do not operate the camera for about three minutes while the power is on the camera again (page 13). • The battery pack is dead. The power turns off automatically to "Cyber-shot... Handbook". 2 Remove the battery pack, wait for about one . 33 Replace it may be checked. Troubleshooting If you experience trouble with the camera, try the following solutions. 1 Check the items below, and ...
...Sony dealer or local authorized Sony service facility. Turn on , the camera turns off suddenly. • If you do not operate the camera for about three minutes while the power is on the camera again (page 13). • The battery pack is dead. The power turns off automatically to "Cyber-shot... Handbook". 2 Remove the battery pack, wait for about one . 33 Replace it may be checked. Troubleshooting If you experience trouble with the camera, try the following solutions. 1 Check the items below, and ...
Operating Instructions
Page 34
... (Playback) (page 18). • The folder/file name has been changed on your computer. • Sony does not guarantee playback of the following : - Replace it with another camera. • The camera is in USB mode. Shooting still images/movies Cannot record images. • Check the free capacity of the... shutter button all the way down. 34 Do one . Insert a "Memory Stick PRO Duo". • In (Smile Shutter) mode, no image is shot unless a smile is dead. Delete the USB connection. • Playback is impossible if the Smile Shutter is not a malfunction. Delete unnecessary images (page 18...
... (Playback) (page 18). • The folder/file name has been changed on your computer. • Sony does not guarantee playback of the following : - Replace it with another camera. • The camera is in USB mode. Shooting still images/movies Cannot record images. • Check the free capacity of the... shutter button all the way down. 34 Do one . Insert a "Memory Stick PRO Duo". • In (Smile Shutter) mode, no image is shot unless a smile is dead. Delete the USB connection. • Playback is impossible if the Smile Shutter is not a malfunction. Delete unnecessary images (page 18...


