Operating Instructions
Page 85
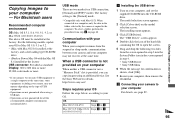
... USB) compatible computer environment allows highspeed data transfer. • If you need not install the USB driver. When connected to a computer, only the data in the folder selected by the camera is not assured in an environment upgraded to your OS. • Close down all the recommended computer... describes the Windows Me screen as an example. USB mode There are two modes for details. See the Sony Website for a USB connection, [Normal] and [PTP]* modes. http://www.sony.net/ Contents of USB equipment. • Operations are not guaranteed when using Windows XP or Windows 2000,...
... USB) compatible computer environment allows highspeed data transfer. • If you need not install the USB driver. When connected to a computer, only the data in the folder selected by the camera is not assured in an environment upgraded to your OS. • Close down all the recommended computer... describes the Windows Me screen as an example. USB mode There are two modes for details. See the Sony Website for a USB connection, [Normal] and [PTP]* modes. http://www.sony.net/ Contents of USB equipment. • Operations are not guaranteed when using Windows XP or Windows 2000,...
Operating Instructions
Page 86
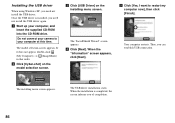
..." screen appears. d Click [Next]. Then, you need not install the USB driver again. Do not connect your camera to restart my computer now], then click [Finish]. b Click [Cyber-shot] on the installing menu screen. c Click [USB Driver] on the model selection screen. The USB driver installation starts. If it does not appear, double-click (My Computer...
..." screen appears. d Click [Next]. Then, you need not install the USB driver again. Do not connect your camera to restart my computer now], then click [Finish]. b Click [Cyber-shot] on the installing menu screen. c Click [USB Driver] on the model selection screen. The USB driver installation starts. If it does not appear, double-click (My Computer...

Operating Instructions
Page 88
...details, see the software's help files. Follow the procedure on the installing menu screen. d Remove the CD-ROM. 88 If the necessary driver is not already installed on the screen. Install "ImageMixer" according to the screen. • When you wish to the screen. g ...[ImageMixer] on the screen. b Follow instructions on the installing menu screen and then follow the procedure. • The USB driver is not installed in order to use the "ImageMixer Ver. 1.5 for Sony" software to the InstallShield Wizard" screen appears. • This section describes the English screen.
...details, see the software's help files. Follow the procedure on the installing menu screen. d Remove the CD-ROM. 88 If the necessary driver is not already installed on the screen. Install "ImageMixer" according to the screen. • When you wish to the screen. g ...[ImageMixer] on the screen. b Follow instructions on the installing menu screen and then follow the procedure. • The USB driver is not installed in order to use the "ImageMixer Ver. 1.5 for Sony" software to the InstallShield Wizard" screen appears. • This section describes the English screen.

Operating Instructions
Page 91
...following column. • When using Windows XP, see the following procedure. Try the USB driver installation again using Windows 2000, click [Hardware] on the tasktray, select [Open Settings]. .... • When using the supplied CD-ROM (page 86). 91 Enjoying images on your camera appear. • This section describes an example of the devices above, follow the steps below... [DCIM], then double-click the folder which an image with the new one, the original one is a " Sony DSC" with a mark under [ Other Devices]. 3 If you can change the [Basic] setting. The "Confirm Device...
...following column. • When using Windows XP, see the following procedure. Try the USB driver installation again using Windows 2000, click [Hardware] on the tasktray, select [Open Settings]. .... • When using the supplied CD-ROM (page 86). 91 Enjoying images on your camera appear. • This section describes an example of the devices above, follow the steps below... [DCIM], then double-click the folder which an image with the new one, the original one is a " Sony DSC" with a mark under [ Other Devices]. 3 If you can change the [Basic] setting. The "Confirm Device...
Operating Instructions
Page 95
...from the suspend or sleep mode, communication between your camera and your computer - OS Mac OS 8.5.1/8.6/9.0 Mac OS 9.1/9.2/Mac OS X (v10.0/v10.1/v10.2) Steps Steps 1 to 4 Steps 2 to a computer, only the data in step 4. • Sony USB Driver • Sony USB Shim 6 When the message for all the ... installed at the factory. The model selection screen appears. 2 Click [Cyber-shot] on your computer, and set the supplied CD-ROM into the System Folder icon in the screen opened in the folder selected by the camera is provided, you connect two or more USB equipment to a single ...
...from the suspend or sleep mode, communication between your camera and your computer - OS Mac OS 8.5.1/8.6/9.0 Mac OS 9.1/9.2/Mac OS X (v10.0/v10.1/v10.2) Steps Steps 1 to 4 Steps 2 to a computer, only the data in step 4. • Sony USB Driver • Sony USB Shim 6 When the message for all the ... installed at the factory. The model selection screen appears. 2 Click [Cyber-shot] on your computer, and set the supplied CD-ROM into the System Folder icon in the screen opened in the folder selected by the camera is provided, you connect two or more USB equipment to a single ...
Operating Instructions
Page 96
..." cannot be used with Macintosh. The screen display may differ depending on the computer before installing the USB driver and application. • You can use the "ImageMixer Ver. 1.5 for Sony" software to your hard disk. • See pages 93 and 94 for details about the installation method,...to [All Applications]. 3 Select [QuickTime Player] from your computer 1 Double-click the hard disk icon. 2 Double-click the desired image file in your camera appear. 2 Double-click "DCIM." 3 Double-click the folder containing the desired image file. 4 Drag and drop the image files to the "Trash" ...
..." cannot be used with Macintosh. The screen display may differ depending on the computer before installing the USB driver and application. • You can use the "ImageMixer Ver. 1.5 for Sony" software to your hard disk. • See pages 93 and 94 for details about the installation method,...to [All Applications]. 3 Select [QuickTime Player] from your computer 1 Double-click the hard disk icon. 2 Double-click the desired image file in your camera appear. 2 Double-click "DCIM." 3 Double-click the folder containing the desired image file. 4 Drag and drop the image files to the "Trash" ...
Operating Instructions
Page 103
... not long enough to your computer without passing through a USB hub or other than your camera from your computer, then install the USB driver (pages 91 and 86). 103 p Install the USB driver (pages 86 and 95). You cannot cut a movie. • The movie (MPEG Movie) is not installed. • Your computer ... 14). p Delete the erroneously recognized device from the USB connectors. You cannot install the USB driver. p Connect the camera directly to - p Use the AC Adaptor (page 13). Symptom Cause Solution You cannot display a print • You cannot display print (DPOF) marks on your ...
... not long enough to your computer without passing through a USB hub or other than your camera from your computer, then install the USB driver (pages 91 and 86). 103 p Install the USB driver (pages 86 and 95). You cannot cut a movie. • The movie (MPEG Movie) is not installed. • Your computer ... 14). p Delete the erroneously recognized device from the USB connectors. You cannot install the USB driver. p Connect the camera directly to - p Use the AC Adaptor (page 13). Symptom Cause Solution You cannot display a print • You cannot display print (DPOF) marks on your ...

Operating Instructions
Page 123
... (mains lead) (1) • USB cable (1) • NP-FC11 battery pack (1) • A/V connecting cable (1) • Hand strap (1) • "Memory Stick" (32 MB) (1) • CD-ROM (USB driver SPVD-010) (1) • Operating instructions (1) Design and specifications are subject to change without notice. Additional information 123
... (mains lead) (1) • USB cable (1) • NP-FC11 battery pack (1) • A/V connecting cable (1) • Hand strap (1) • "Memory Stick" (32 MB) (1) • CD-ROM (USB driver SPVD-010) (1) • Operating instructions (1) Design and specifications are subject to change without notice. Additional information 123

Operating Instructions
Page 130
T TIFF 61, 94 Trimming 70 TV color system 33 U USB 89, 95 USB driver 86, 95 Using your camera abroad 13 V Viewing images on the LCD screen .......... 30, 80 Viewing images on your computer 92 Voice 62 W Warnings and messages 106 White Balance 55 Z Zoom 23 Zoom lever 23, 116 130
T TIFF 61, 94 Trimming 70 TV color system 33 U USB 89, 95 USB driver 86, 95 Using your camera abroad 13 V Viewing images on the LCD screen .......... 30, 80 Viewing images on your computer 92 Voice 62 W Warnings and messages 106 White Balance 55 Z Zoom 23 Zoom lever 23, 116 130


