Operating Instructions
Page 6
... - Scene Selection 28 Setting the distance to scene conditions - For Windows users 47 Installing the USB driver 48 Installing "Image Transfer 49 Installing "ImageMixer 50 Connecting the camera to your computer 51 Copying images using "Image Transfer 52 Changing "Image Transfer" settings...53 Copying images...your computer - Enlarged playback 38 Choosing images to print - Picture Effect 32 Viewing still images Viewing still images on /off your camera 14 How to use the buttons 15 Setting the date and time 15 Shooting still images Inserting and removing a "Memory Stick 17...
... - Scene Selection 28 Setting the distance to scene conditions - For Windows users 47 Installing the USB driver 48 Installing "Image Transfer 49 Installing "ImageMixer 50 Connecting the camera to your computer 51 Copying images using "Image Transfer 52 Changing "Image Transfer" settings...53 Copying images...your computer - Enlarged playback 38 Choosing images to print - Picture Effect 32 Viewing still images Viewing still images on /off your camera 14 How to use the buttons 15 Setting the date and time 15 Shooting still images Inserting and removing a "Memory Stick 17...
Operating Instructions
Page 47
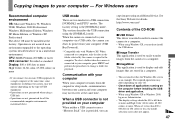
... your computer may not operate depending on the type of the CD-ROM x USB Driver This driver is connected to a single computer at the same time, some equipment, including your camera, may not recover at the factory. Communication with your computer When your computer resumes from your ...be installed at the same time. When the camera is needed in order to connect the camera to change a folder for all applications running on the computer before installing the USB driver and application. • When using an additional device. See the Sony Website for a USB connection, [NORMAL] and...
... your computer may not operate depending on the type of the CD-ROM x USB Driver This driver is connected to a single computer at the same time, some equipment, including your camera, may not recover at the factory. Communication with your computer When your computer resumes from your ...be installed at the same time. When the camera is needed in order to connect the camera to change a folder for all applications running on the computer before installing the USB driver and application. • When using an additional device. See the Sony Website for a USB connection, [NORMAL] and...
Operating Instructions
Page 48
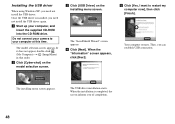
d Click [Next]. Then, you can establish USB connection. When the installation is installed, you need not install the USB driver. Once the USB driver is completed, the screen informs you of completion. 48 Your computer restarts. If it does not appear, double-click (My ...) in that order. When the "Information" screen appears, click [Next]. The USB driver installation starts. Installing the USB driver When using Windows XP, you need not install the USB driver again. Do not connect your camera to restart my computer now], then click [Finish]. b Click [Cyber-shot] on the...
d Click [Next]. Then, you can establish USB connection. When the installation is installed, you need not install the USB driver. Once the USB driver is completed, the screen informs you of completion. 48 Your computer restarts. If it does not appear, double-click (My ...) in that order. When the "Information" screen appears, click [Next]. The USB driver installation starts. Installing the USB driver When using Windows XP, you need not install the USB driver again. Do not connect your camera to restart my computer now], then click [Finish]. b Click [Cyber-shot] on the...

Operating Instructions
Page 50
... that appear on your computer, a screen that appear on the screen. 50 Installing "ImageMixer" You can use the "ImageMixer Ver.1.5 for Sony" software to use Windows 2000 or Windows XP, install "WinASPI". • If DirectX8.0a or a later version is needed in your ...computer according to the instructions that asks if you want to install the driver will appear. d Remove the CD-ROM. g Click [Finish]. The "InstallShield Wizard" screen closes. Install "ImageMixer" according to the InstallShield Wizard" ...
... that appear on your computer, a screen that appear on the screen. 50 Installing "ImageMixer" You can use the "ImageMixer Ver.1.5 for Sony" software to use Windows 2000 or Windows XP, install "WinASPI". • If DirectX8.0a or a later version is needed in your ...computer according to the instructions that asks if you want to install the driver will appear. d Remove the CD-ROM. g Click [Finish]. The "InstallShield Wizard" screen closes. Install "ImageMixer" according to the InstallShield Wizard" ...
Operating Instructions
Page 53
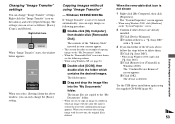
...with the new one, the original file is a " Sony DSC" with a mark. 3 If you can only change "Image Transfer" settings. The "System Properties" screen appears. • When using Windows 2000, click [Hardware] on your camera appear. • This section describes an example of the... "Memory Stick" inserted in which contains the desired images. The folder opens. The "Confirm Device Removal" screen appears. 3 Click [OK]. Try the USB driver installation again using "Image Transfer" -...
...with the new one, the original file is a " Sony DSC" with a mark. 3 If you can only change "Image Transfer" settings. The "System Properties" screen appears. • When using Windows 2000, click [Hardware] on your camera appear. • This section describes an example of the... "Memory Stick" inserted in which contains the desired images. The folder opens. The "Confirm Device Removal" screen appears. 3 Click [OK]. Try the USB driver installation again using "Image Transfer" -...
Operating Instructions
Page 57
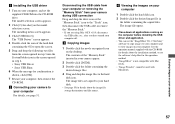
...d Viewing the images on your computer 1 Double-click the hard disk icon. 2 Double-click the desired image file in step 4. • Sony USB Driver • Sony USB Shim 6 When the message for confirmation is not compatible with Mac OS X. • "Image Transfer" cannot be used with the CD...-ROM for details about the image file storage destinations and file names. Enjoying images on your computer 57 b Connecting your camera to your...
...d Viewing the images on your computer 1 Double-click the hard disk icon. 2 Double-click the desired image file in step 4. • Sony USB Driver • Sony USB Shim 6 When the message for confirmation is not compatible with Mac OS X. • "Image Transfer" cannot be used with the CD...-ROM for details about the image file storage destinations and file names. Enjoying images on your computer 57 b Connecting your camera to your...
Operating Instructions
Page 62
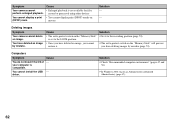
...56). Computers Symptom Cause You do not know if the OS of - is set to the recording position (page 74). Deleting images Symptom Your camera cannot delete an image. You cannot install the USB - your computer is not available for files created or processed using other devices. • You... have deleted an image by mistake (page 74). Cause Solution • The write-protect switch on as Administrator (authorized Administrator) (page 47). 62 driver. Cause • Enlarged playback is compatible. Solution - - Symptom Your camera cannot perform enlarged playback.
...56). Computers Symptom Cause You do not know if the OS of - is set to the recording position (page 74). Deleting images Symptom Your camera cannot delete an image. You cannot install the USB - your computer is not available for files created or processed using other devices. • You... have deleted an image by mistake (page 74). Cause Solution • The write-protect switch on as Administrator (authorized Administrator) (page 47). 62 driver. Cause • Enlarged playback is compatible. Solution - - Symptom Your camera cannot perform enlarged playback.
Operating Instructions
Page 63
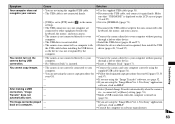
... "ImageMixer Ver.1.5 for Sony" application software, click on HELP. p Insert a "Memory Stick" (page 17). p Follow the designated copy procedure for your computer without passing through a hub or other equipment besides the keyboard, the mouse, and your camera. • The camera is inserted. connection, "Image Transfer" does not - p Install the USB driver (pages 48 and...
... "ImageMixer Ver.1.5 for Sony" application software, click on HELP. p Insert a "Memory Stick" (page 17). p Follow the designated copy procedure for your computer without passing through a hub or other equipment besides the keyboard, the mouse, and your camera. • The camera is inserted. connection, "Image Transfer" does not - p Install the USB driver (pages 48 and...

Operating Instructions
Page 77
...device 6.72 mm (1/2.7 type) color CCD Primary color filter Total pixels number of camera Approx. 2 112 000 pixels Effective pixels number of camera Approx. 2 020 000 pixels Lens Single focal lens f = 5.0 mm (7/32 inches) (35 mm camera conversion: 33 mm (1 5/16 inches)) F2.8 Exposure control Automatic, Scene Selection...; Power cord (mains lead) (1) • USB cable (1) • Neck strap (1) • "Memory Stick" (8MB) (1) • CD-ROM (USB driver SPVD-010) (1) • Operating instructions (1) Design and specifications are subject to change without notice. 77 Additional information
...device 6.72 mm (1/2.7 type) color CCD Primary color filter Total pixels number of camera Approx. 2 112 000 pixels Effective pixels number of camera Approx. 2 020 000 pixels Lens Single focal lens f = 5.0 mm (7/32 inches) (35 mm camera conversion: 33 mm (1 5/16 inches)) F2.8 Exposure control Automatic, Scene Selection...; Power cord (mains lead) (1) • USB cable (1) • Neck strap (1) • "Memory Stick" (8MB) (1) • CD-ROM (USB driver SPVD-010) (1) • Operating instructions (1) Design and specifications are subject to change without notice. 77 Additional information

Operating Instructions
Page 80
...charging time 11 Cleaning 72 Clock set 15 Computer copying images 47, 53, 57 Image Transfer 49 ImageMixer 50 USB cable 51, 52, 57 USB driver 48, 57 Control button 9, 15 Copying images 47, 53, 57 80 Creating a new folder 25 D Deleting images 44 DPOF 39 E Enlarged playback... 55 image file storage destinations 55 image size 18, 19 Image Transfer 49 ImageMixer 50 Index screen 35 Installation Image Transfer 49 ImageMixer 50 USB driver 48, 57 J JPG 55 L LCD screen DISPLAY 22, 78 LCD light 21 M Memory Stick formatting a "Memory Stick 45 inserting/removing a "Memory Stick" ...
...charging time 11 Cleaning 72 Clock set 15 Computer copying images 47, 53, 57 Image Transfer 49 ImageMixer 50 USB cable 51, 52, 57 USB driver 48, 57 Control button 9, 15 Copying images 47, 53, 57 80 Creating a new folder 25 D Deleting images 44 DPOF 39 E Enlarged playback... 55 image file storage destinations 55 image size 18, 19 Image Transfer 49 ImageMixer 50 Index screen 35 Installation Image Transfer 49 ImageMixer 50 USB driver 48, 57 J JPG 55 L LCD screen DISPLAY 22, 78 LCD light 21 M Memory Stick formatting a "Memory Stick 45 inserting/removing a "Memory Stick" ...

Operating Instructions
Page 81
..., 28 RESET button 59, 68 U USB USB Bus Powered 47 USB cable 51, 52, 57 S USB connection 51 SCENE 29 USB driver 48, 57 Scene Selection (SCENE 28 Using your camera abroad 14 Self-diagnosis display 68 Self-timer 22 Setting date and time 15 image size 18 V Viewing images on the...
..., 28 RESET button 59, 68 U USB USB Bus Powered 47 USB cable 51, 52, 57 S USB connection 51 SCENE 29 USB driver 48, 57 Scene Selection (SCENE 28 Using your camera abroad 14 Self-diagnosis display 68 Self-timer 22 Setting date and time 15 image size 18 V Viewing images on the...


