Operating Instructions
Page 1
... space provided below. Model No. Digital Still Camera Operating Instructions Before operating the unit, please read this product. DSC-U30 Serial No. Refer to these numbers whenever you call upon your computer _____ Troubleshooting Additional information Index Owner's Record The model and serial numbers are located on your Sony dealer regarding this manual thoroughly, and...
... space provided below. Model No. Digital Still Camera Operating Instructions Before operating the unit, please read this product. DSC-U30 Serial No. Refer to these numbers whenever you call upon your computer _____ Troubleshooting Additional information Index Owner's Record The model and serial numbers are located on your Sony dealer regarding this manual thoroughly, and...
Operating Instructions
Page 3
...has been tested and found compliant with the limits sets out in Canada THIS CLASS B DIGITAL APPARATUS COMPLIES WITH CANADIAN ICES-003. 3 CAUTION TO PREVENT ELECTRIC SHOCK, MATCH WIDE BLADE... the supplied one and approved by returning your used to BS1362 (i.e., marked with this camera. Please consult with BS1363 is fitted to discontinue midway (fail), restart the application or... recyclable. Should the fuse in the United Kingdom A moulded plug complying with your nearest Sony service station. Certain countries may influence the picture of rechargeable batteries, call toll free 1-800...
...has been tested and found compliant with the limits sets out in Canada THIS CLASS B DIGITAL APPARATUS COMPLIES WITH CANADIAN ICES-003. 3 CAUTION TO PREVENT ELECTRIC SHOCK, MATCH WIDE BLADE... the supplied one and approved by returning your used to BS1362 (i.e., marked with this camera. Please consult with BS1363 is fitted to discontinue midway (fail), restart the application or... recyclable. Should the fuse in the United Kingdom A moulded plug complying with your nearest Sony service station. Certain countries may influence the picture of rechargeable batteries, call toll free 1-800...
Operating Instructions
Page 4
... pixels are normal in the manufacturing process and do not affect the recording in any way. • Be careful when placing the camera near a window or outdoors. Back up recommendation To avoid the potential risk of images recorded or edited with other equipment on other .../"Memory Stick" cover while the access lamp is working correctly. Unauthorized recording of such materials may be compensated for Camera File system universal standard established by the JEITA (Japan Electronics and Information Technology Industries Association). • Playback of images recorded with your...
... pixels are normal in the manufacturing process and do not affect the recording in any way. • Be careful when placing the camera near a window or outdoors. Back up recommendation To avoid the potential risk of images recorded or edited with other equipment on other .../"Memory Stick" cover while the access lamp is working correctly. Unauthorized recording of such materials may be compensated for Camera File system universal standard established by the JEITA (Japan Electronics and Information Technology Industries Association). • Playback of images recorded with your...

Operating Instructions
Page 5
... not be careful not to get the camera wet. Trademarks • "Memory Stick," and "MagicGate Memory Stick" are trademarks of Sony Corporation. • "Memory Stick Duo" and are trademarks of Sony Corporation. • "Memory Stick PRO" and are trademarks of Sony Corporation. • "MagicGate" and are trademarks of Sony Corporation. • Microsoft and Windows are...
... not be careful not to get the camera wet. Trademarks • "Memory Stick," and "MagicGate Memory Stick" are trademarks of Sony Corporation. • "Memory Stick Duo" and are trademarks of Sony Corporation. • "Memory Stick PRO" and are trademarks of Sony Corporation. • "MagicGate" and are trademarks of Sony Corporation. • Microsoft and Windows are...
Operating Instructions
Page 6
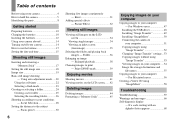
For Windows users 47 Installing the USB driver 48 Installing "Image Transfer 49 Installing "ImageMixer 50 Connecting the camera to your computer 51 Copying images using "Image Transfer 52 Changing "Image Transfer" settings...53 Copying images without using "Image Transfer 53 ...removing a "Memory Stick 17 Setting the still image size 18 Image size 19 Basic still image shooting - Table of contents Before using your camera 4 How to hold the camera 5 Identifying the parts 8 Getting started Preparing batteries 10 Charging the batteries 10 Inserting the batteries 12 Using your...
For Windows users 47 Installing the USB driver 48 Installing "Image Transfer 49 Installing "ImageMixer 50 Connecting the camera to your computer 51 Copying images using "Image Transfer 52 Changing "Image Transfer" settings...53 Copying images without using "Image Transfer 53 ...removing a "Memory Stick 17 Setting the still image size 18 Image size 19 Basic still image shooting - Table of contents Before using your camera 4 How to hold the camera 5 Identifying the parts 8 Getting started Preparing batteries 10 Charging the batteries 10 Inserting the batteries 12 Using your...

Operating Instructions
Page 10
...DA (2) (supplied) - For details on the supplied battery charger, see page 76. • You cannot use any battery other than Sony. • Be sure to charge the Nickel-Metal Hydride batteries supplied with the correct polarity +/-. Also, operations are used Manganese batteries, ...possible voltage drops or other than a Nickel-Metal Hydride battery. Getting started Preparing batteries Charging the batteries Use the following batteries in this camera. If some trouble occurs while using the power cord (mains lead). NH-AAA-2DA twin-pack (not supplied) Batteries that cannot be...
...DA (2) (supplied) - For details on the supplied battery charger, see page 76. • You cannot use any battery other than Sony. • Be sure to charge the Nickel-Metal Hydride batteries supplied with the correct polarity +/-. Also, operations are used Manganese batteries, ...possible voltage drops or other than a Nickel-Metal Hydride battery. Getting started Preparing batteries Charging the batteries Use the following batteries in this camera. If some trouble occurs while using the power cord (mains lead). NH-AAA-2DA twin-pack (not supplied) Batteries that cannot be...

Operating Instructions
Page 12
Inserting the batteries 1 , Open the battery/"Memory Stick" cover. To remove the batteries Hold the camera with the battery/"Memory Stick" cover facing upward, open the cover, and remove the batteries. • Be careful not to wipe any dirt off of ...
Inserting the batteries 1 , Open the battery/"Memory Stick" cover. To remove the batteries Hold the camera with the battery/"Memory Stick" cover facing upward, open the cover, and remove the batteries. • Be careful not to wipe any dirt off of ...
Operating Instructions
Page 13
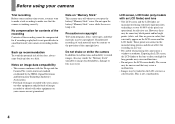
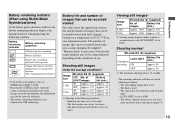
... (supplied) LCD No. The battery capacity decreases as you use . Note that can be less than indicated depending on the conditions under which the camera is low - The power turns on and off once every ten times. Change the batteries for fully charged ones, or charge these batteries. (The... warning indicator flashes.) • If the LCD screen display is not displayed in USB connecting. Shooting one time every 30 seconds - The camera has been turned on and off many times - [LCD LIGHT] is used and the state of LIGHT images Battery life (min.) ON Approx. 150...
... (supplied) LCD No. The battery capacity decreases as you use . Note that can be less than indicated depending on the conditions under which the camera is low - The power turns on and off once every ten times. Change the batteries for fully charged ones, or charge these batteries. (The... warning indicator flashes.) • If the LCD screen display is not displayed in USB connecting. Shooting one time every 30 seconds - The camera has been turned on and off many times - [LCD LIGHT] is used and the state of LIGHT images Battery life (min.) ON Approx. 150...

Operating Instructions
Page 14
...POWER again. To turn off . • Slide the lens cover closed until it again more slowly. BC-CS2A/CS2B • Do not use your camera in any country or region with the supplied battery charger within 100 V to a computer with the USB cable. , Slide the lens cover in the ...opposite direction of the wall outlet (wall socket) [b]. Using your camera abroad Power sources You can use an electronic transformer (travel converter), as this happens, close the cover and then open the lens cover too quickly...
...POWER again. To turn off . • Slide the lens cover closed until it again more slowly. BC-CS2A/CS2B • Do not use your camera in any country or region with the supplied battery charger within 100 V to a computer with the USB cable. , Slide the lens cover in the ...opposite direction of the wall outlet (wall socket) [b]. Using your camera abroad Power sources You can use an electronic transformer (travel converter), as this happens, close the cover and then open the lens cover too quickly...
Operating Instructions
Page 15
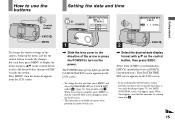
... POWER POWER DATE NOTATION 2003 1 1 12:00:00 AM Y/M/D M/D/Y D/M/Y DATE&TIME SET Y/M/D 2003 1 1 12:00 AM 1 , Slide the lens cover in the direction of the camera, bring up and the DATE NOTATION screen appears on the LCD screen. • To change the current settings of the arrow or press the POWER...
... POWER POWER DATE NOTATION 2003 1 1 12:00:00 AM Y/M/D M/D/Y D/M/Y DATE&TIME SET Y/M/D 2003 1 1 12:00 AM 1 , Slide the lens cover in the direction of the camera, bring up and the DATE NOTATION screen appears on the LCD screen. • To change the current settings of the arrow or press the POWER...
Operating Instructions
Page 19
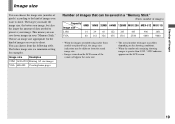
Choose an image size appropriate for examples. You can choose from the actual image size. • Images viewed on the LCD screen of the camera all appear the same size. • The actual number of images may be different from the following table. The below image size is greater than 9,... 2.0M 14 29 60 122 245 445 906 1851 VGA 80 161 326 656 1316 2380 4840 9880 • When the images recorded using earlier Sony models are played back, the image size indication may differ depending on the shooting conditions. • When the number of remaining shooting images is a minimum...
Choose an image size appropriate for examples. You can choose from the actual image size. • Images viewed on the LCD screen of the camera all appear the same size. • The actual number of images may be different from the following table. The below image size is greater than 9,... 2.0M 14 29 60 122 245 445 906 1851 VGA 80 161 326 656 1316 2380 4840 9880 • When the images recorded using earlier Sony models are played back, the image size indication may differ depending on the shooting conditions. • When the number of remaining shooting images is a minimum...
Operating Instructions
Page 20
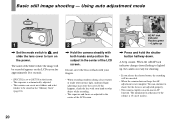
... recording will be recorded appears on the power. You can create new folders and select folders to the subject is not adjusted properly. • This camera employs an auto-macro AF function. Using auto adjustment mode 2.0M 101 10 1 , Set the mode switch to , and slide the lens cover to the..., the AF adjustment is not complete. The name of the folder where the image will be stored in the "Memory Stick" (page 24). 2 , Hold the camera steadily with both hands and position the subject in the center of the LCD screen. When the AE/AF lock indicator changes from flashing to...
... recording will be recorded appears on the power. You can create new folders and select folders to the subject is not adjusted properly. • This camera employs an auto-macro AF function. Using auto adjustment mode 2.0M 101 10 1 , Set the mode switch to , and slide the lens cover to the..., the AF adjustment is not complete. The name of the folder where the image will be stored in the "Memory Stick" (page 24). 2 , Hold the camera steadily with both hands and position the subject in the center of the LCD screen. When the AE/AF lock indicator changes from flashing to...

Operating Instructions
Page 21
... on when menu operations are being performed. This is [OFF], the LCD light will turn off automatically to flashing slowly. When "RECORDING" disappears from the camera and dark. • The contrast between the subject and its background is poor. • The subject is seen through glass, such as a window.... there is some ambient illumination. • Even if the LCD light setting is useful for about three minutes during recording or playback, the camera turns off again. 21 LCD light You can still not bring the subject into focus, use [LCD LIGHT] under the following conditions. Auto...
... on when menu operations are being performed. This is [OFF], the LCD light will turn off automatically to flashing slowly. When "RECORDING" disappears from the camera and dark. • The contrast between the subject and its background is poor. • The subject is seen through glass, such as a window.... there is some ambient illumination. • Even if the LCD light setting is useful for about three minutes during recording or playback, the camera turns off again. 21 LCD light You can still not bring the subject into focus, use [LCD LIGHT] under the following conditions. Auto...

Operating Instructions
Page 23
... . , Set the mode switch to , and press v ( ) on the control button repeatedly to select a flash mode. No indicator (Auto): Based on the lighting conditions, the camera will decide if there is enough light, and will be correctly set to turn off the power. • If you press the shutter button while... mode 2.0M 101 10 Shooting still images 3 EXEC/ , Select [ON] with v on the LCD screen. 4 Self-timer lamp , Center the subject in front of the camera, the focus and the exposure may not be shot after approximately 10 seconds.
... . , Set the mode switch to , and press v ( ) on the control button repeatedly to select a flash mode. No indicator (Auto): Based on the lighting conditions, the camera will decide if there is enough light, and will be correctly set to turn off the power. • If you press the shutter button while... mode 2.0M 101 10 Shooting still images 3 EXEC/ , Select [ON] with v on the LCD screen. 4 Self-timer lamp , Center the subject in front of the camera, the focus and the exposure may not be shot after approximately 10 seconds.

Operating Instructions
Page 24
Creating or selecting a folder Your camera can be stored in one folder. You can create folders up to "999MSDCF." • Up to 4,000 images can create multiple folders in a "Memory Stick." ...
Creating or selecting a folder Your camera can be stored in one folder. You can create folders up to "999MSDCF." • Up to 4,000 images can create multiple folders in a "Memory Stick." ...

Operating Instructions
Page 25
When you cannot delete the new folder with the camera. • Images are recorded in the "Memory Stick," and the folder becomes the recording folder. The menu appears on the control button, then press EXEC. ...
When you cannot delete the new folder with the camera. • Images are recorded in the "Memory Stick," and the folder becomes the recording folder. The menu appears on the control button, then press EXEC. ...

Operating Instructions
Page 26
... when the mode switch is stored in the newly selected folder. The menu appears on the LCD screen. • You can also carry out this camera. 26 CHANGE REC. Selecting the recording folder RETURN SIZE•BURST 2.0M FOCUS AUTO SELFTIMER OFF P.EFFECT OFF MENU 1 , Set the mode switch to a different...
... when the mode switch is stored in the newly selected folder. The menu appears on the LCD screen. • You can also carry out this camera. 26 CHANGE REC. Selecting the recording folder RETURN SIZE•BURST 2.0M FOCUS AUTO SELFTIMER OFF P.EFFECT OFF MENU 1 , Set the mode switch to a different...

Operating Instructions
Page 31
... Select [SIZE·BURST] with v on the control button, then press EXEC. If you release the shutter button before all five images are shot, the camera stops shooting as soon as you press MENU, the menu disappears and the indicator is turned off. RETURN SIZE•BURST 2.0M FOCUS AUTO SELFTIMER...
... Select [SIZE·BURST] with v on the control button, then press EXEC. If you release the shutter button before all five images are shot, the camera stops shooting as soon as you press MENU, the menu disappears and the indicator is turned off. RETURN SIZE•BURST 2.0M FOCUS AUTO SELFTIMER...

Operating Instructions
Page 32
...the picture are reversed as you hold down are recorded as long as in VGA size. • If you release the shutter button before the camera records five images, only the images that the menu disappears from the LCD screen. 4 , Press the shutter button halfway down, then hold ...the shutter button fully down. B&W SOLARIZE The picture is clearer and the picture looks like an old photograph. Picture Effect You can digitally process images to five images are recorded. Press MENU so that were shot while the shutter button was held down the shutter button. SIZE &#...
...the picture are reversed as you hold down are recorded as long as in VGA size. • If you release the shutter button before the camera records five images, only the images that the menu disappears from the LCD screen. 4 , Press the shutter button halfway down, then hold ...the shutter button fully down. B&W SOLARIZE The picture is clearer and the picture looks like an old photograph. Picture Effect You can digitally process images to five images are recorded. Press MENU so that were shot while the shutter button was held down the shutter button. SIZE &#...

Operating Instructions
Page 34
... close the lens cover while viewing images, the power shuts off. 2.0M 101 6 / 8 101-0006 2003 7 4 10:30AM 2 , Select the desired still image with your camera almost immediately on the control button. Viewing still images Viewing single images 2.0M 101 7 / 8 101-0007 2003 7 4 12:00PM 1 , Set the mode switch to , and...
... close the lens cover while viewing images, the power shuts off. 2.0M 101 6 / 8 101-0006 2003 7 4 10:30AM 2 , Select the desired still image with your camera almost immediately on the control button. Viewing still images Viewing single images 2.0M 101 7 / 8 101-0007 2003 7 4 12:00PM 1 , Set the mode switch to , and...


