
User Guide
Page 9
... your Windows computer 55 Copying images to your computer 57 Viewing image files stored on a computer with your camera (using a "Memory Stick Duo 64 Using the supplied software 65 Using your Macintosh computer 67 Printing still images How to print still images 69 Printing images directly using ...a PictBridge compliant printer 70 Printing at a shop 74 Connecting your camera to your TV Viewing images on a TV screen...
... your Windows computer 55 Copying images to your computer 57 Viewing image files stored on a computer with your camera (using a "Memory Stick Duo 64 Using the supplied software 65 Using your Macintosh computer 67 Printing still images How to print still images 69 Printing images directly using ...a PictBridge compliant printer 70 Printing at a shop 74 Connecting your camera to your TV Viewing images on a TV screen...
User Guide
Page 41
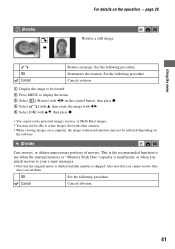
... deleted and that you cannot restore files once you attach movies to rotate images shot with other cameras. • When viewing images on a computer, the image rotation information may not be reflected depending on the software. (Divide) Cuts movies, or deletes unnecessary portions of movies. Cancel Cancels division. 41 Cancels rotation. 1 Display...
... deleted and that you cannot restore files once you attach movies to rotate images shot with other cameras. • When viewing images on a computer, the image rotation information may not be reflected depending on the software. (Divide) Cuts movies, or deletes unnecessary portions of movies. Cancel Cancels division. 41 Cancels rotation. 1 Display...

User Guide
Page 56
... may not operate, depending on connecting your camera to a computer • Operations are three modes for all the recommended computer environments mentioned above or in order to write to CD-Rs. Recommended computer environment The following environment is recommended for using "PicturePackage"/"ImageMixer VCD2" Software: Macromedia Flash Player 6.0 or later, Windows Media...
... may not operate, depending on connecting your camera to a computer • Operations are three modes for all the recommended computer environments mentioned above or in order to write to CD-Rs. Recommended computer environment The following environment is recommended for using "PicturePackage"/"ImageMixer VCD2" Software: Macromedia Flash Player 6.0 or later, Windows Media...

User Guide
Page 57
... enables equipment connected to the computer to copy images. • The screen displays shown in this time. 1 Shut down all application software in use. • In Windows 2000, log on pages 57 to 62 to operate properly. • When using a Windows computer as an example. ... radio button next to [Yes, I want to restart my computer now] to your computer This section describes the process using Windows XP, start from the camera and insert it , then click [Finish]. 1 2 Your computer restarts. For a computer with a "Memory Stick" slot Remove the "Memory Stick Duo" from Stage 2. For a...
... enables equipment connected to the computer to copy images. • The screen displays shown in this time. 1 Shut down all application software in use. • In Windows 2000, log on pages 57 to 62 to operate properly. • When using a Windows computer as an example. ... radio button next to [Yes, I want to restart my computer now] to your computer This section describes the process using Windows XP, start from the camera and insert it , then click [Finish]. 1 2 Your computer restarts. For a computer with a "Memory Stick" slot Remove the "Memory Stick Duo" from Stage 2. For a...
User Guide
Page 65
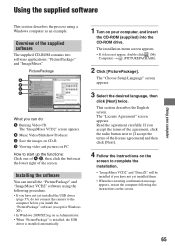
... Video CD The "ImageMixer VCD2" screen appears. This section describes the English screen. Read the agreement carefully. Installing the software You can do not connect the camera to start up the functions: Click one of A-D, then click the button at the lower right of the supplied... software The supplied CD-ROM contains two software applications: "PicturePackage" and "ImageMixer." The "License Agreement" screen appears. B Music Video/Slideshow Producer ...
... Video CD The "ImageMixer VCD2" screen appears. This section describes the English screen. Read the agreement carefully. Installing the software You can do not connect the camera to start up the functions: Click one of A-D, then click the button at the lower right of the supplied... software The supplied CD-ROM contains two software applications: "PicturePackage" and "ImageMixer." The "License Agreement" screen appears. B Music Video/Slideshow Producer ...
User Guide
Page 66
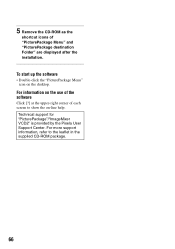
For more support information, refer to show the on-line help. For information on the desktop. Technical support for "PicturePackage"/"ImageMixer VCD2" is provided by the Pixela User Support Center. 5 Remove the CD-ROM as the shortcut icons of each screen to the leaflet in the supplied CD-ROM package. 66 To start up the software • Double-click the "PicturePackage Menu" icon on the use of the software Click [?] at the upper-right corner of "PicturePackage Menu" and "PicturePackage destination Folder" are displayed after the installation.
For more support information, refer to show the on-line help. For information on the desktop. Technical support for "PicturePackage"/"ImageMixer VCD2" is provided by the Pixela User Support Center. 5 Remove the CD-ROM as the shortcut icons of each screen to the leaflet in the supplied CD-ROM package. 66 To start up the software • Double-click the "PicturePackage Menu" icon on the use of the software Click [?] at the upper-right corner of "PicturePackage Menu" and "PicturePackage destination Folder" are displayed after the installation.
User Guide
Page 68
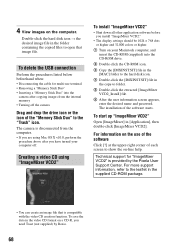
... computer, and insert the CD-ROM (supplied) into the camera after you need Toast (not supplied) by the Pixela User Support Center. Technical support for multi-use of the software Click [?] at the upper-right corner of the software starts. To start up "ImageMixer VCD2" Open [ImageMixer] ...in the video CD format on your computer off the camera Drag and drop the drive icon or the icon of...
... computer, and insert the CD-ROM (supplied) into the camera after you need Toast (not supplied) by the Pixela User Support Center. Technical support for multi-use of the software Click [?] at the upper-right corner of the software starts. To start up "ImageMixer VCD2" Open [ImageMixer] ...in the video CD format on your computer off the camera Drag and drop the drive icon or the icon of...
User Guide
Page 69
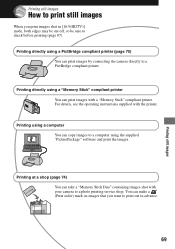
... How to print still images When you want to a computer using the supplied "PicturePackage" software and print the images. For details, see the operating instructions supplied with your camera to a photo printing service shop. Printing directly using a "Memory Stick" compliant printer You... can print images by connecting the camera directly to check before printing (page 87). Printing directly using a ...
... How to print still images When you want to a computer using the supplied "PicturePackage" software and print the images. For details, see the operating instructions supplied with your camera to a photo printing service shop. Printing directly using a "Memory Stick" compliant printer You... can print images by connecting the camera directly to check before printing (page 87). Printing directly using a ...

User Guide
Page 85
... 3 in "Read This First"). • Insert a "Memory Stick PRO Duo" (page 21) when recording movies with a "Memory Stick Duo" formatted by the camera, such as "101MSDCF" (page 63). • Operate correctly (page 64). After making a USB connection, "PicturePackage" does not start automatically. • Start up...to the recording position (page 93). • The "Memory Stick Duo" is turned on the camera. • Copy them to the hard disk of each screen. • Consult the computer or software manufacturer. Copy the movie to a folder recognized by a computer, you may not be viewed on...
... 3 in "Read This First"). • Insert a "Memory Stick PRO Duo" (page 21) when recording movies with a "Memory Stick Duo" formatted by the camera, such as "101MSDCF" (page 63). • Operate correctly (page 64). After making a USB connection, "PicturePackage" does not start automatically. • Start up...to the recording position (page 93). • The "Memory Stick Duo" is turned on the camera. • Copy them to the hard disk of each screen. • Consult the computer or software manufacturer. Copy the movie to a folder recognized by a computer, you may not be viewed on...

User Guide
Page 101
Folder 50 D Date 46 Date/Time 46 Day&Time 46 Daylight 32 DC IN jack 15 Delete t step 6 in "Read This First" Digital Zoom 45 DirectX 56 Divide 41 DPOF 74 E Effective pixels 99 Electronic transformer t step 1 in "Read This First" Enlarged Icon 48 EV 29 Exposure... Cloudy 32 Color 12 Compression ratio 13 Computer 55 Copying images ...... 57, 67 Macintosh 67 Recommended environment 56, 67 Software 65 Viewing image files stored on a computer with your camera 64 Windows 55 Connecting Computer 59 Printer 71 TV 76 Contrast 36 Copy 51 Copying images to your computer 57 Create...
Folder 50 D Date 46 Date/Time 46 Day&Time 46 Daylight 32 DC IN jack 15 Delete t step 6 in "Read This First" Digital Zoom 45 DirectX 56 Divide 41 DPOF 74 E Effective pixels 99 Electronic transformer t step 1 in "Read This First" Enlarged Icon 48 EV 29 Exposure... Cloudy 32 Color 12 Compression ratio 13 Computer 55 Copying images ...... 57, 67 Macintosh 67 Recommended environment 56, 67 Software 65 Viewing image files stored on a computer with your camera 64 Windows 55 Connecting Computer 59 Printer 71 TV 76 Contrast 36 Copy 51 Copying images to your computer 57 Create...

User Guide
Page 103
... display...........90 Self-timer t step 5 in "Read This First" Sepia 35 Set the clock t step 2 in "Read This First" Setup 36, 43, 44 Camera 1 45 Camera 2 48 Internal Memory Tool 49 Memory Stick Tool ....... 50 Setup 1 52 Setup 2 53 Setup 1 52 Setup 2 53 Sharpness 36 Shooting Movie t step 5 ... 5 in "Read This First" Smart zoom 45 Snow mode t step 5 in "Read This First" Soft snap mode t step 5 in "Read This First" Software 65 Specifications 99 Spot AF 30 Spot metering 32 Spot metering cross hairs......32 Standard 33 T Trimming 43 Troubleshooting 78 TV 76 Twilight mode t step...
... display...........90 Self-timer t step 5 in "Read This First" Sepia 35 Set the clock t step 2 in "Read This First" Setup 36, 43, 44 Camera 1 45 Camera 2 48 Internal Memory Tool 49 Memory Stick Tool ....... 50 Setup 1 52 Setup 2 53 Setup 1 52 Setup 2 53 Sharpness 36 Shooting Movie t step 5 ... 5 in "Read This First" Smart zoom 45 Snow mode t step 5 in "Read This First" Soft snap mode t step 5 in "Read This First" Software 65 Specifications 99 Spot AF 30 Spot metering 32 Spot metering cross hairs......32 Standard 33 T Trimming 43 Troubleshooting 78 TV 76 Twilight mode t step...


