

Instruction Manual
Page 5
...on the product or on its packaging indicates that to which can be determined by turning the equipment off and on a circuit different from that this product shall not be ...detailed information about recycling of this product, please contact your local Civic Office, your nearest Sony service station. 5 Never use the plug without the fuse cover. For Customers in Europe... This product has been tested and found compliant with the limits for a digital device pursuant to Subpart B of Part 15 of this equipment for using connection cables shorter than 3 ...
...on the product or on its packaging indicates that to which can be determined by turning the equipment off and on a circuit different from that this product shall not be ...detailed information about recycling of this product, please contact your local Civic Office, your nearest Sony service station. 5 Never use the plug without the fuse cover. For Customers in Europe... This product has been tested and found compliant with the limits for a digital device pursuant to Subpart B of Part 15 of this equipment for using connection cables shorter than 3 ...
Instruction Manual
Page 6
...screen is manufactured using extremely high-precision technology so over 99.99% of the pixels are operational for Camera File system) universal standard established by making a back up Do not turn off the camera or remove the battery pack or "Memory Stick Duo" while the access lamp is lighted, as ...the internal memory data or "Memory Stick Duo" data may cause the malfunction of your camera or recording media, etc. 6 The camera may not be repairable. •...
...screen is manufactured using extremely high-precision technology so over 99.99% of the pixels are operational for Camera File system) universal standard established by making a back up Do not turn off the camera or remove the battery pack or "Memory Stick Duo" while the access lamp is lighted, as ...the internal memory data or "Memory Stick Duo" data may cause the malfunction of your camera or recording media, etc. 6 The camera may not be repairable. •...
Instruction Manual
Page 7
...menu items 20 GB Menu items 21 Enjoying your camera 6 Getting started 8 Checking the accessories supplied 8 1 Preparing the battery pack 9 2 Inserting the battery pack/a "Memory Stick Duo" (not supplied) ........ 10 3 Turning the camera on the screen 24 Battery life and memory ... .......... 26 Number of still images and recording time of contents IMPORTANT SAFEGUARDS 2 Read this first 4 Notes on using your computer 22 Supported Operating Systems for USB connection and application software (supplied 22 Viewing "Cyber-shot Handbook" or "Cyber-shot Step-up Guide 23 Indicators...
...menu items 20 GB Menu items 21 Enjoying your camera 6 Getting started 8 Checking the accessories supplied 8 1 Preparing the battery pack 9 2 Inserting the battery pack/a "Memory Stick Duo" (not supplied) ........ 10 3 Turning the camera on the screen 24 Battery life and memory ... .......... 26 Number of still images and recording time of contents IMPORTANT SAFEGUARDS 2 Read this first 4 Notes on using your computer 22 Supported Operating Systems for USB connection and application software (supplied 22 Viewing "Cyber-shot Handbook" or "Cyber-shot Step-up Guide 23 Indicators...
Instruction Manual
Page 9
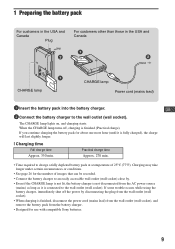
... from the AC power source (mains) as long as it is not disconnected from the battery charger. • Designed for use with compatible Sony batteries. 9 When the CHARGE lamp turns off the power by . • Even if the CHARGE lamp is not lit, the battery charger is fully charged), the charge will...
... from the AC power source (mains) as long as it is not disconnected from the battery charger. • Designed for use with compatible Sony batteries. 9 When the CHARGE lamp turns off the power by . • Even if the CHARGE lamp is not lit, the battery charger is fully charged), the charge will...
Instruction Manual
Page 11
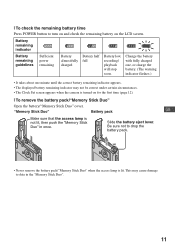
...flashes.) • It takes about one minute until the correct battery remaining indicator appears. • The displayed battery remaining indicator may cause damage to turn on and check the remaining battery on for the first time (page 12). [ To remove the battery pack/"Memory Stick Duo" Open the battery/"...Memory Stick Duo" cover. This may not be correct under certain circumstances. • The Clock Set screen appears when the camera is lit. "Memory Stick Duo" Battery pack GB Make sure that the access lamp is not lit, then push the "Memory Stick Duo" in...
...flashes.) • It takes about one minute until the correct battery remaining indicator appears. • The displayed battery remaining indicator may cause damage to turn on and check the remaining battery on for the first time (page 12). [ To remove the battery pack/"Memory Stick Duo" Open the battery/"...Memory Stick Duo" cover. This may not be correct under certain circumstances. • The Clock Set screen appears when the camera is lit. "Memory Stick Duo" Battery pack GB Make sure that the access lamp is not lit, then push the "Memory Stick Duo" in...
Instruction Manual
Page 12
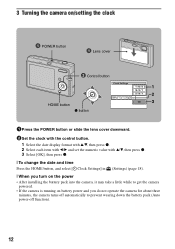
3 Turning the camera on/setting the clock POWER button Lens cover ɟ Control button 1 2 3 HOME button z button 1Press the POWER button or slide the lens cover downward. 2Set ... the power • After installing the battery pack into the camera, it may take a little while to get the camera powered. • If the camera is running on battery power and you do not operate the camera for about three minutes, the camera turns off automatically to prevent wearing down the battery pack (Auto power-off...
3 Turning the camera on/setting the clock POWER button Lens cover ɟ Control button 1 2 3 HOME button z button 1Press the POWER button or slide the lens cover downward. 2Set ... the power • After installing the battery pack into the camera, it may take a little while to get the camera powered. • If the camera is running on battery power and you do not operate the camera for about three minutes, the camera turns off automatically to prevent wearing down the battery pack (Auto power-off...
Instruction Manual
Page 15
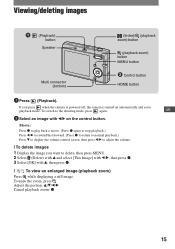
To switch to adjust the volume. [ To delete images 1 Display the image you press when the camera is powered off, the camera is turned on the control button. Adjust the portion: v/V/b/B Cancel playback zoom: z 15 To undo the zoom, press . Viewing/deleting images (Playback...Control button HOME button 1 Press (Playback). GB 2 Select an image with v, then press z. [ To view an enlarged image (playback zoom) Press while displaying a still image. If you want to delete, then press MENU. 2 Select (Delete) with v and select [This Image] with b/B, then press z. 3 Select [OK] ...
To switch to adjust the volume. [ To delete images 1 Display the image you press when the camera is powered off, the camera is turned on the control button. Adjust the portion: v/V/b/B Cancel playback zoom: z 15 To undo the zoom, press . Viewing/deleting images (Playback...Control button HOME button 1 Press (Playback). GB 2 Select an image with v, then press z. [ To view an enlarged image (playback zoom) Press while displaying a still image. If you want to delete, then press MENU. 2 Select (Delete) with v and select [This Image] with b/B, then press z. 3 Select [OK] ...

Instruction Manual
Page 20
... • The menu can be displayed only when the camera is hidden, keep pressing v/V until the item appears on the screen. 3Select the desired setting with b/B on the control button. Using menu items MENU button Control button z button 1Press MENU to turn off the menu. 20 If the desired item is hidden...
... • The menu can be displayed only when the camera is hidden, keep pressing v/V until the item appears on the screen. 3Select the desired setting with b/B on the control button. Using menu items MENU button Control button z button 1Press MENU to turn off the menu. 20 If the desired item is hidden...

Instruction Manual
Page 23
... stored on the CD-ROM. When you click the "Cyber-shot Handbook" button, both the "Cyber-shot Handbook" and the "Cyber-shot Step-up Guide" will be installed. 3 After the installation is complete, double- To view the "Cyber-shot Step-up Guide" 1 In the [stepupguide] folder on...is another folder called [stepupguide]. When you click the [Cyber-shot Handbook] button, the screen for HQX file is not installed, install the Stuffit Expander. 23 Viewing "Cyber-shot Handbook" or "Cyber-shot Step-up Guide" [ For Windows users 1 Turn on -screen instructions to your computer. 2 After copying...
... stored on the CD-ROM. When you click the "Cyber-shot Handbook" button, both the "Cyber-shot Handbook" and the "Cyber-shot Step-up Guide" will be installed. 3 After the installation is complete, double- To view the "Cyber-shot Step-up Guide" 1 In the [stepupguide] folder on...is another folder called [stepupguide]. When you click the [Cyber-shot Handbook] button, the screen for HQX file is not installed, install the Stuffit Expander. 23 Viewing "Cyber-shot Handbook" or "Cyber-shot Step-up Guide" [ For Windows users 1 Turn on -screen instructions to your computer. 2 After copying...
Instruction Manual
Page 26
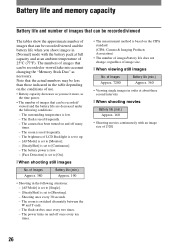
The camera has been turned on the CIPA standard. (CIPA: Camera & Imaging Products Association) • The number of images/battery life does not change, regardless of image size. [ When viewing still images No. The zoom is set to [Shooting]. - of Images Approx. 380 Battery life (min.) Approx. 190 •... • Battery capacity decreases as necessary. The surrounding temperature is set to [On]. [ When shooting still images No. The brightness of 25°C (77°F). The power turns on the conditions of use it more, as the time passes. • The number of images that...
The camera has been turned on the CIPA standard. (CIPA: Camera & Imaging Products Association) • The number of images/battery life does not change, regardless of image size. [ When viewing still images No. The zoom is set to [Shooting]. - of Images Approx. 380 Battery life (min.) Approx. 190 •... • Battery capacity decreases as necessary. The surrounding temperature is set to [On]. [ When shooting still images No. The brightness of 25°C (77°F). The power turns on the conditions of use it more, as the time passes. • The number of images that...
Instruction Manual
Page 28
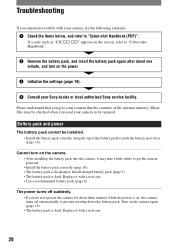
...:ss" appears on the screen, refer to "Cyber-shot Handbook". 2 Remove the battery pack, and insert the battery pack again after about three minutes while the power is on, the camera turns off suddenly. • If you do not operate the camera for about one . • Use a recommended... the camera powered. • Install the battery pack correctly (page 10). • The battery pack is discharged. Turn on the power. 3 Initialize the settings (page 19). 4 Consult your Sony dealer or local authorized Sony service facility. Replace it with a new one minute, and turn on the camera. •...
...:ss" appears on the screen, refer to "Cyber-shot Handbook". 2 Remove the battery pack, and insert the battery pack again after about three minutes while the power is on, the camera turns off suddenly. • If you do not operate the camera for about one . • Use a recommended... the camera powered. • Install the battery pack correctly (page 10). • The battery pack is discharged. Turn on the power. 3 Initialize the settings (page 19). 4 Consult your Sony dealer or local authorized Sony service facility. Replace it with a new one minute, and turn on the camera. •...

Instruction Manual
Page 30
...then wipe the surface with rubber or vinyl for a long time. [ On operating temperatures Your camera is not charged, you can still use the camera as long as you do not use /store the camera in the following as you attempt to shoot with a soft cloth to remove fingerprints, dust, ...etc. If moisture condensation occurs Turn off . This moisture condensation may cause a malfunction. • In a location ...
...then wipe the surface with rubber or vinyl for a long time. [ On operating temperatures Your camera is not charged, you can still use the camera as long as you do not use /store the camera in the following as you attempt to shoot with a soft cloth to remove fingerprints, dust, ...etc. If moisture condensation occurs Turn off . This moisture condensation may cause a malfunction. • In a location ...
Sony® Guide to Digital Photography (Spring 2007)
Page 6
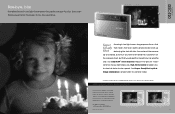
... optical image stabilization compensates for details or visit www.sony.com/dsctraining. Without Super SteadyShot With Super SteadyShot 9 You could turn on a tripod, but that would spoil the mood! Aperture f4.5. The camera sends an equal-butopposite correcting signal to a stabilization ... light have one handy! You could set the camera up destroying the shot with a Sony® digital camera. Shutter 1/8 sec. ISO 400. And that means that detect camera shake. Monitor picture simulated. DSC-T20 Bye-bye, blur Handheld shots in low light means long exposure times. Our ...
... optical image stabilization compensates for details or visit www.sony.com/dsctraining. Without Super SteadyShot With Super SteadyShot 9 You could turn on a tripod, but that would spoil the mood! Aperture f4.5. The camera sends an equal-butopposite correcting signal to a stabilization ... light have one handy! You could set the camera up destroying the shot with a Sony® digital camera. Shutter 1/8 sec. ISO 400. And that means that detect camera shake. Monitor picture simulated. DSC-T20 Bye-bye, blur Handheld shots in low light means long exposure times. Our ...
Sony® Guide to Digital Photography (Spring 2007)
Page 18
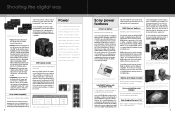
... of rechargeable batteries. As a result, our DSC-S650 and DSC-S700 can curtail the life of shots. • Speed. InfoLITHIUM® battery with Sony accessory batteries and chargers. cards. Powerhungry image ...Cyber-shot® cameras are also easy to capture movies with off-the-shelf alkaline batteries from an on Sony Processing Features (page 28). Left: You can recharge our NiMH batteries, or substitute store-bought alkaline batteries on -battery chip dynamically monitors the power draw and communicates the battery status to the camera, enabling Sony digital cameras...
... of rechargeable batteries. As a result, our DSC-S650 and DSC-S700 can curtail the life of shots. • Speed. InfoLITHIUM® battery with Sony accessory batteries and chargers. cards. Powerhungry image ...Cyber-shot® cameras are also easy to capture movies with off-the-shelf alkaline batteries from an on Sony Processing Features (page 28). Left: You can recharge our NiMH batteries, or substitute store-bought alkaline batteries on -battery chip dynamically monitors the power draw and communicates the battery status to the camera, enabling Sony digital cameras...
Sony® Guide to Digital Photography (Spring 2007)
Page 19
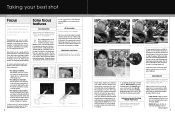
...DSC-H7, H9, and N2, you shoot, the Face Detection function actually analyzes the data that are standing still. Unfortunately, if your digital picture. Even a simple snapshot can be focusing on a conventional camera... camera automatically adjusts for optimum focus, exposure, flash and even white balance on - For the complete story on Face Detection and the BIONZ processor, please turn to...ideal for focus illumination, processing and control. 34 Sony focus features Face Detection Taking advantage of focus. Taking your best shot CAMERA CONTROL Focus With all but where she's going...
...DSC-H7, H9, and N2, you shoot, the Face Detection function actually analyzes the data that are standing still. Unfortunately, if your digital picture. Even a simple snapshot can be focusing on a conventional camera... camera automatically adjusts for optimum focus, exposure, flash and even white balance on - For the complete story on Face Detection and the BIONZ processor, please turn to...ideal for focus illumination, processing and control. 34 Sony focus features Face Detection Taking advantage of focus. Taking your best shot CAMERA CONTROL Focus With all but where she's going...
Sony® Guide to Digital Photography (Spring 2007)
Page 21
...your digital picture. Special "scene modes" can become too dark when sunlight or other common shooting situations pose their own, specific exposure challenges. Sony exposure features Face Detection Taking advantage of a conventional camera. Even a simple snapshot can trip up your best shot CAMERA CONTROL .... If you manual adjustment of a night scene beautifully. Displays a magnified image on Face Detection and the BIONZ processor, please turn to eight faces at a time. Suppresses flash to 1/30 second for the beginning photographer to produce a clear picture of focus...
...your digital picture. Special "scene modes" can become too dark when sunlight or other common shooting situations pose their own, specific exposure challenges. Sony exposure features Face Detection Taking advantage of a conventional camera. Even a simple snapshot can trip up your best shot CAMERA CONTROL .... If you manual adjustment of a night scene beautifully. Displays a magnified image on Face Detection and the BIONZ processor, please turn to eight faces at a time. Suppresses flash to 1/30 second for the beginning photographer to produce a clear picture of focus...
Sony® Guide to Digital Photography (Spring 2007)
Page 23
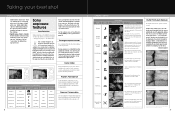
...cameras address these issues. Even a simple snapshot can only guess at flash metering, Sony delivers better flash exposure with the shutter mechanism. In this difference, the DSC-H7, H9 and the a100 Digital... exposure systems are standing still. the human face. As you 've taken the shot, thanks to capture both... in the foreground, while it does have some limitations. • Metering/exposure issues. For the complete story on Face Detection and the BIONZ processor, please turn to overexpose near subjects and underexpose far subjects. Step One: The Sony...
...cameras address these issues. Even a simple snapshot can only guess at flash metering, Sony delivers better flash exposure with the shutter mechanism. In this difference, the DSC-H7, H9 and the a100 Digital... exposure systems are standing still. the human face. As you 've taken the shot, thanks to capture both... in the foreground, while it does have some limitations. • Metering/exposure issues. For the complete story on Face Detection and the BIONZ processor, please turn to overexpose near subjects and underexpose far subjects. Step One: The Sony...

Cyber-shot® Handbook
Page 14
...warning appears, you from shooting clear images due to stabilize the camera (page 7). However, we recommend that you turn on the screen Each time you press v (DISP) button, the display changes (page 18). When shooting still images A Display E When shooting movies Indication Battery remaining Low battery... (43) Recording mode (37) Metering mode (40) Face Detection (36) SteadyShot (45) Vibration warning • Indicates vibration may prevent you can still shoot images. Self-timer (23) Zoom scaling (21, 64) Color mode (38) 14 See the pages in parentheses for better lighting or using...
...warning appears, you from shooting clear images due to stabilize the camera (page 7). However, we recommend that you turn on the screen Each time you press v (DISP) button, the display changes (page 18). When shooting still images A Display E When shooting movies Indication Battery remaining Low battery... (43) Recording mode (37) Metering mode (40) Face Detection (36) SteadyShot (45) Vibration warning • Indicates vibration may prevent you can still shoot images. Self-timer (23) Zoom scaling (21, 64) Color mode (38) 14 See the pages in parentheses for better lighting or using...

Cyber-shot® Handbook
Page 24
If you press (Playback) when the camera is powered off, the camera is turned on the control button. To undo the zoom, press . Adjust the portion: v/V/b/B Cancel playback zoom: z • To store enlarged images: [Trimming] (page 51) 24 Movie: ..., press (Playback) again. 2 Select an image with the image size [320] are displayed a size smaller. / To view an enlarged image (playback zoom) Press while displaying a still image.
If you press (Playback) when the camera is powered off, the camera is turned on the control button. To undo the zoom, press . Adjust the portion: v/V/b/B Cancel playback zoom: z • To store enlarged images: [Trimming] (page 51) 24 Movie: ..., press (Playback) again. 2 Select an image with the image size [320] are displayed a size smaller. / To view an enlarged image (playback zoom) Press while displaying a still image.

Cyber-shot® Handbook
Page 30
z button v/V/b/B button Control button Function guide Setting [Function Guide] to [Off] turns off the function guide (page 60). • The menu can be displayed only when the camera is in shooting mode or playback mode. • Different items are available depending on the selected mode. 2 Select the desired menu item with v/V on the... the screen. • Press z after selecting an item. 4 Press MENU to display the menu. HOME/Menu Using the menu items MENU button 1 Press MENU to turn off the menu. 30 Learning the various functions -
z button v/V/b/B button Control button Function guide Setting [Function Guide] to [Off] turns off the function guide (page 60). • The menu can be displayed only when the camera is in shooting mode or playback mode. • Different items are available depending on the selected mode. 2 Select the desired menu item with v/V on the... the screen. • Press z after selecting an item. 4 Press MENU to display the menu. HOME/Menu Using the menu items MENU button 1 Press MENU to turn off the menu. 30 Learning the various functions -


