
Instruction Manual
Page 4
...a vertical or floor mount position. However, there is intended to be determined by turning the equipment off and on, the user is encouraged to try to correct the interference... our environment by one or more information regarding recycling of Conformity Trade Name: SONY Model No.: DSC-T2 Responsible Party: Sony Electronics Inc. If you have any questions about this equipment. [ Note: This...Via Esprillo, San Diego, CA 92127U.S.A. These limits are recyclable. Operation is for a Class B digital device, pursuant to excessive heat such as sunshine, fire or the like. For more of the ...
...a vertical or floor mount position. However, there is intended to be determined by turning the equipment off and on, the user is encouraged to try to correct the interference... our environment by one or more information regarding recycling of Conformity Trade Name: SONY Model No.: DSC-T2 Responsible Party: Sony Electronics Inc. If you have any questions about this equipment. [ Note: This...Via Esprillo, San Diego, CA 92127U.S.A. These limits are recyclable. Operation is for a Class B digital device, pursuant to excessive heat such as sunshine, fire or the like. For more of the ...
Instruction Manual
Page 7
... 11 2 Inserting the battery pack 12 3 Turning the camera on/setting the clock 14 Shooting images easily 16 Image size/Self-timer/Shooting mode/Flash/Macro/Display 17 Viewing/deleting images 19 Selecting how to your computer 28 Viewing "Cyber-shot Handbook 29 Enjoying the supplied software 29 Indicators ...on the screen 31 Battery life and memory capacity 34 Battery life and number of images that you can record/view 34 Number of still images and recording time of movies 35...
... 11 2 Inserting the battery pack 12 3 Turning the camera on/setting the clock 14 Shooting images easily 16 Image size/Self-timer/Shooting mode/Flash/Macro/Display 17 Viewing/deleting images 19 Selecting how to your computer 28 Viewing "Cyber-shot Handbook 29 Enjoying the supplied software 29 Indicators ...on the screen 31 Battery life and memory capacity 34 Battery life and number of images that you can record/view 34 Number of still images and recording time of movies 35...

Instruction Manual
Page 8
...Electronics and Information Technology Industries Association). • Sony does not guarantee that the camera will play back images recorded with a soft cloth. If water enters inside the camera, a malfunction may be repaired. • Do not aim the camera at the sun or other materials may cause ...or dusty locations may be contrary to the provisions of the camera or recording media, etc. 8 Notes on using the camera [ Internal memory and "Memory Stick Duo" back up Do not turn off the screen with the camera. [ Warning on copyright Television programs, films, videotapes, and...
...Electronics and Information Technology Industries Association). • Sony does not guarantee that the camera will play back images recorded with a soft cloth. If water enters inside the camera, a malfunction may be repaired. • Do not aim the camera at the sun or other materials may cause ...or dusty locations may be contrary to the provisions of the camera or recording media, etc. 8 Notes on using the camera [ Internal memory and "Memory Stick Duo" back up Do not turn off the screen with the camera. [ Warning on copyright Television programs, films, videotapes, and...

Instruction Manual
Page 11
... wall outlet (wall socket). Charging may take longer depending on conditions of use and circumstances. • See page 34 for use with compatible Sony batteries. 11 If some trouble occurs while using the battery charger, immediately shut off , charging is fully charged), the charge will last slightly ...charger. 2Connect the battery charger to the wall outlet (wall socket). The CHARGE lamp lights up, and charging starts. When the CHARGE lamp turns off the power by disconnecting the plug from the wall outlet (wall socket). • When charging is finished, disconnect the power cord (mains...
... wall outlet (wall socket). Charging may take longer depending on conditions of use and circumstances. • See page 34 for use with compatible Sony batteries. 11 If some trouble occurs while using the battery charger, immediately shut off , charging is fully charged), the charge will last slightly ...charger. 2Connect the battery charger to the wall outlet (wall socket). The CHARGE lamp lights up, and charging starts. When the CHARGE lamp turns off the power by disconnecting the plug from the wall outlet (wall socket). • When charging is finished, disconnect the power cord (mains...
Instruction Manual
Page 12
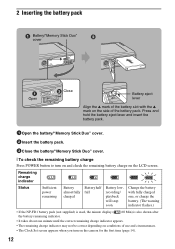
... the battery with the v mark on the side of use and circumstances. • The Clock Set screen appears when you turn on and check the remaining battery charge on the camera for the first time (page 14). 12 Press and hold the battery eject lever and insert the battery pack. 1Open the... battery/"Memory Stick Duo" cover. 2Insert the battery pack. 3Close the battery/"Memory Stick Duo" cover. [ To check the remaining battery charge Press POWER button to turn on...
... the battery with the v mark on the side of use and circumstances. • The Clock Set screen appears when you turn on and check the remaining battery charge on the camera for the first time (page 14). 12 Press and hold the battery eject lever and insert the battery pack. 1Open the... battery/"Memory Stick Duo" cover. 2Insert the battery pack. 3Close the battery/"Memory Stick Duo" cover. [ To check the remaining battery charge Press POWER button to turn on...

Instruction Manual
Page 14
... [?] displays the guide about the touched item. Taking your finger. • When the item you want to the previous screen by touching v/V. 3 Touch [OK]. 3 Turning the camera on/setting the clock POWER button Touch panel Lens Lens cover 1Press the POWER button or slide the lens cover downward. 2Set the clock by... v/V to change the page. • You can return to set is touched while shooting, the icons will make the icons reappear. 14 To hide this camera by lightly touching the buttons or icons on the screen with your finger off the screen will momentarily disappear.
... [?] displays the guide about the touched item. Taking your finger. • When the item you want to the previous screen by touching v/V. 3 Touch [OK]. 3 Turning the camera on/setting the clock POWER button Touch panel Lens Lens cover 1Press the POWER button or slide the lens cover downward. 2Set the clock by... v/V to change the page. • You can return to set is touched while shooting, the icons will make the icons reappear. 14 To hide this camera by lightly touching the buttons or icons on the screen with your finger off the screen will momentarily disappear.

Instruction Manual
Page 15
..., 24). [ Note on when the Power is turn on • Once the battery is inserted in the camera, it may take time before operation becomes possible. • If the camera is running on battery power and you do not operate the camera for about three minutes, the camera turns off automatically to prevent wearing down the...
..., 24). [ Note on when the Power is turn on • Once the battery is inserted in the camera, it may take time before operation becomes possible. • If the camera is running on battery power and you do not operate the camera for about three minutes, the camera turns off automatically to prevent wearing down the...
Instruction Manual
Page 19
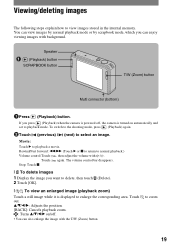
...view images stored in the internal memory. If you press (Playback) when the camera is powered off . • You can enjoy viewing images with / . v/V/b/B: Adjusts the position. [BACK]: Cancels playback zoom. : Turns v/V/b/B on automatically and set to playback mode. Viewing/deleting images The following steps ... delete, then touch 2 Touch [OK]. (Delete). [ To view an enlarged image (playback zoom) Touch a still image while it is turned on /off , the camera is displayed to normal playback.) Volume control:Touch , then adjust the volume with background. to select an image. The...
...view images stored in the internal memory. If you press (Playback) when the camera is powered off . • You can enjoy viewing images with / . v/V/b/B: Adjusts the position. [BACK]: Cancels playback zoom. : Turns v/V/b/B on automatically and set to playback mode. Viewing/deleting images The following steps ... delete, then touch 2 Touch [OK]. (Delete). [ To view an enlarged image (playback zoom) Touch a still image while it is turned on /off , the camera is displayed to normal playback.) Volume control:Touch , then adjust the volume with background. to select an image. The...
Instruction Manual
Page 22
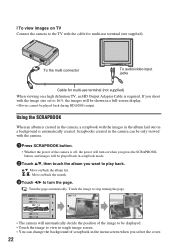
...the cover. 22 Touch the image to stop turning the page. • The camera will automatically decide the position of the image to be displayed. • Touch the image to view in single image screen. • You can be only viewed with the camera. 1Press SCRAPBOOK button. • Whether the power... background is required. v/V: Move on/back the album list. / : Move on when you want to turn on /back the month. 3Touch b/B to play back. Using the SCRAPBOOK When an album is created in the camera, a scrapbook with the image size set to 16:9, the images will be shown in a full-screen...
...the cover. 22 Touch the image to stop turning the page. • The camera will automatically decide the position of the image to be displayed. • Touch the image to view in single image screen. • You can be only viewed with the camera. 1Press SCRAPBOOK button. • Whether the power... background is required. v/V: Move on/back the album list. / : Move on when you want to turn on /back the month. 3Touch b/B to play back. Using the SCRAPBOOK When an album is created in the camera, a scrapbook with the image size set to 16:9, the images will be shown in a full-screen...
Instruction Manual
Page 25
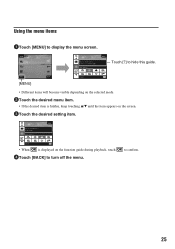
Using the menu items 1Touch [MENU] to confirm. 25 to display the menu screen. Touch [?] to hide this guide. [MENU] • Different items will become visible depending on the selected mode. 2Touch the desired menu item. • If the desired item is hidden, keep touching v/V until the item appears on the screen. 3Touch the desired setting item. • When is displayed on the function guide during playback, touch 4Touch [BACK] to turn off the menu.
Using the menu items 1Touch [MENU] to confirm. 25 to display the menu screen. Touch [?] to hide this guide. [MENU] • Different items will become visible depending on the selected mode. 2Touch the desired menu item. • If the desired item is hidden, keep touching v/V until the item appears on the screen. 3Touch the desired setting item. • When is displayed on the function guide during playback, touch 4Touch [BACK] to turn off the menu.
Instruction Manual
Page 28
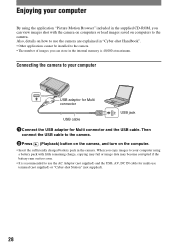
Then connect the USB cable to the camera. 2Press (Playback) button on the camera, and turn on how to use the camera are explained in "Cyber-shot Handbook". • Other applications cannot be installed to the camera. • The number of images you can view images shot with little remaining charge, copying may fail or image data may become... adaptor for multi-use the AC Adaptor (not supplied) and the USB, AV, DC IN cable for Multi connector and the USB cable. Connecting the camera to use terminal (not supplied) or "Cyber-shot Station" (not supplied). 28
Then connect the USB cable to the camera. 2Press (Playback) button on the camera, and turn on how to use the camera are explained in "Cyber-shot Handbook". • Other applications cannot be installed to the camera. • The number of images you can view images shot with little remaining charge, copying may fail or image data may become... adaptor for multi-use the AC Adaptor (not supplied) and the USB, AV, DC IN cable for Multi connector and the USB cable. Connecting the camera to use terminal (not supplied) or "Cyber-shot Station" (not supplied). 28

Instruction Manual
Page 29
... enjoy the still images and movies shot with the camera more efficiently. Adobe Reader is required for you click the "Cyber-shot Handbook" button, both of words that can name the album. ROM (supplied) into the CD-ROM drive. Enjoying the supplied software [ Recommended environment for using "Picture Motion Browser", you click the [Cyber-shot Handbook] button...
... enjoy the still images and movies shot with the camera more efficiently. Adobe Reader is required for you click the "Cyber-shot Handbook" button, both of words that can name the album. ROM (supplied) into the CD-ROM drive. Enjoying the supplied software [ Recommended environment for using "Picture Motion Browser", you click the [Cyber-shot Handbook] button...
Instruction Manual
Page 30
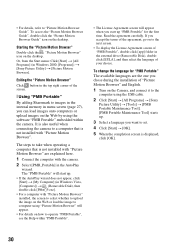
... that is not installed with "Picture Motion Browser" are the one you accept the terms of "Picture Motion Browser" and English. 1 Turn on the Camera, and connect it to the computer using the software "PMB Portable" embedded within "PMB Portable". • The License Agreement screen will... Browser Guide", double-click the "Picture Motion Browser Guide" icon on the Web by using the USB cable. 2 Click [Start] t [All Programs] t [Sony Picture Utility] t [Tools] t [PMB Portable Maintenance Tool]. [PMB Portable Maintenance Tool] starts up. 3 Select a language you start up "PMB Portable" for...
... that is not installed with "Picture Motion Browser" are the one you accept the terms of "Picture Motion Browser" and English. 1 Turn on the Camera, and connect it to the computer using the software "PMB Portable" embedded within "PMB Portable". • The License Agreement screen will... Browser Guide", double-click the "Picture Motion Browser Guide" icon on the Web by using the USB cable. 2 Click [Start] t [All Programs] t [Sony Picture Utility] t [Tools] t [PMB Portable Maintenance Tool]. [PMB Portable Maintenance Tool] starts up. 3 Select a language you start up "PMB Portable" for...
Instruction Manual
Page 32
D Display Indication Battery remaining Smile shutter (number of still images) Zoom scaling Display E Display C:32:00 96 00:25:05 Indication SteadyShot Recording Media (internal memory, "Memory Stick Duo") Recording folder AF ... on /off. Recordable time (h:m:s) Red-eye reduction Flash level Recording mode Face Detection Touch AF indicator White balance Color mode Flash charging 32 Playback zoom Turns v/V/b/B on the shooting condition. Adjusts the volume. Flash mode settings Macro/Close focus settings Changes the screen display. B Display BACK DISP / N x Indication Goes ...
D Display Indication Battery remaining Smile shutter (number of still images) Zoom scaling Display E Display C:32:00 96 00:25:05 Indication SteadyShot Recording Media (internal memory, "Memory Stick Duo") Recording folder AF ... on /off. Recordable time (h:m:s) Red-eye reduction Flash level Recording mode Face Detection Touch AF indicator White balance Color mode Flash charging 32 Playback zoom Turns v/V/b/B on the shooting condition. Adjusts the volume. Flash mode settings Macro/Close focus settings Changes the screen display. B Display BACK DISP / N x Indication Goes ...
Instruction Manual
Page 34
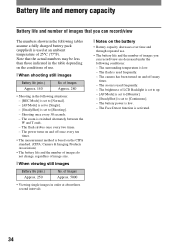
...single images in the table depending on the battery • Battery capacity decreases over time and through repeated use . [ When shooting still images Battery life (min.) Approx. 140 No. The surrounding temperature is activated. 34 Battery life and memory capacity Battery life and ...based on and off many times. - The flash is set to [Monitor]. - [SteadyShot] is used frequently. - The camera has been turned on the CIPA standard. (CIPA: Camera & Imaging Products Association) • The battery life and the number of images do not change, regardless of LCD Backlight is...
...single images in the table depending on the battery • Battery capacity decreases over time and through repeated use . [ When shooting still images Battery life (min.) Approx. 140 No. The surrounding temperature is activated. 34 Battery life and memory capacity Battery life and ...based on and off many times. - The flash is set to [Monitor]. - [SteadyShot] is used frequently. - The camera has been turned on the CIPA standard. (CIPA: Camera & Imaging Products Association) • The battery life and the number of images do not change, regardless of LCD Backlight is...
Instruction Manual
Page 36
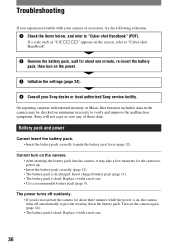
...and power Cannot insert the battery pack. • Insert the battery pack correctly to "Cyber-shot Handbook" (PDF). Cannot turn on the power. 3 Initialize the settings (page 24). 4 Consult your camera or accessory, try the following solutions. 1 Check the items below, and refer to ...Cyber-shot Handbook". 2 Remove the battery pack, wait for the camera to power up. • Insert the battery pack correctly (page 12). • The battery pack is dead. Turn on the camera. • After inserting the battery pack into the camera, it with a new one . 36 On repairing cameras with your Sony...
...and power Cannot insert the battery pack. • Insert the battery pack correctly to "Cyber-shot Handbook" (PDF). Cannot turn on the power. 3 Initialize the settings (page 24). 4 Consult your camera or accessory, try the following solutions. 1 Check the items below, and refer to ...Cyber-shot Handbook". 2 Remove the battery pack, wait for the camera to power up. • Insert the battery pack correctly (page 12). • The battery pack is dead. Turn on the camera. • After inserting the battery pack into the camera, it with a new one . 36 On repairing cameras with your Sony...
Instruction Manual
Page 38
...the finish or casing: • Do not expose the camera to chemical products such as you can still use the camera, but the date and time will not be not clear. [ On the internal rechargeable backup battery This camera has an internal rechargeable battery for maintaining the date and ...°C (32°F and 104°F). If moisture condensation occurs Turn off . 38 However, even if this rechargeable battery is designed for a long time. [ On operating temperatures Your camera is not charged, you are using the camera. Note that if you shoot with moisture remaining inside or outside the...
...the finish or casing: • Do not expose the camera to chemical products such as you can still use the camera, but the date and time will not be not clear. [ On the internal rechargeable backup battery This camera has an internal rechargeable battery for maintaining the date and ...°C (32°F and 104°F). If moisture condensation occurs Turn off . 38 However, even if this rechargeable battery is designed for a long time. [ On operating temperatures Your camera is not charged, you are using the camera. Note that if you shoot with moisture remaining inside or outside the...

Cyber-shot® Handbook
Page 16
... subject may come out red, or fuzzy white circular spots may appear when using the flash. When they are accentuated by taking the following steps. Camera Eye Retina How can the "White circular spots" be reduced? • Light the room and shoot the subject without a flash. • Select (High ...etc.) in the air How can the "Red-eye phenomenon" be reduced by the camera's flash, they appear as white circular spots. Basic techniques for better images Flash On using the flash The eyes of the subject turn out red, correct the image with [Retouch] on the viewing menu (page 64) ...
... subject may come out red, or fuzzy white circular spots may appear when using the flash. When they are accentuated by taking the following steps. Camera Eye Retina How can the "White circular spots" be reduced? • Light the room and shoot the subject without a flash. • Select (High ...etc.) in the air How can the "Red-eye phenomenon" be reduced by the camera's flash, they appear as white circular spots. Basic techniques for better images Flash On using the flash The eyes of the subject turn out red, correct the image with [Retouch] on the viewing menu (page 64) ...
Cyber-shot® Handbook
Page 19
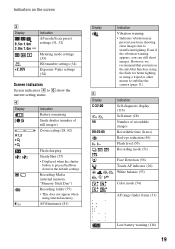
... lighting or using internal memory. AF illuminator (81) Indication Vibration warning • Indicates vibration may prevent you can still shoot images. However, we recommend that you turn on the screen C Display 0.5m 1.0m 3.0m 7.0m +2.0EV Indication AF mode/focus preset settings (31, ...32) Metering mode settings (33) ISO number settings (34) Exposure Value settings (34) Screen indicators Screen indicators 4 to stabilize the camera (page 11). Recording ...
... lighting or using internal memory. AF illuminator (81) Indication Vibration warning • Indicates vibration may prevent you can still shoot images. However, we recommend that you turn on the screen C Display 0.5m 1.0m 3.0m 7.0m +2.0EV Indication AF mode/focus preset settings (31, ...32) Metering mode settings (33) ISO number settings (34) Exposure Value settings (34) Screen indicators Screen indicators 4 to stabilize the camera (page 11). Recording ...
Cyber-shot® Handbook
Page 21
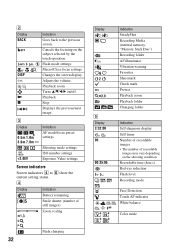
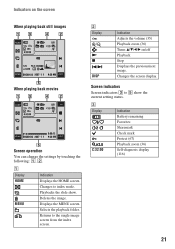
...-diagnosis display (116) 21 A Display HOME MENU Indication Displays the HOME screen. B Display / N x DISP Indication Adjusts the volume (35) Playback zoom (36) Turns v/V/b/B on the screen When playing back still images When playing back movies Screen operation You can change the settings by touching the following: 1, 2. Screen indicators Screen indicators 3 to 5 show...
...-diagnosis display (116) 21 A Display HOME MENU Indication Displays the HOME screen. B Display / N x DISP Indication Adjusts the volume (35) Playback zoom (36) Turns v/V/b/B on the screen When playing back still images When playing back movies Screen operation You can change the settings by touching the following: 1, 2. Screen indicators Screen indicators 3 to 5 show...


