Instruction Manual
Page 7
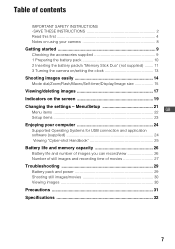
... supplied) ........ 11 3 Turning the camera on/setting the clock 13 Shooting images easily 14 Mode dial/Zoom/Flash/Macro/Self-timer/Display/Image size 15 Viewing/deleting images 17 Indicators on using your computer 24 Supported Operating Systems for USB connection and application software (supplied 24 Viewing "Cyber-shot Handbook 25 Battery life...
... supplied) ........ 11 3 Turning the camera on/setting the clock 13 Shooting images easily 14 Mode dial/Zoom/Flash/Macro/Self-timer/Display/Image size 15 Viewing/deleting images 17 Indicators on using your computer 24 Supported Operating Systems for USB connection and application software (supplied 24 Viewing "Cyber-shot Handbook 25 Battery life...

Instruction Manual
Page 8
...) universal standard established by JEITA (Japan Electronics and Information Technology Industries Association). • Sony does not guarantee that the camera will play back images recorded or edited with other equipment, or that the camera is working correctly. • The camera is neither dust-proof, nor splashproof, nor water-proof. Notes on using your data...
...) universal standard established by JEITA (Japan Electronics and Information Technology Industries Association). • Sony does not guarantee that the camera will play back images recorded or edited with other equipment, or that the camera is working correctly. • The camera is neither dust-proof, nor splashproof, nor water-proof. Notes on using your data...
Instruction Manual
Page 9
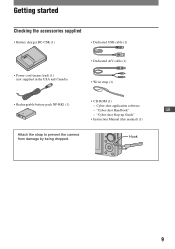
Getting started Checking the accessories supplied • Battery charger BC-CSK (1) • Dedicated USB cable (1) • Power cord (mains lead) (1) (not supplied in the USA and Canada) • Dedicated A/V cable (1) • Wrist strap (1) • CD-ROM (1) • Rechargeable battery pack NP-BK1 (1) - Hook 9 Cyber-shot application software - "Cyber-shot Handbook" GB - "Cyber-shot Step-up Guide" • Instruction Manual (this manual) (1) Attach the strap to prevent the camera from damage by being dropped.
Getting started Checking the accessories supplied • Battery charger BC-CSK (1) • Dedicated USB cable (1) • Power cord (mains lead) (1) (not supplied in the USA and Canada) • Dedicated A/V cable (1) • Wrist strap (1) • CD-ROM (1) • Rechargeable battery pack NP-BK1 (1) - Hook 9 Cyber-shot application software - "Cyber-shot Handbook" GB - "Cyber-shot Step-up Guide" • Instruction Manual (this manual) (1) Attach the strap to prevent the camera from damage by being dropped.
Instruction Manual
Page 11
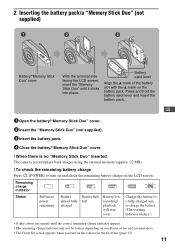
..." (not supplied). 3 Insert the battery pack. 4 Close the battery/"Memory Stick Duo" cover. [ When there is no "Memory Stick Duo" inserted The camera records/plays back images using the internal memory (approx. 22 MB). [ To check the remaining battery charge Press (POWER) to a fully charged one, or ... power remaining Battery almost fully charged Battery half full Battery low, recording/ playback will stop soon. Change the battery to turn on the camera for the first time (page 13). 11 Press and hold the battery eject lever and insert the battery pack. Battery eject lever Align ...
..." (not supplied). 3 Insert the battery pack. 4 Close the battery/"Memory Stick Duo" cover. [ When there is no "Memory Stick Duo" inserted The camera records/plays back images using the internal memory (approx. 22 MB). [ To check the remaining battery charge Press (POWER) to a fully charged one, or ... power remaining Battery almost fully charged Battery half full Battery low, recording/ playback will stop soon. Change the battery to turn on the camera for the first time (page 13). 11 Press and hold the battery eject lever and insert the battery pack. Battery eject lever Align ...
Instruction Manual
Page 13
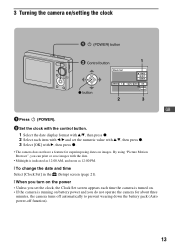
... and you can print or save images with B, then press z. • The camera does not have a feature for about three minutes, the camera turns off automatically to prevent wearing down the battery pack (Auto power-off function). 13 3 Turning the camera on/setting the clock (POWER) button ɟ Control button 1 z button 2 3...format with v/V, then press z. 2 Select each item with b/B and set the clock, the Clock Set screen appears each time the camera is turned on. • If the camera is indicated as 12:00 AM, and noon as 12:00 PM. [ To change the date and time Select [Clock Set] in...
... and you can print or save images with B, then press z. • The camera does not have a feature for about three minutes, the camera turns off automatically to prevent wearing down the battery pack (Auto power-off function). 13 3 Turning the camera on/setting the clock (POWER) button ɟ Control button 1 z button 2 3...format with v/V, then press z. 2 Select each item with b/B and set the clock, the Clock Set screen appears each time the camera is turned on. • If the camera is indicated as 12:00 AM, and noon as 12:00 PM. [ To change the date and time Select [Clock Set] in...
Instruction Manual
Page 14
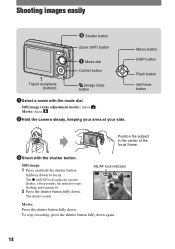
... button Flash button Self-timer button Position the subject in the center of the focus frame. 3Shoot with the mode dial. Movie: Select . 2Hold the camera steady, keeping your arms at your side. To stop recording, press the shutter button fully down .
... button Flash button Self-timer button Position the subject in the center of the focus frame. 3Shoot with the mode dial. Movie: Select . 2Hold the camera steady, keeping your arms at your side. To stop recording, press the shutter button fully down .
Instruction Manual
Page 17
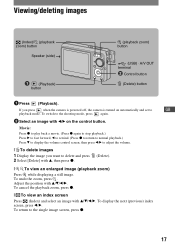
..., then press b/B to the single image screen, press z. 17 To return to adjust the volume. [ To delete images 1 Display the image you press when the camera is powered off, the camera is turned on the control button. To display the next (previous) index screen, press b/B.
..., then press b/B to the single image screen, press z. 17 To return to adjust the volume. [ To delete images 1 Display the image you press when the camera is powered off, the camera is turned on the control button. To display the next (previous) index screen, press b/B.
Instruction Manual
Page 18
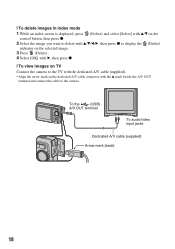
... v/V/b/B, then press z to display the (Delete) indicator on the selected image. 3 Press (Delete). 4 Select [OK] with B, then press z. [ To view images on TV Connect the camera to the TV with the dedicated A/V cable (supplied). • Align the arrow mark on the dedicated A/V cable connector with the v mark beside the A/V OUT terminal...
... v/V/b/B, then press z to display the (Delete) indicator on the selected image. 3 Press (Delete). 4 Select [OK] with B, then press z. [ To view images on TV Connect the camera to the TV with the dedicated A/V cable (supplied). • Align the arrow mark on the dedicated A/V cable connector with the v mark beside the A/V OUT terminal...
Instruction Manual
Page 19
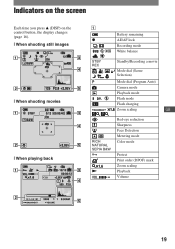
N Red-eye reduction Sharpness Face Detection Metering mode Color mode Protect Print order (DPOF) mark Zoom scaling Playback Volume 19 Indicators on the screen Each time you press v (DISP) on the control button, the display changes (page 16). [ When shooting still images [ When shooting movies [ When playing back A Battery remaining z AE/AF lock Recording mode White balance STBY REC Standby/Recording a movie Mode dial (Scene Selection) Mode dial (Program Auto) Camera mode Playback mode Flash mode Flash charging Zoom scaling GB RICH NATURAL SEPIA B&W -
N Red-eye reduction Sharpness Face Detection Metering mode Color mode Protect Print order (DPOF) mark Zoom scaling Playback Volume 19 Indicators on the screen Each time you press v (DISP) on the control button, the display changes (page 16). [ When shooting still images [ When shooting movies [ When playing back A Battery remaining z AE/AF lock Recording mode White balance STBY REC Standby/Recording a movie Mode dial (Scene Selection) Mode dial (Program Auto) Camera mode Playback mode Flash mode Flash charging Zoom scaling GB RICH NATURAL SEPIA B&W -

Instruction Manual
Page 21
... ɠ Control button (Playback) button z button GB 1 Recording: Turn on the control button. • If the desired item is zoomed and set with b/B on the camera, then set the mode dial.
... ɠ Control button (Playback) button z button GB 1 Recording: Turn on the control button. • If the desired item is zoomed and set with b/B on the camera, then set the mode dial.
Instruction Manual
Page 23
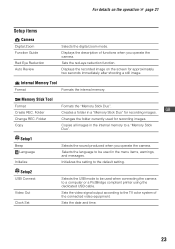
... on the screen for recording images. Displays the recorded image on the operation 1 page 21 Setup items Camera Digital Zoom Function Guide Red Eye Reduction Auto Review Selects the digital zoom mode. Setup2 USB Connect Video Out Clock Set Selects the USB mode to be used for recording ...images. Setup1 Beep Language Initialize Selects the sound produced when you operate the camera. GB Creates a folder in the internal...
... on the screen for recording images. Displays the recorded image on the operation 1 page 21 Setup items Camera Digital Zoom Function Guide Red Eye Reduction Auto Review Selects the digital zoom mode. Setup2 USB Connect Video Out Clock Set Selects the USB mode to be used for recording ...images. Setup1 Beep Language Initialize Selects the sound produced when you operate the camera. GB Creates a folder in the internal...
Instruction Manual
Page 24
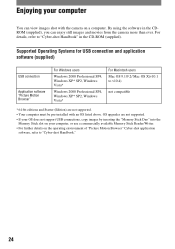
OS upgrades are not supported. • Your computer must be pre-installed with the camera on a computer. For details, refer to "Cyber-shot Handbook" in the CDROM (supplied), you can view images shot with an OS listed above. Supported Operating Systems for USB connection and application software (supplied) USB connection Application software "Picture Motion Browser...
OS upgrades are not supported. • Your computer must be pre-installed with the camera on a computer. For details, refer to "Cyber-shot Handbook" in the CDROM (supplied), you can view images shot with an OS listed above. Supported Operating Systems for USB connection and application software (supplied) USB connection Application software "Picture Motion Browser...
Instruction Manual
Page 25
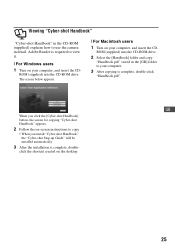
... the CD- The screen below appears. [ For Macintosh users 1 Turn on -screen instructions to copy. • When you install "Cyber-shot Handbook," the "Cyber-shot Step-up Guide" will be installed automatically. 3 After the installation is complete, double-click "Handbook.pdf". Adobe Reader is required to ...view it. [ For Windows users 1 Turn on the desktop. 25 Viewing "Cyber-shot Handbook" "Cyber-shot Handbook" in the CD-ROM (supplied) explains how to use the camera in the [GB] folder to your computer. 3 After copying is complete, double-
... the CD- The screen below appears. [ For Macintosh users 1 Turn on -screen instructions to copy. • When you install "Cyber-shot Handbook," the "Cyber-shot Step-up Guide" will be installed automatically. 3 After the installation is complete, double-click "Handbook.pdf". Adobe Reader is required to ...view it. [ For Windows users 1 Turn on the desktop. 25 Viewing "Cyber-shot Handbook" "Cyber-shot Handbook" in the CD-ROM (supplied) explains how to use the camera in the [GB] folder to your computer. 3 After copying is complete, double-
Instruction Manual
Page 26
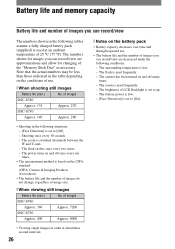
... following tables assume a fully charged battery pack (supplied) is set to [Off]. - Shooting once every 30 seconds. - of images DSC-S780 Approx. 135 Approx. 270 DSC-S750 Approx. 140 Approx. 280 [ Notes on the conditions of use . • The battery life and the number of images you can... record/view The numbers shown in order at an ambient temperature of 25 °C (77 °F). The camera has been turned on the CIPA standard. (CIPA: Camera ...
... following tables assume a fully charged battery pack (supplied) is set to [Off]. - Shooting once every 30 seconds. - of images DSC-S780 Approx. 135 Approx. 270 DSC-S750 Approx. 140 Approx. 280 [ Notes on the conditions of use . • The battery life and the number of images you can... record/view The numbers shown in order at an ambient temperature of 25 °C (77 °F). The camera has been turned on the CIPA standard. (CIPA: Camera ...

Instruction Manual
Page 27
... memory "Memory Stick Duo" formatted with this camera Size Approx. 22MB 128MB 256MB 512MB 1GB 2GB 4GB 8GB 8M (DSC-S780) 6 37 72 144 293 588 1183 2360 3:2 (DSC-S780) 6 37 72 144 293 588 1183 2360 GB 7M (DSC-S750) 7 41 74 153 313 631 1249 2508 3:2 (DSC-S750) 7 41 74 153 313 631 1249 2508... than 9,999, the ">9999" indicator appears. • You can resize the images later ([Resize], page 22). • When an image was recorded using an earlier Sony model and is played back on the camera, the image may not appear in the actual image size. 27
... memory "Memory Stick Duo" formatted with this camera Size Approx. 22MB 128MB 256MB 512MB 1GB 2GB 4GB 8GB 8M (DSC-S780) 6 37 72 144 293 588 1183 2360 3:2 (DSC-S780) 6 37 72 144 293 588 1183 2360 GB 7M (DSC-S750) 7 41 74 153 313 631 1249 2508 3:2 (DSC-S750) 7 41 74 153 313 631 1249 2508... than 9,999, the ">9999" indicator appears. • You can resize the images later ([Resize], page 22). • When an image was recorded using an earlier Sony model and is played back on the camera, the image may not appear in the actual image size. 27
Instruction Manual
Page 28
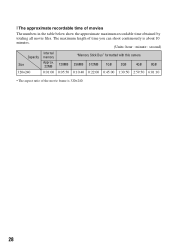
The maximum length of time you can shoot continuously is about 10 minutes. (Units: hour : minute : second) Internal Capacity memory "Memory Stick Duo" formatted with this camera Size Approx. 22MB 128MB 256MB 512MB 1GB 2GB 4GB 8GB 320×240 0:01:00 0:05:50 0:10:40 0:22:00 0:45:00 1:30:50 2:59:50 6:01:10 • The aspect ratio of movies The numbers in the table below show the approximate maximum recordable time obtained by totaling all movie files. [ The approximate recordable time of the movie frame is 320×240. 28
The maximum length of time you can shoot continuously is about 10 minutes. (Units: hour : minute : second) Internal Capacity memory "Memory Stick Duo" formatted with this camera Size Approx. 22MB 128MB 256MB 512MB 1GB 2GB 4GB 8GB 320×240 0:01:00 0:05:50 0:10:40 0:22:00 0:45:00 1:30:50 2:59:50 6:01:10 • The aspect ratio of movies The numbers in the table below show the approximate maximum recordable time obtained by totaling all movie files. [ The approximate recordable time of the movie frame is 320×240. 28
Instruction Manual
Page 29
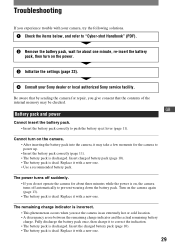
...• The battery pack is discharged. Cannot turn on the power. 3 Initialize the settings (page 23). 4 Consult your camera, try the following solutions. 1 Check the items below, and refer to "Cyber-shot Handbook" (PDF). 2 Remove the battery pack, wait for about three minutes while the power is on, the...a new one minute, re-insert the battery pack, then turn on the camera again (page 13). • The battery pack is dead. Troubleshooting If you experience trouble with your Sony dealer or local authorized Sony service facility. Replace it to push the battery eject lever (page 11). The...
...• The battery pack is discharged. Cannot turn on the power. 3 Initialize the settings (page 23). 4 Consult your camera, try the following solutions. 1 Check the items below, and refer to "Cyber-shot Handbook" (PDF). 2 Remove the battery pack, wait for about three minutes while the power is on, the...a new one minute, re-insert the battery pack, then turn on the camera again (page 13). • The battery pack is dead. Troubleshooting If you experience trouble with your Sony dealer or local authorized Sony service facility. Replace it to push the battery eject lever (page 11). The...
Instruction Manual
Page 30
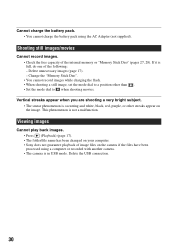
... Cannot play back images. • Press (Playback) (page 17). • The folder/file name has been changed on your computer. • Sony does not guarantee playback of image files on the image. Delete the USB connection. 30 Cannot charge the battery pack. • You cannot charge the... battery pack using a computer or recorded with another camera. • The camera is full, do one of the internal memory or "Memory Stick Duo" (pages 27, 28). Delete unnecessary images (page 17). - Vertical ...
... Cannot play back images. • Press (Playback) (page 17). • The folder/file name has been changed on your computer. • Sony does not guarantee playback of image files on the image. Delete the USB connection. 30 Cannot charge the battery pack. • You cannot charge the... battery pack using a computer or recorded with another camera. • The camera is full, do one of the internal memory or "Memory Stick Duo" (pages 27, 28). Delete unnecessary images (page 17). - Vertical ...
Instruction Manual
Page 31
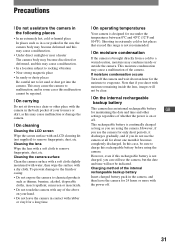
...not supplied) to a warm location, moisture may condense inside the lens, images will not be sure to let sand or dust get into the camera. However, even if this rechargeable battery is brought directly from a cold to remove fingerprints, dust, etc. Note that exceed this range is ...vibration • Near strong magnetic place • In sandy or dusty places Be careful not to charge this rechargeable battery before using the camera. Cleaning the lens Wipe the lens with a dry cloth. This moisture condensation may cause a malfunction of the internal rechargeable backup battery ...
...not supplied) to a warm location, moisture may condense inside the lens, images will not be sure to let sand or dust get into the camera. However, even if this rechargeable battery is brought directly from a cold to remove fingerprints, dust, etc. Note that exceed this range is ...vibration • Near strong magnetic place • In sandy or dusty places Be careful not to charge this rechargeable battery before using the camera. Cleaning the lens Wipe the lens with a dry cloth. This moisture condensation may cause a malfunction of the internal rechargeable backup battery ...
Instruction Manual
Page 32
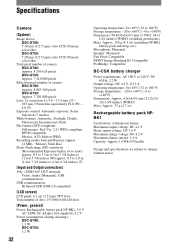
...(1/2.5 type) color CCD, Primary color filter DSC-S750: 7.20 mm (1/2.5 type) color CCD, Primary color filter Total pixel number of camera: DSC-S780: Approx. 8 286 624 pixels DSC-S750: Approx. 7 410 000 pixels Effective pixel number of camera: DSC-S780: Approx. 8 083 560 pixels DSC-S750: Approx. 7 201 000 pixels Lens: ...[Power, general] Power: Rechargeable battery pack NP-BK1, 3.6 V AC-LS5K AC Adaptor (not supplied), 4.2 V Power consumption (during shooting): DSC-S780: 1.3 W DSC-S750: 1.2 W 32 Operating temperature: 0 to 40°C (32 to 104°F) Storage temperature: -20 to +60°C (-4 to ...
...(1/2.5 type) color CCD, Primary color filter DSC-S750: 7.20 mm (1/2.5 type) color CCD, Primary color filter Total pixel number of camera: DSC-S780: Approx. 8 286 624 pixels DSC-S750: Approx. 7 410 000 pixels Effective pixel number of camera: DSC-S780: Approx. 8 083 560 pixels DSC-S750: Approx. 7 201 000 pixels Lens: ...[Power, general] Power: Rechargeable battery pack NP-BK1, 3.6 V AC-LS5K AC Adaptor (not supplied), 4.2 V Power consumption (during shooting): DSC-S780: 1.3 W DSC-S750: 1.2 W 32 Operating temperature: 0 to 40°C (32 to 104°F) Storage temperature: -20 to +60°C (-4 to ...


