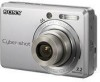
Instruction Manual
Page 1
Digital Still Camera Instruction Manual GB DSC-S730 For details on the CD-ROM (supplied) using a computer. Operating Instructions Before operating the unit, please read "Cybershot Handbook" (PDF) and "Cyber-shot Step-up Guide" on advanced operations, please read this manual thoroughly, and retain it for future reference. © 2007 Sony Corporation 3-281-198-11(1)
Digital Still Camera Instruction Manual GB DSC-S730 For details on the CD-ROM (supplied) using a computer. Operating Instructions Before operating the unit, please read "Cybershot Handbook" (PDF) and "Cyber-shot Step-up Guide" on advanced operations, please read this manual thoroughly, and retain it for future reference. © 2007 Sony Corporation 3-281-198-11(1)
Instruction Manual
Page 6
...stop moving. These dots are operational for Camera File system) universal standard established by JEITA (Japan Electronics and Information Technology Industries Association). • Sony does not guarantee that the camera will play back images recorded or edited with the camera. [ Warning on the LCD screen and... lens • The LCD screen is manufactured using the camera (page 29). • Do not ...
...stop moving. These dots are operational for Camera File system) universal standard established by JEITA (Japan Electronics and Information Technology Industries Association). • Sony does not guarantee that the camera will play back images recorded or edited with the camera. [ Warning on the LCD screen and... lens • The LCD screen is manufactured using the camera (page 29). • Do not ...
Instruction Manual
Page 7
..." (not supplied 9 2 Turning the camera on/setting the clock 11 Shooting images easily 12 Mode dial/Zoom/Flash/Macro/Self-timer/Display/Image size 13 Viewing/deleting images 15 Indicators on using your computer 22 Supported Operating Systems for USB connection and application software (supplied 22 Viewing "Cyber-shot Handbook 23 Battery life...
..." (not supplied 9 2 Turning the camera on/setting the clock 11 Shooting images easily 12 Mode dial/Zoom/Flash/Macro/Self-timer/Display/Image size 13 Viewing/deleting images 15 Indicators on using your computer 22 Supported Operating Systems for USB connection and application software (supplied 22 Viewing "Cyber-shot Handbook 23 Battery life...
Instruction Manual
Page 8
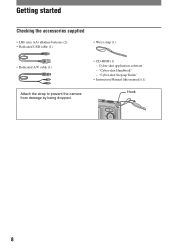
Getting started Checking the accessories supplied • LR6 (size AA) alkaline batteries (2) • Dedicated USB cable (1) • Wrist strap (1) • Dedicated A/V cable (1) Attach the strap to prevent the camera from damage by being dropped. • CD-ROM (1) - "Cyber-shot Handbook" - "Cyber-shot Step-up Guide" • Instruction Manual (this manual) (1) Hook 8 Cyber-shot application software -
Getting started Checking the accessories supplied • LR6 (size AA) alkaline batteries (2) • Dedicated USB cable (1) • Wrist strap (1) • Dedicated A/V cable (1) Attach the strap to prevent the camera from damage by being dropped. • CD-ROM (1) - "Cyber-shot Handbook" - "Cyber-shot Step-up Guide" • Instruction Manual (this manual) (1) Hook 8 Cyber-shot application software -
Instruction Manual
Page 9
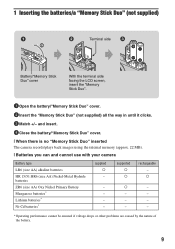
... caused by the nature of the battery. 9 and insert. 4 Close the battery/"Memory Stick Duo" cover. [ When there is no "Memory Stick Duo" inserted The camera records/plays back images using the internal memory (approx. 22 MB). [ Batteries you can and cannot use with your... camera Battery type LR6 (size AA) alkaline batteries HR 15/51:HR6 (size AA) Nickel-Metal Hydride batteries ZR6 (size AA) Oxy Nickel Primary Battery Manganese ...
... caused by the nature of the battery. 9 and insert. 4 Close the battery/"Memory Stick Duo" cover. [ When there is no "Memory Stick Duo" inserted The camera records/plays back images using the internal memory (approx. 22 MB). [ Batteries you can and cannot use with your... camera Battery type LR6 (size AA) alkaline batteries HR 15/51:HR6 (size AA) Nickel-Metal Hydride batteries ZR6 (size AA) Oxy Nickel Primary Battery Manganese ...
Instruction Manual
Page 11
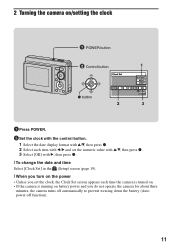
2 Turning the camera on/setting the clock POWER button ɟ Control button 1 z button 2 3 1 Press POWER. 2 Set the clock with the control button. 1 Select the date display format with v/V, ... • Unless you set the clock, the Clock Set screen appears each time the camera is turned on. • If the camera is running on battery power and you do not operate the camera for about three minutes, the camera turns off automatically to prevent wearing down the battery (Auto power-off function). 11
2 Turning the camera on/setting the clock POWER button ɟ Control button 1 z button 2 3 1 Press POWER. 2 Set the clock with the control button. 1 Select the date display format with v/V, ... • Unless you set the clock, the Clock Set screen appears each time the camera is turned on. • If the camera is running on battery power and you do not operate the camera for about three minutes, the camera turns off automatically to prevent wearing down the battery (Auto power-off function). 11
Instruction Manual
Page 12
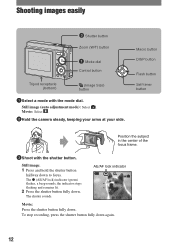
... with the mode dial. AE/AF lock indicator Movie: Press the shutter button fully down . Still image (auto adjustment mode): Select . Movie: Select . 2Hold the camera steady, keeping your arms at your side. The z (AE/AF lock) indicator (green) flashes, a beep sounds, the indicator stops flashing and remains lit. 2 Press the...
... with the mode dial. AE/AF lock indicator Movie: Press the shutter button fully down . Still image (auto adjustment mode): Select . Movie: Select . 2Hold the camera steady, keeping your arms at your side. The z (AE/AF lock) indicator (green) flashes, a beep sounds, the indicator stops flashing and remains lit. 2 Press the...
Instruction Manual
Page 15
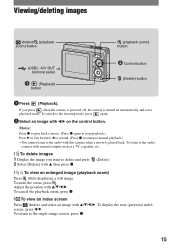
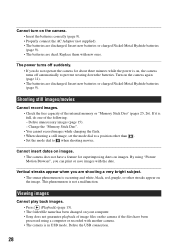
... listen to the audio, connect with external outputs such as a TV, a speaker, etc. [ To delete images 1 Display the image you press when the camera is powered off, the camera is played back. To undo the zoom, press . If you want to playback mode. Movie: Press z to play back a movie. (Press z again to... with v/V/b/B. To switch to the shooting mode, press again. 2 Select an image with b/B on automatically and set to delete and press 2 Select [Delete] with this camera when a movie is turned on the control button. To display the next (previous) index screen, press b/B.
... listen to the audio, connect with external outputs such as a TV, a speaker, etc. [ To delete images 1 Display the image you press when the camera is powered off, the camera is played back. To undo the zoom, press . If you want to playback mode. Movie: Press z to play back a movie. (Press z again to... with v/V/b/B. To switch to the shooting mode, press again. 2 Select an image with b/B on automatically and set to delete and press 2 Select [Delete] with this camera when a movie is turned on the control button. To display the next (previous) index screen, press b/B.
Instruction Manual
Page 16
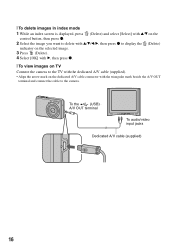
... v/V/b/B, then press z to display the (Delete) indicator on the selected image. 3 Press (Delete). 4 Select [OK] with B, then press z. [ To view images on TV Connect the camera to the TV with the dedicated A/V cable (supplied). • Align the arrow mark on the dedicated A/V cable connector with the triangular mark beside the A/V OUT...
... v/V/b/B, then press z to display the (Delete) indicator on the selected image. 3 Press (Delete). 4 Select [OK] with B, then press z. [ To view images on TV Connect the camera to the TV with the dedicated A/V cable (supplied). • Align the arrow mark on the dedicated A/V cable connector with the triangular mark beside the A/V OUT...
Instruction Manual
Page 17
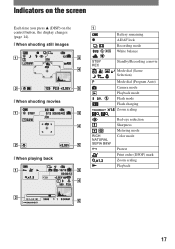
N Red-eye reduction Sharpness Metering mode Color mode Protect Print order (DPOF) mark Zoom scaling Playback 17 Indicators on the screen Each time you press v (DISP) on the control button, the display changes (page 14). [ When shooting still images [ When shooting movies [ When playing back A Battery remaining z AE/AF lock Recording mode White balance STBY REC Standby/Recording a movie Mode dial (Scene Selection) Mode dial (Program Auto) Camera mode Playback mode Flash mode Flash charging 1.6 Zoom scaling RICH NATURAL SEPIA B&W -
N Red-eye reduction Sharpness Metering mode Color mode Protect Print order (DPOF) mark Zoom scaling Playback 17 Indicators on the screen Each time you press v (DISP) on the control button, the display changes (page 14). [ When shooting still images [ When shooting movies [ When playing back A Battery remaining z AE/AF lock Recording mode White balance STBY REC Standby/Recording a movie Mode dial (Scene Selection) Mode dial (Program Auto) Camera mode Playback mode Flash mode Flash charging 1.6 Zoom scaling RICH NATURAL SEPIA B&W -
Instruction Manual
Page 19
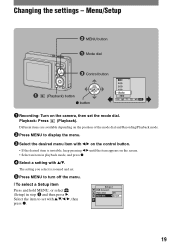
The setting you select is invisible, keep pressing b/B until the item appears on the camera, then set the mode dial. Playback: Press (Playback). Select the item to set . 5 Press MENU to display the menu. 3 Select the desired menu item with b/B ...
The setting you select is invisible, keep pressing b/B until the item appears on the camera, then set the mode dial. Playback: Press (Playback). Select the item to set . 5 Press MENU to display the menu. 3 Select the desired menu item with b/B ...
Instruction Manual
Page 21
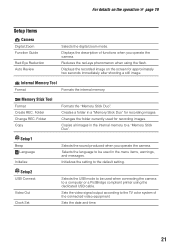
... the TV color system of functions when you operate the camera. Displays the recorded image on the operation 1 page 19 Setup items Camera Digital Zoom Function Guide Red Eye Reduction Auto Review Selects the digital zoom mode. Sets the video signal output according to a... messages. Displays the description of the connected video equipment. Setup1 Beep Language Initialize Selects the sound produced when you operate the camera. For details on the screen for approximately two seconds immediately after shooting a still image. Changes the folder currently used in ...
... the TV color system of functions when you operate the camera. Displays the recorded image on the operation 1 page 19 Setup items Camera Digital Zoom Function Guide Red Eye Reduction Auto Review Selects the digital zoom mode. Sets the video signal output according to a... messages. Displays the description of the connected video equipment. Setup1 Beep Language Initialize Selects the sound produced when you operate the camera. For details on the screen for approximately two seconds immediately after shooting a still image. Changes the folder currently used in ...
Instruction Manual
Page 22
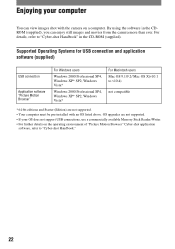
... Stick Reader/Writer. • For further details on a computer. For details, refer to "Cyber-shot Handbook." 22 OS upgrades are not supported. • Your computer must be pre-installed with the camera on the operating environment of "Picture Motion Browser" Cyber-shot application software, refer to "Cyber-shot Handbook" in the CDROM (supplied), you can view images...
... Stick Reader/Writer. • For further details on a computer. For details, refer to "Cyber-shot Handbook." 22 OS upgrades are not supported. • Your computer must be pre-installed with the camera on the operating environment of "Picture Motion Browser" Cyber-shot application software, refer to "Cyber-shot Handbook" in the CDROM (supplied), you can view images...
Instruction Manual
Page 23
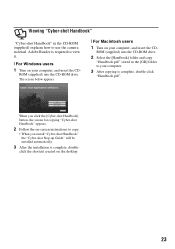
... Adobe Reader is complete, double- When you click the [Cyber-shot Handbook] button, the screen for copying "Cyber-shot Handbook" appears. 2 Follow the on-screen instructions to copy. • When you install "Cyber-shot Handbook," the "Cyber-shot Step-up Guide" will be installed automatically. 3 After the ...installation is required to your computer, and insert the CD- Viewing "Cyber-shot Handbook" "Cyber-shot Handbook" in the CD-ROM (supplied) explains how to use the camera in the [GB] folder to view it. [ For Windows users 1 Turn on your computer....
... Adobe Reader is complete, double- When you click the [Cyber-shot Handbook] button, the screen for copying "Cyber-shot Handbook" appears. 2 Follow the on-screen instructions to copy. • When you install "Cyber-shot Handbook," the "Cyber-shot Step-up Guide" will be installed automatically. 3 After the ...installation is required to your computer, and insert the CD- Viewing "Cyber-shot Handbook" "Cyber-shot Handbook" in the CD-ROM (supplied) explains how to use the camera in the [GB] folder to view it. [ For Windows users 1 Turn on your computer....

Instruction Manual
Page 24
... life (min.) No. of images Alkaline Approx. The zoom is low. - The flash is low. • The values shown for regular camera use only. Approx. 50 100 • Shooting in all alkaline batteries in the following conditions: - The battery power is used frequently. -... product setting, etc. • The supplied alkaline battery is used frequently. - Approx. 350 7000 [ Notes on the CIPA standard. (CIPA: Camera & Imaging Products Association) • The battery life and the number of LCD Backlight is based on the batteries • The battery capacity decreases...
... life (min.) No. of images Alkaline Approx. The zoom is low. - The flash is low. • The values shown for regular camera use only. Approx. 50 100 • Shooting in all alkaline batteries in the following conditions: - The battery power is used frequently. -... product setting, etc. • The supplied alkaline battery is used frequently. - Approx. 350 7000 [ Notes on the CIPA standard. (CIPA: Camera & Imaging Products Association) • The battery life and the number of LCD Backlight is based on the batteries • The battery capacity decreases...
Instruction Manual
Page 25
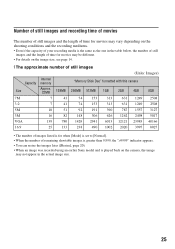
... details on the image size, see page 14. [ The approximate number of still images (Units: Images) Internal Capacity memory "Memory Stick Duo" formatted with this camera Size Approx. 22MB 128MB 256MB 512MB 1GB 2GB 4GB 8GB 7M 7 41 74 153 313 631 1249 2508 3:2 7 41 74 153 313 631 1249 2508... than 9,999, the ">9999" indicator appears. • You can resize the images later ([Resize], page 20). • When an image was recorded using an earlier Sony model and is played back on the camera, the image may not appear in the actual image size. 25
... details on the image size, see page 14. [ The approximate number of still images (Units: Images) Internal Capacity memory "Memory Stick Duo" formatted with this camera Size Approx. 22MB 128MB 256MB 512MB 1GB 2GB 4GB 8GB 7M 7 41 74 153 313 631 1249 2508 3:2 7 41 74 153 313 631 1249 2508... than 9,999, the ">9999" indicator appears. • You can resize the images later ([Resize], page 20). • When an image was recorded using an earlier Sony model and is played back on the camera, the image may not appear in the actual image size. 25
Instruction Manual
Page 26
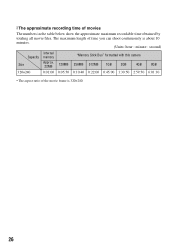
The maximum length of time you can shoot continuously is 320×240. 26 [ The approximate recording time of the movie frame is about 10 minutes. (Units: hour : minute : second) Internal Capacity memory "Memory Stick Duo" formatted with this camera Size Approx. 22MB 128MB 256MB 512MB 1GB 2GB 4GB 8GB 320×240 0:01:00 0:05:50 0:10:40 0:22:00 0:45:00 1:30:50 2:59:50 6:01:10 • The aspect ratio of movies The numbers in the table below show the approximate maximum recordable time obtained by totaling all movie files.
The maximum length of time you can shoot continuously is 320×240. 26 [ The approximate recording time of the movie frame is about 10 minutes. (Units: hour : minute : second) Internal Capacity memory "Memory Stick Duo" formatted with this camera Size Approx. 22MB 128MB 256MB 512MB 1GB 2GB 4GB 8GB 320×240 0:01:00 0:05:50 0:10:40 0:22:00 0:45:00 1:30:50 2:59:50 6:01:10 • The aspect ratio of movies The numbers in the table below show the approximate maximum recordable time obtained by totaling all movie files.
Instruction Manual
Page 27
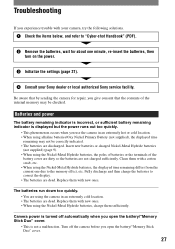
... re-insert the batteries, then turn on the power. 3 Initialize the settings (page 21). 4 Consult your camera, try the following solutions. 1 Check the items below, and refer to "Cyber-shot Handbook" (PDF). 2 Remove the batteries, wait for repair, you give consent that the contents of the battery... out too quickly. • This phenomenon occurs when you use the camera in an extremely cold location. • The batteries are dead. Troubleshooting If you experience trouble with your Sony dealer or local authorized Sony service facility. The batteries run down too quickly. • You are...
... re-insert the batteries, then turn on the power. 3 Initialize the settings (page 21). 4 Consult your camera, try the following solutions. 1 Check the items below, and refer to "Cyber-shot Handbook" (PDF). 2 Remove the batteries, wait for repair, you give consent that the contents of the battery... out too quickly. • This phenomenon occurs when you use the camera in an extremely cold location. • The batteries are dead. Troubleshooting If you experience trouble with your Sony dealer or local authorized Sony service facility. The batteries run down too quickly. • You are...
Instruction Manual
Page 28
... Hydride batteries (page 9). • The batteries are shooting a very bright subject. • The smear phenomenon is full, do not operate the camera for superimposing dates on your computer. • Sony does not guarantee playback of the following: - Delete unnecessary images (page 15). - Shooting still images/movies Cannot record images. • Check the...
... Hydride batteries (page 9). • The batteries are shooting a very bright subject. • The smear phenomenon is full, do not operate the camera for superimposing dates on your computer. • Sony does not guarantee playback of the following: - Delete unnecessary images (page 15). - Shooting still images/movies Cannot record images. • Check the...
Instruction Manual
Page 29
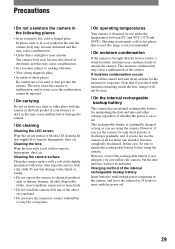
...Charging method of the internal rechargeable backup battery Insert batteries with enough power remaining in the camera, and leave the camera for the moisture to chemical products such as in a car parked in the sun, the camera body may become deformed and this may cause a malfunction. • Under direct sunlight ... places such as thinner, benzine, alcohol, disposable cloths, insect repellent, sunscreen or insecticide. • Do not touch the camera with any of the above on or off the camera and wait about an hour for 24 hours or more with a dry cloth. In this case, be repaired. [ On...
...Charging method of the internal rechargeable backup battery Insert batteries with enough power remaining in the camera, and leave the camera for the moisture to chemical products such as in a car parked in the sun, the camera body may become deformed and this may cause a malfunction. • Under direct sunlight ... places such as thinner, benzine, alcohol, disposable cloths, insect repellent, sunscreen or insecticide. • Do not touch the camera with any of the above on or off the camera and wait about an hour for 24 hours or more with a dry cloth. In this case, be repaired. [ On...


