
Instruction Manual
Page 3
..., or built-in the operating instructions and adhere to them , paying particular attention to the plugs, receptacles, and the point where the cord exits from battery power, or other sources, refer to have a suitable outlet installed. Use a cloth lightly dampened with a cloth or other materials. - Installation Water and Moisture Do not...
..., or built-in the operating instructions and adhere to them , paying particular attention to the plugs, receptacles, and the point where the cord exits from battery power, or other sources, refer to have a suitable outlet installed. Use a cloth lightly dampened with a cloth or other materials. - Installation Water and Moisture Do not...
Instruction Manual
Page 6
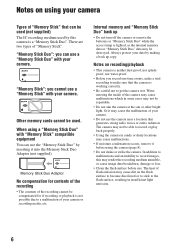
.... • Clean the flash surface before using a "Memory Stick Duo" with your data by making a back up • Do not turn off the camera or remove the batteries or "Memory Stick Duo" while the access lamp is lighted, as the internal memory data or "Memory Stick Duo" data may not be compensated... for contents of the recording • The contents of the recording cannot be repairable. • Do not aim the camera at the sun or ...
.... • Clean the flash surface before using a "Memory Stick Duo" with your data by making a back up • Do not turn off the camera or remove the batteries or "Memory Stick Duo" while the access lamp is lighted, as the internal memory data or "Memory Stick Duo" data may not be compensated... for contents of the recording • The contents of the recording cannot be repairable. • Do not aim the camera at the sun or ...
Instruction Manual
Page 8
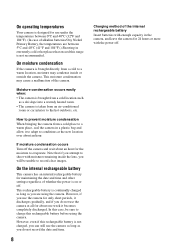
...the date and time. 8 Charging method of the internal rechargeable battery Insert batteries with enough capacity in the camera, and leave the camera for 24 hours or more with moisture remaining inside or outside the camera. Note that exceed this range is not recommended. If moisture ...cold to a warm location, moisture may cause a malfunction of alkaline batteries/Oxy Nickel Primary Battery, the temperatures are using the camera. This rechargeable battery is continually charged as long as you do not use the camera at the new location over about an hour for the moisture to ...
...the date and time. 8 Charging method of the internal rechargeable battery Insert batteries with enough capacity in the camera, and leave the camera for 24 hours or more with moisture remaining inside or outside the camera. Note that exceed this range is not recommended. If moisture ...cold to a warm location, moisture may cause a malfunction of alkaline batteries/Oxy Nickel Primary Battery, the temperatures are using the camera. This rechargeable battery is continually charged as long as you do not use the camera at the new location over about an hour for the moisture to ...
Instruction Manual
Page 9
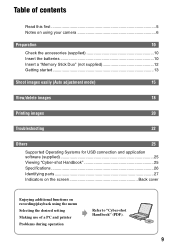
... camera 6 Preparation 10 Check the accessories (supplied 10 Insert the batteries 10 Insert a "Memory Stick Duo" (not supplied 12 Getting started 13 Shoot images easily (Auto adjustment mode) 15 View/delete images 18 Printing images 20 Troubleshooting 22 Others 25 Supported Operating Systems for USB connection and application software (supplied 25 Viewing "Cyber-shot...
... camera 6 Preparation 10 Check the accessories (supplied 10 Insert the batteries 10 Insert a "Memory Stick Duo" (not supplied 12 Getting started 13 Shoot images easily (Auto adjustment mode) 15 View/delete images 18 Printing images 20 Troubleshooting 22 Others 25 Supported Operating Systems for USB connection and application software (supplied 25 Viewing "Cyber-shot...
Instruction Manual
Page 10
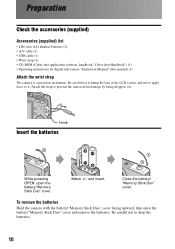
... not to apply force to it. and insert. Preparation Check the accessories (supplied) Accessories (supplied) list • LR6 (size AA) alkaline batteries (2) • A/V cable (1) • USB cable (1) • Wrist strap (1) • CD-ROM (Cyber-shot application software, handbook "Cyber-shot Handbook") (1) • Operating instructions for digital still camera "Instruction Manual" (this manual) (1) Attach the wrist strap The...
... not to apply force to it. and insert. Preparation Check the accessories (supplied) Accessories (supplied) list • LR6 (size AA) alkaline batteries (2) • A/V cable (1) • USB cable (1) • Wrist strap (1) • CD-ROM (Cyber-shot application software, handbook "Cyber-shot Handbook") (1) • Operating instructions for digital still camera "Instruction Manual" (this manual) (1) Attach the wrist strap The...
Instruction Manual
Page 11
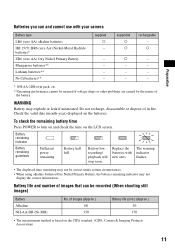
... and check the time on the batteries. Battery life and number of in fire. of the battery. Replace the batteries with your camera Battery type LR6 (size AA) alkaline batteries HR 15/51:HR6 (size AA) Nickel-Metal Hydride batteries* ZR6 (size AA) Oxy Nickel Primary Battery Manganese batteries** Lithium batteries** Ni-Cd batteries** supplied a - - - - - Preparation Batteries you can be recorded (When shooting...
... and check the time on the batteries. Battery life and number of in fire. of the battery. Replace the batteries with your camera Battery type LR6 (size AA) alkaline batteries HR 15/51:HR6 (size AA) Nickel-Metal Hydride batteries* ZR6 (size AA) Oxy Nickel Primary Battery Manganese batteries** Lithium batteries** Ni-Cd batteries** supplied a - - - - - Preparation Batteries you can be recorded (When shooting...
Instruction Manual
Page 12
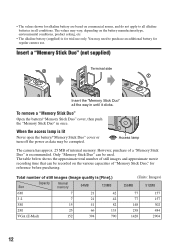
...1428 157 157 302 484 2904 12 • The values shown for regular camera use only. You may need to purchase an additional battery for alkaline battery are based on commercial norms, and do not apply to all alkaline batteries in all the way in once. Only "Memory Stick Duo" can be ...or turn off the power as data may vary, depending on the various capacities of internal memory. To remove a "Memory Stick Duo" Open the battery/"Memory Stick Duo" cover, then push the "Memory Stick Duo" in until it clicks. The table below shows the approximate total number of still images...
...1428 157 157 302 484 2904 12 • The values shown for regular camera use only. You may need to purchase an additional battery for alkaline battery are based on commercial norms, and do not apply to all alkaline batteries in all the way in once. Only "Memory Stick Duo" can be ...or turn off the power as data may vary, depending on the various capacities of internal memory. To remove a "Memory Stick Duo" Open the battery/"Memory Stick Duo" cover, then push the "Memory Stick Duo" in until it clicks. The table below shows the approximate total number of still images...
Instruction Manual
Page 13
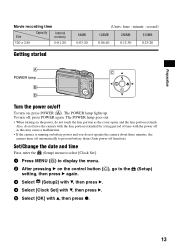
...the lens portion extended for a long period of time with the power off as this may cause a malfunction. • If the camera is running on battery power and you do not touch the lens portion as the cover opens and the lens portion extends. Set/Change the date and ...to display the menu. 2 After pressing B on the control button (C), go to prevent battery drain (Auto power-off function). The POWER lamp goes out. • When turning on the power, do not operate the camera about three minutes, the camera turns off automatically to the (Setup) setting, then press B again. 3 Select (Setup2...
...the lens portion extended for a long period of time with the power off as this may cause a malfunction. • If the camera is running on battery power and you do not touch the lens portion as the cover opens and the lens portion extends. Set/Change the date and ...to display the menu. 2 After pressing B on the control button (C), go to prevent battery drain (Auto power-off function). The POWER lamp goes out. • When turning on the power, do not operate the camera about three minutes, the camera turns off automatically to the (Setup) setting, then press B again. 3 Select (Setup2...
Instruction Manual
Page 20
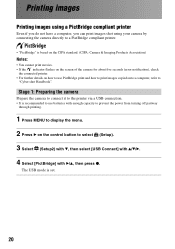
...the menu. 2 Press B on the control button to "Cyber-shot Handbook". Printing images Printing images using a PictBridge compliant printer Even if you do not have a computer, you can print images shot using your camera by connecting the camera directly to a PictBridge compliant printer. • "PictBridge" .... (CIPA: Camera & Imaging Products Association) Notes: • You cannot print movies. • If the indicator flashes on the screen of the camera for about five seconds (error notification), check the connected printer. • For further details on how to use batteries with B/v, then...
...the menu. 2 Press B on the control button to "Cyber-shot Handbook". Printing images Printing images using a PictBridge compliant printer Even if you do not have a computer, you can print images shot using your camera by connecting the camera directly to a PictBridge compliant printer. • "PictBridge" .... (CIPA: Camera & Imaging Products Association) Notes: • You cannot print movies. • If the indicator flashes on the screen of the camera for about five seconds (error notification), check the connected printer. • For further details on how to use batteries with B/v, then...
Instruction Manual
Page 22
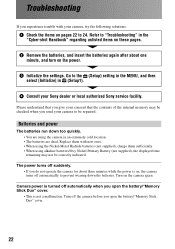
... turn on the camera again. Batteries and power The batteries run down the batteries. Go to the (Setup) setting in the MENU, and then select [Initialize] in the "Cyber-shot Handbook" regarding unlisted items on these pages. 2 Remove the batteries, and insert the batteries again after about ...items on , the camera turns off automatically to prevent wearing down too quickly. • You are using alkaline batteries/Oxy Nickel Primary Battery (not supplied), the displayed time remaining may be checked when you send your Sony dealer or local authorized Sony service facility. Please ...
... turn on the camera again. Batteries and power The batteries run down the batteries. Go to the (Setup) setting in the MENU, and then select [Initialize] in the "Cyber-shot Handbook" regarding unlisted items on these pages. 2 Remove the batteries, and insert the batteries again after about ...items on , the camera turns off automatically to prevent wearing down too quickly. • You are using alkaline batteries/Oxy Nickel Primary Battery (not supplied), the displayed time remaining may be checked when you send your Sony dealer or local authorized Sony service facility. Please ...
Instruction Manual
Page 26
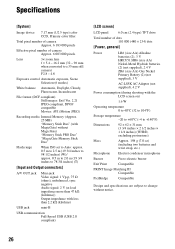
...Lens 3× zoom lens f = 5.4 - 16.2 mm (32 - 96 mm when converted to a 35 mm still camera) F2.8 - 4.8 Exposure control Automatic exposure, Scene Selection (6 modes) White balance Automatic, Daylight, Cloudy, Fluorescent, Incandescent File ...3/4 inches × 2 1/2 inches × 1 1/4 inches) (W/H/D, excluding protrusions) Mass Microphone Buzzer Approx. 198 g (7.0 oz) (including two batteries and wrist strap, etc.) Electret condenser microphone Piezo-electric buzzer Exif Print Compatible PRINT Image Matching III Compatible PictBridge Compatible Design and specifications are subject...
...Lens 3× zoom lens f = 5.4 - 16.2 mm (32 - 96 mm when converted to a 35 mm still camera) F2.8 - 4.8 Exposure control Automatic exposure, Scene Selection (6 modes) White balance Automatic, Daylight, Cloudy, Fluorescent, Incandescent File ...3/4 inches × 2 1/2 inches × 1 1/4 inches) (W/H/D, excluding protrusions) Mass Microphone Buzzer Approx. 198 g (7.0 oz) (including two batteries and wrist strap, etc.) Electret condenser microphone Piezo-electric buzzer Exif Print Compatible PRINT Image Matching III Compatible PictBridge Compatible Design and specifications are subject...

Instruction Manual
Page 27
M Battery/"Memory Stick Duo" cover (10) N AC Adaptor cord cover O For shooting: Zoom (W/T) button (16) For viewing: / (Playback zoom) button (19)/ (Index) button (19) P LCD screen (7) Q (...) K A/V OUT jack (19) L Tripod receptacle • Use a tripod with a screw length of less than 5.5 mm (7/32 inch), and may damage the camera. You will be unable to firmly secure the camera to shoot still images, see "To shoot an image using the mode dial" (page 16). wa 5 q; qj ws qa Others qs...
M Battery/"Memory Stick Duo" cover (10) N AC Adaptor cord cover O For shooting: Zoom (W/T) button (16) For viewing: / (Playback zoom) button (19)/ (Index) button (19) P LCD screen (7) Q (...) K A/V OUT jack (19) L Tripod receptacle • Use a tripod with a screw length of less than 5.5 mm (7/32 inch), and may damage the camera. You will be unable to firmly secure the camera to shoot still images, see "To shoot an image using the mode dial" (page 16). wa 5 q; qj ws qa Others qs...

Instruction Manual
Page 28
... capacity Remaining "Memory Stick" capacity Recording time [maximum recordable time] Remaining number of recordable images Self-timer D Display E Indication Low battery warning AF range finder frame E Display 33 F2.8 Mode (not displayed on the screen shown above) Indication Shutter speed Aperture value Menu... mode) When shooting movies (Factory setting) STBY 320 101 00:00:00 [00:00:30] A Display z STBY REC SL B Display Indication Battery remaining AE/AF lock Recording mode Standby/Recording a movie Flash mode Flash charging Indication Macro C Display 6M 3:2 3M 2M VGA 3 2 0 FINE...
... capacity Remaining "Memory Stick" capacity Recording time [maximum recordable time] Remaining number of recordable images Self-timer D Display E Indication Low battery warning AF range finder frame E Display 33 F2.8 Mode (not displayed on the screen shown above) Indication Shutter speed Aperture value Menu... mode) When shooting movies (Factory setting) STBY 320 101 00:00:00 [00:00:30] A Display z STBY REC SL B Display Indication Battery remaining AE/AF lock Recording mode Standby/Recording a movie Flash mode Flash charging Indication Macro C Display 6M 3:2 3M 2M VGA 3 2 0 FINE...
Service Manual
Page 2
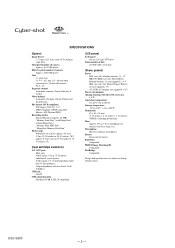
DSC-S500 - 2 - SPECIFICATIONS [System] Image device 7.17 mm (1/2.5 type) color CCD, Primary color filter Total pixel number of camera Approx. 6 183 000 pixels Effective pixel number of camera Approx. 6 003 000 pixels Lens 3× zoom lens f = 5.4 - 16.2 mm (32 - 96 mm when converted to a 35 mm still camera...; 2 1/2 inches × 1 1/4 inches) (W/H/D, excluding protrusions) Mass Approx. 198 g (7.0 oz) (including two batteries and wrist strap, etc.) Microphone Electret condenser microphone Buzzer Piezo-electric buzzer Exif Print Compatible PRINT Image Matching III Compatible PictBridge ...
DSC-S500 - 2 - SPECIFICATIONS [System] Image device 7.17 mm (1/2.5 type) color CCD, Primary color filter Total pixel number of camera Approx. 6 183 000 pixels Effective pixel number of camera Approx. 6 003 000 pixels Lens 3× zoom lens f = 5.4 - 16.2 mm (32 - 96 mm when converted to a 35 mm still camera...; 2 1/2 inches × 1 1/4 inches) (W/H/D, excluding protrusions) Mass Approx. 198 g (7.0 oz) (including two batteries and wrist strap, etc.) Microphone Electret condenser microphone Buzzer Piezo-electric buzzer Exif Print Compatible PRINT Image Matching III Compatible PictBridge ...

Service Manual
Page 3
...OR IN SUPPLEMENTS PUBLISHED BY SONY. Unleaded solder Boards requiring use only unleaded solder but the iron tip has to be added to the customer and recommend their replacement. 5. Point them out to ordinary solder. - 3 - Ordinary soldering irons can be used but unleaded solder may DSC-S500 also be applied to the...3. Check the interboard wiring to apply force on IC pins, etc. • Usable with ordinary solder It is best to use of explosion if battery is more viscous (sticky, less prone to flow) than ordinary solder. NE REMPLACER CES COMPOSANTS QUE PAR DES PIÈSES...
...OR IN SUPPLEMENTS PUBLISHED BY SONY. Unleaded solder Boards requiring use only unleaded solder but the iron tip has to be added to the customer and recommend their replacement. 5. Point them out to ordinary solder. - 3 - Ordinary soldering irons can be used but unleaded solder may DSC-S500 also be applied to the...3. Check the interboard wiring to apply force on IC pins, etc. • Usable with ordinary solder It is best to use of explosion if battery is more viscous (sticky, less prone to flow) than ordinary solder. NE REMPLACER CES COMPOSANTS QUE PAR DES PIÈSES...
Service Manual
Page 5
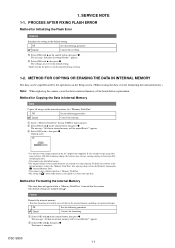
... the internal memory are retained even after copying, then execute the [Format ] command in internal memory will be copied Ready?" Copying 102_COPY •Use batteries with v, then press z. appears. 2 Select [OK] with v, then press z. appears. 3 Select [OK] with v, then press z. Copying ...Setup screen. (When erasing the data, execute formatting the internal memory.) Note: When replacing the camera, erase the data in the internal memory, including even protected images. DSC-S500 1-1 OK See the following procedure. Cancel Cancels the copying. 1 Insert a "Memory Stick Duo...
... the internal memory are retained even after copying, then execute the [Format ] command in internal memory will be copied Ready?" Copying 102_COPY •Use batteries with v, then press z. appears. 2 Select [OK] with v, then press z. appears. 3 Select [OK] with v, then press z. Copying ...Setup screen. (When erasing the data, execute formatting the internal memory.) Note: When replacing the camera, erase the data in the internal memory, including even protected images. DSC-S500 1-1 OK See the following procedure. Cancel Cancels the copying. 1 Insert a "Memory Stick Duo...

Service Manual
Page 6
...DSC-S500 3 1 Two tapping screws (M1.7x3.5) silver 2 Middle cover assembly (right) 3 Tapping screw (M1.7x16) silver 4 Inner belt (left) 2-1 Front section (See page 2-2.) 1 2 1 1 1 Six tapping screws (M1.7x3.5) silver 2 Rear cover assembly The following flow chart shows the disassembly procedure. 2-1. DISASSEMBLY 2. DISASSEMBLY 2 3 1 A Battery... case lid removal 1 Pull out the battery case slowly until stop. 2 Put a nail into a slot. 3 Pull the battery case in the direction of arrow A. 1 1 2 1 2...
...DSC-S500 3 1 Two tapping screws (M1.7x3.5) silver 2 Middle cover assembly (right) 3 Tapping screw (M1.7x16) silver 4 Inner belt (left) 2-1 Front section (See page 2-2.) 1 2 1 1 1 Six tapping screws (M1.7x3.5) silver 2 Rear cover assembly The following flow chart shows the disassembly procedure. 2-1. DISASSEMBLY 2. DISASSEMBLY 2 3 1 A Battery... case lid removal 1 Pull out the battery case slowly until stop. 2 Put a nail into a slot. 3 Pull the battery case in the direction of arrow A. 1 1 2 1 2...

Service Manual
Page 10
No. 1 2 3 4 5 Part No. Description 2-699-483-01 LID, Battery Case 2-682-974-01 Mode Dial 2-682-975-01 Shutter Button 2-682-976-01 Shutter Button Spring DSC-S500 4-1 EXPLODED VIEWS 4-1-1. Description 2-682-984-01 Screw TP1.7*3.5 X-2149-431-1 Cover Assy, Rear X-2149-248-1 Belt (left), Inner X-2109-765-1 Middle Cover Assy (right) 2-694-421-01 Screw TP1.7*16 Ref. OVERALL SECTION 4. REPAIR PARTS LIST 2 1 1 7 8 9 1 1 1 4 3 Main Frame Block (See page 4-3.) 6 1 Front Block (See page 4-2.) 5 1 Ref. No. 6 7 8 9 Part No. 4-1.
No. 1 2 3 4 5 Part No. Description 2-699-483-01 LID, Battery Case 2-682-974-01 Mode Dial 2-682-975-01 Shutter Button 2-682-976-01 Shutter Button Spring DSC-S500 4-1 EXPLODED VIEWS 4-1-1. Description 2-682-984-01 Screw TP1.7*3.5 X-2149-431-1 Cover Assy, Rear X-2149-248-1 Belt (left), Inner X-2109-765-1 Middle Cover Assy (right) 2-694-421-01 Screw TP1.7*16 Ref. OVERALL SECTION 4. REPAIR PARTS LIST 2 1 1 7 8 9 1 1 1 4 3 Main Frame Block (See page 4-3.) 6 1 Front Block (See page 4-2.) 5 1 Ref. No. 6 7 8 9 Part No. 4-1.
Service Manual
Page 13
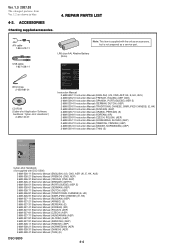
...AEP) 2-689-528-41 Electronic Manual (THAI) (E) DSC-S500 4-4 Ownerís Record The model and serial numbers are located on the bottom. Model No. DSC-S500 Serial No © 2006 Sony Corporation Enjoying the camera Using the menu Using the Setup screen Using your computer...this manual and "Cyber-shot Handbook" (PDF) on this product. Record the serial number in the space provided below . LR6 (size AA) Alkaline Battery (Note) Preparation Digital Still Camera Instruction Manual DSC-S500 Before operating the unit, please read this product. DSC-S500 Serial No Additional ...
...AEP) 2-689-528-41 Electronic Manual (THAI) (E) DSC-S500 4-4 Ownerís Record The model and serial numbers are located on the bottom. Model No. DSC-S500 Serial No © 2006 Sony Corporation Enjoying the camera Using the menu Using the Setup screen Using your computer...this manual and "Cyber-shot Handbook" (PDF) on this product. Record the serial number in the space provided below . LR6 (size AA) Alkaline Battery (Note) Preparation Digital Still Camera Instruction Manual DSC-S500 Before operating the unit, please read this product. DSC-S500 Serial No Additional ...


