
Operating Instructions
Page 3
...different from that interference will not occur in accordance with the instructions, may be used under the following measures: - For the Customers in order to comply with the limits for a digital device pursuant to Subpart B of Part 15 of the FCC Rules. Consult ...the dealer or an experienced radio/TV technician for help. If you should lose the fuse cover, please contact your safety and convenience. This equipment generates, uses, and can return your unwanted lithium ion batteries to your nearest Sony...
...different from that interference will not occur in accordance with the instructions, may be used under the following measures: - For the Customers in order to comply with the limits for a digital device pursuant to Subpart B of Part 15 of the FCC Rules. Consult ...the dealer or an experienced radio/TV technician for help. If you should lose the fuse cover, please contact your safety and convenience. This equipment generates, uses, and can return your unwanted lithium ion batteries to your nearest Sony...
Operating Instructions
Page 4
...recording to a disk. You cannot play back on your camera • This Owner's Manual is working correctly. If moisture condensation occurs, refer to get the camera wet When taking pictures outdoors in CANADA This Class B digital apparatus complies with this may render the "Memory Stick" ...lens • The LCD screen is manufactured using your camera still images recorded on other equipment and playback of the DSC-S30 and the DSC-S50. Do not get the camera wet. Precaution on other equipment (DCR-TRV890E/TRV900/ TRV900E, DSC-D700, DSC-D770) that constantly appear on how to...
...recording to a disk. You cannot play back on your camera • This Owner's Manual is working correctly. If moisture condensation occurs, refer to get the camera wet When taking pictures outdoors in CANADA This Class B digital apparatus complies with this may render the "Memory Stick" ...lens • The LCD screen is manufactured using your camera still images recorded on other equipment and playback of the DSC-S30 and the DSC-S50. Do not get the camera wet. Precaution on other equipment (DCR-TRV890E/TRV900/ TRV900E, DSC-D700, DSC-D770) that constantly appear on how to...

Operating Instructions
Page 5
...Memory Stick 15 Basic operations B Recording Recording still images 16 Recording moving images (DSC-S50 only 20 B Playback Playing back still images 21 Playing back moving images 22 Viewing images using a personal computer 24 Image file storage destinations and image files 28 Advanced operations ...Before performing advanced operations How to use the MODE selector .......... 29 How to use the control button 29 How to print (PRINT MARK 53 Additional information Precautions 54 On "Memory Sticks 55 Using your camera abroad 56 Troubleshooting 57 Warning and notice ...
...Memory Stick 15 Basic operations B Recording Recording still images 16 Recording moving images (DSC-S50 only 20 B Playback Playing back still images 21 Playing back moving images 22 Viewing images using a personal computer 24 Image file storage destinations and image files 28 Advanced operations ...Before performing advanced operations How to use the MODE selector .......... 29 How to use the control button 29 How to print (PRINT MARK 53 Additional information Precautions 54 On "Memory Sticks 55 Using your camera abroad 56 Troubleshooting 57 Warning and notice ...
Operating Instructions
Page 6
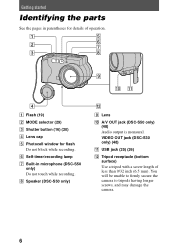
...DSC-S50 only) qs I Lens J A/V OUT jack (DSC-S50 only) (48) Audio output is monaural. F Self-timer/recording lamp G Built-in parentheses for details of less than 9/32 inch (6.5 mm). You will be unable to firmly secure the camera to tripods having longer screws, and may damage the camera. 6 VIDEO OUT jack (DSC...-S30 only) (48) K USB jack (25) (26) L Tripod receptacle (bottom surface) Use a tripod with a screw length of operation. 1 5 6 2 7...
...DSC-S50 only) qs I Lens J A/V OUT jack (DSC-S50 only) (48) Audio output is monaural. F Self-timer/recording lamp G Built-in parentheses for details of less than 9/32 inch (6.5 mm). You will be unable to firmly secure the camera to tripods having longer screws, and may damage the camera. 6 VIDEO OUT jack (DSC...-S30 only) (48) K USB jack (25) (26) L Tripod receptacle (bottom surface) Use a tripod with a screw length of operation. 1 5 6 2 7...
Operating Instructions
Page 7
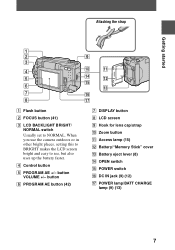
... 5 qs qg 6 qd 7 qh 8 qj A Flash button B FOCUS button (41) C LCD BACKLIGHT BRIGHT/ NORMAL switch Usually set to see, but also uses up the battery faster. When you use the camera outdoors or in other bright places, setting this to BRIGHT makes the LCD screen bright and easy to NORMAL. button F PROGRAM AE...
... 5 qs qg 6 qd 7 qh 8 qj A Flash button B FOCUS button (41) C LCD BACKLIGHT BRIGHT/ NORMAL switch Usually set to see, but also uses up the battery faster. When you use the camera outdoors or in other bright places, setting this to BRIGHT makes the LCD screen bright and easy to NORMAL. button F PROGRAM AE...
Operating Instructions
Page 8
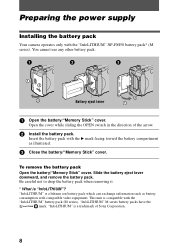
Open the cover while sliding the OPEN switch in the direction of Sony Corporation. 8 Slide the battery eject lever downward, and remove the ... the battery/"Memory Stick" cover. To remove the battery pack Open the battery/"Memory Stick" cover. You cannot use any other battery pack. Be careful not to drop the battery pack when removing it. * What is a...with compatible video equipment. Preparing the power supply Installing the battery pack Your camera operates only with the B mark facing toward the battery compartment as battery consumption with the "InfoLITHIUM" battery pack (M ...
Open the cover while sliding the OPEN switch in the direction of Sony Corporation. 8 Slide the battery eject lever downward, and remove the ... the battery/"Memory Stick" cover. To remove the battery pack Open the battery/"Memory Stick" cover. You cannot use any other battery pack. Be careful not to drop the battery pack when removing it. * What is a...with compatible video equipment. Preparing the power supply Installing the battery pack Your camera operates only with the B mark facing toward the battery compartment as battery consumption with the "InfoLITHIUM" battery pack (M ...
Operating Instructions
Page 9
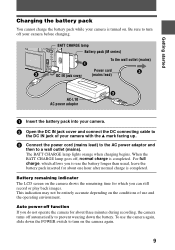
... 9 This indication may not be entirely accurate depending on . Auto power-off function If you can still record or play back images. To use the camera again, slide down the battery. BATT CHARGE lamp Battery pack (M series) To the wall outlet (mains) DC IN jack cover Power cord ... wearing down the POWER switch to a wall outlet (mains). Be sure to use and the operating environment. For full charge, which you do not operate the camera for about three minutes during recording, the camera turns off , normal charge is completed. Getting started Charging the battery pack You...
... 9 This indication may not be entirely accurate depending on . Auto power-off function If you can still record or play back images. To use the camera again, slide down the battery. BATT CHARGE lamp Battery pack (M series) To the wall outlet (mains) DC IN jack cover Power cord ... wearing down the POWER switch to a wall outlet (mains). Be sure to use and the operating environment. For full charge, which you do not operate the camera for about three minutes during recording, the camera turns off , normal charge is completed. Getting started Charging the battery pack You...
Operating Instructions
Page 10
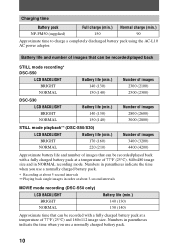
...time when you use a normally charged battery pack. 10 Battery life and number of images that can be recorded/played back STILL mode recording* DSC-S50 LCD BACKLIGHT BRIGHT NORMAL Battery life (min.) 140 (130) 150 (140) Number of images 2300 (2100) 2500 (2300) DSC-S30 LCD ...480 image size and in parentheses indicate the time when you use a normally charged battery pack. ∗ Recording at about 5-second intervals ∗∗ Playing back single images in order at about 3-second intervals MOVIE mode recording (DSC-S50 only) LCD BACKLIGHT BRIGHT NORMAL Battery life (min.) 140 (...
...time when you use a normally charged battery pack. 10 Battery life and number of images that can be recorded/played back STILL mode recording* DSC-S50 LCD BACKLIGHT BRIGHT NORMAL Battery life (min.) 140 (130) 150 (140) Number of images 2300 (2100) 2500 (2300) DSC-S30 LCD ...480 image size and in parentheses indicate the time when you use a normally charged battery pack. ∗ Recording at about 5-second intervals ∗∗ Playing back single images in order at about 3-second intervals MOVIE mode recording (DSC-S50 only) LCD BACKLIGHT BRIGHT NORMAL Battery life (min.) 140 (...

Operating Instructions
Page 11
... the "Memory Stick." • If sufficient battery remaining time is limited. The above figures are a guide when you use your camera at low temperatures, use the flash, repeatedly turn the power on/off or use the zoom. • The capacity of the "Memory Stick" is indicated but the power runs out soon, fully charge...
... the "Memory Stick." • If sufficient battery remaining time is limited. The above figures are a guide when you use your camera at low temperatures, use the flash, repeatedly turn the power on/off or use the zoom. • The capacity of the "Memory Stick" is indicated but the power runs out soon, fully charge...

Operating Instructions
Page 12
Using a car battery Use Sony DC adaptor/charger. 12 Using the AC power adaptor DC IN jack cover To the wall outlet (mains) Power cord (mains lead) AC-L10 AC power adaptor 1 Open the DC IN jack cover and connect the DC connecting cable to the DC IN jack of your camera with the v mark facing up. 2 Connect the power cord (mains lead) to the AC power adaptor and then to a wall outlet (mains).
Using a car battery Use Sony DC adaptor/charger. 12 Using the AC power adaptor DC IN jack cover To the wall outlet (mains) Power cord (mains lead) AC-L10 AC power adaptor 1 Open the DC IN jack cover and connect the DC connecting cable to the DC IN jack of your camera with the v mark facing up. 2 Connect the power cord (mains lead) to the AC power adaptor and then to a wall outlet (mains).

Operating Instructions
Page 13
The menu bar appears on the LCD screen. 3 Select [SETUP] with B on the control button, then press the center z. 4 Select [CLOCK SET] with v/V on the control button. The POWER lamp lights up. 2 Press v on the control button, then press the center z. 13 If these are not set, the CLOCK SET screen appears whenever you first use your camera for recording. Control button POWER lamp 1 Slide down the POWER switch to turn on the power. Getting started Setting the date and time When you turn on your camera, set the date and time.
The menu bar appears on the LCD screen. 3 Select [SETUP] with B on the control button, then press the center z. 4 Select [CLOCK SET] with v/V on the control button. The POWER lamp lights up. 2 Press v on the control button, then press the center z. 13 If these are not set, the CLOCK SET screen appears whenever you first use your camera for recording. Control button POWER lamp 1 Slide down the POWER switch to turn on the power. Getting started Setting the date and time When you turn on your camera, set the date and time.
Operating Instructions
Page 17
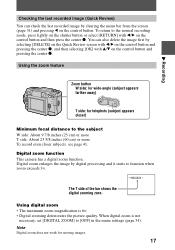
... v/V on the control button and pressing the center z. Using the zoom feature Zoom button W side: for wide-angle (subject appears farther away) T side: for moving images. 17 The T side of the bar shows the digital zooming zone. B Recording Checking the last recorded image (...41. To return to [OFF] in the menu settings (page 34). When digital zoom is 6×. • Digital zooming deteriorates the picture quality. Digital zoom function This camera has a digital zoom function. Note Digital zoom does not work for telephoto (subject appears closer) Minimum focal distance to ...
... v/V on the control button and pressing the center z. Using the zoom feature Zoom button W side: for wide-angle (subject appears farther away) T side: for moving images. 17 The T side of the bar shows the digital zooming zone. B Recording Checking the last recorded image (...41. To return to [OFF] in the menu settings (page 34). When digital zoom is 6×. • Digital zooming deteriorates the picture quality. Digital zoom function This camera has a digital zoom function. Note Digital zoom does not work for telephoto (subject appears closer) Minimum focal distance to ...
Operating Instructions
Page 18
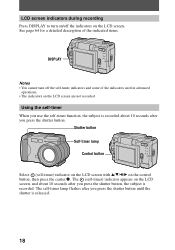
... (self-timer) indicator on the LCD screen with v/V/b/B on the control button, then press the center z. See page 64 for a detailed description of the indicators used in advanced operations. • The indicators on the LCD screen are not recorded. The (self-timer) indicator appears on the LCD screen, and about 10... on/off the self-timer indicators and some of the indicated items. DISPLAY Notes • You cannot turn off the indicators on the LCD screen. Using the self-timer When you press the shutter button. The self-timer lamp flashes after you...
... (self-timer) indicator on the LCD screen with v/V/b/B on the control button, then press the center z. See page 64 for a detailed description of the indicators used in advanced operations. • The indicators on the LCD screen are not recorded. The (self-timer) indicator appears on the LCD screen, and about 10... on/off the self-timer indicators and some of the indicated items. DISPLAY Notes • You cannot turn off the indicators on the LCD screen. Using the self-timer When you press the shutter button. The self-timer lamp flashes after you...
Operating Instructions
Page 19
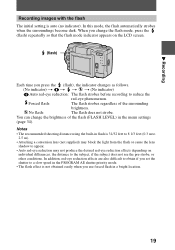
... appear. • Auto red-eye reduction may not produce the desired red-eye reduction effects depending on the LCD screen. (flash) Each time you use forced flash in flash is not obtained easily when you press the (flash), the indicator changes as follows. (No indicator) t t t t (No...not see the pre-strobe, or other conditions. When you change the brightness of the surrounding brightness. Notes • The recommended shooting distance using the built-in a bright location. 19 You can change the flash mode, press the (flash) repeatedly so that the flash mode indicator ...
... appear. • Auto red-eye reduction may not produce the desired red-eye reduction effects depending on the LCD screen. (flash) Each time you use forced flash in flash is not obtained easily when you press the (flash), the indicator changes as follows. (No indicator) t t t t (No...not see the pre-strobe, or other conditions. When you change the brightness of the surrounding brightness. Notes • The recommended shooting distance using the built-in a bright location. 19 You can change the flash mode, press the (flash) repeatedly so that the flash mode indicator ...

Operating Instructions
Page 20
Recording moving images, slide the POWER switch down to turn on the power and insert a "Memory Stick." Zooming or using the self-timer, etc. See page 64 for five seconds. LCD screen indicators during recording Press DISPLAY to turn on/off the indicators on the "...
Recording moving images, slide the POWER switch down to turn on the power and insert a "Memory Stick." Zooming or using the self-timer, etc. See page 64 for five seconds. LCD screen indicators during recording Press DISPLAY to turn on/off the indicators on the "...
Operating Instructions
Page 24
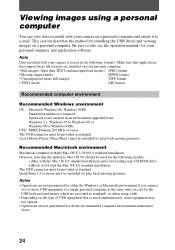
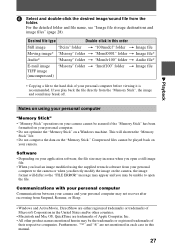
... computer environments mentioned above. 24 Be sure to also see the operation manuals for your camera on a personal computer and attach it to play back moving pictures). Viewing images using a hub. • Depending on the type of USB equipment that is stored in ...formats. Note Data recorded with the Mac OS 8.5.1/8.6/9.0 standard installation However, note that support these file formats are installed on your camera is used for installing the USB driver and viewing images on a personal computer. Recommended Macintosh environment Macintosh computer with your personal computer. &#...
... computer environments mentioned above. 24 Be sure to also see the operation manuals for your camera on a personal computer and attach it to play back moving pictures). Viewing images using a hub. • Depending on the type of USB equipment that is stored in ...formats. Note Data recorded with the Mac OS 8.5.1/8.6/9.0 standard installation However, note that support these file formats are installed on your camera is used for installing the USB driver and viewing images on a personal computer. Recommended Macintosh environment Macintosh computer with your personal computer. &#...
Operating Instructions
Page 25
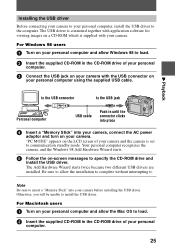
... screen of your camera. Otherwise, you will be unable to the computer. Be sure to allow the Mac OS to load. 2 Insert the supplied CD-ROM in until the connector clicks into place 4 Insert a "Memory Stick" into your personal computer using the supplied USB cable.... "PC MODE" appears on your camera before installing the USB driver. Your personal computer recognizes the camera, and the Windows 98 Add Hardware Wizard starts. 5 Follow the on your personal...
... screen of your camera. Otherwise, you will be unable to the computer. Be sure to allow the Mac OS to load. 2 Insert the supplied CD-ROM in until the connector clicks into place 4 Insert a "Memory Stick" into your personal computer using the supplied USB cable.... "PC MODE" appears on your camera before installing the USB driver. Your personal computer recognizes the camera, and the Windows 98 Add Hardware Wizard starts. 5 Follow the on your personal...
Operating Instructions
Page 27
...from your personal computer to open a still image file. • When you load an image modified using your personal computer "Memory Stick" • "Memory Stick" operations on your camera cannot be assured if the "Memory Stick" has been formatted on your personal computer may not recover... the "Memory Stick" life. • Do not compress the data on a Windows machine. Communications with your personal computer Communications between your camera and your personal computer. • Do not optimize the "Memory Stick" on the "Memory Stick." Compressed files cannot be the trademarks or...
...from your personal computer to open a still image file. • When you load an image modified using your personal computer "Memory Stick" • "Memory Stick" operations on your camera cannot be assured if the "Memory Stick" has been formatted on your personal computer may not recover... the "Memory Stick" life. • Do not compress the data on a Windows machine. Communications with your personal computer Communications between your camera and your personal computer. • Do not optimize the "Memory Stick" on the "Memory Stick." Compressed files cannot be the trademarks or...
Operating Instructions
Page 29
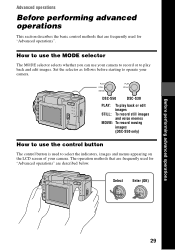
... advanced operations 29 PLAY STILL MOVIE PLAY STILL DSC-S50 DSC-S30 PLAY: To play back and edit images. Advanced operations Before performing advanced operations This section describes the basic control methods that are frequently used for "Advanced operations" are frequently used to operate your camera. How to use the MODE selector The MODE selector selects whether...
... advanced operations 29 PLAY STILL MOVIE PLAY STILL DSC-S50 DSC-S30 PLAY: To play back and edit images. Advanced operations Before performing advanced operations This section describes the basic control methods that are frequently used for "Advanced operations" are frequently used to operate your camera. How to use the MODE selector The MODE selector selects whether...
Operating Instructions
Page 34
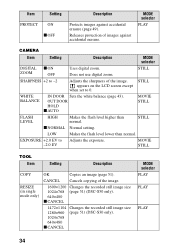
...page 51) (DSC-S50 only). 640×480 x CANCEL 1472×1104 Changes the recorded still image size 1280×960 (page 51) (DSC-S30 only). 1024×768 640×480 x CANCEL MODE selector PLAY PLAY PLAY 34 Does not use digital zoom. WHITE BALANCE...erasure (page 49). Item Setting PROTECT ON x OFF Description Protects images against accidental erasure. MODE selector PLAY CAMERA Item Setting Description MODE selector DIGITAL x ON ZOOM OFF Uses digital zoom. EXPOSURE +2.0 EV to Adjusts the exposure. -2.0 EV MOVIE STILL TOOL Item Setting Description COPY RESIZE ...
...page 51) (DSC-S50 only). 640×480 x CANCEL 1472×1104 Changes the recorded still image size 1280×960 (page 51) (DSC-S30 only). 1024×768 640×480 x CANCEL MODE selector PLAY PLAY PLAY 34 Does not use digital zoom. WHITE BALANCE...erasure (page 49). Item Setting PROTECT ON x OFF Description Protects images against accidental erasure. MODE selector PLAY CAMERA Item Setting Description MODE selector DIGITAL x ON ZOOM OFF Uses digital zoom. EXPOSURE +2.0 EV to Adjusts the exposure. -2.0 EV MOVIE STILL TOOL Item Setting Description COPY RESIZE ...

