
Operating Instructions
Page 4
... the recording in the U.S.A. These points are operational for the DSCP72 only) This camera is not a malfunction. Exposing the LCD screen, the finder or the lens to power this may render the "Memory Stick" unusable or image data breakdown, damage or loss may regulate disposal of your...not shake or strike the camera In addition to malfunctions and inability to a disk. "Memory Stick" N50 For the Customers in any way. • Be careful when placing the camera near a window or outdoors. Please consult with power zoom lens. and Canada THIS CLASS B DIGITAL DEVICE COMPLIES WITH PART 15 ...
... the recording in the U.S.A. These points are operational for the DSCP72 only) This camera is not a malfunction. Exposing the LCD screen, the finder or the lens to power this may render the "Memory Stick" unusable or image data breakdown, damage or loss may regulate disposal of your...not shake or strike the camera In addition to malfunctions and inability to a disk. "Memory Stick" N50 For the Customers in any way. • Be careful when placing the camera near a window or outdoors. Please consult with power zoom lens. and Canada THIS CLASS B DIGITAL DEVICE COMPLIES WITH PART 15 ...
Operating Instructions
Page 5
... irrecoverable damage to interfere the camera. Trademarks • "Memory Stick," , and "MagicGate Memory Stick" are trademarks of Sony Corporation. • "Memory Stick Duo" and are trademarks of Sony Corporation. • "Memory Stick PRO" and are trademarks of Sony Corporation. • "MagicGate" and are trademarks of Sony Corporation. • Microsoft and Windows are of the DSC-P72 unless noted otherwise. Remove...
... irrecoverable damage to interfere the camera. Trademarks • "Memory Stick," , and "MagicGate Memory Stick" are trademarks of Sony Corporation. • "Memory Stick Duo" and are trademarks of Sony Corporation. • "Memory Stick PRO" and are trademarks of Sony Corporation. • "MagicGate" and are trademarks of Sony Corporation. • Microsoft and Windows are of the DSC-P72 unless noted otherwise. Remove...

Operating Instructions
Page 6
...the batteries 16 Using an external power source 19 Using your camera abroad 19 Turning your camera on a TV screen 38 Deleting still images Deleting images 40 Formatting a "Memory Stick 44 Before advanced operations How to setup and operate your camera 36 Viewing images on /off 20 How to use the ... button 20 Setting the date and time 21 Shooting still images Inserting and removing a "Memory Stick 23 Setting the still image size 24 Image size and quality 25 Basic still image shooting - Macro (DSC-P72 only 30 Using the self-timer 31 Selecting a flash mode 32 Shooting with audio...
...the batteries 16 Using an external power source 19 Using your camera abroad 19 Turning your camera on a TV screen 38 Deleting still images Deleting images 40 Formatting a "Memory Stick 44 Before advanced operations How to setup and operate your camera 36 Viewing images on /off 20 How to use the ... button 20 Setting the date and time 21 Shooting still images Inserting and removing a "Memory Stick 23 Setting the still image size 24 Image size and quality 25 Basic still image shooting - Macro (DSC-P72 only 30 Using the self-timer 31 Selecting a flash mode 32 Shooting with audio...
Operating Instructions
Page 7
...61 Enlarging a portion of images that can be saved/ shooting time 101 Menu items 102 SET UP items 106 Precautions 108 The "Memory Stick 109 The nickel-metal hydride batteries ........110 The battery charger 111 Specifications 111 The LCD screen 113 Index Index 116 7 For ...Windows users 78 Installing the USB driver 79 Installing "Image Transfer 80 Installing "ImageMixer 81 Connecting the camera to your computer 82 Copying images using "Image Transfer" 83 Changing "Image Transfer" settings .. 84 Copying images without using "Image Transfer...
...61 Enlarging a portion of images that can be saved/ shooting time 101 Menu items 102 SET UP items 106 Precautions 108 The "Memory Stick 109 The nickel-metal hydride batteries ........110 The battery charger 111 Specifications 111 The LCD screen 113 Index Index 116 7 For ...Windows users 78 Installing the USB driver 79 Installing "Image Transfer 80 Installing "ImageMixer 81 Connecting the camera to your computer 82 Copying images using "Image Transfer" 83 Changing "Image Transfer" settings .. 84 Copying images without using "Image Transfer...

Operating Instructions
Page 8
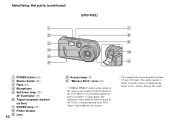
...DSC-P72) 1 7 2 8 3 9 4 q; 5 qa 6 A POWER button (20) B Shutter button (26) C Flash (32) D Microphone E Self-timer lamp (31)/ AF illuminator (33) F Tripod receptacle (bottom surface) G POWER lamp (20) H Finder window I Lens 8 J Access lamp (23) K "Memory Stick" cover (23) • "3.2MEGA PIXELS" shown on the surface of the camera... is the number of effective pixels of less than 5.5 mm (7/32 inch). You will be unable to firmly secure the camera to tripods having longer screws, and...
...DSC-P72) 1 7 2 8 3 9 4 q; 5 qa 6 A POWER button (20) B Shutter button (26) C Flash (32) D Microphone E Self-timer lamp (31)/ AF illuminator (33) F Tripod receptacle (bottom surface) G POWER lamp (20) H Finder window I Lens 8 J Access lamp (23) K "Memory Stick" cover (23) • "3.2MEGA PIXELS" shown on the surface of the camera... is the number of effective pixels of less than 5.5 mm (7/32 inch). You will be unable to firmly secure the camera to tripods having longer screws, and...
Operating Instructions
Page 10
The indication of the number of effective pixels of the CCD is the number of effective pixels of the CCD. Identifying the parts (continued) (DSC-P52) 1 7 2 8 3 9 4 q; 5 6 qa A POWER button (20) B Shutter button (26) C Flash (32) D Microphone E Self-timer lamp (31)/ AF illuminator (33) F...) G POWER lamp (20) H Finder window I Lens 10 J Access lamp (23) K "Memory Stick" cover (23) • "3.2MEGA PIXELS" shown on the surface of the camera is a recommendation of the JCIA (Japan Camera Industry Association). • Use a tripod with a screw length of less than 5.5 mm (7/32 ...
The indication of the number of effective pixels of the CCD is the number of effective pixels of the CCD. Identifying the parts (continued) (DSC-P52) 1 7 2 8 3 9 4 q; 5 6 qa A POWER button (20) B Shutter button (26) C Flash (32) D Microphone E Self-timer lamp (31)/ AF illuminator (33) F...) G POWER lamp (20) H Finder window I Lens 10 J Access lamp (23) K "Memory Stick" cover (23) • "3.2MEGA PIXELS" shown on the surface of the camera is a recommendation of the JCIA (Japan Camera Industry Association). • Use a tripod with a screw length of less than 5.5 mm (7/32 ...

Operating Instructions
Page 12
... tripods having longer screws, and may damage the camera. Identifying the parts (continued) (DSC-P32) 1 7 2 8 3 9 4 5 q; 6 qa A POWER button (20) B Shutter button (26) C Flash (32) D Finder window E Lens F Tripod receptacle (bottom surface) G POWER lamp (20) H Microphone I Self-timer lamp (31)/ 12 AF illuminator (33) J Access lamp (23) K "Memory Stick" cover (23) • "3.2MEGA PIXELS" shown...
... tripods having longer screws, and may damage the camera. Identifying the parts (continued) (DSC-P32) 1 7 2 8 3 9 4 5 q; 6 qa A POWER button (20) B Shutter button (26) C Flash (32) D Finder window E Lens F Tripod receptacle (bottom surface) G POWER lamp (20) H Microphone I Self-timer lamp (31)/ 12 AF illuminator (33) J Access lamp (23) K "Memory Stick" cover (23) • "3.2MEGA PIXELS" shown...
Operating Instructions
Page 15
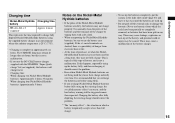
...batteries will be triggered sooner than full charge. • To use up the batteries completely, put the camera in the slide show mode (page 63) and leave it , should correct the problem. * The "memory effect" - If the +/- the situation in an environment where the ambient temperature is 25°C (77... long time, they loose their charge naturally over time. These may cause leakage, explosion, or heat-up the existing charge, the so-called memory effect* can occur, and the low battery warning will charge faster. This is typical of this type of the Nickel-Metal Hydride batteries are ...
...batteries will be triggered sooner than full charge. • To use up the batteries completely, put the camera in the slide show mode (page 63) and leave it , should correct the problem. * The "memory effect" - If the +/- the situation in an environment where the ambient temperature is 25°C (77... long time, they loose their charge naturally over time. These may cause leakage, explosion, or heat-up the existing charge, the so-called memory effect* can occur, and the low battery warning will charge faster. This is typical of this type of the Nickel-Metal Hydride batteries are ...
Operating Instructions
Page 17
...when using the following symbols. The factory setting of the camera is set [Power Save] in an environment where the ambient... , the battery remaining indicator displays the amount of time the camera can be correctly indicated. • When the AC Adaptor ... on. • Based on the conditions under which the camera is being used and the state of the charge, or...longer period of Battery size screen images life (min.) DSC-P72 3.1M On Off Approx. 300 Approx. 150 Approx. ... Off Approx. 320 Approx. 160 Approx. 540 Approx. 270 DSC-P32 3.1M On Off Approx. 320 Approx. 160 Approx. 540 ...
...when using the following symbols. The factory setting of the camera is set [Power Save] in an environment where the ambient... , the battery remaining indicator displays the amount of time the camera can be correctly indicated. • When the AC Adaptor ... on. • Based on the conditions under which the camera is being used and the state of the charge, or...longer period of Battery size screen images life (min.) DSC-P72 3.1M On Off Approx. 300 Approx. 150 Approx. ... Off Approx. 320 Approx. 160 Approx. 540 Approx. 270 DSC-P32 3.1M On Off Approx. 320 Approx. 160 Approx. 540 ...

Operating Instructions
Page 23
... it out. • Whenever the access lamp is lit, the camera is recording or reading out an image. Never remove the "Memory Stick" or turn off the power at this time. To remove the "Memory Stick" Open the "Memory Stick" cover, then push the "Memory Stick" to pop it correctly, a proper recording or playback may...
... it out. • Whenever the access lamp is lit, the camera is recording or reading out an image. Never remove the "Memory Stick" or turn off the power at this time. To remove the "Memory Stick" Open the "Memory Stick" cover, then push the "Memory Stick" to pop it correctly, a proper recording or playback may...

Operating Instructions
Page 25
... size and the higher you make the image quality, the better your image, but also the larger the amount of data needed to preserve your "Memory Stick." This means you want to shoot. The image sizes shown below . (Units: number of images) Capacity Image size 3.1M 2.8M (3:2) 2.0M 16MB 10 (... (number of pixels) and image quality (compression ratio) based on the kind of images you can save fewer images in other Sony devices are viewed on the surface of the camera is the number of effective pixels of the CCD. However, the maximum number of pixels recorded is 3.1 mega pixels. • When...
... size and the higher you make the image quality, the better your image, but also the larger the amount of data needed to preserve your "Memory Stick." This means you want to shoot. The image sizes shown below . (Units: number of images) Capacity Image size 3.1M 2.8M (3:2) 2.0M 16MB 10 (... (number of pixels) and image quality (compression ratio) based on the kind of images you can save fewer images in other Sony devices are viewed on the surface of the camera is the number of effective pixels of the CCD. However, the maximum number of pixels recorded is 3.1 mega pixels. • When...
Operating Instructions
Page 26
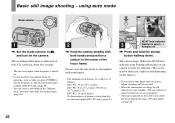
... only) (page 29). • You can continue to turn on the camera. You can create a new folder in the "Memory Stick" and select the folder for storing images (page 46). 2 , Hold the camera steadily with your finger from the shutter button, shooting will be frozen for a split second depending on... on, the camera is ready for about five seconds. • The lens cover opens when the power is turned on. • Do not touch the lens portion while it is operating, such as follows: DSC-P72: 50 cm (19 3/4 inches) DSC-P52: 8 cm (3 1/4 inches) (W)/40 cm (15 3/4 inches) (T) DSC-P32: 10 cm ...
... only) (page 29). • You can continue to turn on the camera. You can create a new folder in the "Memory Stick" and select the folder for storing images (page 46). 2 , Hold the camera steadily with your finger from the shutter button, shooting will be frozen for a split second depending on... on, the camera is ready for about five seconds. • The lens cover opens when the power is turned on. • Do not touch the lens portion while it is operating, such as follows: DSC-P72: 50 cm (19 3/4 inches) DSC-P52: 8 cm (3 1/4 inches) (W)/40 cm (15 3/4 inches) (T) DSC-P32: 10 cm ...

Operating Instructions
Page 27
...metering mode is saved in the menu settings according to multi-pattern metering (pages 48, 51). Snow mode [ ] See page 58. To change according to (Camera) and [Mode] (REC Mode). The shutter clicks, the shooting is completed, and the still image is set to your subject easily since this mode, [...Mode] is set to [Fine], the AF range finder is set the shooting functions in the "Memory Stick." In this mode automatically adjusts the focus, exposure, and white balance. The menu items you are shooting with the batteries, if no tasks are...
...metering mode is saved in the menu settings according to multi-pattern metering (pages 48, 51). Snow mode [ ] See page 58. To change according to (Camera) and [Mode] (REC Mode). The shutter clicks, the shooting is completed, and the still image is set to your subject easily since this mode, [...Mode] is set to [Fine], the AF range finder is set the shooting functions in the "Memory Stick." In this mode automatically adjusts the focus, exposure, and white balance. The menu items you are shooting with the batteries, if no tasks are...

Operating Instructions
Page 40
"Memory Stick access" appears on the camera. Deleting images Deleting still images VGA 101 2/9 VGA 101 2/9 VGA 101 2/9 101-0002 2003 7 4 10:30PM BACK/NEXT VOLUME 1 , Set the mode selector to delete ...
"Memory Stick access" appears on the camera. Deleting images Deleting still images VGA 101 2/9 VGA 101 2/9 VGA 101 2/9 101-0002 2003 7 4 10:30PM BACK/NEXT VOLUME 1 , Set the mode selector to delete ...
Operating Instructions
Page 42
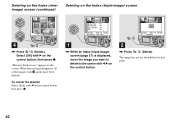
... 7 4 10:30PM OK BACK/NEXT 4 , Press (Delete). When this point. 42 Deleting on the Index (nineimage) screen (continued) Deleting on the control button. 2 , Press (Delete). "Memory Stick access" appears on the control button, then press z. The image has not yet been deleted at this message disappears, all of the images with...
... 7 4 10:30PM OK BACK/NEXT 4 , Press (Delete). When this point. 42 Deleting on the Index (nineimage) screen (continued) Deleting on the control button. 2 , Press (Delete). "Memory Stick access" appears on the control button, then press z. The image has not yet been deleted at this message disappears, all of the images with...
Operating Instructions
Page 43
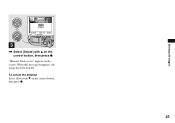
Deleting still images Delete Exit 101-0002 2003 7 4 10:30PM OK BACK/NEXT 3 , Select [Delete] with V on the control button, then press z. 43 "Memory Stick access" appears on the control button, then press z. When this message disappears, the image has been deleted. To cancel the deletion Select [Exit] with v on the screen.
Deleting still images Delete Exit 101-0002 2003 7 4 10:30PM OK BACK/NEXT 3 , Select [Delete] with V on the control button, then press z. 43 "Memory Stick access" appears on the control button, then press z. When this message disappears, the image has been deleted. To cancel the deletion Select [Exit] with v on the screen.
Operating Instructions
Page 44
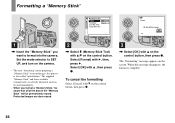
... is complete. 44 Select [OK] with B, then, press B. this message disappears, the format is also called "initialization." Formatting a "Memory Stick" Memory Stick Tool Format: File Number: Create REC. The "Formatting" message appears on the camera. • The term "formatting" means preparing a "Memory Stick" to record images; Set the mode selector to format into the...
... is complete. 44 Select [OK] with B, then, press B. this message disappears, the format is also called "initialization." Formatting a "Memory Stick" Memory Stick Tool Format: File Number: Create REC. The "Formatting" message appears on the camera. • The term "formatting" means preparing a "Memory Stick" to record images; Set the mode selector to format into the...
Operating Instructions
Page 46
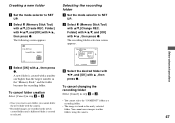
... value selected here is preserved even when the camera is set to 4000 images can select the still image quality from [Fine] or [Standard]. FINE Fine Standard ISO P.Quality Mode PFX • You can create multiple folders within a "Memory Stick." When not creating a new folder, ..."101MSDCF" folder is automatically created. When the folder capacity is exceeded, a new folder is selected as the recording folder. Creating or selecting a folder Mode selector: SET UP Your camera can carry out this operation ...
... value selected here is preserved even when the camera is set to 4000 images can select the still image quality from [Fine] or [Standard]. FINE Fine Standard ISO P.Quality Mode PFX • You can create multiple folders within a "Memory Stick." When not creating a new folder, ..."101MSDCF" folder is automatically created. When the folder capacity is exceeded, a new folder is selected as the recording folder. Creating or selecting a folder Mode selector: SET UP Your camera can carry out this operation ...
Operating Instructions
Page 47
... O K Cancel c Select the desired folder with b/B, and [OK] with v , then press z. b Select (Memory Stick Tool) with the camera. • The image is created folders using the camera. Before advanced operations Create REC. the new folder with v/V, [Create REC. Creating a new folder a Set the mode... selector to SET UP. b Select (Memory Stick Tool) with B/v , then press z. or selected. 47 Selecting the ...
... O K Cancel c Select the desired folder with b/B, and [OK] with v , then press z. b Select (Memory Stick Tool) with the camera. • The image is created folders using the camera. Before advanced operations Create REC. the new folder with v/V, [Create REC. Creating a new folder a Set the mode... selector to SET UP. b Select (Memory Stick Tool) with B/v , then press z. or selected. 47 Selecting the ...
Operating Instructions
Page 54
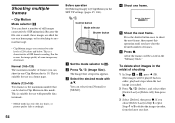
... setup item appears. Making "Clip Motion" e Shoot the next frame. To delete shot images in the midst of frames you can be saved in the "Memory Stick." Shot images will be shot in Clip Motion in order, from [Normal] or [Mobile]. 54 d Shoot one shot. Clip Motion Mode selector: You can...
... setup item appears. Making "Clip Motion" e Shoot the next frame. To delete shot images in the midst of frames you can be saved in the "Memory Stick." Shot images will be shot in Clip Motion in order, from [Normal] or [Mobile]. 54 d Shoot one shot. Clip Motion Mode selector: You can...


