Operating Instructions
Page 3
... static electricity or electromagnetism causes data transfer to this equipment for a digital device pursuant to Subpart B of Part 15 of this equipment has ...fail), restart the application or disconnect and connect the communication cable (USB, etc.) again. For Customers in Europe This product has been... customers in order to comply with the limits for your nearest Sony service station. and Canada THIS DEVICE COMPLIES WITH PART 15 OF...the equipment in the United Kingdom A moulded plug complying with this camera. For more information regarding recycling of the same rating as the ...
... static electricity or electromagnetism causes data transfer to this equipment for a digital device pursuant to Subpart B of Part 15 of this equipment has ...fail), restart the application or disconnect and connect the communication cable (USB, etc.) again. For Customers in Europe This product has been... customers in order to comply with the limits for your nearest Sony service station. and Canada THIS DEVICE COMPLIES WITH PART 15 OF...the equipment in the United Kingdom A moulded plug complying with this camera. For more information regarding recycling of the same rating as the ...
Operating Instructions
Page 8
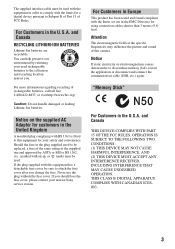
Folder Setup 1 50 1 LCD Backlight Beep Language Setup 2 51 2 File Number USB Connect Video Out Clock Set 8 Folder Change REC. Viewing menu 36 (Folder) - (Protect) DPOF (Print) (Slide) (Resize) (Rotate) (Divide) (Setup) Using the Setup screen Using Setup items 43 Camera 1 44 1 AF Mode Digital Zoom Date/Time Red Eye Reduction AF Illuminator Auto Review Camera 2 47 2 Enlarged Icon Memory Stick Tool 48 Format Create REC.
Folder Setup 1 50 1 LCD Backlight Beep Language Setup 2 51 2 File Number USB Connect Video Out Clock Set 8 Folder Change REC. Viewing menu 36 (Folder) - (Protect) DPOF (Print) (Slide) (Resize) (Rotate) (Divide) (Setup) Using the Setup screen Using Setup items 43 Camera 1 44 1 AF Mode Digital Zoom Date/Time Red Eye Reduction AF Illuminator Auto Review Camera 2 47 2 Enlarged Icon Memory Stick Tool 48 Format Create REC.
Operating Instructions
Page 51
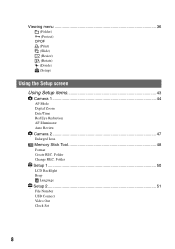
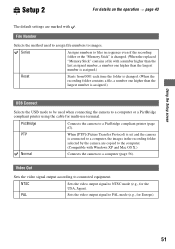
Series Assigns numbers to files in the recording folder selected by the camera are marked with . NTSC Sets the video output signal to a PictBridge compliant printer (page 67). PictBridge Connects the camera to NTSC mode (e.g., for the USA, Japan). PAL Sets the video output signal to connected equipment...PTP When [PTP] (Picture Transfer Protocol) is set and the camera is connected to a computer, the images in sequence even if the recording folder or the "Memory Stick" is assigned.) USB Connect Selects the USB mode to be used to assign file numbers to images. Video Out...
Series Assigns numbers to files in the recording folder selected by the camera are marked with . NTSC Sets the video output signal to a PictBridge compliant printer (page 67). PictBridge Connects the camera to NTSC mode (e.g., for the USA, Japan). PAL Sets the video output signal to connected equipment...PTP When [PTP] (Picture Transfer Protocol) is set and the camera is connected to a computer, the images in sequence even if the recording folder or the "Memory Stick" is assigned.) USB Connect Selects the USB mode to be used to assign file numbers to images. Video Out...
Operating Instructions
Page 53
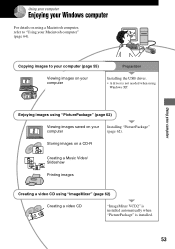
... installed automatically when "PicturePackage" is not needed when using a Macintosh computer, refer to your computer (page 55) Preparation Viewing images on your computer Installing the USB driver. • A driver is installed. 53 Using your computer Enjoying your Windows computer For details on using Windows XP. Storing images on your Macintosh computer...
... installed automatically when "PicturePackage" is not needed when using a Macintosh computer, refer to your computer (page 55) Preparation Viewing images on your computer Installing the USB driver. • A driver is installed. 53 Using your computer Enjoying your Windows computer For details on using Windows XP. Storing images on your Macintosh computer...
Operating Instructions
Page 54
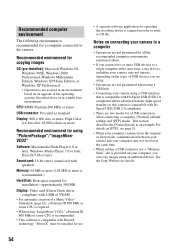
... more is recommended.) Hard Disk: Disk space required for a USB connection when connecting a computer, [Normal] (default setting) and [PTP] modes. Notes on your camera using a USB interface that is compatible with Hi-Speed USB (USB 2.0 compliant) allows advanced transfer (high speed transfer) as an...mentioned above or in order to write to the camera. This section describes the [Normal] mode as this camera is compatible with DirectX technology. See the Sony Website for operating the recording device is compatible with HiSpeed USB (USB 2.0 compliant). • There are not guaranteed...
... more is recommended.) Hard Disk: Disk space required for a USB connection when connecting a computer, [Normal] (default setting) and [PTP] modes. Notes on your camera using a USB interface that is compatible with Hi-Speed USB (USB 2.0 compliant) allows advanced transfer (high speed transfer) as an...mentioned above or in order to write to the camera. This section describes the [Normal] mode as this camera is compatible with DirectX technology. See the Sony Website for operating the recording device is compatible with HiSpeed USB (USB 2.0 compliant). • There are not guaranteed...
Operating Instructions
Page 55
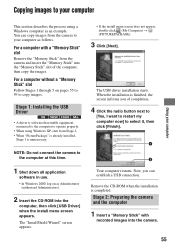
...to 59 to copy images. The USB driver installation starts. Stage 2: Preparing the camera and the computer 1 Insert a "Memory Stick" with a "Memory Stick" slot Remove the "Memory Stick" from the camera and insert the "Memory Stick" into the camera. 55 Copying images to your computer... Using your computer as follows. Stage 1: Installing the USB Driver • A driver is finished, the screen informs you can copy images ...
...to 59 to copy images. The USB driver installation starts. Stage 2: Preparing the camera and the computer 1 Insert a "Memory Stick" with a "Memory Stick" slot Remove the "Memory Stick" from the camera and insert the "Memory Stick" into the camera. 55 Copying images to your computer... Using your computer as follows. Stage 1: Installing the USB Driver • A driver is finished, the screen informs you can copy images ...
Operating Instructions
Page 56
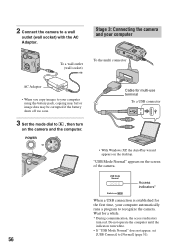
...) To the multi connector AC Adaptor • When you copy images to your computer automatically runs a program to , then turn on the screen of the camera. USB Mode Normal Access indicators* Switch on the desktop. Do not operate the computer until the indicators turn red. POWER Cable for multi-use terminal To...
...) To the multi connector AC Adaptor • When you copy images to your computer automatically runs a program to , then turn on the screen of the camera. USB Mode Normal Access indicators* Switch on the desktop. Do not operate the computer until the indicators turn red. POWER Cable for multi-use terminal To...
Operating Instructions
Page 57
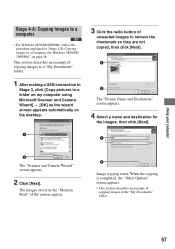
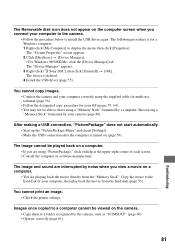
...on the "Memory Stick" of the camera appear. 2 Image copying starts. When the copying is completed, the "Other Options" screen appears. • This section describes an example of copying images to a "My Documents" folder. 1 After making a USB connection in "Stage 4-B: Copying images ...to the "My Documents" folder. 57 This section describes an example of copying images to a Computer (for the images, then click [Next]. 1 1 2 The "Scanner and Camera Wizard" screen appears. 2 Click [Next]. Using ...
...on the "Memory Stick" of the camera appear. 2 Image copying starts. When the copying is completed, the "Other Options" screen appears. • This section describes an example of copying images to a "My Documents" folder. 1 After making a USB connection in "Stage 4-B: Copying images ...to the "My Documents" folder. 57 This section describes an example of copying images to a Computer (for the images, then click [Next]. 1 1 2 The "Scanner and Camera Wizard" screen appears. 2 Click [Next]. Using ...
Operating Instructions
Page 59
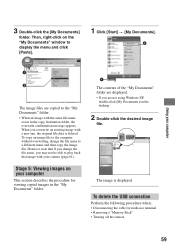
...appears. Using your computer This section describes the procedure for multi-use terminal • Removing a "Memory Stick" • Turning off the camera 59 To copy an image file to the computer without overwriting, change the file name, you overwrite an existing image with a new one..., the original file data is displayed. Stage 5: Viewing images on your computer 3 Double-click the [My Documents] folder. To delete the USB connection Perform the following procedure when: • Disconnecting the cable for viewing copied images in the "My Documents" folder. 1 The contents of ...
...appears. Using your computer This section describes the procedure for multi-use terminal • Removing a "Memory Stick" • Turning off the camera 59 To copy an image file to the computer without overwriting, change the file name, you overwrite an existing image with a new one..., the original file data is displayed. Stage 5: Viewing images on your computer 3 Double-click the [My Documents] folder. To delete the USB connection Perform the following procedure when: • Disconnecting the cable for viewing copied images in the "My Documents" folder. 1 The contents of ...
Operating Instructions
Page 62
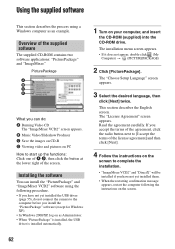
...carefully. Installing the software You can do not connect the camera to the computer before you have not yet installed them. • When the restarting confirmation message appears, restart the computer following procedure. • If you have not yet installed the USB driver (page 55), do : A Burning Video CD... Click [PicturePackage]. PicturePackage A B C D What you can install the "PicturePackage" and "ImageMixer VCD2" software using a Windows computer as Administrator. • When "PicturePackage" is installed, the USB driver is installed automatically. 1 Turn on as an example.
...carefully. Installing the software You can do not connect the camera to the computer before you have not yet installed them. • When the restarting confirmation message appears, restart the computer following procedure. • If you have not yet installed the USB driver (page 55), do : A Burning Video CD... Click [PicturePackage]. PicturePackage A B C D What you can install the "PicturePackage" and "ImageMixer VCD2" software using a Windows computer as Administrator. • When "PicturePackage" is installed, the USB driver is installed automatically. 1 Turn on as an example.
Operating Instructions
Page 64
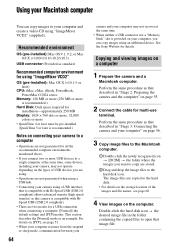
.... 2 Connect the cable for details. This section describes the [Normal] mode as this camera is compatible with HiSpeed USB (USB 2.0 compliant). • There are not guaranteed for a USB connection when connecting a computer, [Normal] (the default setting) and [PTP] modes. See the Sony Website for multi-use terminal. Perform the same procedure as that described in...
.... 2 Connect the cable for details. This section describes the [Normal] mode as this camera is compatible with HiSpeed USB (USB 2.0 compliant). • There are not guaranteed for a USB connection when connecting a computer, [Normal] (the default setting) and [PTP] modes. See the Sony Website for multi-use terminal. Perform the same procedure as that described in...
Operating Instructions
Page 67
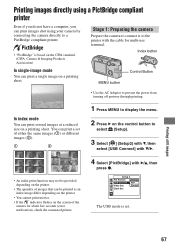
... B on the control button to select (Setup). 3 Select [ ] (Setup2) with V, then 2 select [USB Connect] with V/B. 4 Select [PictBridge] with the cable for about five seconds (error notification), check the connected printer. Printing still images 67 Stage 1: Preparing the camera Prepare the camera to connect it to prevent the power from turning off partway through...
... B on the control button to select (Setup). 3 Select [ ] (Setup2) with V, then 2 select [USB Connect] with V/B. 4 Select [PictBridge] with the cable for about five seconds (error notification), check the connected printer. Printing still images 67 Stage 1: Preparing the camera Prepare the camera to connect it to prevent the power from turning off partway through...
Operating Instructions
Page 68
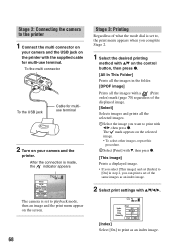
.... 1Select the image you want to print with b/B, then press z. Stage 2: Connecting the camera to the printer 1 Connect the multi connector on your camera and the printer. To the multi connector To the USB jack Cable for multi-use terminal. After the connection is made, the indicator appears Print All... In This Folder DPOF image Select This image Cancel The camera is set to playback mode, then an image and the print menu appear on your camera and the USB jack on the printer with v/V/b/B. 1M 101 2/9 Index Size Date Quantity Print Off Default Off...
.... 1Select the image you want to print with b/B, then press z. Stage 2: Connecting the camera to the printer 1 Connect the multi connector on your camera and the printer. To the multi connector To the USB jack Cable for multi-use terminal. After the connection is made, the indicator appears Print All... In This Folder DPOF image Select This image Cancel The camera is set to playback mode, then an image and the print menu appear on your camera and the USB jack on the printer with v/V/b/B. 1M 101 2/9 Index Size Date Quantity Print Off Default Off...

Operating Instructions
Page 79
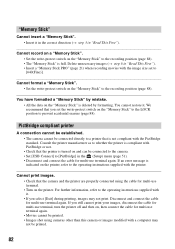
... "Read This First"). • The battery level is correct (page 72). • The cable for multi-use the screen. Deleting/Editing images Your camera cannot delete an image. • Cancel the protection (page 38). • Set the write-protect switch on the "Memory Stick" to the LOCK ... images Refer to the recording position (page 88). The image does not appear on your camera is not guaranteed. • The camera is set the write-protect switch on the "Memory Stick" to "Computers" (page 80) in USB mode. Delete unnecessary images (t step 6 in succession. • The "Memory Stick" ...
... "Read This First"). • The battery level is correct (page 72). • The cable for multi-use the screen. Deleting/Editing images Your camera cannot delete an image. • Cancel the protection (page 38). • Set the write-protect switch on the "Memory Stick" to the LOCK ... images Refer to the recording position (page 88). The image does not appear on your camera is not guaranteed. • The camera is set the write-protect switch on the "Memory Stick" to "Computers" (page 80) in USB mode. Delete unnecessary images (t step 6 in succession. • The "Memory Stick" ...
Operating Instructions
Page 80
...is low (t step 1 in the (Setup) menu (page 51). • Disconnect all equipment other device (page 56). • The USB driver is compatible with the camera. • Check "Recommended computer environment" (page 54) for Windows, and "Recommended environment" (page 64) for multi-use terminal (page 56...). • Disconnect the cable for Macintosh. You cannot install the USB driver. • In Windows 2000, log on the camera (t step 2 in "Read This First"). • Use the AC Adaptor when the battery level is displayed (page 56)....
...is low (t step 1 in the (Setup) menu (page 51). • Disconnect all equipment other device (page 56). • The USB driver is compatible with the camera. • Check "Recommended computer environment" (page 54) for Windows, and "Recommended environment" (page 64) for multi-use terminal (page 56...). • Disconnect the cable for Macintosh. You cannot install the USB driver. • In Windows 2000, log on the camera (t step 2 in "Read This First"). • Use the AC Adaptor when the battery level is displayed (page 56)....
Operating Instructions
Page 81
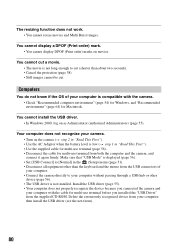
... the USB connection after the computer is turned on the camera. • Copy them to the hard disk of each screen. • Consult the computer or software manufacturer. You cannot print an image. • Check the printer settings. The "Device Manager" appears. 3 Right-click [ Sony DSC], then... click [Uninstall] t [OK]. Copy the movie to a folder recognized by the camera, such as "101MSDCF" (page 60). • Operate correctly (page 61). 81 Troubleshooting The Removable ...
... the USB connection after the computer is turned on the camera. • Copy them to the hard disk of each screen. • Consult the computer or software manufacturer. You cannot print an image. • Check the printer settings. The "Device Manager" appears. 3 Right-click [ Sony DSC], then... click [Uninstall] t [OK]. Copy the movie to a folder recognized by the camera, such as "101MSDCF" (page 60). • Operate correctly (page 61). 81 Troubleshooting The Removable ...
Operating Instructions
Page 82
... 3 in the (Setup) menu (page 51). • Disconnect and connect the cable for multi-use terminal again. • Movies cannot be connected to the camera. • Set [USB Connect] to the operating instructions supplied with a computer may not print. For further information, refer to [640(Fine)]. You have formatted a "Memory Stick" by...
... 3 in the (Setup) menu (page 51). • Disconnect and connect the cable for multi-use terminal again. • Movies cannot be connected to the camera. • Set [USB Connect] to the operating instructions supplied with a computer may not print. For further information, refer to [640(Fine)]. You have formatted a "Memory Stick" by...
Operating Instructions
Page 87
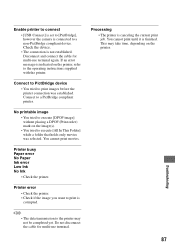
Enable printer to connect • [USB Connect] is set to [PictBridge], however the camera is connected to print images before the printer connection was selected. Connect to PictBridge device • You tried to a non-PictBridge compliant device. Printer busy ...
Enable printer to connect • [USB Connect] is set to [PictBridge], however the camera is connected to print images before the printer connection was selected. Connect to PictBridge device • You tried to a non-PictBridge compliant device. Printer busy ...
Operating Instructions
Page 93
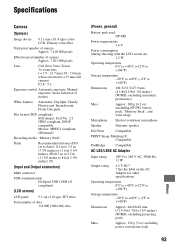
... color filter Total pixel number of camera Approx. 7 410 000 pixels Effective pixel number of camera Approx. 7 201 000 pixels Lens Carl Zeiss Vario-Tessar 3× zoom lens f = 7.9 - 23.7 mm (38 - 114 mm when converted to a 35 mm still camera) F2.8 - 5.2 Exposure control... to 11 feet 5 3/4 inches) (W)/0.3 m to 2.5 m (11 7/8 inches to 8 feet 2 3/8 inches) (T) [Input and Output connectors] Multi connector USB communication Hi-Speed USB (USB 2.0 compliant) [LCD screen] LCD panel 5.1 cm (2.0 type) TFT drive Total number of dots 134 000 (560×240) dots [Power, general] Battery ...
... color filter Total pixel number of camera Approx. 7 410 000 pixels Effective pixel number of camera Approx. 7 201 000 pixels Lens Carl Zeiss Vario-Tessar 3× zoom lens f = 7.9 - 23.7 mm (38 - 114 mm when converted to a 35 mm still camera) F2.8 - 5.2 Exposure control... to 11 feet 5 3/4 inches) (W)/0.3 m to 2.5 m (11 7/8 inches to 8 feet 2 3/8 inches) (T) [Input and Output connectors] Multi connector USB communication Hi-Speed USB (USB 2.0 compliant) [LCD screen] LCD panel 5.1 cm (2.0 type) TFT drive Total number of dots 134 000 (560×240) dots [Power, general] Battery ...
Operating Instructions
Page 97
... menu 27 Shooting movies 23 Shutter speed 11, 24 Single 44 Single-image mode 67 Slide 38 Slow synchro t step 5 in "Read This First" Smart zoom 44 Snow mode t step 5 in "Read This First" Soft snap mode t step 5 in "Read This First" Software 62 Specifications 93 Spot AF 29 ... 14 Troubleshooting 74 TV 72 Twilight mode t step 5 in "Read This First" Twilight portrait mode t step 5 in "Read This First" U Underexposure 11 USB Connect 51 USB Driver 55 Using your camera abroad t step 1 in "Read This First" V VGA t step 4 in "Read This First" Video CD 62, 65 Viewing Movie t step 6 in "...
... menu 27 Shooting movies 23 Shutter speed 11, 24 Single 44 Single-image mode 67 Slide 38 Slow synchro t step 5 in "Read This First" Smart zoom 44 Snow mode t step 5 in "Read This First" Soft snap mode t step 5 in "Read This First" Software 62 Specifications 93 Spot AF 29 ... 14 Troubleshooting 74 TV 72 Twilight mode t step 5 in "Read This First" Twilight portrait mode t step 5 in "Read This First" U Underexposure 11 USB Connect 51 USB Driver 55 Using your camera abroad t step 1 in "Read This First" V VGA t step 4 in "Read This First" Video CD 62, 65 Viewing Movie t step 6 in "...


