Operating Instructions
Page 3
... of this product. Please consult with BS 1363 is fitted to power this camera. and Canada THIS DEVICE COMPLIES WITH PART 15 OF THE FCC RULES. Notice...fuse in the United Kingdom A moulded plug complying with your safety and convenience. "Memory Stick" and battery pack For the Customers in the U.S.A. and Canada RECYCLING LITHIUM-ION ... countries may influence the picture and sound of the battery used . THIS CLASS B DIGITAL APPARATUS COMPLIES WITH CANADIAN ICES-003. 3 You can help preserve our environment by ASTA...by returning your nearest Sony service station.
... of this product. Please consult with BS 1363 is fitted to power this camera. and Canada THIS DEVICE COMPLIES WITH PART 15 OF THE FCC RULES. Notice...fuse in the United Kingdom A moulded plug complying with your safety and convenience. "Memory Stick" and battery pack For the Customers in the U.S.A. and Canada RECYCLING LITHIUM-ION ... countries may influence the picture and sound of the battery used . THIS CLASS B DIGITAL APPARATUS COMPLIES WITH CANADIAN ICES-003. 3 You can help preserve our environment by ASTA...by returning your nearest Sony service station.
Operating Instructions
Page 4
...; Images may be contrary to the provision of the copyright laws. 4 Do not shake or strike the camera In addition to malfunctions and inability to record images, this may render the "Memory Stick" unusable or image data breakdown, damage or loss may cause the malfunction of data loss, always copy ...(back up) data to a disk. Before using your camera Trial recording Before you record one-time events, you may want...
...; Images may be contrary to the provision of the copyright laws. 4 Do not shake or strike the camera In addition to malfunctions and inability to record images, this may render the "Memory Stick" unusable or image data breakdown, damage or loss may cause the malfunction of data loss, always copy ...(back up) data to a disk. Before using your camera Trial recording Before you record one-time events, you may want...
Operating Instructions
Page 5
... of DSC-P8 unless noted otherwise. However, the ™ or ® marks are of the U.S. On illustration Illustrations used in this manual are not used in this manual are not actual images shot using this manual. 5 Trademarks • "Memory Stick," and "MagicGate Memory Stick" are trademarks of Sony Corporation. • "Memory Stick Duo" and are trademarks of Sony Corporation. • "Memory Stick... images, and are , in general, trademarks or registered trademarks of Intel Corporation. • In addition, system and product names used in all cases in this camera.
... of DSC-P8 unless noted otherwise. However, the ™ or ® marks are of the U.S. On illustration Illustrations used in this manual are not used in this manual are not actual images shot using this manual. 5 Trademarks • "Memory Stick," and "MagicGate Memory Stick" are trademarks of Sony Corporation. • "Memory Stick Duo" and are trademarks of Sony Corporation. • "Memory Stick... images, and are , in general, trademarks or registered trademarks of Intel Corporation. • In addition, system and product names used in all cases in this camera.
Operating Instructions
Page 6
...you shot - Picture Effect 57 Quick Review 23 Using the zoom feature 23 Shooting close-ups - Voice 54 Shooting according to the subject - White Balance 49 Adjusting the flash level - Burst 3 (DSC-P10/P12)/ Burst 2 (DSC-P8 53 Shooting still images for e-mail - Table of your camera 30... Viewing images on /off your camera 14 How to use the control button 14 Setting the date and time 15 Shooting still images Inserting and removing a "Memory Stick 17 Setting the still...
...you shot - Picture Effect 57 Quick Review 23 Using the zoom feature 23 Shooting close-ups - Voice 54 Shooting according to the subject - White Balance 49 Adjusting the flash level - Burst 3 (DSC-P10/P12)/ Burst 2 (DSC-P8 53 Shooting still images for e-mail - Table of your camera 30... Viewing images on /off your camera 14 How to use the control button 14 Setting the date and time 15 Shooting still images Inserting and removing a "Memory Stick 17 Setting the still...
Operating Instructions
Page 7
...87 Warnings and messages 95 Self-diagnosis display 97 Additional information Number of a still image.........59 Enlarging an image - Rotate 61 Playing back images shot in Multi Burst mode 61 Playing back continuously 62 Playing back frame by frame - Trimming 60 Playing back successive images - Advanced still image viewing...Folder 58 Enlarging a portion of images that can be saved or shooting time 98 Menu items 100 SET UP items 104 Precautions 107 On "Memory Stick 108 On "InfoLITHIUM" battery pack .........109 Specifications 110 The LCD screen 112 Index Index 115 7
...87 Warnings and messages 95 Self-diagnosis display 97 Additional information Number of a still image.........59 Enlarging an image - Rotate 61 Playing back images shot in Multi Burst mode 61 Playing back continuously 62 Playing back frame by frame - Trimming 60 Playing back successive images - Advanced still image viewing...Folder 58 Enlarging a portion of images that can be saved or shooting time 98 Menu items 100 SET UP items 104 Precautions 107 On "Memory Stick 108 On "InfoLITHIUM" battery pack .........109 Specifications 110 The LCD screen 112 Index Index 115 7

Operating Instructions
Page 9
... movies, Clip Motion images or Multi Burst mode images : To view or edit images J Zoom button (for shooting) (23)/ Index button (for viewing) (31) K Battery/"Memory Stick" cover L RESET button (87) M Access lamp (17) N Battery eject lever (10) O Jack cover P (USB) jack (78) 9
... movies, Clip Motion images or Multi Burst mode images : To view or edit images J Zoom button (for shooting) (23)/ Index button (for viewing) (31) K Battery/"Memory Stick" cover L RESET button (87) M Access lamp (17) N Battery eject lever (10) O Jack cover P (USB) jack (78) 9
Operating Instructions
Page 10
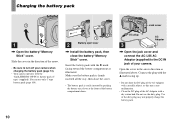
... 2 Battery eject lever , Install the battery pack, then close the cover. • The battery pack is firmly inserted all the way, then close the battery/"Memory Stick" cover. Insert the battery pack with the "InfoLITHIUM" NP-FC11 battery pack (C type) (supplied). DC plug 3 AC Adaptor , Open the jack cover and ...connect the AC-LS5 AC Adaptor (supplied) to turn off your camera. Connect the plug with the v mark facing up. • Do not short the DC plug of the AC Adaptor with a dry cotton bud. Use ...
... 2 Battery eject lever , Install the battery pack, then close the cover. • The battery pack is firmly inserted all the way, then close the battery/"Memory Stick" cover. Insert the battery pack with the "InfoLITHIUM" NP-FC11 battery pack (C type) (supplied). DC plug 3 AC Adaptor , Open the jack cover and ...connect the AC-LS5 AC Adaptor (supplied) to turn off your camera. Connect the plug with the v mark facing up. • Do not short the DC plug of the AC Adaptor with a dry cotton bud. Use ...
Operating Instructions
Page 11
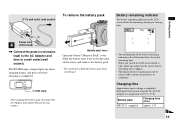
... the battery/"Memory Stick" cover. Slide the battery eject lever in the illustration shows the actual remaining time. • When you switch the LCD screen on/off when charging is completed. /CHG /CHG lamp • After charging the battery pack, disconnect the AC Adaptor from the DC IN jack of your camera. Battery...
... the battery/"Memory Stick" cover. Slide the battery eject lever in the illustration shows the actual remaining time. • When you switch the LCD screen on/off when charging is completed. /CHG /CHG lamp • After charging the battery pack, disconnect the AC Adaptor from the DC IN jack of your camera. Battery...
Operating Instructions
Page 12
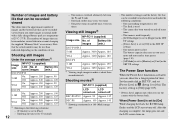
...is low - The flash is set to [On] While charging the flash, the /CHG lamp flashes and the LCD screen turns off DSC-P10/P12 Approx. 90 Approx. 135 DSC-P8 Approx. 100 Approx. 145 3) Shooting continuously at a temperature of 25°C (77°F). The power turns on . Set the... images and the battery life that can be recorded or viewed take into account changing the supplied "Memory Stick" as necessary. The numbers of images that can be recorded/ viewed when you use the camera with a fully charged battery pack at 160 (Mail) image size • The number of images...
...is low - The flash is set to [On] While charging the flash, the /CHG lamp flashes and the LCD screen turns off DSC-P10/P12 Approx. 90 Approx. 135 DSC-P8 Approx. 100 Approx. 145 3) Shooting continuously at a temperature of 25°C (77°F). The power turns on . Set the... images and the battery life that can be recorded or viewed take into account changing the supplied "Memory Stick" as necessary. The numbers of images that can be recorded/ viewed when you use the camera with a fully charged battery pack at 160 (Mail) image size • The number of images...

Operating Instructions
Page 17
.... • Whenever the access lamp is lit, the camera is securely seated in the direction of the way in so that it clicks as illustrated. • Push the "Memory Stick" all of the arrow. • For details on "Memory Stick," see page 108. 2 Label side , Insert the "Memory Stick." The data may not be corrupted. 17 Shooting...
.... • Whenever the access lamp is lit, the camera is securely seated in the direction of the way in so that it clicks as illustrated. • Push the "Memory Stick" all of the arrow. • For details on "Memory Stick," see page 108. 2 Label side , Insert the "Memory Stick." The data may not be corrupted. 17 Shooting...
Operating Instructions
Page 19
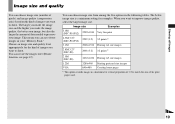
...) 2592×1944 Very fine print 4.5M(3:2)1) 2592 (3:2) 3:2 prints1) (DSC-P10/P12) 3.1M 2048×1536 Printing A4 size images 2.8M(3:2)1) (DSC-P8) 2048 (3:2) 3:2 prints1) 2.0M (DSC-P8) 1632×1224 Printing A5 size images 1.2M 1280×960 Printing postcard size images VGA 640×480 Creating ...options in a horizontal to vertical proportion of 3:2 to match the size of data needed to shoot. This means you want to preserve your "Memory Stick." You can resize the images later (Resize function, see page 65). The below image size is a minimum setting for the kind of ...
...) 2592×1944 Very fine print 4.5M(3:2)1) 2592 (3:2) 3:2 prints1) (DSC-P10/P12) 3.1M 2048×1536 Printing A4 size images 2.8M(3:2)1) (DSC-P8) 2048 (3:2) 3:2 prints1) 2.0M (DSC-P8) 1632×1224 Printing A5 size images 1.2M 1280×960 Printing postcard size images VGA 640×480 Creating ...options in a horizontal to vertical proportion of 3:2 to match the size of data needed to shoot. This means you want to preserve your "Memory Stick." You can resize the images later (Resize function, see page 65). The below image size is a minimum setting for the kind of ...
Operating Instructions
Page 20
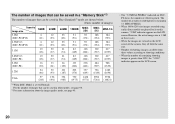
...PIXELS. • When 1600×1200 size images recorded using earlier Sony models are shown below. (Units: number of images) Capacity 16MB Image size 5.0M 6 (DSC-P10/P12) (11) 4.5M(3:2) 6 (DSC-P10/P12) (11) 3.1M 10 (18) 2.8M(3:2) 10 (DSC-P8) (18) 2.0M 16 (DSC-P8) (30) 1.2M 24 (46) VGA 97 (243) 32MB... of remaining shooting images is 1.9M in Fine (Standard)3) mode are played back on this camera, "2.0M" indicator appears on the LCD screen. The number of images that can be saved in a "Memory Stick"2) The number of images that can be saved in other modes, see page 98. 3)...
...PIXELS. • When 1600×1200 size images recorded using earlier Sony models are shown below. (Units: number of images) Capacity 16MB Image size 5.0M 6 (DSC-P10/P12) (11) 4.5M(3:2) 6 (DSC-P10/P12) (11) 3.1M 10 (18) 2.8M(3:2) 10 (DSC-P8) (18) 2.0M 16 (DSC-P8) (30) 1.2M 24 (46) VGA 97 (243) 32MB... of remaining shooting images is 1.9M in Fine (Standard)3) mode are played back on this camera, "2.0M" indicator appears on the LCD screen. The number of images that can be saved in a "Memory Stick"2) The number of images that can be saved in other modes, see page 98. 3)...
Operating Instructions
Page 21
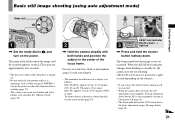
... mode) Mode dial 60min VGA FINE 101 96 S AF F2.8 30 Shooting still images 1 , Set the mode dial to be stored in the "Memory Stick" (page 40). 2 , Hold the camera steadily with your fingers. • The minimum focal distance to shoot, but the image is not yet recorded. When the AE/AF lock... the power is turned on. • Do not touch the lens portion while it is operating, such as follows: DSC-P10/P12: Approx.50 cm (19 3/4 inches) (W)/ 60 cm (23 5/8 inches) (T) or more DSC-P8: Approx. 50 cm (19 3/4 inches) (W/T) or more To shoot subjects at distances closer than this, use the macro...
... mode) Mode dial 60min VGA FINE 101 96 S AF F2.8 30 Shooting still images 1 , Set the mode dial to be stored in the "Memory Stick" (page 40). 2 , Hold the camera steadily with your fingers. • The minimum focal distance to shoot, but the image is not yet recorded. When the AE/AF lock... the power is turned on. • Do not touch the lens portion while it is operating, such as follows: DSC-P10/P12: Approx.50 cm (19 3/4 inches) (W)/ 60 cm (23 5/8 inches) (T) or more DSC-P8: Approx. 50 cm (19 3/4 inches) (W/T) or more To shoot subjects at distances closer than this, use the macro...
Operating Instructions
Page 22
The image will be recorded in the "Memory Stick." In such cases, release the shutter button, then recompose the shot and focus again. • The subject is distant from the camera and dark. • The contrast between the subject and its background is poor. • The subject is difficult to ...95 S AF 4 , Press the shutter button fully down the battery (page 14). 22 Mode dial for still image shooting When shooting still images with your camera, you try to shoot a subject that is seen through glass, such as a window. • A fast-moving subject. • The subject reflects ...
The image will be recorded in the "Memory Stick." In such cases, release the shutter button, then recompose the shot and focus again. • The subject is distant from the camera and dark. • The contrast between the subject and its background is poor. • The subject is difficult to ...95 S AF 4 , Press the shutter button fully down the battery (page 14). 22 Mode dial for still image shooting When shooting still images with your camera, you try to shoot a subject that is seen through glass, such as a window. • A fast-moving subject. • The subject reflects ...

Operating Instructions
Page 34
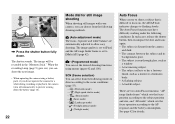
... camera. Deleting images 60min VGA 101 2/9 60min VGA 101 2/9 60min VGA 101 2/9 101-0002 2003 7 4 10:30PM BACK/NEXT VOLUME Delete Exit OK BACK/NEXT 1 , Set the mode dial to , and turn on the control button to select the image you want to be deleted with v and press z. When the message "Memory Stick...
... camera. Deleting images 60min VGA 101 2/9 60min VGA 101 2/9 60min VGA 101 2/9 101-0002 2003 7 4 10:30PM BACK/NEXT VOLUME Delete Exit OK BACK/NEXT 1 , Set the mode dial to , and turn on the control button to select the image you want to be deleted with v and press z. When the message "Memory Stick...

Operating Instructions
Page 36
When the message "Memory Stick access" disappears, the images have been deleted. The image has not yet been deleted at this point. 36 Deleting images in index (triple-image) mode ...
When the message "Memory Stick access" disappears, the images have been deleted. The image has not yet been deleted at this point. 36 Deleting images in index (triple-image) mode ...
Operating Instructions
Page 37
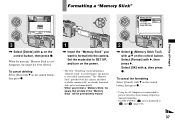
... partway through formatting. • On DSC-P10/P12, item is also called "initialization." folder: 2 OK 3 , Select [Delete] with B, then press B. When the message "Memory Stick access" disappears, the image has been deleted. Select [OK] with V on the power. • The term "formatting" means preparing a "Memory Stick" to format into the camera. this camera, and those available commercially, are...
... partway through formatting. • On DSC-P10/P12, item is also called "initialization." folder: 2 OK 3 , Select [Delete] with B, then press B. When the message "Memory Stick access" disappears, the image has been deleted. Select [OK] with V on the power. • The term "formatting" means preparing a "Memory Stick" to format into the camera. this camera, and those available commercially, are...

Operating Instructions
Page 40
...image quality value selected here is preserved even when the camera is turned off. • You can select the still image quality from [Fine] or [Standard]. The menu appears. • Up to 4000 images can create multiple folders within a "Memory Stick." Creating or selecting a folder Mode dial: SET UP... Your camera can be stored in one folder. You can create folders up to store images. b Press MENU. You can select...
...image quality value selected here is preserved even when the camera is turned off. • You can select the still image quality from [Fine] or [Standard]. The menu appears. • Up to 4000 images can create multiple folders within a "Memory Stick." Creating or selecting a folder Mode dial: SET UP... Your camera can be stored in one folder. You can create folders up to store images. b Press MENU. You can select...

Operating Instructions
Page 41
... creation Select [Cancel] in step 2 or 3. • Once you create a new folder, you cannot delete the new folder with the camera. • Images are recorded in the "Memory Stick," and the folder becomes the recording folder. Changing the recording folder a Set the mode dial to SET UP. b Select... (Memory Stick Tool) with this camera to a different folder. 41 Folder 2/2 102 Folder Name: No. The following screen appears. 60min Create REC. A new folder is created with B/v,...
... creation Select [Cancel] in step 2 or 3. • Once you create a new folder, you cannot delete the new folder with the camera. • Images are recorded in the "Memory Stick," and the folder becomes the recording folder. Changing the recording folder a Set the mode dial to SET UP. b Select... (Memory Stick Tool) with this camera to a different folder. 41 Folder 2/2 102 Folder Name: No. The following screen appears. 60min Create REC. A new folder is created with B/v,...

Operating Instructions
Page 51
... image quality deteriorates. Advanced still image shooting 51 This is suitable for the first frame. d Shoot the image for use on the "Memory Stick." Therefore, the image quality may deteriorate for use with portable data terminals. • The file size is selected in step 4 or ...images before finishing the Clip Motion recording 1 Press b (7) in step 2, each time you repeat steps 1 through 3, the last frame you have shot the desired number of frames. c Select the desired mode with v, then press z. Press the shutter button to 256 colors or less. Making"Clip...
... image quality deteriorates. Advanced still image shooting 51 This is suitable for the first frame. d Shoot the image for use on the "Memory Stick." Therefore, the image quality may deteriorate for use with portable data terminals. • The file size is selected in step 4 or ...images before finishing the Clip Motion recording 1 Press b (7) in step 2, each time you repeat steps 1 through 3, the last frame you have shot the desired number of frames. c Select the desired mode with v, then press z. Press the shutter button to 256 colors or less. Making"Clip...


