Operating Instructions
Page 3
...to be replaced, a 5 AMP fuse approved by returning your nearest Sony service station. Notice If static electricity or electromagnetism causes data transfer to...batteries are recyclable. For more information regarding recycling of the battery used . THIS CLASS B DIGITAL APPARATUS COMPLIES WITH CANADIAN ICES-003. 3 CAUTION TO PREVENT ELECTRIC SHOCK, DO NOT USE ...this equipment for the customers in Europe This product has been tested and found compliant with this camera. "Memory Stick" and battery pack For the Customers in the U.S.A. OPERATION IS SUBJECT TO THE FOLLOWING TWO...
...to be replaced, a 5 AMP fuse approved by returning your nearest Sony service station. Notice If static electricity or electromagnetism causes data transfer to...batteries are recyclable. For more information regarding recycling of the battery used . THIS CLASS B DIGITAL APPARATUS COMPLIES WITH CANADIAN ICES-003. 3 CAUTION TO PREVENT ELECTRIC SHOCK, DO NOT USE ...this equipment for the customers in Europe This product has been tested and found compliant with this camera. "Memory Stick" and battery pack For the Customers in the U.S.A. OPERATION IS SUBJECT TO THE FOLLOWING TWO...
Operating Instructions
Page 4
... equipment and playback of the copyright laws. 4 Do not shake or strike the camera In addition to malfunctions and inability to make a trial recording to record images, this may render the "Memory Stick" unusable or image data breakdown, damage or loss may occur. Notes on copyright Television... programs, films, video tapes, and other equipment on how to the flash surface, resulting in any way. • Be careful when placing the camera near a window or outdoors...
... equipment and playback of the copyright laws. 4 Do not shake or strike the camera In addition to malfunctions and inability to make a trial recording to record images, this may render the "Memory Stick" unusable or image data breakdown, damage or loss may occur. Notes on copyright Television... programs, films, video tapes, and other equipment on how to the flash surface, resulting in any way. • Be careful when placing the camera near a window or outdoors...
Operating Instructions
Page 5
... this manual are reproduced images, and are not actual images shot using this camera. Trademarks • "Memory Stick," and "MagicGate Memory Stick" are trademarks of Sony Corporation. • "Memory Stick Duo" and are trademarks of Sony Corporation. • "Memory Stick PRO" and are trademarks of Sony Corporation. • "MagicGate" and are trademarks of Sony Corporation. • "InfoLITHIUM" is a trademark or a registered trademark of Intel...
... this manual are reproduced images, and are not actual images shot using this camera. Trademarks • "Memory Stick," and "MagicGate Memory Stick" are trademarks of Sony Corporation. • "Memory Stick Duo" and are trademarks of Sony Corporation. • "Memory Stick PRO" and are trademarks of Sony Corporation. • "MagicGate" and are trademarks of Sony Corporation. • "InfoLITHIUM" is a trademark or a registered trademark of Intel...
Operating Instructions
Page 6
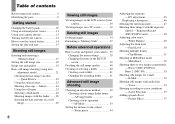
... your camera 14 How to use the control button 14 Setting the date and time 15 Shooting still images Inserting and removing a "Memory Stick 17 Setting the still image size 18 Image size and quality 19 Basic still image shooting (using auto adjustment mode 21 Checking the last image you shot - Exposure Bracket (DSC-P10/P12...
... your camera 14 How to use the control button 14 Setting the date and time 15 Shooting still images Inserting and removing a "Memory Stick 17 Setting the still image size 18 Image size and quality 19 Basic still image shooting (using auto adjustment mode 21 Checking the last image you shot - Exposure Bracket (DSC-P10/P12...
Operating Instructions
Page 7
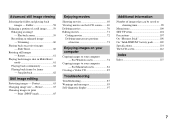
... size - Rotate 61 Playing back images shot in Multi Burst mode 61 Playing back continuously 62 Playing back frame by frame - Folder 58 Enlarging a portion of images that can be saved or shooting time 98 Menu items 100 SET UP items 104 Precautions 107 On "Memory Stick 108 On "InfoLITHIUM" battery pack .........109...
... size - Rotate 61 Playing back images shot in Multi Burst mode 61 Playing back continuously 62 Playing back frame by frame - Folder 58 Enlarging a portion of images that can be saved or shooting time 98 Menu items 100 SET UP items 104 Precautions 107 On "Memory Stick 108 On "InfoLITHIUM" battery pack .........109...

Operating Instructions
Page 9
... movies, Clip Motion images or Multi Burst mode images : To view or edit images J Zoom button (for shooting) (23)/ Index button (for viewing) (31) K Battery/"Memory Stick" cover L RESET button (87) M Access lamp (17) N Battery eject lever (10) O Jack cover P (USB) jack (78) 9
... movies, Clip Motion images or Multi Burst mode images : To view or edit images J Zoom button (for shooting) (23)/ Index button (for viewing) (31) K Battery/"Memory Stick" cover L RESET button (87) M Access lamp (17) N Battery eject lever (10) O Jack cover P (USB) jack (78) 9
Operating Instructions
Page 10
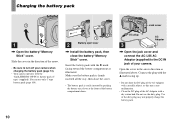
...(supplied) to the DC IN jack of the arrow. • Be sure to turn off your camera. Make sure the battery pack is firmly inserted all the way, then close the battery/"Memory Stick" cover. You can use the dirty plug. Getting started Charging the battery pack Jack cover 1 ,... Open the battery/"Memory Stick" cover. Insert the battery pack with the "InfoLITHIUM" NP-FC11 battery pack (C type) (supplied...
...(supplied) to the DC IN jack of the arrow. • Be sure to turn off your camera. Make sure the battery pack is firmly inserted all the way, then close the battery/"Memory Stick" cover. You can use the dirty plug. Getting started Charging the battery pack Jack cover 1 ,... Open the battery/"Memory Stick" cover. Insert the battery pack with the "InfoLITHIUM" NP-FC11 battery pack (C type) (supplied...
Operating Instructions
Page 11
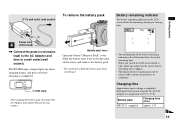
...176;C (77°F). Battery pack Charging time (min.) NP-FC11 (supplied) Approx. 150 11 To remove the battery pack Battery eject lever Open the battery/"Memory Stick" cover. Getting started 2 To wall outlet (wall socket) 1 Power cord 4 (mains lead) , Connect the power cord (mains lead) to the ... screen on the LCD screen shows the remaining shooting or viewing time. 60min 3.1M 101 4 S AF • The black portion of your camera. Charging time Approximate time to charge a completely discharged battery pack using the AC-LS5 AC Adaptor at a temperature of the arrow, and remove...
...176;C (77°F). Battery pack Charging time (min.) NP-FC11 (supplied) Approx. 150 11 To remove the battery pack Battery eject lever Open the battery/"Memory Stick" cover. Getting started 2 To wall outlet (wall socket) 1 Power cord 4 (mains lead) , Connect the power cord (mains lead) to the ... screen on the LCD screen shows the remaining shooting or viewing time. 60min 3.1M 101 4 S AF • The black portion of your camera. Charging time Approximate time to charge a completely discharged battery pack using the AC-LS5 AC Adaptor at a temperature of the arrow, and remove...
Operating Instructions
Page 12
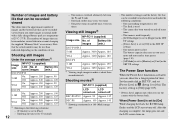
The numbers of images that can be recorded or viewed take into account changing the supplied "Memory Stick" as time passes (page 110). - [AF Mode] is set to [Monitor] or [Cont] in the following conditions: - Note that the actual numbers may be less .... 190 2) Viewing single images in the SET UP settings - The camera has been turned on . After the charging is used - The zoom is complete, the lamp goes out and the LCD screen turns on and off DSC-P10/P12 Approx. 90 Approx. 135 DSC-P8 Approx. 100 Approx. 145 3) Shooting continuously at a temperature of...
The numbers of images that can be recorded or viewed take into account changing the supplied "Memory Stick" as time passes (page 110). - [AF Mode] is set to [Monitor] or [Cont] in the following conditions: - Note that the actual numbers may be less .... 190 2) Viewing single images in the SET UP settings - The camera has been turned on . After the charging is used - The zoom is complete, the lamp goes out and the LCD screen turns on and off DSC-P10/P12 Approx. 90 Approx. 135 DSC-P8 Approx. 100 Approx. 145 3) Shooting continuously at a temperature of...

Operating Instructions
Page 17
.... 17 To remove a "Memory Stick" Open the battery/"Memory Stick" cover, then push the "Memory Stick" to record or display images with the "Memory Stick." 3 Access lamp , Close the battery/"Memory Stick" cover. If the "Memory Stick" is securely seated in the direction of the way in so that it out. • Whenever the access lamp is lit, the camera is recording or...
.... 17 To remove a "Memory Stick" Open the battery/"Memory Stick" cover, then push the "Memory Stick" to record or display images with the "Memory Stick." 3 Access lamp , Close the battery/"Memory Stick" cover. If the "Memory Stick" is securely seated in the direction of the way in so that it out. • Whenever the access lamp is lit, the camera is recording or...
Operating Instructions
Page 19
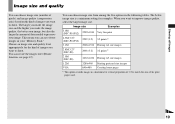
You can choose image size from among the five options in a horizontal to vertical proportion of 3:2 to preserve your "Memory Stick." This means you can save fewer images in your image. Choose an image size and quality level appropriately for examples. The below... of the print paper used. 19 Image size Examples 5.0M (DSC-P10/P12) 2592×1944 Very fine print 4.5M(3:2)1) 2592 (3:2) 3:2 prints1) (DSC-P10/P12) 3.1M 2048×1536 Printing A4 size images 2.8M(3:2)1) (DSC-P8) 2048 (3:2) 3:2 prints1) 2.0M (DSC-P8) 1632×1224 Printing A5 size images 1.2M 1280×...
You can choose image size from among the five options in a horizontal to vertical proportion of 3:2 to preserve your "Memory Stick." This means you can save fewer images in your image. Choose an image size and quality level appropriately for examples. The below... of the print paper used. 19 Image size Examples 5.0M (DSC-P10/P12) 2592×1944 Very fine print 4.5M(3:2)1) 2592 (3:2) 3:2 prints1) (DSC-P10/P12) 3.1M 2048×1536 Printing A4 size images 2.8M(3:2)1) (DSC-P8) 2048 (3:2) 3:2 prints1) 2.0M (DSC-P8) 1632×1224 Printing A5 size images 1.2M 1280×...
Operating Instructions
Page 20
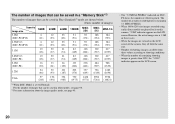
...can be saved in a "Memory Stick"2) The number of images that can be saved in Fine (Standard)3) mode are shown below. (Units: number of images) Capacity 16MB Image size 5.0M 6 (DSC-P10/P12) (11) 4.5M(3:2) 6 (DSC-P10/P12) (11) 3.1M 10 (18) 2.8M(3:2) 10 (DSC-P8) (18) 2.0M 16 (DSC-P8) (30) 1.2M ...14821) 2) When [REC Mode] is maximum 3.1 MEGA PIXELS. • When 1600×1200 size images recorded using earlier Sony models are viewed on the LCD screen of the camera, they all look the same size. • Number of shooting images can differ from these cases. • When the...
...can be saved in a "Memory Stick"2) The number of images that can be saved in Fine (Standard)3) mode are shown below. (Units: number of images) Capacity 16MB Image size 5.0M 6 (DSC-P10/P12) (11) 4.5M(3:2) 6 (DSC-P10/P12) (11) 3.1M 10 (18) 2.8M(3:2) 10 (DSC-P8) (18) 2.0M 16 (DSC-P8) (30) 1.2M ...14821) 2) When [REC Mode] is maximum 3.1 MEGA PIXELS. • When 1600×1200 size images recorded using earlier Sony models are viewed on the LCD screen of the camera, they all look the same size. • Number of shooting images can differ from these cases. • When the...
Operating Instructions
Page 21
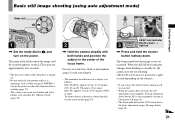
...the power is turned on. • Do not touch the lens portion while it is operating, such as follows: DSC-P10/P12: Approx.50 cm (19 3/4 inches) (W)/ 60 cm (23 5/8 inches) (T) or more DSC-P8: Approx. 50 cm (19 3/4 inches) (W/T) or more To shoot subjects at distances closer than this, use... button halfway down. Do not cover the lens, flash or microphone (page 8) with both hands and position the subject in the "Memory Stick" (page 40). 2 , Hold the camera steadily with your fingers. • The minimum focal distance to turn on the LCD screen shows the focus adjustment range (AF range ...
...the power is turned on. • Do not touch the lens portion while it is operating, such as follows: DSC-P10/P12: Approx.50 cm (19 3/4 inches) (W)/ 60 cm (23 5/8 inches) (T) or more DSC-P8: Approx. 50 cm (19 3/4 inches) (W/T) or more To shoot subjects at distances closer than this, use... button halfway down. Do not cover the lens, flash or microphone (page 8) with both hands and position the subject in the "Memory Stick" (page 40). 2 , Hold the camera steadily with your fingers. • The minimum focal distance to turn on the LCD screen shows the focus adjustment range (AF range ...
Operating Instructions
Page 22
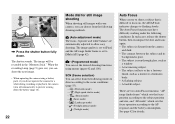
...desired shooting functions using a battery pack, if you do not operate the camera for a while during recording or playback, the camera turns off automatically to prevent wearing down . The image will be recorded in the "Memory Stick." SCN (Scene selection) You can select from the following modes to ... goes out, you can choose from the camera and dark. • The contrast between the subject and its background is poor. • The subject is distant from the following conditions. In such cases, release the shutter button, then recompose the shot and focus again. • The subject ...
...desired shooting functions using a battery pack, if you do not operate the camera for a while during recording or playback, the camera turns off automatically to prevent wearing down . The image will be recorded in the "Memory Stick." SCN (Scene selection) You can select from the following modes to ... goes out, you can choose from the camera and dark. • The contrast between the subject and its background is poor. • The subject is distant from the following conditions. In such cases, release the shutter button, then recompose the shot and focus again. • The subject ...

Operating Instructions
Page 34
... press z. Delete Exit OK BACK/NEXT 3 , Select [Delete] with b/B on the control button to select the image you want to be deleted with v on the camera. Then, select [Delete] with V on the control button, then press z. 34 Press b/B on the control button. To continue and delete other images Display the image...] with v and press z. The image has not yet been deleted at this point. • You cannot delete the protected image (page 63). When the message "Memory Stick access" disappears, the image has been deleted.
... press z. Delete Exit OK BACK/NEXT 3 , Select [Delete] with b/B on the control button to select the image you want to be deleted with v on the camera. Then, select [Delete] with V on the control button, then press z. 34 Press b/B on the control button. To continue and delete other images Display the image...] with v and press z. The image has not yet been deleted at this point. • You cannot delete the protected image (page 63). When the message "Memory Stick access" disappears, the image has been deleted.

Operating Instructions
Page 36
... (Delete) and select [OK] with b/B on the control button, then press z. The image has not yet been deleted at this point. 36 When the message "Memory Stick access" disappears, the images have been deleted.
... (Delete) and select [OK] with b/B on the control button, then press z. The image has not yet been deleted at this point. 36 When the message "Memory Stick access" disappears, the images have been deleted.
Operating Instructions
Page 37
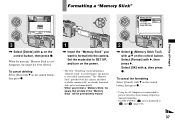
...camera. The "Memory Stick" provided with this process is displayed as and (page 104). 1 2 37 To cancel the formatting Select [Cancel] with v/V on the control button, then press z. 1 , Insert the "Memory Stick" you want to prevent the power from turning off partway through formatting. • On DSC-P10.../P12, item is also called "initialization." To cancel deleting Select [Exit] with v on the power. • The term "formatting" means preparing a "Memory Stick" to SET UP, and turn on the control button,...
...camera. The "Memory Stick" provided with this process is displayed as and (page 104). 1 2 37 To cancel the formatting Select [Cancel] with v/V on the control button, then press z. 1 , Insert the "Memory Stick" you want to prevent the power from turning off partway through formatting. • On DSC-P10.../P12, item is also called "initialization." To cancel deleting Select [Exit] with v on the power. • The term "formatting" means preparing a "Memory Stick" to SET UP, and turn on the control button,...

Operating Instructions
Page 40
... You can create multiple folders within a "Memory Stick." Quality) with b/B, then select the desired image quality with v/V. MENU Control button Mode dial a Set the mode dial to 4000 images can select the folder used to "999MSDCF." Creating or selecting a folder Mode dial: SET UP Your camera can select the still image quality from... folder, "101MSDCF" folder is automatically created. 40 FINE Fine Standard P.Quality Mode PFX • The image quality value selected here is preserved even when the camera is turned off. • You can create folders up to store images.
... You can create multiple folders within a "Memory Stick." Quality) with b/B, then select the desired image quality with v/V. MENU Control button Mode dial a Set the mode dial to 4000 images can select the folder used to "999MSDCF." Creating or selecting a folder Mode dial: SET UP Your camera can select the still image quality from... folder, "101MSDCF" folder is automatically created. 40 FINE Fine Standard P.Quality Mode PFX • The image quality value selected here is preserved even when the camera is turned off. • You can create folders up to store images.

Operating Instructions
Page 41
...the "100MSDCF" folder as a recording folder. • The image is created or selected. You cannot move images recorded with the camera. • Images are recorded in the "Memory Stick," and the folder becomes the recording folder. O K Cancel OK c Select [OK] with v/V, [Change REC. The recording ...folder selection screen appears. b Select (Memory Stick Tool) with v, then press z. Before advanced operations Creating a new folder a Set the mode dial to a different folder. 41 folder 102MSDCF...
...the "100MSDCF" folder as a recording folder. • The image is created or selected. You cannot move images recorded with the camera. • Images are recorded in the "Memory Stick," and the folder becomes the recording folder. O K Cancel OK c Select [OK] with v/V, [Change REC. The recording ...folder selection screen appears. b Select (Memory Stick Tool) with v, then press z. Before advanced operations Creating a new folder a Set the mode dial to a different folder. 41 folder 102MSDCF...

Operating Instructions
Page 51
...operation Set [Moving Image] to two frames can be recorded. c Select the desired mode with v, then press z. The frame images you have shot the desired number of colors for use with portable data terminals. • The file size is suitable for the first frame. You can shoot a...repeat this operation until you shot are recorded on home pages, etc. Shooting multiple frames - Clip Motion Mode dial: You can select from [Normal] or [Mobile]. All the frame images are played back in step 4 or 5. d Shoot the image for use on the "Memory Stick." This is suitable for ...
...operation Set [Moving Image] to two frames can be recorded. c Select the desired mode with v, then press z. The frame images you have shot the desired number of colors for use with portable data terminals. • The file size is suitable for the first frame. You can shoot a...repeat this operation until you shot are recorded on home pages, etc. Shooting multiple frames - Clip Motion Mode dial: You can select from [Normal] or [Mobile]. All the frame images are played back in step 4 or 5. d Shoot the image for use on the "Memory Stick." This is suitable for ...


