Operating Instructions
Page 4
... under similar conditions, be compensated for effective use the camera near a window or outdoors. Be careful not to bump the lens, and be uneven and that generates strong radio wave or emits radiation. The power zoom lens This camera is working correctly. The screen may be careful not ...to apply force to it may want to make sure that constantly appear on your camera. These points are not guaranteed. Noise may be contrary to...
... under similar conditions, be compensated for effective use the camera near a window or outdoors. Be careful not to bump the lens, and be uneven and that generates strong radio wave or emits radiation. The power zoom lens This camera is working correctly. The screen may be careful not ...to apply force to it may want to make sure that constantly appear on your camera. These points are not guaranteed. Noise may be contrary to...
Operating Instructions
Page 8
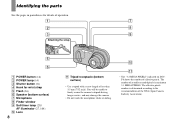
The number of actually recorded pixels is determined according to tripods having longer screws, and may damage the camera. • Do not touch the microphone while recording. 0 qa • The "3.2 MEGA PIXELS" indicated on DSCP8 shows the number of less than 5.5 mm (7/32 ... (14) C Shutter button (21) D Hook for wrist strap E Flash (26) F Speaker (bottom surface) G Microphone H Finder window I Self-timer lamp (25)/ AF illuminator (27, 104) J Lens 8 K Tripod receptacle (bottom surface) • Use a tripod with a screw length of effective pixels. You will be unable to firmly secure the...
The number of actually recorded pixels is determined according to tripods having longer screws, and may damage the camera. • Do not touch the microphone while recording. 0 qa • The "3.2 MEGA PIXELS" indicated on DSCP8 shows the number of less than 5.5 mm (7/32 ... (14) C Shutter button (21) D Hook for wrist strap E Flash (26) F Speaker (bottom surface) G Microphone H Finder window I Self-timer lamp (25)/ AF illuminator (27, 104) J Lens 8 K Tripod receptacle (bottom surface) • Use a tripod with a screw length of effective pixels. You will be unable to firmly secure the...
Operating Instructions
Page 14
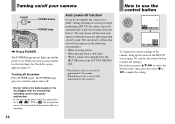
... up and the power is operating. Turning off . • Do not remove the battery pack or the AC Adaptor with the lens portion extended, as this may cause malfunction. • If you do not operate the camera for the first time, the Clock Set screen appears (page 15). Do not touch the... the setting. When you turn on . The auto power-off function only operates when the camera is set to use the control button to , , SCN or , the lens portion moves. Auto power-off function If you turn on /off your camera for a while* during shooting or viewing or when performing SET UP, the...
... up and the power is operating. Turning off . • Do not remove the battery pack or the AC Adaptor with the lens portion extended, as this may cause malfunction. • If you do not operate the camera for the first time, the Clock Set screen appears (page 15). Do not touch the... the setting. When you turn on . The auto power-off function only operates when the camera is set to use the control button to , , SCN or , the lens portion moves. Auto power-off function If you turn on /off your camera for a while* during shooting or viewing or when performing SET UP, the...
Operating Instructions
Page 21
.... When the AE/AF lock indicator changes from flashing to shoot, but the image is operating, such as follows: DSC-P10/P12: Approx.50 cm (19 3/4 inches) (W)/ 60 cm (23 5/8 inches) (T) or more DSC-P8: Approx. 50 cm (19 3/4 inches) (W/T) or more To shoot subjects at distances closer than this, use ... to steadily lit, the camera is ready for shooting. (The LCD screen may be frozen for a split second depending on the subject.) • If you release the shutter button, shooting will be recorded appears on the LCD screen for approximately five seconds. • The lens cover opens when the power...
.... When the AE/AF lock indicator changes from flashing to shoot, but the image is operating, such as follows: DSC-P10/P12: Approx.50 cm (19 3/4 inches) (W)/ 60 cm (23 5/8 inches) (T) or more DSC-P8: Approx. 50 cm (19 3/4 inches) (W/T) or more To shoot subjects at distances closer than this, use ... to steadily lit, the camera is ready for shooting. (The LCD screen may be frozen for a split second depending on the subject.) • If you release the shutter button, shooting will be recorded appears on the LCD screen for approximately five seconds. • The lens cover opens when the power...
Operating Instructions
Page 23
...Smart zoom Digital processing lets you press the zoom button, the zoom scaling indicator appears on the shutter button or press b (7) again. To delete the image displayed on the screen 1 Press (Delete). 2 Select [Delete] with v on the control button. Do not touch the lens portion ...96 S AF , Press the zoom buttons to the subject DSC-P10/P12: Approx. 50 cm (19 3/4 inches) (W)/60 cm (23 5/8 inches) (T) from the lens surface DSC-P8: Approx. 50 cm (19 3/4 inches) (W/T) from the lens surface • The lens portion moves during zoom operation. Zoom scaling indicator The T ...
...Smart zoom Digital processing lets you press the zoom button, the zoom scaling indicator appears on the shutter button or press b (7) again. To delete the image displayed on the screen 1 Press (Delete). 2 Select [Delete] with v on the control button. Do not touch the lens portion ...96 S AF , Press the zoom buttons to the subject DSC-P10/P12: Approx. 50 cm (19 3/4 inches) (W)/60 cm (23 5/8 inches) (T) from the lens surface DSC-P8: Approx. 50 cm (19 3/4 inches) (W/T) from the lens surface • The lens portion moves during zoom operation. Zoom scaling indicator The T ...

Operating Instructions
Page 24
... is not shown when using the smart zoom, the image on the LCD screen. • If the menu is [5.0M] or [4.5M(3:2)] (DSC-P10/P12)/[3.1M] or [2.8M(3:2)] (DSC-P8), the smart zoom does not work. • You cannot confirm the image with the finder when using the smart zoom function. •... 60min VGA 101 96 S AF The macro recording mode is set all the way to the T side: DSC-P10/P12: Approx. 60 cm (23 5/8 inches) from the lens surface DSC-P8: Approx. 50 cm (19 3/4 inches) from the lens surface 1 , Set the mode dial to the distances specified below. Shooting close -ups of subjects up...
... is not shown when using the smart zoom, the image on the LCD screen. • If the menu is [5.0M] or [4.5M(3:2)] (DSC-P10/P12)/[3.1M] or [2.8M(3:2)] (DSC-P8), the smart zoom does not work. • You cannot confirm the image with the finder when using the smart zoom function. •... 60min VGA 101 96 S AF The macro recording mode is set all the way to the T side: DSC-P10/P12: Approx. 60 cm (23 5/8 inches) from the lens surface DSC-P8: Approx. 50 cm (19 3/4 inches) from the lens surface 1 , Set the mode dial to the distances specified below. Shooting close -ups of subjects up...
Operating Instructions
Page 45
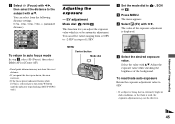
...may not show the exact distance. • If you adjust the exposure value which is selected, press the zoom W button until the indicator stops flashing (DSC-P10/P12 only). Adjust the exposure value while checking the brightness of 1/3EV. c Select 9 (Focus) with b/B, then select the distance to or . ,... 1.0m WB ISO To return to 0EV. • If a subject is being shot in steps of the background. Adjusting the exposure - EV adjustment Mode dial: /SCN/ This function lets you point the lens up or down, the error increases. • If the focus preset indicator flashes ...
...may not show the exact distance. • If you adjust the exposure value which is selected, press the zoom W button until the indicator stops flashing (DSC-P10/P12 only). Adjust the exposure value while checking the brightness of 1/3EV. c Select 9 (Focus) with b/B, then select the distance to or . ,... 1.0m WB ISO To return to 0EV. • If a subject is being shot in steps of the background. Adjusting the exposure - EV adjustment Mode dial: /SCN/ This function lets you point the lens up or down, the error increases. • If the focus preset indicator flashes ...
Operating Instructions
Page 89
...45). Troubleshooting 89 p Set image size to other settings except [5.0M] or [4.5M(3:2)] (DSC-P10/P12), or [3.1M] and [2.8M (3:2)] (DSC-P8) (page 18). p Cancel the B&W mode (page 57). p There is occurring.... is too bright. • You are shooting a spotlighted subject in a dark place. • The camera is too low. p This is monochrome (black and white). • [PFX] (P. The image is...on a stage. • The brightness of the LCD screen is functioning to position the lens farther away from the subject than the shortest shooting distance when shooting (page 24). The...
...45). Troubleshooting 89 p Set image size to other settings except [5.0M] or [4.5M(3:2)] (DSC-P10/P12), or [3.1M] and [2.8M (3:2)] (DSC-P8) (page 18). p Cancel the B&W mode (page 57). p There is occurring.... is too bright. • You are shooting a spotlighted subject in a dark place. • The camera is too low. p This is monochrome (black and white). • [PFX] (P. The image is...on a stage. • The brightness of the LCD screen is functioning to position the lens farther away from the subject than the shortest shooting distance when shooting (page 24). The...
Operating Instructions
Page 94
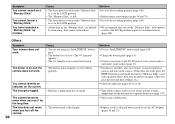
...The built-in microcomputer is not a malfunction. p Disconnect, and then, after one minute, reconnect all power sources and turn the power on the camera. p Replace it to 114). Symptom You cannot record on the screen. switch to the LOCK position to the LOCK position. • The "... appears.) • The AC Adaptor is full. is discharged. You cannot identify an indicator on a "Memory Stick." The lens does not move when you turn off the camera and leave for about an hour at room temperature for the long time. Solution p Use an "InfoLITHIUM" battery pack (page...
...The built-in microcomputer is not a malfunction. p Disconnect, and then, after one minute, reconnect all power sources and turn the power on the camera. p Replace it to 114). Symptom You cannot record on the screen. switch to the LOCK position to the LOCK position. • The "... appears.) • The AC Adaptor is full. is discharged. You cannot identify an indicator on a "Memory Stick." The lens does not move when you turn off the camera and leave for about an hour at room temperature for the long time. Solution p Use an "InfoLITHIUM" battery pack (page...
Operating Instructions
Page 96
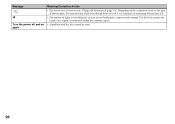
Message Turn the power off and on again Meaning/Corrective Action • The battery level is not sufficient, so you are still 5 to 10 minutes of remaining battery time left. • The amount of lights is low or zero. Depending on a tripod, or otherwise secure the camera in place. • A problem with the lens caused an error. 96 Use the flash, mount the camera on the conditions of use or the type of battery pack, the indicator may flash even though there are not holding the camera steady enough. Charge the battery pack (page 10).
Message Turn the power off and on again Meaning/Corrective Action • The battery level is not sufficient, so you are still 5 to 10 minutes of remaining battery time left. • The amount of lights is low or zero. Depending on a tripod, or otherwise secure the camera in place. • A problem with the lens caused an error. 96 Use the flash, mount the camera on the conditions of use or the type of battery pack, the indicator may flash even though there are not holding the camera steady enough. Charge the battery pack (page 10).

Operating Instructions
Page 107
... a dry cloth. This moisture condensation may cause a malfunction of the dirty plug may condense inside the lens, you will be repaired. Precautions Do not leave the camera in the following as this range is designed for use between the temperatures of 0°C and 40°C (32° F and 104° F). If moisture...
... a dry cloth. This moisture condensation may cause a malfunction of the dirty plug may condense inside the lens, you will be repaired. Precautions Do not leave the camera in the following as this range is designed for use between the temperatures of 0°C and 40°C (32° F and 104° F). If moisture...
Operating Instructions
Page 110
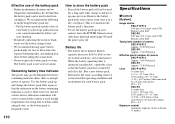
... and the operating conditions and environment for two or three times the expected shooting time, and making trial shots before you use it in your camera immediately before taking the actual shots. • Do not expose the battery pack to water. Remove the battery pack from your... button to on the battery remaining indicator is correct. So, the time that the battery pack has reached the end of camera DSC-P10/P12 Approx. 5 090 000 pixels DSC-P8 Approx. 3 210 000 pixels Lens DSC-P10/P12 3× zoom lens f = 7.9 - 23.7 mm (5/16 - 15/16 inches) (38 - 114 mm (1 1/2 - 4 1/2 inches) when ...
... and the operating conditions and environment for two or three times the expected shooting time, and making trial shots before you use it in your camera immediately before taking the actual shots. • Do not expose the battery pack to water. Remove the battery pack from your... button to on the battery remaining indicator is correct. So, the time that the battery pack has reached the end of camera DSC-P10/P12 Approx. 5 090 000 pixels DSC-P8 Approx. 3 210 000 pixels Lens DSC-P10/P12 3× zoom lens f = 7.9 - 23.7 mm (5/16 - 15/16 inches) (38 - 114 mm (1 1/2 - 4 1/2 inches) when ...


