
Limited Warranty (U.S. Only)
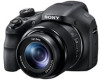
Page 1
.... Instructions: To obtain warranty service, you may have stored or preserved on your authorized dealer, call: 1-800-488-SONY (7669) Repair / Replacement Warranty: This Limited Warranty shall apply to backup any data, software or other than Sony or a Sony Retailer. This Limited Warranty only covers product issues caused by any other rights which vary from Sony or a Sony Retailer. SONY® Digital Camera LIMITED...
.... Instructions: To obtain warranty service, you may have stored or preserved on your authorized dealer, call: 1-800-488-SONY (7669) Repair / Replacement Warranty: This Limited Warranty shall apply to backup any data, software or other than Sony or a Sony Retailer. This Limited Warranty only covers product issues caused by any other rights which vary from Sony or a Sony Retailer. SONY® Digital Camera LIMITED...
Instruction Manual
Page 3
... or dispose of the proper configuration for the power outlet. DSC-HX300 Serial No Model No. Observe the following cautions. • Do not disassemble. • Do not crush and do not expose the unit to these numbers whenever you call your Sony dealer regarding this product. Record the serial number in fire. • Do not handle damaged or...
... or dispose of the proper configuration for the power outlet. DSC-HX300 Serial No Model No. Observe the following cautions. • Do not disassemble. • Do not crush and do not expose the unit to these numbers whenever you call your Sony dealer regarding this product. Record the serial number in fire. • Do not handle damaged or...
Instruction Manual
Page 5
...manual could void your authority to operate this equipment does cause harmful interference to radio or television reception, which can radiate radio frequency energy and, if not installed and used with the equipment in accordance with the limits for a Class B digital device, pursuant to comply with Part15 of Conformity Trade Name: SONY Model No.: DSC-HX300 Responsible Party: Sony... a residential installation. However, there is connected. - Address: 16530 Via Esprillo, San Diego, CA 92127 U.S.A. Connect the equipment into an outlet on , the user is subject to Subpart B of Part 15 of...
...manual could void your authority to operate this equipment does cause harmful interference to radio or television reception, which can radiate radio frequency energy and, if not installed and used with the equipment in accordance with the limits for a Class B digital device, pursuant to comply with Part15 of Conformity Trade Name: SONY Model No.: DSC-HX300 Responsible Party: Sony... a residential installation. However, there is connected. - Address: 16530 Via Esprillo, San Diego, CA 92127 U.S.A. Connect the equipment into an outlet on , the user is subject to Subpart B of Part 15 of...
Instruction Manual
Page 8
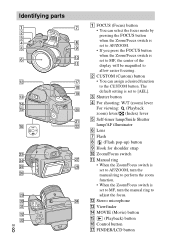
... (Movie) button O (Playback) button P Control button Q FINDER/LCD button B CUSTOM (Custom) button • You can select the focus mode by pressing the FOCUS button when the Zoom/Focus switch is set to AF/ZOOM. • If you press the FOCUS button when the Zoom/Focus switch is set to [AEL]. Identifying parts GB 8 A FOCUS (Focus) button • You can assign a desired function to the CUSTOM button. C Shutter button D For shooting: W/T (zoom) lever For viewing: (Playback zoom) lever/ (Index) lever E Self-timer lamp/Smile Shutter lamp/AF illuminator F Lens G Flash H (Flash pop-up) button...
... (Movie) button O (Playback) button P Control button Q FINDER/LCD button B CUSTOM (Custom) button • You can select the focus mode by pressing the FOCUS button when the Zoom/Focus switch is set to AF/ZOOM. • If you press the FOCUS button when the Zoom/Focus switch is set to [AEL]. Identifying parts GB 8 A FOCUS (Focus) button • You can assign a desired function to the CUSTOM button. C Shutter button D For shooting: W/T (zoom) lever For viewing: (Playback zoom) lever/ (Index) lever E Self-timer lamp/Smile Shutter lamp/AF illuminator F Lens G Flash H (Flash pop-up) button...

Instruction Manual
Page 9
... to the camera may occur. * Supports Micro USB compatible device. R ON/OFF (Power) button and Power/Charge lamp S Mode dial: (Intelligent Auto)/ (Superior Auto)/ (Program Auto)/ (Aperture Priority Shooting)/ (Shutter Speed Priority Shooting)/ GB (Manual Exposure Shooting)/ (Memory recall mode)/ (iSweep Panorama)/ (Movie Mode)/ (3D Still Image)/ (Scene Selection) T Jog dial U / (In-Camera Guide/Delete) button V MENU button W Finder adjustment dial X Multi/Micro USB Terminal* Y Connector cover Z HDMI micro jack wj Speaker wk LCD screen wl Battery/Memory card cover...
... to the camera may occur. * Supports Micro USB compatible device. R ON/OFF (Power) button and Power/Charge lamp S Mode dial: (Intelligent Auto)/ (Superior Auto)/ (Program Auto)/ (Aperture Priority Shooting)/ (Shutter Speed Priority Shooting)/ GB (Manual Exposure Shooting)/ (Memory recall mode)/ (iSweep Panorama)/ (Movie Mode)/ (3D Still Image)/ (Scene Selection) T Jog dial U / (In-Camera Guide/Delete) button V MENU button W Finder adjustment dial X Multi/Micro USB Terminal* Y Connector cover Z HDMI micro jack wj Speaker wk LCD screen wl Battery/Memory card cover...
Instruction Manual
Page 11
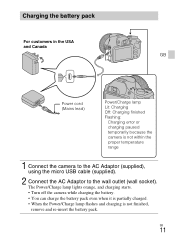
... camera is not finished, remove and re-insert the battery pack. GB 11 The Power/Charge lamp lights orange, and charging starts. • Turn off the camera while charging the battery. • You can charge the battery pack even when it is partially charged. • When the Power/Charge lamp flashes and charging is not within the proper temperature range 1 Connect the camera to the AC Adaptor (supplied), using the micro USB cable (supplied). 2 Connect...
... camera is not finished, remove and re-insert the battery pack. GB 11 The Power/Charge lamp lights orange, and charging starts. • Turn off the camera while charging the battery. • You can charge the battery pack even when it is partially charged. • When the Power/Charge lamp flashes and charging is not within the proper temperature range 1 Connect the camera to the AC Adaptor (supplied), using the micro USB cable (supplied). 2 Connect...
Instruction Manual
Page 13
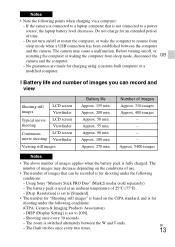
... sleep mode when a USB connection has been established between the W and T ends. x Battery life and number of images Approx. 310 images Approx. 400 images - - - - The zoom is for shooting under the following points when charging via a computer: - If the camera is connected to a laptop computer that can record and view Shooting still images LCD screen Viewfinder Typical movie LCD screen shooting Viewfinder Continuous LCD screen movie shooting Viewfinder Viewing still images Battery life Approx. 155 min. Before turning on/off or restart the...
... sleep mode when a USB connection has been established between the W and T ends. x Battery life and number of images Approx. 310 images Approx. 400 images - - - - The zoom is for shooting under the following points when charging via a computer: - If the camera is connected to a laptop computer that can record and view Shooting still images LCD screen Viewfinder Typical movie LCD screen shooting Viewfinder Continuous LCD screen movie shooting Viewfinder Viewing still images Battery life Approx. 155 min. Before turning on/off or restart the...

Instruction Manual
Page 14
... playback screen to the playback screen. The power turns on non-stop shooting until the limit (29 minutes) has been reached, and then continued by pressing the MOVIE button again. Continuous movie shooting: Battery life based on and off , etc. - In addition, you connect the camera and a computer using the micro USB cable. Press (Playback) button to switch to the USB connection screen. Movie quality: AVC HD HQ - GB 14 Other functions, such as zooming, are for shooting to a power...
... playback screen to the playback screen. The power turns on non-stop shooting until the limit (29 minutes) has been reached, and then continued by pressing the MOVIE button again. Continuous movie shooting: Battery life based on and off , etc. - In addition, you connect the camera and a computer using the micro USB cable. Press (Playback) button to switch to the USB connection screen. Movie quality: AVC HD HQ - GB 14 Other functions, such as zooming, are for shooting to a power...
Instruction Manual
Page 17
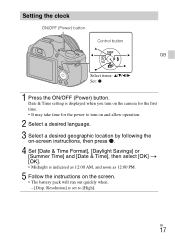
... allow operation. 2 Select a desired language. 3 Select a desired geographic location by following the on-screen instructions, then press z. 4 Set [Date & Time Format], [Daylight Savings] or [Summer Time] and [Date & Time], then select [OK] t [OK]. • Midnight is displayed when you turn on the camera for the first time. • It may take time for the power to [High]. Setting the clock ON/OFF (Power) button Control button GB Select items: v/V/b/B Set: z 1 Press the ON/OFF (Power) button. GB...
... allow operation. 2 Select a desired language. 3 Select a desired geographic location by following the on-screen instructions, then press z. 4 Set [Date & Time Format], [Daylight Savings] or [Summer Time] and [Date & Time], then select [OK] t [OK]. • Midnight is displayed when you turn on the camera for the first time. • It may take time for the power to [High]. Setting the clock ON/OFF (Power) button Control button GB Select items: v/V/b/B Set: z 1 Press the ON/OFF (Power) button. GB...

Instruction Manual
Page 18
... the image is in Mode dial : Intelligent Auto : Movie Mode Shooting still images MOVIE 1 Press the shutter button halfway down to focus. GB 18 Shooting still images/movies W: zoom out Shutter button T: zoom in focus, a beep sounds and the z indicator lights. 2 Press the shutter button fully down to shoot an image. Shooting movies 1 Press the MOVIE (Movie) button to start recording. • Use the W/T (zoom) lever to change the zoom scale. • Press the shutter button to shoot still images while continuing to record the movie. 2 Press the MOVIE button again to stop recording.
... the image is in Mode dial : Intelligent Auto : Movie Mode Shooting still images MOVIE 1 Press the shutter button halfway down to focus. GB 18 Shooting still images/movies W: zoom out Shutter button T: zoom in focus, a beep sounds and the z indicator lights. 2 Press the shutter button fully down to shoot an image. Shooting movies 1 Press the MOVIE (Movie) button to start recording. • Use the W/T (zoom) lever to change the zoom scale. • Press the shutter button to shoot still images while continuing to record the movie. 2 Press the MOVIE button again to stop recording.
Instruction Manual
Page 19
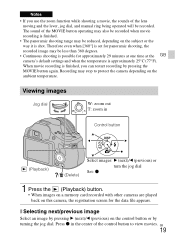
... be recorded. x Selecting next/previous image Select an image by pressing B (next)/b (previous) on the ambient temperature. Press z in Control button (Playback) / (Delete) Select images: B (next)/b (previous) or turn the jog dial Set: z 1 Press the (Playback) button. • When images on a memory card recorded with other cameras are played back on the subject or the way it is finished, you use the zoom function while shooting a movie, the sounds of the MOVIE button operating may stop to view movies.
... be recorded. x Selecting next/previous image Select an image by pressing B (next)/b (previous) on the ambient temperature. Press z in Control button (Playback) / (Delete) Select images: B (next)/b (previous) or turn the jog dial Set: z 1 Press the (Playback) button. • When images on a memory card recorded with other cameras are played back on the subject or the way it is finished, you use the zoom function while shooting a movie, the sounds of the MOVIE button operating may stop to view movies.
Instruction Manual
Page 21
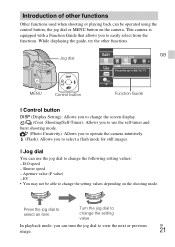
... MENU Control button Function Guide x Control button DISP (Display Setting): Allows you to change the screen display. / (Cont. Shutter speed - Aperture value (F value) - Press the jog dial to easily select from the functions. ISO speed - EV • You may not be operated using the control button, the jog dial or MENU button on the shooting mode. x Jog dial You can be able to select a flash mode for still images. Shooting/Self-Timer): Allows you to use the jog dial to change the following setting values: - Turn...
... MENU Control button Function Guide x Control button DISP (Display Setting): Allows you to change the screen display. / (Cont. Shutter speed - Aperture value (F value) - Press the jog dial to easily select from the functions. ISO speed - EV • You may not be operated using the control button, the jog dial or MENU button on the shooting mode. x Jog dial You can be able to select a flash mode for still images. Shooting/Self-Timer): Allows you to use the jog dial to change the following setting values: - Turn...
Instruction Manual
Page 22
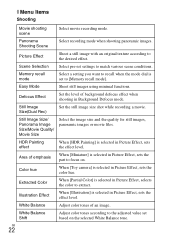
... Color When [Partial Color] is selected in Picture Effect, sets the effect level. Picture Effect Shoot a still image with an original texture according to match various scene conditions. Easy Mode Shoot still images using minimal functions. x Menu Items Shooting Movie shooting scene Select movie recording mode. Color hue When [Toy camera] is set settings to the desired effect. Memory recall mode Select a setting you want to recall when the mode dial is selected in Picture Effect, selects the color to the adjusted value set...
... Color When [Partial Color] is selected in Picture Effect, sets the effect level. Picture Effect Shoot a still image with an original texture according to match various scene conditions. Easy Mode Shoot still images using minimal functions. x Menu Items Shooting Movie shooting scene Select movie recording mode. Color hue When [Toy camera] is set settings to the desired effect. Memory recall mode Select a setting you want to recall when the mode dial is selected in Picture Effect, selects the color to the adjusted value set...
Instruction Manual
Page 23
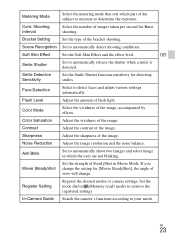
...-Camera Guide Search the camera's functions according to automatically detect shooting conditions. Noise Reduction Adjust the image resolution and the noise balance. Smile Detection Sensitivity Set the Smile Shutter function sensitivity for Burst shooting. If you change . Scene Recognition Set to your needs. GB 23 Shooting Interval Select the number of view will change the setting for [Movie SteadyShot], the angle of images taken per second for detecting smiles. Set the mode dial to (Memory recall mode...
...-Camera Guide Search the camera's functions according to automatically detect shooting conditions. Noise Reduction Adjust the image resolution and the noise balance. Smile Detection Sensitivity Set the Smile Shutter function sensitivity for Burst shooting. If you change . Scene Recognition Set to your needs. GB 23 Shooting Interval Select the number of view will change the setting for [Movie SteadyShot], the angle of images taken per second for detecting smiles. Set the mode dial to (Memory recall mode...
Instruction Manual
Page 24
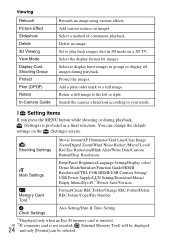
Viewing Retouch Picture Effect Slideshow Delete 3D Viewing View Mode Display Cont. Delete an image. Resolution Main Settings Beep/Panel Brightness/Language Setting/Display color/ Demo Mode/Initialize/Function Guide/HDMI Resolution/CTRL FOR HDMI/USB Connect Setting/ USB Power Supply/LUN Setting/Download Music/ Empty Music/Eye-Fi*1/Power Save/Version Memory Card Tool*2 Format/Create REC.Folder/Change REC.Folder/Delete REC.Folder/Copy/File Number Clock Settings Area Setting/Date & Time Setting *1Displayed only when an Eye-Fi memory card is not inserted, (Internal Memory Tool) will be...
Viewing Retouch Picture Effect Slideshow Delete 3D Viewing View Mode Display Cont. Delete an image. Resolution Main Settings Beep/Panel Brightness/Language Setting/Display color/ Demo Mode/Initialize/Function Guide/HDMI Resolution/CTRL FOR HDMI/USB Connect Setting/ USB Power Supply/LUN Setting/Download Music/ Empty Music/Eye-Fi*1/Power Save/Version Memory Card Tool*2 Format/Create REC.Folder/Change REC.Folder/Delete REC.Folder/Copy/File Number Clock Settings Area Setting/Date & Time Setting *1Displayed only when an Eye-Fi memory card is not inserted, (Internal Memory Tool) will be...
Instruction Manual
Page 26
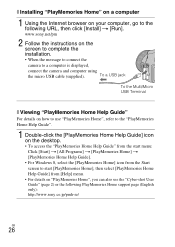
... is displayed, connect the camera and computer using the micro USB cable (supplied). www.sony.net/pm 2 Follow the instructions on "PlayMemories Home", you can also see the "Cyber-shot User Guide" (page 2) or the following URL, then click [Install] t [Run]. To a USB jack To the Multi/Micro USB Terminal x Viewing "PlayMemories Home Help Guide" For details on how to use "PlayMemories Home", refer to the "PlayMemories Home Help Guide". 1 Double...
... is displayed, connect the camera and computer using the micro USB cable (supplied). www.sony.net/pm 2 Follow the instructions on "PlayMemories Home", you can also see the "Cyber-shot User Guide" (page 2) or the following URL, then click [Install] t [Run]. To a USB jack To the Multi/Micro USB Terminal x Viewing "PlayMemories Home Help Guide" For details on how to use "PlayMemories Home", refer to the "PlayMemories Home Help Guide". 1 Double...
Instruction Manual
Page 28
... or software you take regular breaks. The recordable time also varies depending on the product. This increases the resolution, and provides a smoother, more realistic image. • Do not watch 3D images shot with this camera. GB 28 Notes on 3D-compatible monitors. • When you view 3D images shot with this camera • This manual describes each of the functions of the lens. Unlike standard recording modes up...
... or software you take regular breaks. The recordable time also varies depending on the product. This increases the resolution, and provides a smoother, more realistic image. • Do not watch 3D images shot with this camera. GB 28 Notes on 3D-compatible monitors. • When you view 3D images shot with this camera • This manual describes each of the functions of the lens. Unlike standard recording modes up...

Instruction Manual
Page 29
... malfunction cannot be GB able to record images. In some tiny black and/or bright dots (white, red, blue or green) may cause the camera to malfunction, and in accordance with a Carl Zeiss lens which is capable of the camera. • If moisture condensation occurs, remove it is not a malfunction. The lens for effective use /store the camera in the following places •...
... malfunction cannot be GB able to record images. In some tiny black and/or bright dots (white, red, blue or green) may cause the camera to malfunction, and in accordance with a Carl Zeiss lens which is capable of the camera. • If moisture condensation occurs, remove it is not a malfunction. The lens for effective use /store the camera in the following places •...
Instruction Manual
Page 30
... transferring the camera. • Format the internal memory (page 24), record images up to the finish or casing: - GB 30 In this case, leave the power off automatically to the battery characteristics, and is due to protect the camera. Note on copyright Television programs, films, videotapes, and other materials can no longer record movies. A message will make it to the screen, we recommend that you gently remove...
... transferring the camera. • Format the internal memory (page 24), record images up to the finish or casing: - GB 30 In this case, leave the power off automatically to the battery characteristics, and is due to protect the camera. Note on copyright Television programs, films, videotapes, and other materials can no longer record movies. A message will make it to the screen, we recommend that you gently remove...
Instruction Manual
Page 31
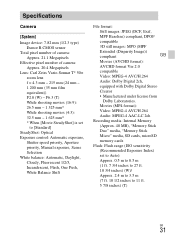
....8 (W) - F6.3 (T) While shooting movies (16:9): 26.5 mm - 1 325 mm* While shooting movies (4:3): 32.5 mm - 1 625 mm* * When [Movie SteadyShot] is set to Auto): Approx. 0.5 m to 8.5 m (1 ft. 7 3/4 inches to 27 ft. 10 3/4 inches) (W)/ Approx. 2.4 m to 3.5 m (7 ft. 10 1/2 inches to [Standard] SteadyShot: Optical Exposure control: Automatic exposure, Shutter speed priority, Aperture priority, Manual exposure, Scene Selection White balance: Automatic, Daylight, Cloudy, Fluorescent 1/2/3, Incandescent, Flash, One Push, White Balance Shift File format: Still images: JPEG (DCF...
....8 (W) - F6.3 (T) While shooting movies (16:9): 26.5 mm - 1 325 mm* While shooting movies (4:3): 32.5 mm - 1 625 mm* * When [Movie SteadyShot] is set to Auto): Approx. 0.5 m to 8.5 m (1 ft. 7 3/4 inches to 27 ft. 10 3/4 inches) (W)/ Approx. 2.4 m to 3.5 m (7 ft. 10 1/2 inches to [Standard] SteadyShot: Optical Exposure control: Automatic exposure, Shutter speed priority, Aperture priority, Manual exposure, Scene Selection White balance: Automatic, Daylight, Cloudy, Fluorescent 1/2/3, Incandescent, Flash, One Push, White Balance Shift File format: Still images: JPEG (DCF...


