
User's Guide
Page 1
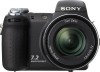
... Record the serial number in Japan Digital Still Camera User's Guide/ Troubleshooting DSC-H2/H5 "Read This First" (separate volume) Explains the set-up and basic operations for future reference. DSC-H2/H5 Serial No © 2006 Sony Corporation Enjoying the camera Using the menu Using the Setup ...screen Using your computer Printing still images Connecting your camera to frequently asked questions can be found at our Customer...
... Record the serial number in Japan Digital Still Camera User's Guide/ Troubleshooting DSC-H2/H5 "Read This First" (separate volume) Explains the set-up and basic operations for future reference. DSC-H2/H5 Serial No © 2006 Sony Corporation Enjoying the camera Using the menu Using the Setup ...screen Using your computer Printing still images Connecting your camera to frequently asked questions can be found at our Customer...

User's Guide
Page 6
...frequency energy and, if not installed and used in the EMC Directive for a Class B digital device, pursuant to Part 15 of electrical and electronic equipment. If the plug supplied with ...equipment and receiver. - Consult the dealer or an experienced radio/TV technician for your nearest Sony service station. 6 Disposal of Old Electrical & Electronic Equipment (Applicable in the plug supplied need...the user is connected. - For more of correctly, you purchased the product. If this camera. Note: This equipment has been tested and found compliant with the limits set out in ...
...frequency energy and, if not installed and used in the EMC Directive for a Class B digital device, pursuant to Part 15 of electrical and electronic equipment. If the plug supplied with ...equipment and receiver. - Consult the dealer or an experienced radio/TV technician for your nearest Sony service station. 6 Disposal of Old Electrical & Electronic Equipment (Applicable in the plug supplied need...the user is connected. - For more of correctly, you purchased the product. If this camera. Note: This equipment has been tested and found compliant with the limits set out in ...

User's Guide
Page 7
..., use up method. Memory Stick Duo Adaptor Notes on the Nickel-Metal Hydride battery • Charge both of "Memory Stick" that the camera is to record or play back properly. 7 This may not be used by inserting it may cause the malfunction of the batteries as the... for contents of the recording • The contents of the recording cannot be destroyed. Read "Precautions" (page 112) before using the camera for this camera has been produced under a quality assurance system certified by Carl Zeiss in accordance with "Memory Stick" compatible equipment You can use the partially...
..., use up method. Memory Stick Duo Adaptor Notes on the Nickel-Metal Hydride battery • Charge both of "Memory Stick" that the camera is to record or play back properly. 7 This may not be used by inserting it may cause the malfunction of the batteries as the... for contents of the recording • The contents of the recording cannot be destroyed. Read "Precautions" (page 112) before using the camera for this camera has been produced under a quality assurance system certified by Carl Zeiss in accordance with "Memory Stick" compatible equipment You can use the partially...

User's Guide
Page 8
...the flash surface, resulting in a cold location. Information Technology Industries Association). • Playback of images recorded with other equipment on your camera on other materials may be some tiny black points and/or bright points (white, red, blue or green in color) that may ... However, there may be careful not to apply force to record images, this manual are reproduced images, and are operational for Camera File system) universal standard established by JEITA (Japan Electronics and 8 Unauthorized recording of such materials may be copyrighted. On illustrations ...
...the flash surface, resulting in a cold location. Information Technology Industries Association). • Playback of images recorded with other equipment on your camera on other materials may be some tiny black points and/or bright points (white, red, blue or green in color) that may ... However, there may be careful not to apply force to record images, this manual are reproduced images, and are operational for Camera File system) universal standard established by JEITA (Japan Electronics and 8 Unauthorized recording of such materials may be copyrighted. On illustrations ...

User's Guide
Page 9
For full use of the digital still camera Prepare the camera and shoot images easily "Read This First" (separate volume) 1 Prepare the batteries 2 Turn the camera on/set the clock 3 Insert a "Memory Stick Duo" (not supplied) 4 Select the image size for use 5 Shoot images easily (...Auto adjustment mode) Shoot still images (Scene Selection) 6 View/delete images Get more friendly with your camera This manual • Shoot with your favorite settings (Program auto shooting/ Manual exposure shooting) t page 33 • Enjoy various shooting/playback using ...
For full use of the digital still camera Prepare the camera and shoot images easily "Read This First" (separate volume) 1 Prepare the batteries 2 Turn the camera on/set the clock 3 Insert a "Memory Stick Duo" (not supplied) 4 Select the image size for use 5 Shoot images easily (...Auto adjustment mode) Shoot still images (Scene Selection) 6 View/delete images Get more friendly with your camera This manual • Shoot with your favorite settings (Program auto shooting/ Manual exposure shooting) t page 33 • Enjoy various shooting/playback using ...

User's Guide
Page 10
... parts 18 Indicators on a subject successfully 13 Exposure - Table of lighting 16 Quality - On the effects of contents Read this first 5 Notes on using your camera 7 Enjoying the camera Basic techniques for better images 13 Focus -
... parts 18 Indicators on a subject successfully 13 Exposure - Table of lighting 16 Quality - On the effects of contents Read this first 5 Notes on using your camera 7 Enjoying the camera Basic techniques for better images 13 Focus -

User's Guide
Page 11
Folder Copy Setup 1 65 1 LCD Backlight (DSC-H5 only) EVF Backlight Beep Language Initialize Setup 2 67 2 File Number USB Connect Video Out Clock Set 11 Viewing menu 49 (Folder) - (Protect) DPOF (Print) (Slide) (Resize) (Rotate) (Divide) (Setup) Trimming Using the Setup screen Using Setup items 56 1 Camera 1 57 AF Mode Digital Zoom Function Guide Red Eye Reduction AF Illuminator Auto Review 2 Camera 2 60 Expanded Focus Flash Sync. Folder Change REC. STEADY SHOT Conversion Lens Internal Memory Tool 62 Format Memory Stick Tool 63 Format Create REC.
Folder Copy Setup 1 65 1 LCD Backlight (DSC-H5 only) EVF Backlight Beep Language Initialize Setup 2 67 2 File Number USB Connect Video Out Clock Set 11 Viewing menu 49 (Folder) - (Protect) DPOF (Print) (Slide) (Resize) (Rotate) (Divide) (Setup) Trimming Using the Setup screen Using Setup items 56 1 Camera 1 57 AF Mode Digital Zoom Function Guide Red Eye Reduction AF Illuminator Auto Review 2 Camera 2 60 Expanded Focus Flash Sync. Folder Change REC. STEADY SHOT Conversion Lens Internal Memory Tool 62 Format Memory Stick Tool 63 Format Create REC.
User's Guide
Page 12
... your Windows computer 69 Installing the software (supplied 71 Copying images to your computer 72 Viewing image files stored on a computer with your camera (using a "Memory Stick Duo 78 Using the "Cyber-shot Viewer" (supplied 79 Using your Macintosh computer 83 Printing still images How ...to print still images 85 Printing images directly using a PictBridge compliant printer 86 Printing at a shop 89 Connecting your camera to your TV Viewing images on a TV screen 91 Troubleshooting Troubleshooting 93 Warning indicators and messages 105 Others On the "Memory Stick 108...
... your Windows computer 69 Installing the software (supplied 71 Copying images to your computer 72 Viewing image files stored on a computer with your camera (using a "Memory Stick Duo 78 Using the "Cyber-shot Viewer" (supplied 79 Using your Macintosh computer 83 Printing still images How ...to print still images 85 Printing images directly using a PictBridge compliant printer 86 Printing at a shop 89 Connecting your camera to your TV Viewing images on a TV screen 91 Troubleshooting Troubleshooting 93 Warning indicators and messages 105 Others On the "Memory Stick 108...

User's Guide
Page 13
...page 43), and so on a subject successfully When you press the shutter button halfway down, the camera adjusts the focus automatically (Auto Focus). Also, you can enjoy your side. Remember to use various camera functions such as follows). Using the 2-second delay selftimer or a tripod, or turning on t...If the image looks blurred even after focusing, it may be because of camera shake. Then press the shutter button fully down . Hints for preventing blur Hold the camera steadily, keeping your arms at your camera. It tells you how to press the shutter button only halfway down ....
...page 43), and so on a subject successfully When you press the shutter button halfway down, the camera adjusts the focus automatically (Auto Focus). Also, you can enjoy your side. Remember to use various camera functions such as follows). Using the 2-second delay selftimer or a tripod, or turning on t...If the image looks blurred even after focusing, it may be because of camera shake. Then press the shutter button fully down . Hints for preventing blur Hold the camera steadily, keeping your arms at your camera. It tells you how to press the shutter button only halfway down ....

User's Guide
Page 14
... shutter. However, you to adjust the shutter speed and aperture value manually. t page 37 Image Brightness (EV): Allows you can create various images by the camera. Exposure Adjusting the light intensity You can adjust it manually using the functions below. Shutter speed = Length of time the... to be measured to the proper value in "Read This First", page 37 Metering Mode: Allows you to change the part of light that the camera will receive when you to adjust the exposure that has been determined by adjusting the exposure and the ISO sensitivity. Exposure is automatically set to...
... shutter. However, you to adjust the shutter speed and aperture value manually. t page 37 Image Brightness (EV): Allows you can create various images by the camera. Exposure Adjusting the light intensity You can adjust it manually using the functions below. Shutter speed = Length of time the... to be measured to the proper value in "Read This First", page 37 Metering Mode: Allows you to change the part of light that the camera will receive when you to adjust the exposure that has been determined by adjusting the exposure and the ISO sensitivity. Exposure is automatically set to...

User's Guide
Page 15
...exposure (EV) When shooting a whitish overall image such as a backlit subject or a snowy scene When shooting a darker overall image The camera judges that the subject is bright so that the exposure is darker. Adjust in "Read This First", page 38 Adjusting the ISO sensitivity ...You can check the exposure referring to overexpose or underexpose your subject (giving a whitish or darkish image). t step 5 in the + direction The camera judges that the subject is dark so that the exposure is brighter. However, when the exposure is insufficient, the image may become noisy. However, ...
...exposure (EV) When shooting a whitish overall image such as a backlit subject or a snowy scene When shooting a darker overall image The camera judges that the subject is bright so that the exposure is darker. Adjust in "Read This First", page 38 Adjusting the ISO sensitivity ...You can check the exposure referring to overexpose or underexpose your subject (giving a whitish or darkish image). t step 5 in the + direction The camera judges that the subject is dark so that the exposure is brighter. However, when the exposure is insufficient, the image may become noisy. However, ...

User's Guide
Page 16
... size" is printed or displayed on the screen of the camera, the fine detail and data processing time differ when the ...called pixels. Description of the pixels and the image size 1 Image size: 7M (DSC-H5 only) 3072 pixels × 2304 pixels = 7,077,888 pixels 2 Image size: 6M (DSC-H2 only) 2816 pixels × 2112 pixels = 5,947,392 pixels Pixels 3 ...Image size: VGA 640 pixels × 480 pixels = 307,200 pixels 16 Reddish Quality On "image quality" and "image size" A digital image is displayed in ...
... size" is printed or displayed on the screen of the camera, the fine detail and data processing time differ when the ...called pixels. Description of the pixels and the image size 1 Image size: 7M (DSC-H5 only) 3072 pixels × 2304 pixels = 7,077,888 pixels 2 Image size: 6M (DSC-H2 only) 2816 pixels × 2112 pixels = 5,947,392 pixels Pixels 3 ...Image size: VGA 640 pixels × 480 pixels = 307,200 pixels 16 Reddish Quality On "image quality" and "image size" A digital image is displayed in ...

User's Guide
Page 17
...Fine image quality and large file size) Example: Printing in up to A3 size (DSCH5)/A4 size (DSCH2) Enjoying the camera Few pixels (Rough image quality but has a smaller file size. 17 When you select a high compression ratio, the ...sent by email Image size 7M (3072×2304) (DSC-H5 only) 3:21) (3072×2048) (DSC-H5 only) 6M (2816×2112) (DSC-H2 only) 3:21) (2816×1872) (DSC-H2 only) 5M (2592×1944) (DSC-H5 only) 3M (2048×1536) 2M (1632×1224... is. • The more frames per second you can select the compression ratio when digital images are marked with .
...Fine image quality and large file size) Example: Printing in up to A3 size (DSCH5)/A4 size (DSCH2) Enjoying the camera Few pixels (Rough image quality but has a smaller file size. 17 When you select a high compression ratio, the ...sent by email Image size 7M (3072×2304) (DSC-H5 only) 3:21) (3072×2048) (DSC-H5 only) 6M (2816×2112) (DSC-H2 only) 3:21) (2816×1872) (DSC-H2 only) 5M (2592×1944) (DSC-H5 only) 3M (2048×1536) 2M (1632×1224... is. • The more frames per second you can select the compression ratio when digital images are marked with .

User's Guide
Page 19
... cord cover When using an AC-LS5K AC Adaptor (not supplied) For details, refer to tripods having screws longer than 5.5 mm (7/32 inch). Enjoying the camera K For shooting: Zoom (W/T) button (t step 5 in "Read This First") For viewing: / (Playback zoom) button/ (Index) button (t step 6 in "Read This ...First") 19 You will be unable to firmly secure the camera to the operation manual supplied with a screw length of less than 5.5 mm (7/32 inch), and may damage the camera. • Do not pinch the cord when you close the cover.
... cord cover When using an AC-LS5K AC Adaptor (not supplied) For details, refer to tripods having screws longer than 5.5 mm (7/32 inch). Enjoying the camera K For shooting: Zoom (W/T) button (t step 5 in "Read This First") For viewing: / (Playback zoom) button/ (Index) button (t step 6 in "Read This ...First") 19 You will be unable to firmly secure the camera to the operation manual supplied with a screw length of less than 5.5 mm (7/32 inch), and may damage the camera. • Do not pinch the cord when you close the cover.

User's Guide
Page 21
Attaching a conversion lens (not supplied) When you want to store it with your conversion lens. 21 Position the lens hood as shown below and turn the lens hood clockwise until it is not in shots on distant objects, attach a conversion lens. 1 Attach the adaptor ring. 2 Attach a conversion lens. • For details, see the operating instructions supplied with the camera when it clicks. Enjoying the camera Storing the lens hood The lens hood can be attached in the reverse direction to do enhanced wide-angle shots or zoom-in use.
Attaching a conversion lens (not supplied) When you want to store it with your conversion lens. 21 Position the lens hood as shown below and turn the lens hood clockwise until it is not in shots on distant objects, attach a conversion lens. 1 Attach the adaptor ring. 2 Attach a conversion lens. • For details, see the operating instructions supplied with the camera when it clicks. Enjoying the camera Storing the lens hood The lens hood can be attached in the reverse direction to do enhanced wide-angle shots or zoom-in use.

User's Guide
Page 22
When shooting still images Display P S A M SL 1.3 Indication Mode dial (33) Camera mode (t step 5 in "Read This First") Flash mode (t step 5 in "Read This First") Flash charging • The LCD screen gets dim while charging. (DSC-H5 only) Zoom scaling (57, t step 5 in "Read This First") When shooting movies A Display z BRK M Indication Battery remaining (t step...
When shooting still images Display P S A M SL 1.3 Indication Mode dial (33) Camera mode (t step 5 in "Read This First") Flash mode (t step 5 in "Read This First") Flash charging • The LCD screen gets dim while charging. (DSC-H5 only) Zoom scaling (57, t step 5 in "Read This First") When shooting movies A Display z BRK M Indication Battery remaining (t step...

User's Guide
Page 23
Enjoying the camera B Display Indication Peaking High Peaking (40) Peaking Low Peaking Off 2 5 10 90cm Manual focus bar (40) 0.9 2 5m zSet Flexible spot AF (39) Manual focus (40) ... of recordable images (28, 29) Self-timer (t step 5 in "Read This First") • 7M and 5M are displayed only for the DSC-H5. • 6M is displayed only for the DSC-H2. • 1M is displayed only when the Multi Burst is activated. Image quality (47) Recording folder (63) • This does not...
Enjoying the camera B Display Indication Peaking High Peaking (40) Peaking Low Peaking Off 2 5 10 90cm Manual focus bar (40) 0.9 2 5m zSet Flexible spot AF (39) Manual focus (40) ... of recordable images (28, 29) Self-timer (t step 5 in "Read This First") • 7M and 5M are displayed only for the DSC-H5. • 6M is displayed only for the DSC-H2. • 1M is displayed only when the Multi Burst is activated. Image quality (47) Recording folder (63) • This does not...

User's Guide
Page 24
... (45) AF range finder frame (38) E Display Indication Histogram (27, 38) NR slow shutter (36) • When using a tripod or other means to stabilize the camera. D Display E + Indication Vibration warning (13) • Indicates vibration may prevent you can still shoot images. Even if the vibration warning appears, you from shooting clear...
... (45) AF range finder frame (38) E Display Indication Histogram (27, 38) NR slow shutter (36) • When using a tripod or other means to stabilize the camera. D Display E + Indication Vibration warning (13) • Indicates vibration may prevent you can still shoot images. Even if the vibration warning appears, you from shooting clear...

User's Guide
Page 25
... 6 in "Read This First") Protect (50) Print order (DPOF) mark (89) Change folder (49) • This does not appear when using internal memory. Enjoying the camera When playing back still images 1 3 4 2 BACK/NEXT VOLUME 5 When playing back movies 1 3 4 2 5 A Display M 7M 6M 5M 3:2 3M 1M VGA 16:9 FINE STD 640 640 160...
... 6 in "Read This First") Protect (50) Print order (DPOF) mark (89) Change folder (49) • This does not appear when using internal memory. Enjoying the camera When playing back still images 1 3 4 2 BACK/NEXT VOLUME 5 When playing back movies 1 3 4 2 5 A Display M 7M 6M 5M 3:2 3M 1M VGA 16:9 FINE STD 640 640 160...

User's Guide
Page 27
... when shooting and during playback may not appear for images recorded using playback zoom. - When the menu is displayed. - Enjoying the camera Changing the screen display Each time you press the (Screen display switch) button, the display changes as follows. (Screen display switch) ...button Histogram on Histogram display Indicators off • By pressing the (Screen display switch) button longer, you can brighten the LCD backlight (DSC-H5 only)/finder backlight (page 65, t step 5 in "Read This First"). • When you set the histogram display to on 27 Indicators on...
... when shooting and during playback may not appear for images recorded using playback zoom. - When the menu is displayed. - Enjoying the camera Changing the screen display Each time you press the (Screen display switch) button, the display changes as follows. (Screen display switch) ...button Histogram on Histogram display Indicators off • By pressing the (Screen display switch) button longer, you can brighten the LCD backlight (DSC-H5 only)/finder backlight (page 65, t step 5 in "Read This First"). • When you set the histogram display to on 27 Indicators on...


