Operating Instructions
Page 9
...Enjoying your Windows computer 62 Copying images to your computer 64 Viewing image files stored on a computer with your camera (using a "Memory Stick 70 Using the supplied software 71 Using your Macintosh computer 73 Printing still images How to print still images 75 Printing images directly using ...a PictBridge compliant printer 76 Printing at a shop 79 Connecting your camera to your TV Viewing images on a TV screen 81...
...Enjoying your Windows computer 62 Copying images to your computer 64 Viewing image files stored on a computer with your camera (using a "Memory Stick 70 Using the supplied software 71 Using your Macintosh computer 73 Printing still images How to print still images 75 Printing images directly using ...a PictBridge compliant printer 76 Printing at a shop 79 Connecting your camera to your TV Viewing images on a TV screen 81...
Operating Instructions
Page 47
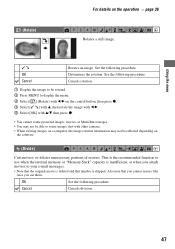
See the following procedure. Using the menu (Rotate) For details on the software. (Divide) P S AM Cuts movies, or deletes unnecessary portions of movies. Determines the rotation. This is the recommended function to use when the internal memory or "... messages. • Note that the original movie is deleted and that you cannot restore files once you attach movies to rotate images shot with other cameras. • When viewing images on a computer, the image rotation information may not be reflected depending on the operation t page 36 P S AM Rotates a still image. OK...
See the following procedure. Using the menu (Rotate) For details on the software. (Divide) P S AM Cuts movies, or deletes unnecessary portions of movies. Determines the rotation. This is the recommended function to use when the internal memory or "... messages. • Note that the original movie is deleted and that you cannot restore files once you attach movies to rotate images shot with other cameras. • When viewing images on a computer, the image rotation information may not be reflected depending on the operation t page 36 P S AM Rotates a still image. OK...
Operating Instructions
Page 63
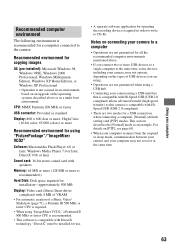
...). • There are not guaranteed when using a USB hub. • Connecting your camera, may not recover at the same time, some devices, including your camera using "ImageMixer VCD2," a Pentium III 800 MHz or faster CPU is recommended. • This software is recommended for all the recommended computer environments mentioned above or in order...
...). • There are not guaranteed when using a USB hub. • Connecting your camera, may not recover at the same time, some devices, including your camera using "ImageMixer VCD2," a Pentium III 800 MHz or faster CPU is recommended. • This software is recommended for all the recommended computer environments mentioned above or in order...
Operating Instructions
Page 64
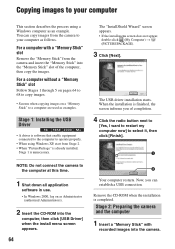
... I want to restart my computer now] to select it, then click [Finish]. 1 NOTE: Do not connect the camera to the computer at this time. 1 Shut down all application software in use. • In Windows 2000, log on a "Memory Stick" to operate properly. • When using ...you of the computer, then copy the images. When the installation is software that enable equipment connected to the computer to a computer are used as Administrator (authorized Administrators). 2 Insert the CD-ROM into the camera. Stage 2: Preparing the camera and the computer 1 Insert a "Memory Stick" with a "Memory...
... I want to restart my computer now] to select it, then click [Finish]. 1 NOTE: Do not connect the camera to the computer at this time. 1 Shut down all application software in use. • In Windows 2000, log on a "Memory Stick" to operate properly. • When using ...you of the computer, then copy the images. When the installation is software that enable equipment connected to the computer to a computer are used as Administrator (authorized Administrators). 2 Insert the CD-ROM into the camera. Stage 2: Preparing the camera and the computer 1 Insert a "Memory Stick" with a "Memory...
Operating Instructions
Page 71
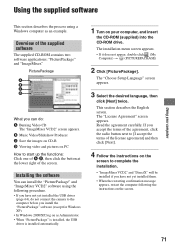
...double-click (My Computer) t (PICTUREPACKAGE) 2 Click [PicturePackage]. PicturePackage A B C D What you can install the "PicturePackage" and "ImageMixer VCD2" software using a Windows computer as Administrator. • When "PicturePackage" is installed, the USB driver is installed automatically. 1 Turn on your computer, and ...) into the CD-ROM drive. Read the agreement carefully. The "License Agreement" screen appears. Installing the software You can do not connect the camera to complete the installation. • "ImageMixer VCD2" and "DirectX" will be installed if you have not...
...double-click (My Computer) t (PICTUREPACKAGE) 2 Click [PicturePackage]. PicturePackage A B C D What you can install the "PicturePackage" and "ImageMixer VCD2" software using a Windows computer as Administrator. • When "PicturePackage" is installed, the USB driver is installed automatically. 1 Turn on your computer, and ...) into the CD-ROM drive. Read the agreement carefully. The "License Agreement" screen appears. Installing the software You can do not connect the camera to complete the installation. • "ImageMixer VCD2" and "DirectX" will be installed if you have not...

Operating Instructions
Page 72
To start up the software • Double-click the "PicturePackage Menu" icon on -line help. For information on the use of the software Click [?] at the upper-right corner of "PicturePackage Menu" and "PicturePackage destination Folder" are displayed after the installation. Technical support for "PicturePackage"/"ImageMixer VCD2" is provided by the Pixela User Support Center. For more information, refer to show the on the desktop. 5 Remove the CD-ROM as the shortcut icons of each screen to the information included on the CD-ROM. 72
To start up the software • Double-click the "PicturePackage Menu" icon on -line help. For information on the use of the software Click [?] at the upper-right corner of "PicturePackage Menu" and "PicturePackage destination Folder" are displayed after the installation. Technical support for "PicturePackage"/"ImageMixer VCD2" is provided by the Pixela User Support Center. For more information, refer to show the on the desktop. 5 Remove the CD-ROM as the shortcut icons of each screen to the information included on the CD-ROM. 72

Operating Instructions
Page 74
...74 To save the data in the video CD format on your computer off the camera. • If you need Toast (not supplied) by the Pixela User Support Center. For information on the use of the software Click [?] at the upper-right corner of each screen to show the on the ... Roxio. Technical support for "ImageMixer VCD2" is compatible with the video CD creation function. To install "ImageMixer VCD2" • Shut down all other application software before you install "ImageMixer VCD2." • The display settings should be 1024 × 768 dots or higher and 32,000 colors or higher. 1 Turn...
...74 To save the data in the video CD format on your computer off the camera. • If you need Toast (not supplied) by the Pixela User Support Center. For information on the use of the software Click [?] at the upper-right corner of each screen to show the on the ... Roxio. Technical support for "ImageMixer VCD2" is compatible with the video CD creation function. To install "ImageMixer VCD2" • Shut down all other application software before you install "ImageMixer VCD2." • The display settings should be 1024 × 768 dots or higher and 32,000 colors or higher. 1 Turn...

Operating Instructions
Page 75
... a shop (page 79) You can print images with your camera to a photo printing service shop. You can print images by connecting the camera directly to a PictBridge compliant printer. Printing still images How to print still images Printing directly using the supplied "PicturePackage" software and print the images. Printing directly using a "Memory Stick" compliant...
... a shop (page 79) You can print images with your camera to a photo printing service shop. You can print images by connecting the camera directly to a PictBridge compliant printer. Printing still images How to print still images Printing directly using the supplied "PicturePackage" software and print the images. Printing directly using a "Memory Stick" compliant...
Operating Instructions
Page 89
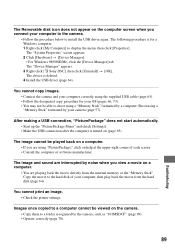
...] to the hard disk of each screen. • Consult the computer or software manufacturer. Images once copied to a computer cannot be viewed on the camera. • Copy them to install the USB driver again. The "Device Manager" appears. 3 Right-click [ Sony DSC], then click [Uninstall] t [OK]. Shoot using a "Memory Stick" formatted by your OS...
...] to the hard disk of each screen. • Consult the computer or software manufacturer. Images once copied to a computer cannot be viewed on the camera. • Copy them to install the USB driver again. The "Device Manager" appears. 3 Right-click [ Sony DSC], then click [Uninstall] t [OK]. Shoot using a "Memory Stick" formatted by your OS...

Operating Instructions
Page 103
...Set 61 Cloudy 39 Color 12 Compression ratio 13 Computer Copying images 64 Macintosh 73 Recommended environment 63, 73 Software 71 Viewing image stored on a computer with your camera 70 Windows 62 Connecting Computer 65 Printer 77 TV 81 Continuous 51 Contrast 41 Conversion Lens 55 Copy 58... metering .... 38 Change REC. Folder 57 D Date 52 Date/Time 52 Day&Time 52 Daylight 39 Delete t step 6 in "Read This First" Digital Zoom 51 DirectX 63 Divide 47 DPOF 79 E Effective pixels 101 Electronic transformer t step 1 in "Read This First" Enlarged Icon 54 Enlarging an image...
...Set 61 Cloudy 39 Color 12 Compression ratio 13 Computer Copying images 64 Macintosh 73 Recommended environment 63, 73 Software 71 Viewing image stored on a computer with your camera 70 Windows 62 Connecting Computer 65 Printer 77 TV 81 Continuous 51 Contrast 41 Conversion Lens 55 Copy 58... metering .... 38 Change REC. Folder 57 D Date 52 Date/Time 52 Day&Time 52 Daylight 39 Delete t step 6 in "Read This First" Digital Zoom 51 DirectX 63 Divide 47 DPOF 79 E Effective pixels 101 Electronic transformer t step 1 in "Read This First" Enlarged Icon 54 Enlarging an image...

Operating Instructions
Page 105
...display...........93 Self-timer t step 5 in "Read This First" Sepia 41 Setting the clock t step 2 in "Read This First" Setup 42, 49, 50 Camera 1 51 Camera 2 54 Internal Memory Tool ... 56 Memory Stick Tool ....... 57 Setup 1 59 Setup 2 60 Setup 1 59 Setup 2 60 Sharpness 42 Shooting Movie t step ...16 Shutter speed 11 Single 51 Single-image mode 76 Slide 45 Slow synchro t step 5 in "Read This First" Smart zoom 51 Software 71 Specifications 101 Spot metering 38 Spot metering cross hairs ..... 38 Standard 40 STEADY SHOT 54 T Trimming 49 Tripod receptacle 15 Troubleshooting 83...
...display...........93 Self-timer t step 5 in "Read This First" Sepia 41 Setting the clock t step 2 in "Read This First" Setup 42, 49, 50 Camera 1 51 Camera 2 54 Internal Memory Tool ... 56 Memory Stick Tool ....... 57 Setup 1 59 Setup 2 60 Setup 1 59 Setup 2 60 Sharpness 42 Shooting Movie t step ...16 Shutter speed 11 Single 51 Single-image mode 76 Slide 45 Slow synchro t step 5 in "Read This First" Smart zoom 51 Software 71 Specifications 101 Spot metering 38 Spot metering cross hairs ..... 38 Standard 40 STEADY SHOT 54 T Trimming 49 Tripod receptacle 15 Troubleshooting 83...


