
Operating Instructions
Page 6
... the last image shot - ISO.........64 Focus Choosing an auto focus method 65 Choosing a focus range finder frame - Table of your camera 47 Changing menu settings 47 Changing items in the SET UP screen 48 How to use the multi-selector 18 Setting the date and ...the date and time on the screen during shooting 30 Using the zoom feature 30 6 Changing the lens orientation 32 Shooting close-ups - Quick Review 29 Shooting images with the finder ......... 29 Indicators on a still image 36 Shooting according to photo-shooting situations 52 Exposure (shutter speed, aperture...
... the last image shot - ISO.........64 Focus Choosing an auto focus method 65 Choosing a focus range finder frame - Table of your camera 47 Changing menu settings 47 Changing items in the SET UP screen 48 How to use the multi-selector 18 Setting the date and ...the date and time on the screen during shooting 30 Using the zoom feature 30 6 Changing the lens orientation 32 Shooting close-ups - Quick Review 29 Shooting images with the finder ......... 29 Indicators on a still image 36 Shooting according to photo-shooting situations 52 Exposure (shutter speed, aperture...
Operating Instructions
Page 18
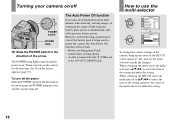
... up the menu or the SET UP screen (pages 47, 48), and use the multi-selector Camera 1 AF Mode: Digital Zoom: Date/Time: Red Eye Reduction: Hologram AF: Auto Review: Monitor Precision Off Off Auto Off SELECT Setup 2 File Number: USB Connect: Video Out: OK Clock Set: Cancel To change the current ...to v/V/b/B to select the item or the setting and press the center of the arrow again, the POWER lamp goes out, and the camera turns off to power the camera, the Auto Power Off function will not work. • Movies are performed for the first time, the Clock Set screen appears (page...
... up the menu or the SET UP screen (pages 47, 48), and use the multi-selector Camera 1 AF Mode: Digital Zoom: Date/Time: Red Eye Reduction: Hologram AF: Auto Review: Monitor Precision Off Off Auto Off SELECT Setup 2 File Number: USB Connect: Video Out: OK Clock Set: Cancel To change the current ...to v/V/b/B to select the item or the setting and press the center of the arrow again, the POWER lamp goes out, and the camera turns off to power the camera, the Auto Power Off function will not work. • Movies are performed for the first time, the Clock Set screen appears (page...

Operating Instructions
Page 29
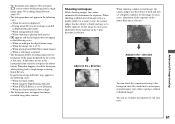
... following subjects. Shooting still images About Auto Focus When you try to recompose the shot and focus again. • The subject is distant from the camera and dark • The contrast between the subject and its background is poor • The subject is seen through glass, such as a window • A ...• The subject has a reflection, such as that is hard to focus on . selector to shooting mode, press the shutter button lightly or press 7 (quick review) again. Adjust the finder adjustment lever until the image appears clearly within the finder, then shoot the image. 29
... following subjects. Shooting still images About Auto Focus When you try to recompose the shot and focus again. • The subject is distant from the camera and dark • The contrast between the subject and its background is poor • The subject is seen through glass, such as a window • A ...• The subject has a reflection, such as that is hard to focus on . selector to shooting mode, press the shutter button lightly or press 7 (quick review) again. Adjust the finder adjustment lever until the image appears clearly within the finder, then shoot the image. 29
Operating Instructions
Page 36
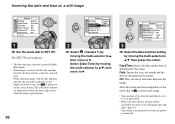
...the date and time on the lower-right corner when the image is played back. 36 Camera 1 AF Mode: Day&Time Digital Zoom: Date Date/Time: Off Red Eye Reduction: Hologram AF: Auto Review: 2 , Select 1 (Camera 1) by moving the multi-selector to v/V, then move to B. The actual date and ...screen, and is displayed on the screen instead. Select [Date/Time] by moving the multi-selector to B. Camera 1 AF Mode: Digital Zoom: Date/Time: Red Eye Reduction: Hologram AF: Auto Review: Monitor Precision Date Off Auto Off PAGE SELECT 3 , Select the date and time setting by moving the...
...the date and time on the lower-right corner when the image is played back. 36 Camera 1 AF Mode: Day&Time Digital Zoom: Date Date/Time: Off Red Eye Reduction: Hologram AF: Auto Review: 2 , Select 1 (Camera 1) by moving the multi-selector to v/V, then move to B. The actual date and ...screen, and is displayed on the screen instead. Select [Date/Time] by moving the multi-selector to B. Camera 1 AF Mode: Digital Zoom: Date/Time: Red Eye Reduction: Hologram AF: Auto Review: Monitor Precision Date Off Auto Off PAGE SELECT 3 , Select the date and time setting by moving the...
Operating Instructions
Page 48
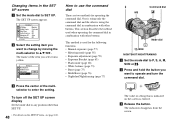
... for operating the command dial. One is using only the command dial and the other buttons. This method is entered. Camera 1 AF Mode: Digital Zoom: Date/Time: Red Eye Reduction: Hologram AF: Auto Review: Monitor Precision Off Off Auto Off SELECT b Select the setting item you select turns yellow. The frame of the...
... for operating the command dial. One is using only the command dial and the other buttons. This method is entered. Camera 1 AF Mode: Digital Zoom: Date/Time: Red Eye Reduction: Hologram AF: Auto Review: Monitor Precision Off Off Auto Off SELECT b Select the setting item you select turns yellow. The frame of the...
Operating Instructions
Page 61
... exposure in the following cases: - m Adjust in the + direction m Adjust in the digital zoom range - You can check the exposure referring to overexpose or underexpose your taste. When ... 61 When playing back Multi Burst mode images - Shooting techniques While shooting images, the camera automatically determines the exposure. minus direction is [3:2] - • The histogram also appears when... button. When this happens, check the histogram while playing back a single-image or during Quick Review (page 29). • The histogram does not appear in the + plus direction is dark ...
... exposure in the following cases: - m Adjust in the + direction m Adjust in the digital zoom range - You can check the exposure referring to overexpose or underexpose your taste. When ... 61 When playing back Multi Burst mode images - Shooting techniques While shooting images, the camera automatically determines the exposure. minus direction is [3:2] - • The histogram also appears when... button. When this happens, check the histogram while playing back a single-image or during Quick Review (page 29). • The histogram does not appear in the + plus direction is dark ...

Operating Instructions
Page 84
... to v Move to b Move to enlarge with the command dial. The image is enlarged twice. You can be enlarged using the procedures outlined in Quick Review (page 29) can also record the enlarged image as a new file. c Press (playback zoom).
... to v Move to b Move to enlarge with the command dial. The image is enlarged twice. You can be enlarged using the procedures outlined in Quick Review (page 29) can also record the enlarged image as a new file. c Press (playback zoom).

Operating Instructions
Page 85
... a Set the mode dial to 3:2-sized image. • You cannot trim RAW data file/uncompressed (TIFF) images. • You cannot trim images displayed with Quick Review. The menu appears. Interval settings 3 sec/5 sec/10 sec/30 sec/1 min Image Folder:Plays back all the images in succession, one time and then...
... a Set the mode dial to 3:2-sized image. • You cannot trim RAW data file/uncompressed (TIFF) images. • You cannot trim images displayed with Quick Review. The menu appears. Interval settings 3 sec/5 sec/10 sec/30 sec/1 min Image Folder:Plays back all the images in succession, one time and then...

Operating Instructions
Page 140
...you shoot a still image. The SET UP screen appears. Selects the digital zoom mode (page 30). Reduces the red-eye phenomenon when using a flash (page 69). Default settings are indicated with x. 1 (Camera 1) Item AF Mode Digital Zoom Date/Time Setting Single / xMonitor / Cont Smart / xPrecision ...Day&Time / Date / xOff Red Eye Reduction Hologram AF Auto Review On / xOff xAuto / Off On / xOff 2 (Camera 2) Item Expanded Focus Hot Shoe Pop-up the...
...you shoot a still image. The SET UP screen appears. Selects the digital zoom mode (page 30). Reduces the red-eye phenomenon when using a flash (page 69). Default settings are indicated with x. 1 (Camera 1) Item AF Mode Digital Zoom Date/Time Setting Single / xMonitor / Cont Smart / xPrecision ...Day&Time / Date / xOff Red Eye Reduction Hologram AF Auto Review On / xOff xAuto / Off On / xOff 2 (Camera 2) Item Expanded Focus Hot Shoe Pop-up the...
Operating Instructions
Page 158
...27 AF Mode 66 AF range finder 65 Aperture priority 56 Auto adjustment mode 27 Auto Focus 29, 65 Auto Power Off function 18 Auto Review 140 B Battery remaining indicator 15 Beep/shutter sound 141 Burst 75 C CD-ROM 106 Center AF 65 Charging the battery pack 14 Charging ...67 Contrast 138 Copying images to your computer ......... 110, 111 Cutting movies 104 D DC plug 14, 17 Deleting movies 102 Deleting still images 43 Digital zoom 31 Display window 149 Divide 104 DPOF 91 E E-Mail 81 EV adjustment 59 Exposure bracket 63 F File names 114 File storage destinations 114 Finder...
...27 AF Mode 66 AF range finder 65 Aperture priority 56 Auto adjustment mode 27 Auto Focus 29, 65 Auto Power Off function 18 Auto Review 140 B Battery remaining indicator 15 Beep/shutter sound 141 Burst 75 C CD-ROM 106 Center AF 65 Charging the battery pack 14 Charging ...67 Contrast 138 Copying images to your computer ......... 110, 111 Cutting movies 104 D DC plug 14, 17 Deleting movies 102 Deleting still images 43 Digital zoom 31 Display window 149 Divide 104 DPOF 91 E E-Mail 81 EV adjustment 59 Exposure bracket 63 F File names 114 File storage destinations 114 Finder...
Operating Instructions
Page 159
... 79 Playback zoom 84 Pop-up Flash 69 Power on/off 18 Precautions 143 Precision digital zoom 31 Print (DPOF) mark 91 Program auto shooting 28, 54 Program shift 54 Protect 89 Q Quick reference chart 155 Quick Review 29 R RAW 79 Red Eye Reduction 69 RESET button 119 Resize 90 Rotate 86... 66 Single screen 39 Slide show 85 Smart zoom 31 Speed burst 75 T TIFF 80 Trimming 85 U USB 109, 117 USB driver 106 Using your camera abroad 17 V VGA 25 Viewing images on TV 41 Viewing movies on the LCD screen 101 Viewing the images on the LCD screen .......... 39 Voice...
... 79 Playback zoom 84 Pop-up Flash 69 Power on/off 18 Precautions 143 Precision digital zoom 31 Print (DPOF) mark 91 Program auto shooting 28, 54 Program shift 54 Protect 89 Q Quick reference chart 155 Quick Review 29 R RAW 79 Red Eye Reduction 69 RESET button 119 Resize 90 Rotate 86... 66 Single screen 39 Slide show 85 Smart zoom 31 Speed burst 75 T TIFF 80 Trimming 85 U USB 109, 117 USB driver 106 Using your camera abroad 17 V VGA 25 Viewing images on TV 41 Viewing movies on the LCD screen 101 Viewing the images on the LCD screen .......... 39 Voice...
