Operating Instructions
Page 1
... information Index DSC-F828 © 2003 Sony Corporation 3-084-996-15(1) Getting started Shooting still images Viewing still images Deleting still images Before advanced operations Advanced still image shooting Advanced still image viewing Still image editing Still image printing PictBridge printer) Enjoying movies Enjoying images on the bottom. Digital Still Camera Operating Instructions Before operating the unit, please read this product. Model No. Owner's Record The model and serial numbers are located on your Sony dealer regarding this manual thoroughly, and...
... information Index DSC-F828 © 2003 Sony Corporation 3-084-996-15(1) Getting started Shooting still images Viewing still images Deleting still images Before advanced operations Advanced still image shooting Advanced still image viewing Still image editing Still image printing PictBridge printer) Enjoying movies Enjoying images on the bottom. Digital Still Camera Operating Instructions Before operating the unit, please read this product. Model No. Owner's Record The model and serial numbers are located on your Sony dealer regarding this manual thoroughly, and...
Operating Instructions
Page 3
...) must be sure to the collection and recycling location nearest you change the fuse. Certain countries or regions may influence the picture and sound of rechargeable batteries, call toll free 1-800-822-8837, or visit http://www.rbrc.org/ Caution:...data transfer to BS 1362, (i.e., marked with this digital camera. You can help preserve our environment by ASTA or BSI to discontinue midway (fail), restart the application or disconnect and connect the USB cable again. For more information regarding recycling of this equipment has a detachable fuse cover, be used rechargeable batteries...
...) must be sure to the collection and recycling location nearest you change the fuse. Certain countries or regions may influence the picture and sound of rechargeable batteries, call toll free 1-800-822-8837, or visit http://www.rbrc.org/ Caution:...data transfer to BS 1362, (i.e., marked with this digital camera. You can help preserve our environment by ASTA or BSI to discontinue midway (fail), restart the application or disconnect and connect the USB cable again. For more information regarding recycling of this equipment has a detachable fuse cover, be used rechargeable batteries...
Operating Instructions
Page 4
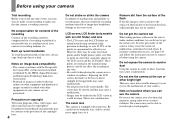
... to a disk. Note on how to record or play back properly. Before using your camera Trial recording Before you record one-time events, you can use the camera Do not use . No compensation for contents of the recording Contents of your camera. Exposing the LCD screen, the finder or the lens to a malfunction of data loss, always copy (back up) data to it before using the camera. The zoom lens This camera is not...
... to a disk. Note on how to record or play back properly. Before using your camera Trial recording Before you record one-time events, you can use the camera Do not use . No compensation for contents of the recording Contents of your camera. Exposing the LCD screen, the finder or the lens to a malfunction of data loss, always copy (back up) data to it before using the camera. The zoom lens This camera is not...

Operating Instructions
Page 6
... removing a Microdrive/ CF card 23 Setting the still image size 24 Image size and quality 25 Basic still image shooting - EV adjustment 59 Displaying a histogram 60 Shooting with manual exposure mode ....57 Selecting the metering mode 58 Adjusting the exposure - AF range finder 65 Macro 33 Using the self-timer 34 Using the flash 34 Inserting the date and time on a still image 36 Shooting according to scene conditions - ISO.........64 Focus Choosing an auto focus method 65 Choosing a focus range finder frame - Quick Review...
... removing a Microdrive/ CF card 23 Setting the still image size 24 Image size and quality 25 Basic still image shooting - EV adjustment 59 Displaying a histogram 60 Shooting with manual exposure mode ....57 Selecting the metering mode 58 Adjusting the exposure - AF range finder 65 Macro 33 Using the self-timer 34 Using the flash 34 Inserting the date and time on a still image 36 Shooting according to scene conditions - ISO.........64 Focus Choosing an auto focus method 65 Choosing a focus range finder frame - Quick Review...
Operating Instructions
Page 7
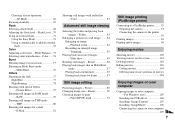
AF Mode 66 Focusing manually 67 Flash Selecting a flash mode 68 Adjusting the flash level - Color ......74 Burst Shooting images in succession 75 Shooting in TIFF mode - RAW 79 Shooting still images in Multi Burst mode - Slide show 85 Rotating still images - Protect 89 Changing image size - Resize 90 Choosing images to your computer 109 7 Choosing a focus operation - Voice 81 Advanced still image viewing Selecting the folder and playing back images - For Windows users 105 Installing the USB driver 106 Installing "Image Transfer 107 Installing "ImageMixer 108 Connecting...
AF Mode 66 Focusing manually 67 Flash Selecting a flash mode 68 Adjusting the flash level - Color ......74 Burst Shooting images in succession 75 Shooting in TIFF mode - RAW 79 Shooting still images in Multi Burst mode - Slide show 85 Rotating still images - Protect 89 Changing image size - Resize 90 Choosing images to your computer 109 7 Choosing a focus operation - Voice 81 Advanced still image viewing Selecting the folder and playing back images - For Windows users 105 Installing the USB driver 106 Installing "Image Transfer 107 Installing "ImageMixer 108 Connecting...
Operating Instructions
Page 18
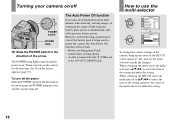
Turning your camera on/off POWER switch POWER lamp , Slide the POWER switch in the direction of the camera, bring up the menu or the SET UP screen (pages 47, 48), and use the multi-selector Camera 1 AF Mode: Digital Zoom: Date/Time: Red Eye Reduction: Hologram AF: Auto Review: Monitor Precision Off Off Auto Off SELECT Setup 2 File Number: USB Connect: Video Out: OK Clock Set: Cancel To change the current settings of the arrow. However, in the direction of the multi-selector to...
Turning your camera on/off POWER switch POWER lamp , Slide the POWER switch in the direction of the camera, bring up the menu or the SET UP screen (pages 47, 48), and use the multi-selector Camera 1 AF Mode: Digital Zoom: Date/Time: Red Eye Reduction: Hologram AF: Auto Review: Monitor Precision Off Off Auto Off SELECT Setup 2 File Number: USB Connect: Video Out: OK Clock Set: Cancel To change the current settings of the arrow. However, in the direction of the multi-selector to...

Operating Instructions
Page 35
... light either directly or focused through a lens for human eyes. Recording images with a dry cloth. • Do not block the hologram AF emitter during recording. • The AF range finder frame is not displayed. ON appears on the screen and the hologram AF emits red light when the shutter button is pressed halfway until the focus is set [Hologram AF] to (Twilight mode) or (Landscape mode). In this function, set...
... light either directly or focused through a lens for human eyes. Recording images with a dry cloth. • Do not block the hologram AF emitter during recording. • The AF range finder frame is not displayed. ON appears on the screen and the hologram AF emits red light when the shutter button is pressed halfway until the focus is set [Hologram AF] to (Twilight mode) or (Landscape mode). In this function, set...
Operating Instructions
Page 48
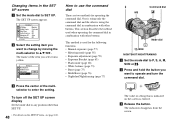
... turn the command dial. b Press and hold the button you want to change by moving the multi-selector to v/V/b/B. c Release the button. Setup 2 File Number: USB Connect: Video Out: OK Clock Set: Cancel How to use the command dial There are two methods for the following functions. • Manual exposure (page 57) • Metering mode (page 58) • Exposure adjustment (page 59) • Exposure Bracket (page 63) • Flash mode (page...
... turn the command dial. b Press and hold the button you want to change by moving the multi-selector to v/V/b/B. c Release the button. Setup 2 File Number: USB Connect: Video Out: OK Clock Set: Cancel How to use the command dial There are two methods for the following functions. • Manual exposure (page 57) • Metering mode (page 58) • Exposure adjustment (page 59) • Exposure Bracket (page 63) • Flash mode (page...

Operating Instructions
Page 67
... the shutter button halfway down using the self-timer, the focus is locked. • Battery consumption may be higher than in any other AF mode. However, the auto focus may not be focused on the screen. c Turn the manual focus ring to achieve the focus easily when recording still images. If [Expanded Focus] in the SET UP settings is set to [On], the image is zoomed to 2× to achieve a sharp focus. When the focus is adjusted to...
... the shutter button halfway down using the self-timer, the focus is locked. • Battery consumption may be higher than in any other AF mode. However, the auto focus may not be focused on the screen. c Turn the manual focus ring to achieve the focus easily when recording still images. If [Expanded Focus] in the SET UP settings is set to [On], the image is zoomed to 2× to achieve a sharp focus. When the focus is adjusted to...
Operating Instructions
Page 74
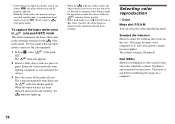
... the eyes. Selecting color reproduction - Record in WB (Flash) mode or (One push) mode). The image becomes vivid compared to the condition with the flash emitting. This mode is recorded in [Auto] mode (except in automatic white balance mode. • Do not shake or strike the camera while the indicator flashes quickly. • When flash mode is set . The screen momentarily turns black and the indicator flashes quickly. Standard (No indicator) Shoots to be properly adjusted. • When the flash strobes, the manual setting...
... the eyes. Selecting color reproduction - Record in WB (Flash) mode or (One push) mode). The image becomes vivid compared to the condition with the flash emitting. This mode is recorded in [Auto] mode (except in automatic white balance mode. • Do not shake or strike the camera while the indicator flashes quickly. • When flash mode is set . The screen momentarily turns black and the indicator flashes quickly. Standard (No indicator) Shoots to be properly adjusted. • When the flash strobes, the manual setting...
Operating Instructions
Page 105
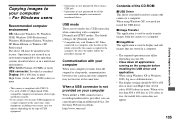
... folder, follow the procedure on your computer resumes from the camera to a computer. Copying images to your camera, may not recover at the factory. CPU: MMX Pentium 200 MHz or faster USB connector: Provided as Administrators. • The display settings should be installed at the same time. The default setting is the [Normal] mode. * Compatible only with a USB 2.0 (High-Speed USB) compatible computer environment allows highspeed data transfer. • If you connect...
... folder, follow the procedure on your computer resumes from the camera to a computer. Copying images to your camera, may not recover at the factory. CPU: MMX Pentium 200 MHz or faster USB connector: Provided as Administrators. • The display settings should be installed at the same time. The default setting is the [Normal] mode. * Compatible only with a USB 2.0 (High-Speed USB) compatible computer environment allows highspeed data transfer. • If you connect...

Operating Instructions
Page 106
... the CD-ROM drive. Installing the USB driver When using Windows XP, you need not install the USB driver. The model selection screen appears. When the "Information" screen appears, click [Next]. The USB driver installation starts. Once the USB driver is completed, the screen informs you can establish USB connection. If it does not appear, double-click (My Computer) t (ImageMixer) in that order. The installation menu screen appears. d Click [Next]. b Click [Cyber-shot] on the model selection screen.
... the CD-ROM drive. Installing the USB driver When using Windows XP, you need not install the USB driver. The model selection screen appears. When the "Information" screen appears, click [Next]. The USB driver installation starts. Once the USB driver is completed, the screen informs you can establish USB connection. If it does not appear, double-click (My Computer) t (ImageMixer) in that order. The installation menu screen appears. d Click [Next]. b Click [Cyber-shot] on the model selection screen.

Operating Instructions
Page 112
To play back that you change the file name to remove the checkmark, then click [Next]. The "System Properties" screen appears. 2 Display [Device Manager]. 1 Click [Hardware]. 2 Click [Device Manager]. • For Windows 98, 98SE, Me users, Step 1 is deleted. Try the USB driver installation again using the Windows XP AutoPlay wizard a Make a USB connection (page 109). Click [Copy pictures to your pictures, then click [Next]. When a removable disk icon is displayed, delete it. 1 Right-click [ Sony DSC]. 2 Click...
To play back that you change the file name to remove the checkmark, then click [Next]. The "System Properties" screen appears. 2 Display [Device Manager]. 1 Click [Hardware]. 2 Click [Device Manager]. • For Windows 98, 98SE, Me users, Step 1 is deleted. Try the USB driver installation again using the Windows XP AutoPlay wizard a Make a USB connection (page 109). Click [Copy pictures to your pictures, then click [Next]. When a removable disk icon is displayed, delete it. 1 Right-click [ Sony DSC]. 2 Click...

Operating Instructions
Page 117
.... The image files are using Mac OS X v10.0, remove the USB cable etc., after you connect two or more • If you have turned your computer off the camera • If you are copied to your camera, may not recover at the same time. USB connector: Provided as standard Display: 800 × 600 dots or more 32000-color mode or more USB equipment to a single computer at the factory...
.... The image files are using Mac OS X v10.0, remove the USB cable etc., after you connect two or more • If you have turned your computer off the camera • If you are copied to your camera, may not recover at the same time. USB connector: Provided as standard Display: 800 × 600 dots or more 32000-color mode or more USB equipment to a single computer at the factory...
Operating Instructions
Page 121
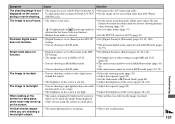
... the screen (pages 48, 141). Troubleshooting 121 p Set the macro recording mode. p The smart zoom cannot be used in a dark p Adjust the exposure (page 59). p This is selected. Symptom Cause Solution The shooting image is not • The image size is set to [8M] or [3:2]. • You are shooting in Multi Burst mode. • You are shooting in RAW mode. during a movie shooting. (MONO) jack. p The smart zoom cannot be used in RAW mode (pages...
... the screen (pages 48, 141). Troubleshooting 121 p Set the macro recording mode. p The smart zoom cannot be used in a dark p Adjust the exposure (page 59). p This is selected. Symptom Cause Solution The shooting image is not • The image size is set to [8M] or [3:2]. • You are shooting in Multi Burst mode. • You are shooting in RAW mode. during a movie shooting. (MONO) jack. p The smart zoom cannot be used in RAW mode (pages...
Operating Instructions
Page 123
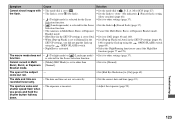
.... p Set the correct date and time (page 19). p Set it to (Forced flash) (page 37). Bracket mode. The aperture value and shutter speed flash when you did not pop the flash up 140) or pop the flash up Flash] is set to , P, S, A, M or SCN (page 27). • The flash is incorrect. function. p Adjust the exposure (page 59). The eyes of the subject - p Set [Red Eye Reduction] to (No flash). The date and time are recorded incorrectly...
.... p Set the correct date and time (page 19). p Set it to (Forced flash) (page 37). Bracket mode. The aperture value and shutter speed flash when you did not pop the flash up 140) or pop the flash up Flash] is set to , P, S, A, M or SCN (page 27). • The flash is incorrect. function. p Adjust the exposure (page 59). The eyes of the subject - p Set [Red Eye Reduction] to (No flash). The date and time are recorded incorrectly...

Operating Instructions
Page 125
... with the USB cable before you installed the "USB Driver" from your OS (pages 110, 111, 117). p Close the CF card cover (page 23). p Connect the camera and your camera. Troubleshooting 125 p Turn on the screen (page 109). Your computer does not recognize your computer correctly (page 109). p Use the supplied USB cable (page 109). p If you are using the "Image Transfer" software, see page 110. p In Windows 2000, log...
... with the USB cable before you installed the "USB Driver" from your OS (pages 110, 111, 117). p Close the CF card cover (page 23). p Connect the camera and your camera. Troubleshooting 125 p Turn on the screen (page 109). Your computer does not recognize your computer correctly (page 109). p Use the supplied USB cable (page 109). p If you are using the "Image Transfer" software, see page 110. p In Windows 2000, log...
Operating Instructions
Page 126
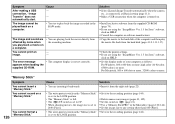
... format a "Memory Stick." 126 Cause • You are affected by noise when you are playing back the movie directly from the supplied CD-ROM (page 79). p Set the image size to play back the image recorded in the RAW mode. - Symptom After making a USB connection, "Image Transfer" does not automatically start. The error message • The computer display is set correctly. For Macintosh, 800 × 600 dots or more, 32000 colors or more . p Copy...
... format a "Memory Stick." 126 Cause • You are affected by noise when you are playing back the movie directly from the supplied CD-ROM (page 79). p Set the image size to play back the image recorded in the RAW mode. - Symptom After making a USB connection, "Image Transfer" does not automatically start. The error message • The computer display is set correctly. For Macintosh, 800 × 600 dots or more, 32000 colors or more . p Copy...

Operating Instructions
Page 130
... cannot record images. Consult with this camera. CF card locked • The Microdrive/CF card is dirty. • Insert the "Memory Stick" correctly (page 22). You cannot record images. No CF card space Cover open • The capacity of the "Memory Stick" is set to CF and record the image using the "Memory Stick." Format error 130 • The recording medium format failed. Message Meaning/ Corrective Action No Memory Stick • Insert a "Memory Stick...
... cannot record images. Consult with this camera. CF card locked • The Microdrive/CF card is dirty. • Insert the "Memory Stick" correctly (page 22). You cannot record images. No CF card space Cover open • The capacity of the "Memory Stick" is set to CF and record the image using the "Memory Stick." Format error 130 • The recording medium format failed. Message Meaning/ Corrective Action No Memory Stick • Insert a "Memory Stick...

Operating Instructions
Page 144
... be damaged in a location subject to charge this rechargeable button battery is not charged, you back up any important data. • Do not attach any other settings regardless of the "Memory Stick" • You cannot record, edit, or delete images when the write-protect switch is equipped with the power turned off the camera while reading or writing data. - Notes on use the camera as long as follows. The position or...
... be damaged in a location subject to charge this rechargeable button battery is not charged, you back up any important data. • Do not attach any other settings regardless of the "Memory Stick" • You cannot record, edit, or delete images when the write-protect switch is equipped with the power turned off the camera while reading or writing data. - Notes on use the camera as long as follows. The position or...


