
Operating Instructions
Page 5
Table of Contents Notice for users 4 Before you begin Identifying the parts 7 Preparations Checking the contents of the package 9 Setting the ink ribbon 9 Inserting the print paper 10 Connecting to the AC power source 12 Operations in the initial state ..........13 Direct printing LCD screen display 14 ...
Table of Contents Notice for users 4 Before you begin Identifying the parts 7 Preparations Checking the contents of the package 9 Setting the ink ribbon 9 Inserting the print paper 10 Connecting to the AC power source 12 Operations in the initial state ..........13 Direct printing LCD screen display 14 ...

Operating Instructions
Page 7
... Card dual-format slot (.pages 16, 80, 81) L CompactFlash card slot (.pages 16, 81) M Paper tray compartment door N Paper tray compartment (.page 11) O Access indicator P Ink ribbon eject lever (.page 9) Q Ink ribbon (sold separately) (.page 9) R Ink ribbon compartment door (.page 9) Continued 7 GB
... Card dual-format slot (.pages 16, 80, 81) L CompactFlash card slot (.pages 16, 81) M Paper tray compartment door N Paper tray compartment (.page 11) O Access indicator P Ink ribbon eject lever (.page 9) Q Ink ribbon (sold separately) (.page 9) R Ink ribbon compartment door (.page 9) Continued 7 GB

Operating Instructions
Page 9
...AC power cord differ depending on the region in which you purchased the printer. Removing the ink ribbon Push up the blue eject lever, and remove the used ink ribbon. Preparations Preparations Checking the contents of the package Make sure that the following accessories ... • Warranty (In some regions, the warranty is not supplied.) (1) • Sony End User Software License Agreement (1) *1 The plug shape and specifications of the arrow until it clicks into place. 3 Close the ink ribbon compartment door. For details, refer to the supplied "About the Print Packs." Continued...
...AC power cord differ depending on the region in which you purchased the printer. Removing the ink ribbon Push up the blue eject lever, and remove the used ink ribbon. Preparations Preparations Checking the contents of the package Make sure that the following accessories ... • Warranty (In some regions, the warranty is not supplied.) (1) • Sony End User Software License Agreement (1) *1 The plug shape and specifications of the arrow until it clicks into place. 3 Close the ink ribbon compartment door. For details, refer to the supplied "About the Print Packs." Continued...

Operating Instructions
Page 10
... or compensate. 2 Set the print paper into place, remove it and then re-insert it in the direction of such an ink ribbon may occur. Please store it . If the ink ribbon does not click into the paper tray. 10 GB Use of the arrow to remove the slack. Only when the..., excessive dust or direct sunlight. Depending on both sides of production. Notes • Do not touch the ink ribbon or store the ink ribbon in the directions shown here. • Do not disassemble the ink ribbon. • Do not pull out the ribbon from the date of the paper tray cover (shown with...
... or compensate. 2 Set the print paper into place, remove it and then re-insert it in the direction of such an ink ribbon may occur. Please store it . If the ink ribbon does not click into the paper tray. 10 GB Use of the arrow to remove the slack. Only when the..., excessive dust or direct sunlight. Depending on both sides of production. Notes • Do not touch the ink ribbon or store the ink ribbon in the directions shown here. • Do not disassemble the ink ribbon. • Do not pull out the ribbon from the date of the paper tray cover (shown with...

Operating Instructions
Page 14
... Per Sheet 9 "On." Indicates Pages Per Sheet 16 "On." To display a different image, press g/G. Indicates "Pattern 1" (Borders). B Number of selected images/Total number of images C Ink ribbon indication P: P size C: Cleaning cartridge Icons Meaning "Memory Stick" media input CompactFlash card input SD memory Card input xD-Picture Card input External Device input...
... Per Sheet 9 "On." Indicates Pages Per Sheet 16 "On." To display a different image, press g/G. Indicates "Pattern 1" (Borders). B Number of selected images/Total number of images C Ink ribbon indication P: P size C: Cleaning cartridge Icons Meaning "Memory Stick" media input CompactFlash card input SD memory Card input xD-Picture Card input External Device input...
Operating Instructions
Page 17
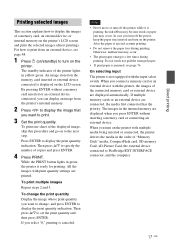
... card or connecting an external device. Notes • Never move or turn on the printer's LCD screen and print the selected images (direct printing). the ink ribbon may become stuck or paper jam may occur. • The print paper emerges a few times during printing. Then press f/F to print. 3 Set the print...
... card or connecting an external device. Notes • Never move or turn on the printer's LCD screen and print the selected images (direct printing). the ink ribbon may become stuck or paper jam may occur. • The print paper emerges a few times during printing. Then press f/F to print. 3 Set the print...

Operating Instructions
Page 31
... handwritten illustrations or input messages by recalling the history. 1 From the CreativePrint menu (page 19), press g/G/f/F to select [Freehand-new]. To save it with a black ink pen on page 27. 2Press g/G to select (Text), then press ENTER. Superimposing a Handwritten message, Stamp or Preinstalled phrase on an image The window used for...
... handwritten illustrations or input messages by recalling the history. 1 From the CreativePrint menu (page 19), press g/G/f/F to select [Freehand-new]. To save it with a black ink pen on page 27. 2Press g/G to select (Text), then press ENTER. Superimposing a Handwritten message, Stamp or Preinstalled phrase on an image The window used for...

Operating Instructions
Page 49
...a digital camera containing a USB hub. 49 GB For details, refer to the operating instructions of your digital camera. (In case of a Sony Cyber-shot digital camera, for example, select "PictBridge" mode for Date Print setting, time may not be printed according to the digital camera ...Set your digital camera, the digital camera settings will be completed before connection differ depending on your digital camera. When you replace an ink ribbon while the printer is displayed on the printer. 4 Connect the PictBridge-compliant digital camera to the PictBridge/EXT INTERFACE connector of ...
...a digital camera containing a USB hub. 49 GB For details, refer to the operating instructions of your digital camera. (In case of a Sony Cyber-shot digital camera, for example, select "PictBridge" mode for Date Print setting, time may not be printed according to the digital camera ...Set your digital camera, the digital camera settings will be completed before connection differ depending on your digital camera. When you replace an ink ribbon while the printer is displayed on the printer. 4 Connect the PictBridge-compliant digital camera to the PictBridge/EXT INTERFACE connector of ...

Operating Instructions
Page 63
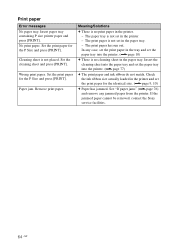
... setting of the connected device may be incompatible. Meaning/Solutions c The ink ribbon is displayed, set the cleaning cartridge. (.page 77) c Replace the current ink ribbon with a new ink ribbon. (.page 9) c Set an ink ribbon and print paper of a digital camera may be writeprotected. Do ...not connect any more USB hubs. Write error in the printer. Insert P size ink ribbon and press [PRINT]. Ink ribbon Error messages No ink ribbon. Or, the USB settings of the device you are using . The built-in memory of the displayed size...
... setting of the connected device may be incompatible. Meaning/Solutions c The ink ribbon is displayed, set the cleaning cartridge. (.page 77) c Replace the current ink ribbon with a new ink ribbon. (.page 9) c Set an ink ribbon and print paper of a digital camera may be writeprotected. Do ...not connect any more USB hubs. Write error in the printer. Insert P size ink ribbon and press [PRINT]. Ink ribbon Error messages No ink ribbon. Or, the USB settings of the device you are using . The built-in memory of the displayed size...
Operating Instructions
Page 64
... actually loaded in the printer and set the paper tray into the printer. (.page 77) c The print paper and ink ribbon do not match. If the jammed paper cannot be removed, contact the Sony service facilities. 64 GB Cleaning sheet is no cleaning sheet in the printer. - Paper jam. Set the print...
... actually loaded in the printer and set the paper tray into the printer. (.page 77) c The print paper and ink ribbon do not match. If the jammed paper cannot be removed, contact the Sony service facilities. 64 GB Cleaning sheet is no cleaning sheet in the printer. - Paper jam. Set the print...

Operating Instructions
Page 67
... the extra sheets. • Riffle the print paper thoroughly and insert it is 3:4. Check • Is the print paper properly set of print paper and ink ribbon. • Load the print paper in the correct direction in the paper tray? Cause/Solutions c If print paper is extremely stretched vertically or horizontally...
... the extra sheets. • Riffle the print paper thoroughly and insert it is 3:4. Check • Is the print paper properly set of print paper and ink ribbon. • Load the print paper in the correct direction in the paper tray? Cause/Solutions c If print paper is extremely stretched vertically or horizontally...

Operating Instructions
Page 75
If this does not solve the problem, contact Sony service facilities or your Sony dealer. Cause/Solutions c If the ink ribbon does not click into place, remove it and then re-insert it on again. After the motor sound stops, try to be removed. Only when the ink ribbon is too slack to remove the ink ribbon. The ink ribbon - the ink ribbon smoothly. cannot be loaded, remove the slack. (.pages 9, 10) c Turn off the printer using the 1 (on/ standby) button and then turn it . Others Symptom Check You cannot insert - Troubleshooting 75 GB
If this does not solve the problem, contact Sony service facilities or your Sony dealer. Cause/Solutions c If the ink ribbon does not click into place, remove it and then re-insert it on again. After the motor sound stops, try to be removed. Only when the ink ribbon is too slack to remove the ink ribbon. The ink ribbon - the ink ribbon smoothly. cannot be loaded, remove the slack. (.pages 9, 10) c Turn off the printer using the 1 (on/ standby) button and then turn it . Others Symptom Check You cannot insert - Troubleshooting 75 GB

Operating Instructions
Page 76
Please wait for the print paper to be ejected automatically. 1 (on again. Note If you cannot remove the jammed paper, contact your Sony dealer. 76 GB Check to see if there is no jammed print paper inside. If paper jams 1 Turn off the power of the printer and then turn it . If any, remove it on /standby) Print paper 2 Remove the ejected print paper from the printer. 3 Remove the paper tray and ink ribbon from the printer and check to ensure if there is jammed paper.
Please wait for the print paper to be ejected automatically. 1 (on again. Note If you cannot remove the jammed paper, contact your Sony dealer. 76 GB Check to see if there is no jammed print paper inside. If paper jams 1 Turn off the power of the printer and then turn it . If any, remove it on /standby) Print paper 2 Remove the ejected print paper from the printer. 3 Remove the paper tray and ink ribbon from the printer and check to ensure if there is jammed paper.

Operating Instructions
Page 77
.... After the cleaning is finished, the cleaning sheet is automatically ejected. 6 Remove the cleaning cartridge and sheet from the printer. 1 Open the ink ribbon compartment door and if there is connected to lose them. Notes • If you start cleaning the printer, please remove any memory cards,...cables from the printer. If there is print paper in the tray, remove it is an ink ribbon inserted, remove it. 2 Insert the supplied cleaning cartridge into the printer and close the ink ribbon compartment door. 5 Set the paper tray into the paper tray with the dust accumulated inside...
.... After the cleaning is finished, the cleaning sheet is automatically ejected. 6 Remove the cleaning cartridge and sheet from the printer. 1 Open the ink ribbon compartment door and if there is connected to lose them. Notes • If you start cleaning the printer, please remove any memory cards,...cables from the printer. If there is print paper in the tray, remove it is an ink ribbon inserted, remove it. 2 Insert the supplied cleaning cartridge into the printer and close the ink ribbon compartment door. 5 Set the paper tray into the paper tray with the dust accumulated inside...

Operating Instructions
Page 78
.... extremely high or low temperatures • Do not use the AC adaptor supplied with the printer. On transport When you transport the printer, remove the ink ribbon, paper tray, AC adaptor, the memory card, or an external device from a cold location to : - direct sunlight - If you persist in an extremely warm...
.... extremely high or low temperatures • Do not use the AC adaptor supplied with the printer. On transport When you transport the printer, remove the ink ribbon, paper tray, AC adaptor, the memory card, or an external device from a cold location to : - direct sunlight - If you persist in an extremely warm...

Operating Instructions
Page 82
... A-TYPE connector, 1 080i (59.94Hz)/1 080i (50Hz)/576p (50Hz)/480p (59.94Hz) compatible, "BRAVIA" Sync compatible USB (Hi-Speed USB) for a memory card/external device Ink ribbon/Print Paper Refer to be handled 8 192(H) × 6 144(V) dots (Excluding "Index Print" and part of "CreativePrint") File system FAT12/16/32, sector size...
... A-TYPE connector, 1 080i (59.94Hz)/1 080i (50Hz)/576p (50Hz)/480p (59.94Hz) compatible, "BRAVIA" Sync compatible USB (Hi-Speed USB) for a memory card/external device Ink ribbon/Print Paper Refer to be handled 8 192(H) × 6 144(V) dots (Excluding "Index Print" and part of "CreativePrint") File system FAT12/16/32, sector size...

Operating Instructions
Page 83
.... (The printing time may vary depending on the LCD screen) *2 When printing a photo (Approx.4.3 MB file size) taken by a Sony digital still camera containing effective picture elements of approximately 12 100 000 or equivalent, and then saved in the printer's slot *5 When printing...including a handle) Depth when the paper tray is installed: Approx. 317 mm (121/2 inches) Mass Approx. 1.2 kg (2 lb 10 oz) (excluding the paper tray, ink ribbon, AC adaptor) Supplied accessories See page 9 of "Operating Instructions" (this booklet) x AC adaptor AC-S2422 Power requirements - 100 V to 240 V, 50/60 Hz...
.... (The printing time may vary depending on the LCD screen) *2 When printing a photo (Approx.4.3 MB file size) taken by a Sony digital still camera containing effective picture elements of approximately 12 100 000 or equivalent, and then saved in the printer's slot *5 When printing...including a handle) Depth when the paper tray is installed: Approx. 317 mm (121/2 inches) Mass Approx. 1.2 kg (2 lb 10 oz) (excluding the paper tray, ink ribbon, AC adaptor) Supplied accessories See page 9 of "Operating Instructions" (this booklet) x AC adaptor AC-S2422 Power requirements - 100 V to 240 V, 50/60 Hz...

Operating Instructions
Page 86
... Index Print 35 Index View Number Order 15, 44 Shoot.Date 15, 44 Initial state 13 Input indications 14 Inserting a memory card 16 Inserting an ink ribbon 9 Inserting the print paper 10 Installing PMB (Picture Motion Browser) 55 Printer driver 53 Internal memory Format 39 L Language 44 Layout print 33 LCD...
... Index Print 35 Index View Number Order 15, 44 Shoot.Date 15, 44 Initial state 13 Input indications 14 Inserting a memory card 16 Inserting an ink ribbon 9 Inserting the print paper 10 Installing PMB (Picture Motion Browser) 55 Printer driver 53 Internal memory Format 39 L Language 44 Layout print 33 LCD...

Operating Instructions
Page 88
Sony Corporation Printed in China Printed using VOC (Volatile Organic Compound)-free vegetable oil based ink.
Sony Corporation Printed in China Printed using VOC (Volatile Organic Compound)-free vegetable oil based ink.

