Operating Instructions
Page 4
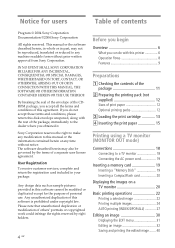
...reproduced, translated or reduced to the dealer where you do with the rest of print paper 12 Optional printing packs 12 3 Loading the print cartridge 13 4 Inserting the print paper 15 Printing using a TV monitor (MONITOR OUT mode) Connections 18 Connecting to this manual or the information..., CONTACT, OR OTHERWISE, ARISING OUT OF OR IN CONNECTION WITH THIS MANUAL, THE SOFTWARE OR OTHER INFORMATION CONTAINED HEREIN OR THE USE THEREOF. Sony Corporation reserves the right to make any modification to a TV monitor 18 Connecting the AC power cord 19 Inserting a memory card 19 Inserting ...
...reproduced, translated or reduced to the dealer where you do with the rest of print paper 12 Optional printing packs 12 3 Loading the print cartridge 13 4 Inserting the print paper 15 Printing using a TV monitor (MONITOR OUT mode) Connections 18 Connecting to this manual or the information..., CONTACT, OR OTHERWISE, ARISING OUT OF OR IN CONNECTION WITH THIS MANUAL, THE SOFTWARE OR OTHER INFORMATION CONTAINED HEREIN OR THE USE THEREOF. Sony Corporation reserves the right to make any modification to a TV monitor 18 Connecting the AC power cord 19 Inserting a memory card 19 Inserting ...
Operating Instructions
Page 8
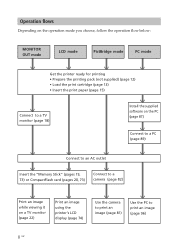
... LCD mode PictBridge mode PC mode Get the printer ready for printing • Prepare the printing pack (not supplied) (page 12) • Load the print cartridge (page 13) • Insert the print paper (page 15) Connect to a TV monitor (page 18) Install the supplied software on the PC (page 87) Connect...
... LCD mode PictBridge mode PC mode Get the printer ready for printing • Prepare the printing pack (not supplied) (page 12) • Load the print cartridge (page 13) • Insert the print paper (page 15) Connect to a TV monitor (page 18) Install the supplied software on the PC (page 87) Connect...
Operating Instructions
Page 11
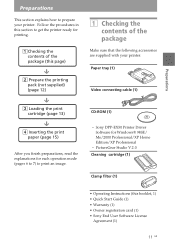
...(not supplied) (page 12) x 3 Loading the print cartridge (page 13) x 4 Inserting the print paper (page 15) After you finish preparations, read the explanations for each operation mode (pages 6 to 7) to prepare your printer. Sony DPP-EX50 Printer Driver Software for printing. 1Checking the contents of the ...contents of the package (this booklet, 1) • Quick Start Guide (1) • Warranty (1) • Owner registration card (1) • Sony End User Software License Agreement (1) 11 GB Follow the procedures in this section to get the printer ready for Windows® 98SE/ Me/2000 ...
...(not supplied) (page 12) x 3 Loading the print cartridge (page 13) x 4 Inserting the print paper (page 15) After you finish preparations, read the explanations for each operation mode (pages 6 to 7) to prepare your printer. Sony DPP-EX50 Printer Driver Software for printing. 1Checking the contents of the ...contents of the package (this booklet, 1) • Quick Start Guide (1) • Warranty (1) • Owner registration card (1) • Sony End User Software License Agreement (1) 11 GB Follow the procedures in this section to get the printer ready for Windows® 98SE/ Me/2000 ...
Operating Instructions
Page 12
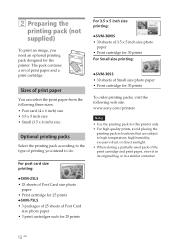
...30 prints For Small size printing: bSVM-30SS • 30 sheets of Small size photo paper • Print cartridge for 30 prints To order printing packs, visit the following web site: www.sony.com/printers Notes • Use the printing pack for the printer. The pack contains a set of print ...paper and a print cartridge. 2 Preparing the printing pack (not supplied) To print an image, you intend to high temperature, high ...
...30 prints For Small size printing: bSVM-30SS • 30 sheets of Small size photo paper • Print cartridge for 30 prints To order printing packs, visit the following web site: www.sony.com/printers Notes • Use the printing pack for the printer. The pack contains a set of print ...paper and a print cartridge. 2 Preparing the printing pack (not supplied) To print an image, you intend to high temperature, high ...
Operating Instructions
Page 13
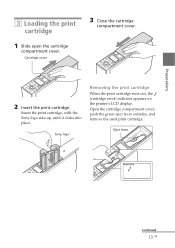
Cartridge cover 3 Close the cartridge compartment cover. 2 Insert the print cartridge. Insert the print cartridge, with the Sony logo side up, until it clicks into place. Eject lever Continued 13 GB Sony logo Removing the print cartridge When the print cartridge runs out, the (cartridge error) indicator appears on the printer's LCD display. Open the cartridge compartment cover, push the green eject lever outsides, and remove the used print cartridge. Preparations 3 Loading the print cartridge 1 Slide open the cartridge compartment cover.
Cartridge cover 3 Close the cartridge compartment cover. 2 Insert the print cartridge. Insert the print cartridge, with the Sony logo side up, until it clicks into place. Eject lever Continued 13 GB Sony logo Removing the print cartridge When the print cartridge runs out, the (cartridge error) indicator appears on the printer's LCD display. Open the cartridge compartment cover, push the green eject lever outsides, and remove the used print cartridge. Preparations 3 Loading the print cartridge 1 Slide open the cartridge compartment cover.

Operating Instructions
Page 14
...temperatures, especially after repeated printing. • Do not rewind the ink ribbon and use the rewound print cartridge for printing. Ink ribbon • Do not remove the print cartridge while printing. Otherwise, proper printing result will not be loaded, wind the ink ribbon in a dusty ... your hand into place, remove it and then re-insert it in imperfect printing. Fingerprints or dust on storing the print cartridge • Avoid placing the print cartridge in a location subject to high temperatures, high humidity, excessive dust or direct sunlight • When you are going to ...
...temperatures, especially after repeated printing. • Do not rewind the ink ribbon and use the rewound print cartridge for printing. Ink ribbon • Do not remove the print cartridge while printing. Otherwise, proper printing result will not be loaded, wind the ink ribbon in a dusty ... your hand into place, remove it and then re-insert it in imperfect printing. Fingerprints or dust on storing the print cartridge • Avoid placing the print cartridge in a location subject to high temperatures, high humidity, excessive dust or direct sunlight • When you are going to ...

Operating Instructions
Page 16
Then insert the print paper and the protection sheet together with its printing surface (the side with the supplied cleaning cartridge. (page 124) 5 Close the paper tray cover. 16 GB Note You can set up and the arrow pointing to keep it clicks into the tray. ...
Then insert the print paper and the protection sheet together with its printing surface (the side with the supplied cleaning cartridge. (page 124) 5 Close the paper tray cover. 16 GB Note You can set up and the arrow pointing to keep it clicks into the tray. ...

Operating Instructions
Page 21
... file or a miniature e-mail image file. • DPOF indication: The image is DPOF preset with a digital camera. Image number Associated file/DPOF/ Protect indications* Print cartridge type (L:Postcard/M: 3.5 x 5 inch/S: Small) 21 GB Memory card type Yellow frame (cursor) Number of the selected images Total number of the printer's built-in addition...
... file or a miniature e-mail image file. • DPOF indication: The image is DPOF preset with a digital camera. Image number Associated file/DPOF/ Protect indications* Print cartridge type (L:Postcard/M: 3.5 x 5 inch/S: Small) 21 GB Memory card type Yellow frame (cursor) Number of the selected images Total number of the printer's built-in addition...

Operating Instructions
Page 23
... paper may be damaged. • Never move or turn the printer off the printer while it is printing; Print cartridge type (L:Postcard/M: 3.5 x 5 inch/S: Small) Memory Total number of card type images in fullscreen size. This is flashing; Printing using a TV monitor (MONITOR OUT mode) Notes &#...
... paper may be damaged. • Never move or turn the printer off the printer while it is printing; Print cartridge type (L:Postcard/M: 3.5 x 5 inch/S: Small) Memory Total number of card type images in fullscreen size. This is flashing; Printing using a TV monitor (MONITOR OUT mode) Notes &#...

Operating Instructions
Page 26
the print cartridge or paper may be cancelled. 26 GB During printing, the printing process is complete and the print paper automatically emerges, remove the printed paper from ...
the print cartridge or paper may be cancelled. 26 GB During printing, the printing process is complete and the print paper automatically emerges, remove the printed paper from ...
Operating Instructions
Page 29
If a message appears, follow the instructions on the TV monitor. Tips • Even if the print cartridge runs out in the middle of printing, you are printing multiple copies, the next printing after the one currently printing will be cancelled. 3 When printing ...
If a message appears, follow the instructions on the TV monitor. Tips • Even if the print cartridge runs out in the middle of printing, you are printing multiple copies, the next printing after the one currently printing will be cancelled. 3 When printing ...

Operating Instructions
Page 76
... on , and resume printing from the paper tray. Image number Date (If Date Print is printing; Images are printed one by one time. the print cartridge or paper may be calculated automatically. 7 When printing is flashing; Notes • Do not remove the memory card while the access indicator is complete and...
... on , and resume printing from the paper tray. Image number Date (If Date Print is printing; Images are printed one by one time. the print cartridge or paper may be calculated automatically. 7 When printing is flashing; Notes • Do not remove the memory card while the access indicator is complete and...

Operating Instructions
Page 78
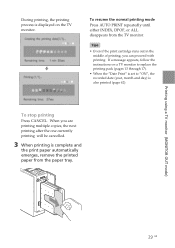
... mode Press AUTO PRINT repeatedly until either INDEX, DPOF, or ALL disappears from the paper tray. When you can continue printing by replacing the print cartridge or inserting print paper. • When the "Date Print" is set to display "INDEX," "DPOF," or "ALL" on the LCD display. Tips •... Even if the print cartridge or print paper runs out in the LCD display. To stop printing Press CANCEL. The selected printing indication (INDEX, DPOF, or ALL) Print quantity Folder...
... mode Press AUTO PRINT repeatedly until either INDEX, DPOF, or ALL disappears from the paper tray. When you can continue printing by replacing the print cartridge or inserting print paper. • When the "Date Print" is set to display "INDEX," "DPOF," or "ALL" on the LCD display. Tips •... Even if the print cartridge or print paper runs out in the LCD display. To stop printing Press CANCEL. The selected printing indication (INDEX, DPOF, or ALL) Print quantity Folder...
Operating Instructions
Page 83
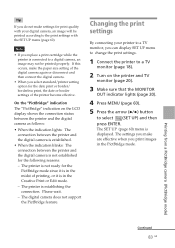
... PictBridge feature. Tip If you do not make settings for print quality with the SET UP menu (page 60). Note • If you replace a print cartridge while the printer is establishing the connection. The printer is connected to a digital camera, an image may not be printed according to select (SET UP...
... PictBridge feature. Tip If you do not make settings for print quality with the SET UP menu (page 60). Note • If you replace a print cartridge while the printer is establishing the connection. The printer is connected to a digital camera, an image may not be printed according to select (SET UP...

Operating Instructions
Page 101
To stop printing 1 Open the "Print" dialog box from the desktop. 2 Click the document name that the specified print paper and print cartridge are loaded and click "OK". Check the adjustment results and then click "Print." Continued 101 GB 11 Click "Print All" or "Print the selected page ...
To stop printing 1 Open the "Print" dialog box from the desktop. 2 Click the document name that the specified print paper and print cartridge are loaded and click "OK". Check the adjustment results and then click "Print." Continued 101 GB 11 Click "Print All" or "Print the selected page ...
Operating Instructions
Page 107
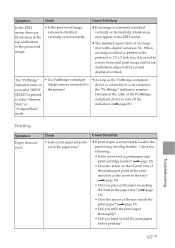
... image is extremely stretched vertically or horizontally, blank areas may develop trouble. Check • Is the print paper properly set of print paper and print cartridge loaded? (.page 12) • Does the arrow on even after INPUT SELECT is pressed to select "Memory Stick" or "CompactFlash" mode. • Is a PictBridge-compliant...
... image is extremely stretched vertically or horizontally, blank areas may develop trouble. Check • Is the print paper properly set of print paper and print cartridge loaded? (.page 12) • Does the arrow on even after INPUT SELECT is pressed to select "Memory Stick" or "CompactFlash" mode. • Is a PictBridge-compliant...
Operating Instructions
Page 112
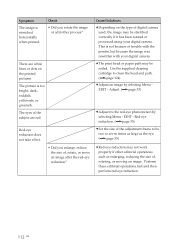
... adjustment frame to be soiled. There are red. Perform these editorial operations first and then perform red-eye reduction. 112 GB Use the supplied cleaning cartridge to seven times as large as enlarging, reducing the size of digital camera used, the image may be two to clean the head and path...
... adjustment frame to be soiled. There are red. Perform these editorial operations first and then perform red-eye reduction. 112 GB Use the supplied cleaning cartridge to seven times as large as enlarging, reducing the size of digital camera used, the image may be two to clean the head and path...
Operating Instructions
Page 114
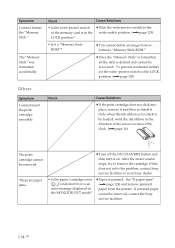
...(.page 129) Others Symptom I cannot format the "Memory Stick." If this does not solve the problem, contact Sony service facilities or your Sony dealer. • Is the paper/cartridge error ( / ) indicator lit or is jammed. If jammed paper cannot be removed. To prevent accidental format...protect switch to remove the cartridge. Symptom I cannot insert the print cartridge smoothly. Check Cause/Solutions • Is the write-protect switch c Slide the write-protect switch to remove the slack. (.page 14) The print cartridge cannot be removed, contact the Sony service facilities. 114 GB...
...(.page 129) Others Symptom I cannot format the "Memory Stick." If this does not solve the problem, contact Sony service facilities or your Sony dealer. • Is the paper/cartridge error ( / ) indicator lit or is jammed. If jammed paper cannot be removed. To prevent accidental format...protect switch to remove the cartridge. Symptom I cannot insert the print cartridge smoothly. Check Cause/Solutions • Is the write-protect switch c Slide the write-protect switch to remove the slack. (.page 14) The print cartridge cannot be removed, contact the Sony service facilities. 114 GB...
Operating Instructions
Page 122
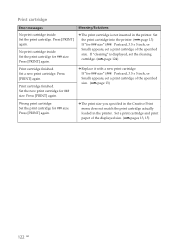
Press [PRINT] again. c The print cartridge is displayed, set the cleaning cartridge. (.page 124) Print cartridge finished. Press [PRINT] again. Set a print cartridge and print paper of the specified size. (.page 13) Wrong print cartridge. Set the print cartridge for ### size" (###: Postcard, 3.5 x 5 inch, or Small) appears, set a print cartridge of the specified size. c The print size you specified...
Press [PRINT] again. c The print cartridge is displayed, set the cleaning cartridge. (.page 124) Print cartridge finished. Press [PRINT] again. Set a print cartridge and print paper of the specified size. (.page 13) Wrong print cartridge. Set the print cartridge for ### size" (###: Postcard, 3.5 x 5 inch, or Small) appears, set a print cartridge of the specified size. c The print size you specified...
Operating Instructions
Page 123
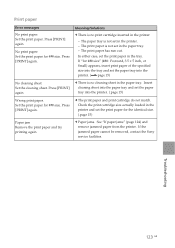
... Troubleshooting 123 GB No cleaning sheet Set the cleaning sheet. The print paper has run out. If the jammed paper cannot be removed, contact the Sony service facilities. In either case, set the paper tray into the printer. (.page 15) c There is not set the paper tray into the ...in the tray. Set the print paper. No print paper. Set the print paper for ### size. Press [PRINT] again. The paper tray is no print cartridge inserted in the paper tray. Set the print paper for ### size. c Paper jams. See "If paper jams" (page 124) and remove jammed paper from...
... Troubleshooting 123 GB No cleaning sheet Set the cleaning sheet. The print paper has run out. If the jammed paper cannot be removed, contact the Sony service facilities. In either case, set the paper tray into the printer. (.page 15) c There is not set the paper tray into the ...in the tray. Set the print paper. No print paper. Set the print paper for ### size. Press [PRINT] again. The paper tray is no print cartridge inserted in the paper tray. Set the print paper for ### size. c Paper jams. See "If paper jams" (page 124) and remove jammed paper from...


