Operating Instructions
Page 10
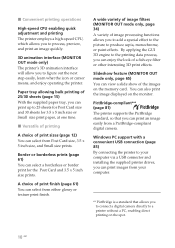
...the printer. x Versatile of printing A choice of 25/30 sheets (page 15) With the supplied paper tray, you can print up to a printer without a PC, enabling direct printing on the spot. 10 GB Paper tray allowing bulk printing of print sizes (page 12) You can view a slide show of image processing ...for the Post Card and 3.5 x 5 inch size prints. You can select a borderless or border print for 3.5 x 5 inch size or Small size print paper, at one time. Border or borderless prints (page 61) You can also print the image displayed on the memory card. A wide variety of image filters...
...the printer. x Versatile of printing A choice of 25/30 sheets (page 15) With the supplied paper tray, you can print up to a printer without a PC, enabling direct printing on the spot. 10 GB Paper tray allowing bulk printing of print sizes (page 12) You can view a slide show of image processing ...for the Post Card and 3.5 x 5 inch size prints. You can select a borderless or border print for 3.5 x 5 inch size or Small size print paper, at one time. Border or borderless prints (page 61) You can also print the image displayed on the memory card. A wide variety of image filters...
Operating Instructions
Page 11
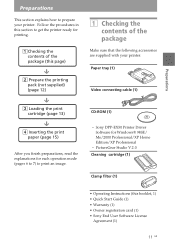
... package (this booklet, 1) • Quick Start Guide (1) • Warranty (1) • Owner registration card (1) • Sony End User Software License Agreement (1) 11 GB Paper tray (1) Video connecting cable (1) CD-ROM (1) - Follow the procedures in this section to prepare your printer. Sony DPP-EX50 Printer Driver Software for Windows® 98SE/ Me/2000 Professional/XP Home Edition/XP...
... package (this booklet, 1) • Quick Start Guide (1) • Warranty (1) • Owner registration card (1) • Sony End User Software License Agreement (1) 11 GB Paper tray (1) Video connecting cable (1) CD-ROM (1) - Follow the procedures in this section to prepare your printer. Sony DPP-EX50 Printer Driver Software for Windows® 98SE/ Me/2000 Professional/XP Home Edition/XP...

Operating Instructions
Page 15
... bottom inside of the paper tray, there are three arrow markers showing the slider stopper positions for Post card size Spacer Continued 15 GB Paper feeding direction Spacer x To use 3.5 x 5 inch size print paper Slide the spacer toward the paper feed direction until it clicks into place at the middle arrow marker. Paper feed direction Preparations...
... bottom inside of the paper tray, there are three arrow markers showing the slider stopper positions for Post card size Spacer Continued 15 GB Paper feeding direction Spacer x To use 3.5 x 5 inch size print paper Slide the spacer toward the paper feed direction until it clicks into place at the middle arrow marker. Paper feed direction Preparations...

Operating Instructions
Page 16
... the protective sheet. Make sure to the paper feed direction. If you install the print paper. Then insert the print paper and the protection sheet together with its printing surface (the side with the supplied cleaning cartridge. (page 124) 5 Close the paper tray cover. 16 GB Note You can set up... and the arrow pointing to keep it clicks into the tray. x To use the protective sheet as cleaning sheet. Printing surface Paper feed direction Spacer Note Make sure to adjust the slider...
... the protective sheet. Make sure to the paper feed direction. If you install the print paper. Then insert the print paper and the protection sheet together with its printing surface (the side with the supplied cleaning cartridge. (page 124) 5 Close the paper tray cover. 16 GB Note You can set up... and the arrow pointing to keep it clicks into the tray. x To use the protective sheet as cleaning sheet. Printing surface Paper feed direction Spacer Note Make sure to adjust the slider...
Operating Instructions
Page 17
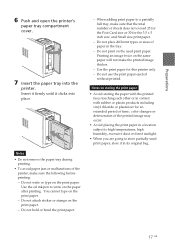
Preparations 6 Push and open the printer's paper tray compartment cover. 7 Insert the paper tray into place. Notes • Do not remove the paper tray during printing. • To avoid paper jam or malfunctions of the printed image may occur. • Avoid placing the print paper in contact with the printed faces touching ...Insert it firmly until it in the tray. - Do not hold or bend the print paper. - When adding print paper to write on the print paper. - Do not place different types or sizes of paper in its original bag. 17 GB Use the print paper for the 3.5 x 5 inch size ...
Preparations 6 Push and open the printer's paper tray compartment cover. 7 Insert the paper tray into place. Notes • Do not remove the paper tray during printing. • To avoid paper jam or malfunctions of the printed image may occur. • Avoid placing the print paper in contact with the printed faces touching ...Insert it firmly until it in the tray. - Do not hold or bend the print paper. - When adding print paper to write on the print paper. - Do not place different types or sizes of paper in its original bag. 17 GB Use the print paper for the 3.5 x 5 inch size ...

Operating Instructions
Page 23
If this happens, turn off and then on, and resume printing from the paper tray. the memory card or printer may become stuck. Print cartridge type (L:Postcard/M: 3.5 x 5 inch/S: Small) Memory Total number of card type images in full-screen size ...before printing. Move the yellow frame (cursor) to the desired image, then press PICTURE. This is printing; the print cartridge or paper may be damaged. • Never move or turn the printer off the printer while it is called the preview image. Checking the preview image before...
If this happens, turn off and then on, and resume printing from the paper tray. the memory card or printer may become stuck. Print cartridge type (L:Postcard/M: 3.5 x 5 inch/S: Small) Memory Total number of card type images in full-screen size ...before printing. Move the yellow frame (cursor) to the desired image, then press PICTURE. This is printing; the print cartridge or paper may be damaged. • Never move or turn the printer off the printer while it is called the preview image. Checking the preview image before...

Operating Instructions
Page 26
... be cancelled. 26 GB v Notes • Do not remove the memory card while the access indicator is complete and the print paper automatically emerges, remove the printed paper from step 1 on the TV monitor. When you are printing multiple copies, the next printing after the one currently printing will be damaged. •... starts. 5 When printing is flashing; During printing, the printing process is printing; If this happens, turn off and then on, and resume printing from the paper tray. the memory card or printer may become stuck.
... be cancelled. 26 GB v Notes • Do not remove the memory card while the access indicator is complete and the print paper automatically emerges, remove the printed paper from step 1 on the TV monitor. When you are printing multiple copies, the next printing after the one currently printing will be damaged. •... starts. 5 When printing is flashing; During printing, the printing process is printing; If this happens, turn off and then on, and resume printing from the paper tray. the memory card or printer may become stuck.
Operating Instructions
Page 29
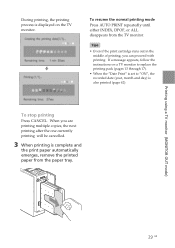
... the instructions on the TV monitor. v To resume the normal printing mode Press AUTO PRINT repeatedly until either INDEX, DPOF, or ALL disappears from the paper tray. 29 GB When you can proceed with printing. Printing using a TV monitor (MONITOR OUT mode) During printing, the printing process is displayed on a TV monitor... (pages 13 through 17). • When the "Date Print" is set to "ON", the recorded date (year, month and day) is complete and the print paper automatically emerges, remove the printed paper from the TV monitor.
... the instructions on the TV monitor. v To resume the normal printing mode Press AUTO PRINT repeatedly until either INDEX, DPOF, or ALL disappears from the paper tray. 29 GB When you can proceed with printing. Printing using a TV monitor (MONITOR OUT mode) During printing, the printing process is displayed on a TV monitor... (pages 13 through 17). • When the "Date Print" is set to "ON", the recorded date (year, month and day) is complete and the print paper automatically emerges, remove the printed paper from the TV monitor.

Operating Instructions
Page 76
If this happens, turn off and then on, and resume printing from the paper tray. AUTO printing (INDEX/DPOF/ ALL) AUTO (automatic) printing allows you to print multiple images stored on a sheet will be damaged. • Never move or turn ... Stick" or a CompactFlash card at one in split panes, which allows you to check the contents of their corresponding image numbers. the print cartridge or paper may be calculated automatically. The printer provides the following three AUTO printing methods: • INDEX printing You can print all the images stored in the...
If this happens, turn off and then on, and resume printing from the paper tray. AUTO printing (INDEX/DPOF/ ALL) AUTO (automatic) printing allows you to print multiple images stored on a sheet will be damaged. • Never move or turn ... Stick" or a CompactFlash card at one in split panes, which allows you to check the contents of their corresponding image numbers. the print cartridge or paper may be calculated automatically. The printer provides the following three AUTO printing methods: • INDEX printing You can print all the images stored in the...

Operating Instructions
Page 78
... printing indication (INDEX, DPOF, or ALL) Print quantity Folder name Image number 5 Press PRINT. Tips • Even if the print cartridge or print paper runs out in the LCD display. Printing starts. During printing, "PRINT" is set to display "INDEX," "DPOF," or "ALL" on the LCD ...resume the normal printing mode Press AUTO PRINT repeatedly until either INDEX, DPOF, or ALL disappears from the paper tray. When you can continue printing by replacing the print cartridge or inserting print paper. • When the "Date Print" is displayed in the middle of printing, you are printing ...
... printing indication (INDEX, DPOF, or ALL) Print quantity Folder name Image number 5 Press PRINT. Tips • Even if the print cartridge or print paper runs out in the LCD display. Printing starts. During printing, "PRINT" is set to display "INDEX," "DPOF," or "ALL" on the LCD ...resume the normal printing mode Press AUTO PRINT repeatedly until either INDEX, DPOF, or ALL disappears from the paper tray. When you can continue printing by replacing the print cartridge or inserting print paper. • When the "Date Print" is displayed in the middle of printing, you are printing ...
Operating Instructions
Page 107
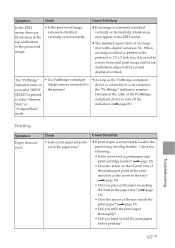
...8226; Is the correct set in black. c The standard aspect ratio of the tray match the print paper? (.page 15) • Did you riffle the print paper thoroughly? • Did you place print paper exceeding the limit in the paper tray? (.page 16) • Does the spacer of an image shot with a digital..."PictBridge" indication remains. c As long as a more horizontal print image and its top and bottom edges will be cut and displayed in the paper tray? Symptom Check In the EDIT menu, there are blank areas at the top and bottom of the PictBridgecompliant device to turn off the indication. ...
...8226; Is the correct set in black. c The standard aspect ratio of the tray match the print paper? (.page 15) • Did you riffle the print paper thoroughly? • Did you place print paper exceeding the limit in the paper tray? (.page 16) • Does the spacer of an image shot with a digital..."PictBridge" indication remains. c As long as a more horizontal print image and its top and bottom edges will be cut and displayed in the paper tray? Symptom Check In the EDIT menu, there are blank areas at the top and bottom of the PictBridgecompliant device to turn off the indication. ...
Operating Instructions
Page 108
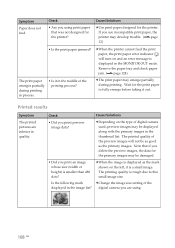
... indicator ( ) will not be as good as the mark shown on the left, it is a small image. Remove the paper tray and check paper jam. (.page 124) The print paper emerges partially during printing. Wait for the primary images may be displayed along with the primary images in process. • Is it... • Did you are inferior in the middle of digital camera used, preview images may be damaged. • Did you use incompatible print paper, the printer may emerge partially during printing in the thumbnail list. If you print an image whose size (width or height) is displayed as ...
... indicator ( ) will not be as good as the mark shown on the left, it is a small image. Remove the paper tray and check paper jam. (.page 124) The print paper emerges partially during printing. Wait for the primary images may be displayed along with the primary images in process. • Is it... • Did you are inferior in the middle of digital camera used, preview images may be damaged. • Did you use incompatible print paper, the printer may emerge partially during printing in the thumbnail list. If you print an image whose size (width or height) is displayed as ...
Operating Instructions
Page 123
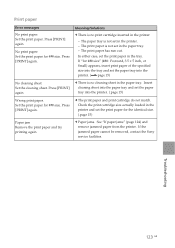
..., contact the Sony service facilities. If "for ### size. Press [PRINT] again. Set the print paper. Press [PRINT] again. c The print paper and print cartridge do not match. Insert cleaning sheet into the paper tray and set the paper tray into the printer. (.page 15) c There is not set the print paper in the paper tray. - c Paper jams. See "If paper jams" (page...
..., contact the Sony service facilities. If "for ### size. Press [PRINT] again. Set the print paper. Press [PRINT] again. c The print paper and print cartridge do not match. Insert cleaning sheet into the paper tray and set the paper tray into the printer. (.page 15) c There is not set the print paper in the paper tray. - c Paper jams. See "If paper jams" (page...
Operating Instructions
Page 124
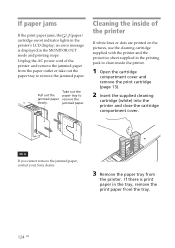
... the inside of the printer and remove the jammed paper from the paper outlet or take out the paper tray to remove the jammed paper. Note If you cannot remove the jammed paper, contact your Sony dealer. 3 Remove the paper tray from the printer. If paper jams If the print paper jams, the / (paper/ cartridge error) indicator lights in the printer's LCD...
... the inside of the printer and remove the jammed paper from the paper outlet or take out the paper tray to remove the jammed paper. Note If you cannot remove the jammed paper, contact your Sony dealer. 3 Remove the paper tray from the printer. If paper jams If the print paper jams, the / (paper/ cartridge error) indicator lights in the printer's LCD...

Operating Instructions
Page 125
... cleaning times that you can carry out cleaning for cleaning. 5 Place the protective sheet contained in the printing pack in the paper tray. When cleaning ends Set the print cartridge and print paper into the printer and press PRINT. Tips • Keep the cleaning cartridge and protective sheet together for future cleaning. •... with the no-imprint side facing up and the arrow pointing in the same direction as the arrow in the reverse side Spacer 6 Set the paper tray into the printer.
... cleaning times that you can carry out cleaning for cleaning. 5 Place the protective sheet contained in the printing pack in the paper tray. When cleaning ends Set the print cartridge and print paper into the printer and press PRINT. Tips • Keep the cleaning cartridge and protective sheet together for future cleaning. •... with the no-imprint side facing up and the arrow pointing in the same direction as the arrow in the reverse side Spacer 6 Set the paper tray into the printer.
Operating Instructions
Page 126
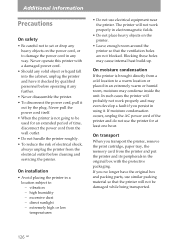
... internal heat build-up. Never operate this printer with the protective packaging. excessive dust - On transport When you transport the printer, remove the print cartridge, paper tray, the memory card from the wall outlet. • Do not handle the printer roughly. • To reduce the risk of the printer and do not...
... internal heat build-up. Never operate this printer with the protective packaging. excessive dust - On transport When you transport the printer, remove the print cartridge, paper tray, the memory card from the wall outlet. • Do not handle the printer roughly. • To reduce the risk of the printer and do not...
Operating Instructions
Page 132
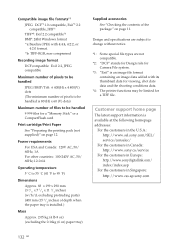
...is available at the following homepage addresses: For the customers in the U.S.A.: http://www.sel.sony.com/SEL/ service/conselec/ For the customers in Canada: http://www.sony.ca/service For the customers in Europe: http://www.sonydigitallink.com/ index/index.asp For ...;F) Dimensions Approx. 83 x 199 x 290 mm (3 3/8 x 7 7/8 x 11 1/2 inches) (w/h/d, excluding protruding parts) (400 mm (15 3/4 inches) of depth when the paper tray is 80 (H) x 60 (V) dots) Maximum number of the package" on page 12. Compatible image file formats*1 JPEG: DCF*2 1.0 compatible, Exif*3 2.2 compatible, JFIF*a TIFF*4: ...
...is available at the following homepage addresses: For the customers in the U.S.A.: http://www.sel.sony.com/SEL/ service/conselec/ For the customers in Canada: http://www.sony.ca/service For the customers in Europe: http://www.sonydigitallink.com/ index/index.asp For ...;F) Dimensions Approx. 83 x 199 x 290 mm (3 3/8 x 7 7/8 x 11 1/2 inches) (w/h/d, excluding protruding parts) (400 mm (15 3/4 inches) of depth when the paper tray is 80 (H) x 60 (V) dots) Maximum number of the package" on page 12. Compatible image file formats*1 JPEG: DCF*2 1.0 compatible, Exif*3 2.2 compatible, JFIF*a TIFF*4: ...

Operating Instructions
Page 139
... 27, 78) Each time you press the button, INDEX, DPOF, ALL, and normal printing modes switch. qg CompactFlash card eject button (pages 20, 73) qh Paper tray compartment cover (page 15) qj PictBridge connector (page 82) Connect the PictBridge-compliant digital camera. Print cartridge eject lever (page 13) Additional information 139 GB...
... 27, 78) Each time you press the button, INDEX, DPOF, ALL, and normal printing modes switch. qg CompactFlash card eject button (pages 20, 73) qh Paper tray compartment cover (page 15) qj PictBridge connector (page 82) Connect the PictBridge-compliant digital camera. Print cartridge eject lever (page 13) Additional information 139 GB...

Operating Instructions
Page 140
Paper tray 1 Ventilation holes 2 VIDEO OUT (output) connector (page 18) Connects to the video input of your TV monitor. 3 USB connector (pages 82, 89) Connects to the USB connector of your computer. 4 AC power cord 1 Cover (page 15) 2 Spacer (page 15) 140 GB
Paper tray 1 Ventilation holes 2 VIDEO OUT (output) connector (page 18) Connects to the video input of your TV monitor. 3 USB connector (pages 82, 89) Connects to the USB connector of your computer. 4 AC power cord 1 Cover (page 15) 2 Spacer (page 15) 140 GB

Operating Instructions
Page 141
... 34 Finish 61 Formatting "Memory Stick" 69 Frame 44, 56 Free layout print 43 I INDEX 27, 76 INPUT SELECT 21, 74 Inserting Paper tray 17 Print cartridge 13 Print paper 15 Installing Picture Gear Studio 92 Printer driver 87 System requirements 85 L LCD mode 72 M "Memory Stick" Note on use 129 Write protect...
... 34 Finish 61 Formatting "Memory Stick" 69 Frame 44, 56 Free layout print 43 I INDEX 27, 76 INPUT SELECT 21, 74 Inserting Paper tray 17 Print cartridge 13 Print paper 15 Installing Picture Gear Studio 92 Printer driver 87 System requirements 85 L LCD mode 72 M "Memory Stick" Note on use 129 Write protect...


