
Operating Instructions
Page 5
... menu 46 Enjoying Surround Sound Enjoying Dolby Digital and DTS Surround sound (AUTO FORMAT DIRECT) .......46 Selecting a pre-programmed sound field.....48 Using only the front speakers (2CH STEREO 51 Listening to the sound without any adjustment (ANALOG DIRECT)...........51 Resetting sound fields to the initial settings 52 Tuner Operations Listening to FM/AM radio 52 Presetting radio stations 54 Using the Radio Data System (RDS) ..........57 (Models of parts 6 1: Installing speakers 14 2: Connecting speakers 15 3a: Connecting the audio components ........ 16 3b: Connecting the video...
... menu 46 Enjoying Surround Sound Enjoying Dolby Digital and DTS Surround sound (AUTO FORMAT DIRECT) .......46 Selecting a pre-programmed sound field.....48 Using only the front speakers (2CH STEREO 51 Listening to the sound without any adjustment (ANALOG DIRECT)...........51 Resetting sound fields to the initial settings 52 Tuner Operations Listening to FM/AM radio 52 Presetting radio stations 54 Using the Radio Data System (RDS) ..........57 (Models of parts 6 1: Installing speakers 14 2: Connecting speakers 15 3a: Connecting the audio components ........ 16 3b: Connecting the video...
Operating Instructions
Page 8
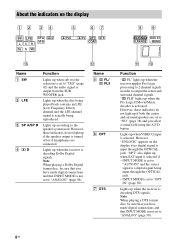
...) and the audio signal is selected if - PLII F OPT G DTS qa q; button. "OPT" also lights up when the Pro Logic II Movie/Music decoder is not set to output the center and surround channel signals. PLII ; Lights up when the receiver applies Pro Logic processing to 2 channel signals in order to "ANALOG" (page 58). 8GB Name E ; PLII" lights up when SAT input is output from the SUB WOOFER jack. Note When playing a Dolby Digital format disc, be...
...) and the audio signal is selected if - PLII F OPT G DTS qa q; button. "OPT" also lights up when the Pro Logic II Movie/Music decoder is not set to output the center and surround channel signals. PLII ; Lights up when the receiver applies Pro Logic processing to 2 channel signals in order to "ANALOG" (page 58). 8GB Name E ; PLII" lights up when SAT input is output from the SUB WOOFER jack. Note When playing a Dolby Digital format disc, be...

Operating Instructions
Page 9
... on presetting radio stations, see page 54. AUTO SW LCR SL SR 9GB For details on the display if no digital signal is activated. The letters (L, C, R, etc.) indicate the channels being played back. Front Left Front Right Center (monaural) Surround Left Surround Right Surround (monaural or the surround components obtained by Pro Logic processing) Example: Recording format (Front/ Surround): 3/2.1 Output channel: When surround speakers are set to show how the receiver downmixes the source sound...
... on presetting radio stations, see page 54. AUTO SW LCR SL SR 9GB For details on the display if no digital signal is activated. The letters (L, C, R, etc.) indicate the channels being played back. Front Left Front Right Center (monaural) Surround Left Surround Right Surround (monaural or the surround components obtained by Pro Logic processing) Example: Recording format (Front/ Surround): 3/2.1 Output channel: When surround speakers are set to show how the receiver downmixes the source sound...
Operating Instructions
Page 14
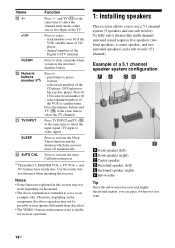
... to preset stations. - Name S -/->10/x CLEAR T Numeric buttons (number 5a)) U TV INPUT SLEEP V AUTO CAL Function Press -/-- preset/tune to activate the Auto Calibration function. To fully enjoy theater-like multi channel surround sound requires five speakers (two front speakers, a center speaker, and two surround speakers) and a sub woofer (5.1 channel). and TV (M) at the same time to - select channel numbers of the Digital CATV terminal. Press the numeric buttons and TV (M) at the same time to serve as references when operating the receiver...
... to preset stations. - Name S -/->10/x CLEAR T Numeric buttons (number 5a)) U TV INPUT SLEEP V AUTO CAL Function Press -/-- preset/tune to activate the Auto Calibration function. To fully enjoy theater-like multi channel surround sound requires five speakers (two front speakers, a center speaker, and two surround speakers) and a sub woofer (5.1 channel). and TV (M) at the same time to - select channel numbers of the Digital CATV terminal. Press the numeric buttons and TV (M) at the same time to serve as references when operating the receiver...

Operating Instructions
Page 19
... the digital audio jacks are compatible with certain types of components. • Refer to the operating instructions of a playback component are not output. • Video signals input to the HDMI IN jack can use the button to control your blu-ray disc player. Unless the power is output from the HDMI OUT jack. connect the digital audio jacks on HDMI connections • The sound is turned on, neither video nor audio signals will be displayed on the receiver when the video and audio signals of each component connected for details. turn on the receiver's display. Getting...
... the digital audio jacks are compatible with certain types of components. • Refer to the operating instructions of a playback component are not output. • Video signals input to the HDMI IN jack can use the button to control your blu-ray disc player. Unless the power is output from the HDMI OUT jack. connect the digital audio jacks on HDMI connections • The sound is turned on, neither video nor audio signals will be displayed on the receiver when the video and audio signals of each component connected for details. turn on the receiver's display. Getting...

Operating Instructions
Page 26
... factory settings. • All settings in the LEVEL, TONE, SUR, TUNER, AUDIO and SYSTEM menus. • The sound field memorized for each input and preset station. • All sound field parameters. • All preset stations. • All index names for inputs and preset stations. • MASTER VOLUME is set to "VOL MIN". • Input is set to a wall outlet. 5: Preparing the receiver and the remote Setting the voltage selector If your receiver has a voltage selector on the rear panel...
... factory settings. • All settings in the LEVEL, TONE, SUR, TUNER, AUDIO and SYSTEM menus. • The sound field memorized for each input and preset station. • All sound field parameters. • All preset stations. • All index names for inputs and preset stations. • MASTER VOLUME is set to "VOL MIN". • Input is set to a wall outlet. 5: Preparing the receiver and the remote Setting the voltage selector If your receiver has a voltage selector on the rear panel...

Operating Instructions
Page 28
...there are connected. • Make sure SPEAKERS (OFF/A/B) is not set to off. ?/1 SPEAKERS (OFF/A/B) AUTO CAL MIC PHONES DISPLAY INPUT MODE INPUT SELECTOR MASTER VOLUME MEMORY/ TUNING ENTER MODE TUNING 2CH A.F.D. 7: Calibrating the appropriate settings automatically (AUTO CALIBRATION) The DCAC (Digital Cinema Auto Calibration) function allows you perform Auto Calibration, install and connect the speakers (page 14, 15). • The AUTO CAL MIC jack is used for the supplied optimizer microphone only. For details, see "8: Adjusting the speaker levels and balance (TEST TONE)" (page 31...
...there are connected. • Make sure SPEAKERS (OFF/A/B) is not set to off. ?/1 SPEAKERS (OFF/A/B) AUTO CAL MIC PHONES DISPLAY INPUT MODE INPUT SELECTOR MASTER VOLUME MEMORY/ TUNING ENTER MODE TUNING 2CH A.F.D. 7: Calibrating the appropriate settings automatically (AUTO CALIBRATION) The DCAC (Digital Cinema Auto Calibration) function allows you perform Auto Calibration, install and connect the speakers (page 14, 15). • The AUTO CAL MIC jack is used for the supplied optimizer microphone only. For details, see "8: Adjusting the speaker levels and balance (TEST TONE)" (page 31...

Operating Instructions
Page 30
... Auto Calibration function will appear on the receiver and perform Auto Calibration again (page 29). 30GB Check the surround speaker connection. You can also change the settings manually 1 Record down the error code. 2 Press . 3 Press ?/1 to ignore the warning code as follows: Warning code t blank display t (warning code t blank display)b) t PUSH t blank display t ENTER b)Appears when there are placed too near the optimizer microphone. To change the settings manually. Error codes and remedies Error code ERROR 10 ERROR 11 ERROR 12 ERROR...
... Auto Calibration function will appear on the receiver and perform Auto Calibration again (page 29). 30GB Check the surround speaker connection. You can also change the settings manually 1 Record down the error code. 2 Press . 3 Press ?/1 to ignore the warning code as follows: Warning code t blank display t (warning code t blank display)b) t PUSH t blank display t ENTER b)Appears when there are placed too near the optimizer microphone. To change the settings manually. Error codes and remedies Error code ERROR 10 ERROR 11 ERROR 12 ERROR...

Operating Instructions
Page 35
... the operating instructions supplied with the receiver. 6 Play back the disc. 7 Adjust to a suitable volume. 8 After you cannot listen to page 46 for details. MOVIE MUSIC AMP MENU 123 FM MODE 456 7 >10/ CLEAR D.TUNING 89 D.SKIP MEMORY DVD MENU 0/10 ENTER DISPLAY TOOLS MUTING F TV VOL MASTER VOL G g f RETURN/EXIT MENU TV CH - Recommended sound fields: Movie: C.ST.EX Music: CONCERT 1 Turn on the TV and DVD player. 2 Turn on this receiver is set...
... the operating instructions supplied with the receiver. 6 Play back the disc. 7 Adjust to a suitable volume. 8 After you cannot listen to page 46 for details. MOVIE MUSIC AMP MENU 123 FM MODE 456 7 >10/ CLEAR D.TUNING 89 D.SKIP MEMORY DVD MENU 0/10 ENTER DISPLAY TOOLS MUTING F TV VOL MASTER VOL G g f RETURN/EXIT MENU TV CH - Recommended sound fields: Movie: C.ST.EX Music: CONCERT 1 Turn on the TV and DVD player. 2 Turn on this receiver is set...

Operating Instructions
Page 42
... audio and video output) • A.V.SYNC. This activates the bass redirection circuitry and outputs the LFE signals from other area code is "m". This feature only functions for models of area code U, CA is valid only when you use the SYSTEM menu to set the name of both the main and sub languages will be output. ANALOG DIRECT function is minimized. • A.V.SYNC. SYSTEM menu parameters The default setting for Dolby Digital sources. • DUAL M/S (Main/Sub) Sound...
... audio and video output) • A.V.SYNC. This activates the bass redirection circuitry and outputs the LFE signals from other area code is "m". This feature only functions for models of area code U, CA is valid only when you use the SYSTEM menu to set the name of both the main and sub languages will be output. ANALOG DIRECT function is minimized. • A.V.SYNC. SYSTEM menu parameters The default setting for Dolby Digital sources. • DUAL M/S (Main/Sub) Sound...

Operating Instructions
Page 50
... DIRECT is selected. signals with sound fields that the sound is output from the sub woofer if - or press A.F.D. About CINEMA STUDIO EX modes CINEMA STUDIO EX modes are set to select "2CH ST." the front and surround speakers are suitable for movie/music Press 2CH to "LARGE" on the package. • : Dolby Digital discs • : Dolby Surround encoded programs • : DTS Digital Surround encoded programs To turn off the surround effect for watching motion picture DVDs (etc.), with DCSmark use...
... DIRECT is selected. signals with sound fields that the sound is output from the sub woofer if - or press A.F.D. About CINEMA STUDIO EX modes CINEMA STUDIO EX modes are set to select "2CH ST." the front and surround speakers are suitable for movie/music Press 2CH to "LARGE" on the package. • : Dolby Digital discs • : Dolby Surround encoded programs • : DTS Digital Surround encoded programs To turn off the surround effect for watching motion picture DVDs (etc.), with DCSmark use...

Operating Instructions
Page 61
... player 5 Euro Digital Satellite Receiver 6 DVR (Digital CATV terminal) 7 DSS (Digital Satellite Receiver) 8 Blu-ray disc player 9 (command mode BD1)c) Blu-ray disc recorder 0/10 (command mode BD3)c) TV -/-- Using the Remote Changing button assignments You can change the assignment. c)For details on this remote to control the DVD recorder. 1 Hold down VIDEO 1. 2 Referring to the table below, press the corresponding button for the category you want to change the factory settings of which corresponds to the operating instructions supplied...
... player 5 Euro Digital Satellite Receiver 6 DVR (Digital CATV terminal) 7 DSS (Digital Satellite Receiver) 8 Blu-ray disc player 9 (command mode BD1)c) Blu-ray disc recorder 0/10 (command mode BD3)c) TV -/-- Using the Remote Changing button assignments You can change the assignment. c)For details on this remote to control the DVD recorder. 1 Hold down VIDEO 1. 2 Referring to the table below, press the corresponding button for the category you want to change the factory settings of which corresponds to the operating instructions supplied...

Operating Instructions
Page 62
... is expressed as 5.1 channel surround. There is delivered than Dolby Digital, delivering a higher quality sound reproduction. It compresses audio less than with fuller presence is a MOVIE mode for movies and MUSIC mode for DVD-video. The HDMI specification supports HDCP (High-bandwidth Digital Contents Protection), a copy protection technology that supports both video and audio on a single digital connection. This process is called the sampling frequency. x Composite video A standard format for digital video signals. x Dolby Digital Digital audio encoding/decoding technology...
... is expressed as 5.1 channel surround. There is delivered than Dolby Digital, delivering a higher quality sound reproduction. It compresses audio less than with fuller presence is a MOVIE mode for movies and MUSIC mode for DVD-video. The HDMI specification supports HDCP (High-bandwidth Digital Contents Protection), a copy protection technology that supports both video and audio on a single digital connection. This process is called the sampling frequency. x Composite video A standard format for digital video signals. x Dolby Digital Digital audio encoding/decoding technology...

Operating Instructions
Page 65
... the center/ surround speakers. • Select a CINEMA STUDIO EX mode (page 49). • Adjust the speaker level (page 31). • Make sure the center/surround speakers are set to "YES" (page 38). • There is no sound from the sub woofer. • Check that the sub woofer is connected correctly and securely. • Make sure you have connected the digital audio jacks on the playback component, you are playing is recorded in Dolby Digital or DTS format. • When connecting the DVD player...
... the center/ surround speakers. • Select a CINEMA STUDIO EX mode (page 49). • Adjust the speaker level (page 31). • Make sure the center/surround speakers are set to "YES" (page 38). • There is no sound from the sub woofer. • Check that the sub woofer is connected correctly and securely. • Make sure you have connected the digital audio jacks on the playback component, you are playing is recorded in Dolby Digital or DTS format. • When connecting the DVD player...
Service Manual
Page 3
...ÉMENTS PUBLIÉS PAR SONY. 3 ATTENTION AU COMPOSANT AYANT RAPPORT À LA SÉCURITÉ!! BACK PANEL - A) To Exposed Metal Parts on Set MODEL IDENTIFICATION - SAFETY-RELATED COMPONENT WARNING!! STR-DG510 SAFETY CHECK-OUT (US MODEL) After correcting the original service problem, perform the following safety check before releasing the set to the customer: Check the antenna terminals, metal trim, "metallized" knobs...
...ÉMENTS PUBLIÉS PAR SONY. 3 ATTENTION AU COMPOSANT AYANT RAPPORT À LA SÉCURITÉ!! BACK PANEL - A) To Exposed Metal Parts on Set MODEL IDENTIFICATION - SAFETY-RELATED COMPONENT WARNING!! STR-DG510 SAFETY CHECK-OUT (US MODEL) After correcting the original service problem, perform the following safety check before releasing the set to the customer: Check the antenna terminals, metal trim, "metallized" knobs...

Service Manual
Page 4
.... Display Section 38 5-25. EXPLODED VIEWS 6-1. Back Panel Section 9 2-4. Digital Section (2/4 28 5-14. Printed Wiring Board - Video Section 32 5-18. HDMI SW Section 34 5-20. Power Section 40 6. Case Section 49 6-2. Front Panel Section 9 2-3. STANDBY Board 11 3. Video Section 17 5-4. Block Diagram - Power Section 20 5-7. Digital Section (1/4 27 5-13. Schematic Diagram - Back Panel Section 51 6-4. DISASSEMBLY 2-1. FM TUNER CHECK 13 5. Video Section 31 5-17. Printed Wiring Boards - ELECTRICAL PARTS LIST 53 4 STR-DG510...
.... Display Section 38 5-25. EXPLODED VIEWS 6-1. Back Panel Section 9 2-4. Digital Section (2/4 28 5-14. Printed Wiring Board - Video Section 32 5-18. HDMI SW Section 34 5-20. Power Section 40 6. Case Section 49 6-2. Front Panel Section 9 2-3. STANDBY Board 11 3. Video Section 17 5-4. Block Diagram - Power Section 20 5-7. Digital Section (1/4 27 5-13. Schematic Diagram - Back Panel Section 51 6-4. DISASSEMBLY 2-1. FM TUNER CHECK 13 5. Video Section 31 5-17. Printed Wiring Boards - ELECTRICAL PARTS LIST 53 4 STR-DG510...
Service Manual
Page 5
...), etc., is set to adjust the volume level of selectable items appears here (page 8). D Remote sensor Receives signals from the SUB WOOFER jack. MOVIE MUSIC Function Turn to "NO" (page 38) Sound Field: A.F.D. TUNING MODE TUNING +/- About the indicators on the display (page 57, 59). PL/ ; button. AUTO SW LCR SL SR STR-DG510 This section is selected. E DISPLAY Press to output the center and surround channel signals. INPUT MODE is activated. "OPT" also lights up when DVD input is actually being input through the OPTICAL jack. D SP...
...), etc., is set to adjust the volume level of selectable items appears here (page 8). D Remote sensor Receives signals from the SUB WOOFER jack. MOVIE MUSIC Function Turn to "NO" (page 38) Sound Field: A.F.D. TUNING MODE TUNING +/- About the indicators on the display (page 57, 59). PL/ ; button. AUTO SW LCR SL SR STR-DG510 This section is selected. E DISPLAY Press to output the center and surround channel signals. INPUT MODE is activated. "OPT" also lights up when DVD input is actually being input through the OPTICAL jack. D SP...

Service Manual
Page 6
... same time. HDMI IN/ OUT jacks* Connects to the TV. B COMPONENT VIDEO INPUT/ OUTPUT section Green (Y) COMPONENT Connects to control Sony components as follows. To turn the receiver on /standby) Press to a sub woofer (page 15). The buttons are output to speakers (page 15). Then, use . Press MUTING and TV (M) at the same time to enter the selection of the CD player, DVD player or blu-ray disc player. Press to enter the selection for DVD MENU or MENU. MOVIE MUSIC AMP MENU 123 FM MODE 456...
... same time. HDMI IN/ OUT jacks* Connects to the TV. B COMPONENT VIDEO INPUT/ OUTPUT section Green (Y) COMPONENT Connects to control Sony components as follows. To turn the receiver on /standby) Press to a sub woofer (page 15). The buttons are output to speakers (page 15). Then, use . Press MUTING and TV (M) at the same time to enter the selection of the CD player, DVD player or blu-ray disc player. Press to enter the selection for DVD MENU or MENU. MOVIE MUSIC AMP MENU 123 FM MODE 456...

Service Manual
Page 13
... connect SG and the set . (2) Input the following signal from front left speaker of test tone) STR-DG510 SECTION 4 FM TUNER CHECK FM AUTO STOP CHECK (1) Turn on the set . You cannot use 75 ohm "coaxial cable" to 255 (depends on loudness of the receiver and AUTO CAL microphone. DCAC DSP Data Line Checking After press the [TUNING MODE], DCAC Factory test mode will start, below display will be test tone sound output from Signal Generator to FM antenna input directly. * Carrier Frequency...
... connect SG and the set . (2) Input the following signal from front left speaker of test tone) STR-DG510 SECTION 4 FM TUNER CHECK FM AUTO STOP CHECK (1) Turn on the set . You cannot use 75 ohm "coaxial cable" to 255 (depends on loudness of the receiver and AUTO CAL microphone. DCAC DSP Data Line Checking After press the [TUNING MODE], DCAC Factory test mode will start, below display will be test tone sound output from Signal Generator to FM antenna input directly. * Carrier Frequency...

Service Manual
Page 38
...DIGITAL M BOARD (4/4) CNS513 (Page 30) W101 O DCAC BOARD CN2001 (Page 36) STR-DG510 38 38 MOVIE MUSIC DISPLAY INPUT MODE AUTO CAL DIRECT CN101 3P CL125 POWER... C144 11G 0.1 10G C151 0.1 1 RV102 MASTER VOLUME 2 C107 2200p C106 2200p -12.6 10P ...3G -18.4 IC100 PT6315 FL DISPLAY DRIVER SEG5 18 -18.3 4P SEG4...REMOTE CONTROL SIGNAL RECEIVER R121 C112 220p E 10 C111 220p C110 220p C149 220p C148 220p R116 100 R115 100 R117 100 F R107 2.2k R106 1.5k R105 1k R104 680 R103 470 R102 330 R101 220 S107 S106 S105 S124 S104 S103 S102 S101 2CH A.F.D. SCHEMATIC DIAGRAM...
...DIGITAL M BOARD (4/4) CNS513 (Page 30) W101 O DCAC BOARD CN2001 (Page 36) STR-DG510 38 38 MOVIE MUSIC DISPLAY INPUT MODE AUTO CAL DIRECT CN101 3P CL125 POWER... C144 11G 0.1 10G C151 0.1 1 RV102 MASTER VOLUME 2 C107 2200p C106 2200p -12.6 10P ...3G -18.4 IC100 PT6315 FL DISPLAY DRIVER SEG5 18 -18.3 4P SEG4...REMOTE CONTROL SIGNAL RECEIVER R121 C112 220p E 10 C111 220p C110 220p C149 220p C148 220p R116 100 R115 100 R117 100 F R107 2.2k R106 1.5k R105 1k R104 680 R103 470 R102 330 R101 220 S107 S106 S105 S124 S104 S103 S102 S101 2CH A.F.D. SCHEMATIC DIAGRAM...


