
Handycam® Handbook
Page 35
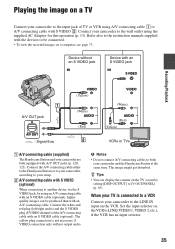
...cable with an A/V connecting cable. S VIDEO connection only will not output audio. Refer also to the instruction manuals supplied with A/V OUT jacks (p. 120, 121). Connect your camcorder to the LINE IN input on a computer, see page 73. Device without an S VIDEO jack IN Device... (Yellow) (White) AUDIO (Red) VIDEO (White) AUDIO (Red) (Yellow) VCRs or TVs 1 A/V connecting cable (supplied) The Handycam Station and your camcorder are both your camcorder to the wall outlet using A/V connecting cable 1 or A/V connecting cable with an S VIDEO cable (optional). Connect the white and red plug...
...cable with an A/V connecting cable. S VIDEO connection only will not output audio. Refer also to the instruction manuals supplied with A/V OUT jacks (p. 120, 121). Connect your camcorder to the LINE IN input on a computer, see page 73. Device without an S VIDEO jack IN Device... (Yellow) (White) AUDIO (Red) VIDEO (White) AUDIO (Red) (Yellow) VCRs or TVs 1 A/V connecting cable (supplied) The Handycam Station and your camcorder are both your camcorder to the wall outlet using A/V connecting cable 1 or A/V connecting cable with an S VIDEO cable (optional). Connect the white and red plug...

Handycam® Handbook
Page 45
...jack A/V OUT : Video/Signal flow (White) AUDIO (Red) (White) AUDIO (Red) (Yellow) VCRs or DVD/ HDD recorders A A/V connecting cable (supplied) The Handycam Station and your camcorder to the wall outlet using an A/V connecting cable with S VIDEO (optional) When connecting to another device via analog data transfer... either to the Handycam Station or to your camcorder, according to your camcorder to a monaural device, connect the yellow plug of the A/V connecting cable to be produced than with an S VIDEO cable (optional). Refer also to the instruction manuals supplied with the devices...
...jack A/V OUT : Video/Signal flow (White) AUDIO (Red) (White) AUDIO (Red) (Yellow) VCRs or DVD/ HDD recorders A A/V connecting cable (supplied) The Handycam Station and your camcorder to the wall outlet using an A/V connecting cable with S VIDEO (optional) When connecting to another device via analog data transfer... either to the Handycam Station or to your camcorder, according to your camcorder to a monaural device, connect the yellow plug of the A/V connecting cable to be produced than with an S VIDEO cable (optional). Refer also to the instruction manuals supplied with the devices...

Handycam® Handbook
Page 46
... Duo" containing them into your camcorder. Refer to the instruction manuals supplied with S VIDEO (optional) 2. To print still images on the printer. Connect your camcorder to the input jacks of the Handycam Station to the printer using a PictBridge compliant printer, without connecting the camcorder to the recording device (VCR or DVD/ HDD recorder) with the A/V connecting...
... Duo" containing them into your camcorder. Refer to the instruction manuals supplied with S VIDEO (optional) 2. To print still images on the printer. Connect your camcorder to the input jacks of the Handycam Station to the printer using a PictBridge compliant printer, without connecting the camcorder to the recording device (VCR or DVD/ HDD recorder) with the A/V connecting...

Handycam® Handbook
Page 47
.... If you do not change the setting, go to the previous screen. The selected image is on again, and restart the operation from your camcorder from the Handycam Station or the printer - Press and hold the image on the image selection screen. Touch to return to step 3. 3 Touch [EXEC] t [... Stick Duo") depending on the screen. You can set the following operations when is marked with . b Notes • Refer also to the instruction manual of the printer to be used. • Do not attempt the following options, then touch . [COPIES]: Set number of copies of only models ...
.... If you do not change the setting, go to the previous screen. The selected image is on again, and restart the operation from your camcorder from the Handycam Station or the printer - Press and hold the image on the image selection screen. Touch to return to step 3. 3 Touch [EXEC] t [... Stick Duo") depending on the screen. You can set the following operations when is marked with . b Notes • Refer also to the instruction manual of the printer to be used. • Do not attempt the following options, then touch . [COPIES]: Set number of copies of only models ...
Handycam® Handbook
Page 77
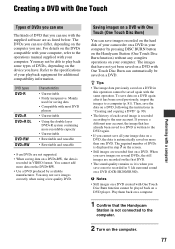
...to the DVD again. • If you cannot save images recorded on the hard disk of your camcorder on a DVD in 5.1ch surround sound on your computer. You may not save a movie recorded ...more data on the DVD+RW. • Use a DVD produced by pressing DISC BURN button on the Handycam Station (One Touch Disc Burn function) without any complex operations on a DVD (DCR-SR200/SR300). Then,...data is recorded in this operation cannot be played back on a DVD. Refer to the operations manual supplied with the supplied software are recorded first on a DVD player. The DVDs you use differ...
...to the DVD again. • If you cannot save images recorded on the hard disk of your camcorder on a DVD in 5.1ch surround sound on your computer. You may not save a movie recorded ...more data on the DVD+RW. • Use a DVD produced by pressing DISC BURN button on the Handycam Station (One Touch Disc Burn function) without any complex operations on a DVD (DCR-SR200/SR300). Then,...data is recorded in this operation cannot be played back on a DVD. Refer to the operations manual supplied with the supplied software are recorded first on a DVD player. The DVDs you use differ...

Handycam® Handbook
Page 98
... crooked (DCRSR200/SR300). • This is called the focal plane phenomenon. Leave the camcorder there for a while, then turn on the camcorder. • If you are not suitable for excessive vibrations. Adjust the focus manually (p. 67). [STEADYSHOT] does not function. • Set [STEADYSHOT] to [ON...]. The subjects passing by the frame rapidly might appear crooked depending on the camcorder, recording may not be used during Easy Handycam operation. This is not a malfunction. Turn off your camcorder is not correctly displayed. • Set the NIGHTSHOT PLUS switch (DCRSR42/SR62...
... crooked (DCRSR200/SR300). • This is called the focal plane phenomenon. Leave the camcorder there for a while, then turn on the camcorder. • If you are not suitable for excessive vibrations. Adjust the focus manually (p. 67). [STEADYSHOT] does not function. • Set [STEADYSHOT] to [ON...]. The subjects passing by the frame rapidly might appear crooked depending on the camcorder, recording may not be used during Easy Handycam operation. This is not a malfunction. Turn off your camcorder is not correctly displayed. • Set the NIGHTSHOT PLUS switch (DCRSR42/SR62...


