
Handycam® Handbook
Page 4
...Hard Disk Drive Handycam Save all your recorded images on a disc such as DVD-R using your computer (p. 77). Also, you can save your image data using a VCR, or a DVD/HDD recorder (p. 45). • It is recommended that you may damage the hard disk drive of the camcorder being lost, save... also be possible. • Especially, during recording/playback, do not apply shock. They may not delete data from the shock by dropping, the camcorder has the drop sensor function (p. 64). Removing the AC Adaptor (while charging the battery pack using the shoulder belt (not supplied), do so, ...
...Hard Disk Drive Handycam Save all your recorded images on a disc such as DVD-R using your computer (p. 77). Also, you can save your image data using a VCR, or a DVD/HDD recorder (p. 45). • It is recommended that you may damage the hard disk drive of the camcorder being lost, save... also be possible. • Especially, during recording/playback, do not apply shock. They may not delete data from the shock by dropping, the camcorder has the drop sensor function (p. 64). Removing the AC Adaptor (while charging the battery pack using the shoulder belt (not supplied), do so, ...
Handycam® Handbook
Page 5
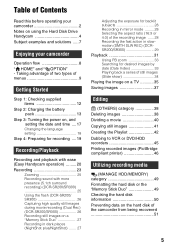
... recording media (MANAGE HDD/MEMORY) category 49 Formatting the hard disk or the "Memory Stick Duo 49 Checking the hard disk information 50 Preventing data on the hard disk of Contents Read this before operating your camcorder 2 Notes on using the Hard Disk Drive Handycam 4 Subject examples and... solutions ..... 7 Enjoying your camcorder Operation flow 8 " HOME" and " OPTION" - Table of the...
... recording media (MANAGE HDD/MEMORY) category 49 Formatting the hard disk or the "Memory Stick Duo 49 Checking the hard disk information 50 Preventing data on the hard disk of Contents Read this before operating your camcorder 2 Notes on using the Hard Disk Drive Handycam 4 Subject examples and... solutions ..... 7 Enjoying your camcorder Operation flow 8 " HOME" and " OPTION" - Table of the...
Handycam® Handbook
Page 9
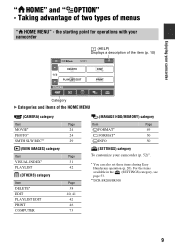
... B Categories and items of menus " HOME MENU" - " HOME" and " Enjoying your camcorder (p. 52)*. * You can also set these items during Easy Handycam operation (p. 20). Taking advantage of two types of the HOME MENU (CAMERA) category Item MOVIE* PHOTO* SMTH SLW REC** (VIEW IMAGES) category Item... EDIT PRINT COMPUTER Page 24 24 29 Page 31 42 Page 38 40, 41 42 46 73 (MANAGE HDD/MEMORY) category Item Page FORMAT* 49 FORMAT* 50 INFO 50 (SETTINGS) category To customize your camcorder OPTION" - For the items available in the (SETTINGS) category, see page 53. **DCR-SR200/SR300 ...
... B Categories and items of menus " HOME MENU" - " HOME" and " Enjoying your camcorder (p. 52)*. * You can also set these items during Easy Handycam operation (p. 20). Taking advantage of two types of the HOME MENU (CAMERA) category Item MOVIE* PHOTO* SMTH SLW REC** (VIEW IMAGES) category Item... EDIT PRINT COMPUTER Page 24 24 29 Page 31 42 Page 38 40, 41 42 46 73 (MANAGE HDD/MEMORY) category Item Page FORMAT* 49 FORMAT* 50 INFO 50 (SETTINGS) category To customize your camcorder OPTION" - For the items available in the (SETTINGS) category, see page 53. **DCR-SR200/SR300 ...

Handycam® Handbook
Page 45
...(S VIDEO channel) of the following ways. Connect your camcorder are connecting your setup. Dubbing to VCR or DVD/HDD recorders You can be connected. Connect the device in either to the Handycam Station or to your camcorder, according to be produced than with an S VIDEO... A/V OUT : Video/Signal flow (White) AUDIO (Red) (White) AUDIO (Red) (Yellow) VCRs or DVD/ HDD recorders A A/V connecting cable (supplied) The Handycam Station and your camcorder to another device via analog data transfer, the image quality may deteriorate. S VIDEO connection only will not output audio....
...(S VIDEO channel) of the following ways. Connect your camcorder are connecting your setup. Dubbing to VCR or DVD/HDD recorders You can be connected. Connect the device in either to the Handycam Station or to your camcorder, according to be produced than with an S VIDEO... A/V OUT : Video/Signal flow (White) AUDIO (Red) (White) AUDIO (Red) (Yellow) VCRs or DVD/ HDD recorders A A/V connecting cable (supplied) The Handycam Station and your camcorder to another device via analog data transfer, the image quality may deteriorate. S VIDEO connection only will not output audio....

Handycam® Handbook
Page 46
... the input mode. 3 Connect your camcorder to the recording device (VCR or DVD/ HDD recorder) with the A/V connecting cable (supplied) 1 or an A/V connecting cable with your recording device for details. 5 When dubbing is finished, stop the recording device, and then your camcorder to the printer 1 Connect the Handycam Station to the wall outlet using...
... the input mode. 3 Connect your camcorder to the recording device (VCR or DVD/ HDD recorder) with the A/V connecting cable (supplied) 1 or an A/V connecting cable with your recording device for details. 5 When dubbing is finished, stop the recording device, and then your camcorder to the printer 1 Connect the Handycam Station to the wall outlet using...
Handycam® Handbook
Page 79
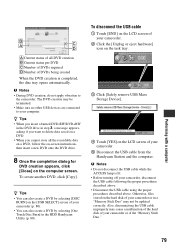
...DVD onto the DVD drive. 8 Once the completion dialog for DVD creation appears, click [Close] on the hard disk of your camcorder. 5 Disconnect the USB cable from the Handycam Station and the computer. Also, disconnecting the USB cable improperly may cause a malfunction of the hard disk of DVDs being created ...When the DVD creation is lit. • Before turning off your camcorder or of the "Memory Stick Duo." 79 z Tips • When you insert a burned DVD-RW/DVD+RW in the DVD drive in the HDD Handycam Utility (p. 80).
...DVD onto the DVD drive. 8 Once the completion dialog for DVD creation appears, click [Close] on the hard disk of your camcorder. 5 Disconnect the USB cable from the Handycam Station and the computer. Also, disconnecting the USB cable improperly may cause a malfunction of the hard disk of DVDs being created ...When the DVD creation is lit. • Before turning off your camcorder or of the "Memory Stick Duo." 79 z Tips • When you insert a burned DVD-RW/DVD+RW in the DVD drive in the HDD Handycam Utility (p. 80).
Handycam® Handbook
Page 80
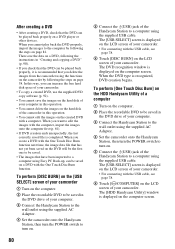
... outlet using the supplied AC Adaptor. 4 Set the camcorder onto the Handycam Station, then turn the POWER switch to turn on. 80 5 Connect the (USB) jack of your computer in this operation. • You cannot edit the images on page 38. The [HDD Handycam Utility] window is displayed on a DVD with a ...78. 6 Touch [DISC BURN] on the LCD screen of your camcorder. • For connecting with the One Touch Disc Burn function next time, the image data file that has not yet been saved on the HDD Handycam Utility of your camcorder. When the DVD type is displayed on a DVD player or other...
... outlet using the supplied AC Adaptor. 4 Set the camcorder onto the Handycam Station, then turn the POWER switch to turn on. 80 5 Connect the (USB) jack of your computer in this operation. • You cannot edit the images on page 38. The [HDD Handycam Utility] window is displayed on a DVD with a ...78. 6 Touch [DISC BURN] on the LCD screen of your camcorder. • For connecting with the One Touch Disc Burn function next time, the image data file that has not yet been saved on the HDD Handycam Utility of your camcorder. When the DVD type is displayed on a DVD player or other...
Handycam® Handbook
Page 81
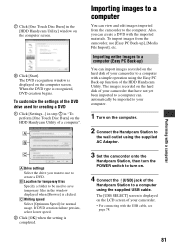
... [Settings...] in step 7 in "To perform [One Touch Disc Burn] on the hard disk of the HDD Handycam Utility. When the DVD type is clicked. The images recorded on the hard disk of your camcorder that have not yet been imported to a computer can create a DVD with a computer 81 7 Click [...One Touch Disc Burn] in the [HDD Handycam Utility] window on the computer screen. A Drive settings Select the drive you...
... [Settings...] in step 7 in "To perform [One Touch Disc Burn] on the hard disk of the HDD Handycam Utility. When the DVD type is clicked. The images recorded on the hard disk of your camcorder that have not yet been imported to a computer can create a DVD with a computer 81 7 Click [...One Touch Disc Burn] in the [HDD Handycam Utility] window on the computer screen. A Drive settings Select the drive you...

Handycam® Handbook
Page 82
... [Easy PC Back-up automatically and the imported images are displayed in the [HDD Handycam Utility] window on the camcorder. 5 Touch [ COMPUTER] on the LCD screen of image file and the destination folder. The [HDD Handycam Utility] window is completed, [Picture Motion Browser] starts up ] in the...window. 7 Select the type of your camcorder to a computer with [Media File Import] on the HDD Handycam Utility. 1 Turn on the computer. 2 Connect the Handycam Station to the wall outlet using the supplied AC Adaptor. 3 Set the camcorder onto the Handycam Station, then turn the POWER switch to...
... [Easy PC Back-up automatically and the imported images are displayed in the [HDD Handycam Utility] window on the camcorder. 5 Touch [ COMPUTER] on the LCD screen of image file and the destination folder. The [HDD Handycam Utility] window is completed, [Picture Motion Browser] starts up ] in the...window. 7 Select the type of your camcorder to a computer with [Media File Import] on the HDD Handycam Utility. 1 Turn on the computer. 2 Connect the Handycam Station to the wall outlet using the supplied AC Adaptor. 3 Set the camcorder onto the Handycam Station, then turn the POWER switch to...

Handycam® Handbook
Page 83
...to import all the images on a "Memory Stick Duo" by selecting a folder from among those registered as [Viewed folder] in the [HDD Handycam Utility] window on the computer screen. You can change the destination, click [Change], then select the desired folder. To import still images using... the supplied USB cable. A Movies B Still images 8 Select the images you want to import. The [HDD Handycam Utility] window is displayed on the thumbnails of a computer. 83 The import of your camcorder. The image select window for importing is displayed on the LCD screen of your...
...to import all the images on a "Memory Stick Duo" by selecting a folder from among those registered as [Viewed folder] in the [HDD Handycam Utility] window on the computer screen. You can change the destination, click [Change], then select the desired folder. To import still images using... the supplied USB cable. A Movies B Still images 8 Select the images you want to import. The [HDD Handycam Utility] window is displayed on the thumbnails of a computer. 83 The import of your camcorder. The image select window for importing is displayed on the LCD screen of your...

Handycam® Handbook
Page 85
...using this function. Click the check box at the top left on . 4 Connect the (USB) jack of the Handycam Station to delete. Movies and still images recorded on the camcorder are deleted. • You cannot delete images recorded on the "Memory Stick Duo" using the supplied AC Adaptor. ...then turn the POWER switch to turn on the thumbnails of your camcorder. • For connecting with a computer 85 The image select window is displayed on the computer screen. 6 Click [Delete Media Files from Handycam] in the [HDD Handycam Utility] window on the LCD screen of movies and still images...
...using this function. Click the check box at the top left on . 4 Connect the (USB) jack of the Handycam Station to delete. Movies and still images recorded on the camcorder are deleted. • You cannot delete images recorded on the "Memory Stick Duo" using the supplied AC Adaptor. ...then turn the POWER switch to turn on the thumbnails of your camcorder. • For connecting with a computer 85 The image select window is displayed on the computer screen. 6 Click [Delete Media Files from Handycam] in the [HDD Handycam Utility] window on the LCD screen of movies and still images...
Handycam® Handbook
Page 91
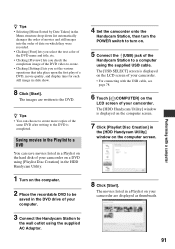
... image of the DVD video to create. • Clicking [Settings] lets you set the various operations that take place upon the first play of your camcorder. The [HDD Handycam Utility] window is displayed on the computer screen. 7 Click [Playlist Disc Creation] in a Playlist on your... . 5 Connect the (USB) jack of the same DVD after writing to the DVD. Saving movies in the DVD drive of your camcorder on a DVD using [Playlist Disc Creation] in the HDD Handycam Utility. 1 Turn on the computer. 2 Place the recordable DVD to be saved in the Playlist to a DVD You can choose to...
... image of the DVD video to create. • Clicking [Settings] lets you set the various operations that take place upon the first play of your camcorder. The [HDD Handycam Utility] window is displayed on the computer screen. 7 Click [Playlist Disc Creation] in a Playlist on your... . 5 Connect the (USB) jack of the same DVD after writing to the DVD. Saving movies in the DVD drive of your camcorder on a DVD using [Playlist Disc Creation] in the HDD Handycam Utility. 1 Turn on the computer. 2 Place the recordable DVD to be saved in the Playlist to a DVD You can choose to...
Handycam® Handbook
Page 128
....... 25 DROP SENSOR 64 DST SET 63 Dual Rec 26 Dubbing 45 DVD 77, 90 D.EFFECT (Digital effect 71 E Easy Handycam 20 Easy PC Back-up 81 EDIT 40, 41 Editing 38 On the camcorder....40, 41 On the computer 88 EMPTY 51 ERASE 43 ERASE ALL 43 EXPOSURE 68 Extension 110 F...FLASH LEVEL 59 FLASH MODE 72 FOCUS 67 FORMAT Hard disk 49 "Memory Stick Duo" ....50 Fragmentation 127 G GENERAL SET 64 GUIDEFRAME 56 H Handycam Station ........ 13, 121 HDD Handycam Utility 80, 81, 82, 85, 91 HOME MENU 9, 52 CLOCK/LANG 63 GENERAL SET 64 MOVIE SETTINGS...... 54 OUTPUT SETTINGS... 62 PHOTO ...
....... 25 DROP SENSOR 64 DST SET 63 Dual Rec 26 Dubbing 45 DVD 77, 90 D.EFFECT (Digital effect 71 E Easy Handycam 20 Easy PC Back-up 81 EDIT 40, 41 Editing 38 On the camcorder....40, 41 On the computer 88 EMPTY 51 ERASE 43 ERASE ALL 43 EXPOSURE 68 Extension 110 F...FLASH LEVEL 59 FLASH MODE 72 FOCUS 67 FORMAT Hard disk 49 "Memory Stick Duo" ....50 Fragmentation 127 G GENERAL SET 64 GUIDEFRAME 56 H Handycam Station ........ 13, 121 HDD Handycam Utility 80, 81, 82, 85, 91 HOME MENU 9, 52 CLOCK/LANG 63 GENERAL SET 64 MOVIE SETTINGS...... 54 OUTPUT SETTINGS... 62 PHOTO ...


