
Operating Instructions
Page 14
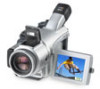
... hood (1) (p. 32) 9 "Memory Stick" (1) (p. 102) 0 USB cable (1) (p. 143) qa CD-ROM (SPVD-010 USB Driver) (1) (p. 148) qs Cleaning cloth (1) (p. 203) qd Stylus (1) (DCR-TRV70 only) (p. 171) qf Shoe cover (1) (p. 94) Contents of the recording cannot be compensated if recording or playback is not made due to a malfunction of the camcorder, storage media, etc. 14 Checking supplied...
... hood (1) (p. 32) 9 "Memory Stick" (1) (p. 102) 0 USB cable (1) (p. 143) qa CD-ROM (SPVD-010 USB Driver) (1) (p. 148) qs Cleaning cloth (1) (p. 203) qd Stylus (1) (DCR-TRV70 only) (p. 171) qf Shoe cover (1) (p. 94) Contents of the recording cannot be compensated if recording or playback is not made due to a malfunction of the camcorder, storage media, etc. 14 Checking supplied...
Operating Instructions
Page 143
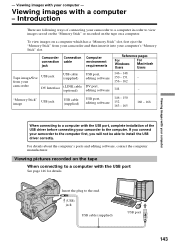
... - 148 editing software 150 - 151 - Introduction There are following ways of the USB driver before connecting your computer - "Memory Stick" image USB jack USB cable (supplied) USB port, editing software 146 - 150 152 163 - 165 166 - 168 When connecting to a computer with your camcorder to a computer with your computer's "Memory Stick" slot. If you connect your...
... - 148 editing software 150 - 151 - Introduction There are following ways of the USB driver before connecting your computer - "Memory Stick" image USB jack USB cable (supplied) USB port, editing software 146 - 150 152 163 - 165 166 - 168 When connecting to a computer with your camcorder to a computer with your computer's "Memory Stick" slot. If you connect your...

Operating Instructions
Page 146
...or more Hard disk: Available memory required for viewing images. The USB port must install a USB driver onto the computer in order to connect your camcorder to the computer's USB port. Furthermore, if you download pictures from your camcorder to a computer first, you can process or edit them in ...a CD-R drive is running Windows 98, but you can view pictures live from your computer is needed. The USB driver can be provided as standard. If you connect your camcorder and pictures recorded on the tape on a computer OS: Microsoft Windows 98SE, Windows Me, Windows 2000 Professional,...
...or more Hard disk: Available memory required for viewing images. The USB port must install a USB driver onto the computer in order to connect your camcorder to the computer's USB port. Furthermore, if you download pictures from your camcorder to a computer first, you can process or edit them in ...a CD-R drive is running Windows 98, but you can view pictures live from your computer is needed. The USB driver can be provided as standard. If you connect your camcorder and pictures recorded on the tape on a computer OS: Microsoft Windows 98SE, Windows Me, Windows 2000 Professional,...

Operating Instructions
Page 147
...the USB cable (For Windows users) Recommended computer usage environment when connecting with USB cable and viewing the "Memory Stick" images on the type of USB equipment that is used simultaneously. •Operations are not guaranteed for installing USB driver is... required. Windows Media Player must be provided as standard. However, operation is not assured if the above . •Windows and Windows Media are not mentioned in each case in the United States and/or other countries. •Pentium is an upgraded OS. Viewing images with your computer Connecting your camcorder...
...the USB cable (For Windows users) Recommended computer usage environment when connecting with USB cable and viewing the "Memory Stick" images on the type of USB equipment that is used simultaneously. •Operations are not guaranteed for installing USB driver is... required. Windows Media Player must be provided as standard. However, operation is not assured if the above . •Windows and Windows Media are not mentioned in each case in the United States and/or other countries. •Pentium is an upgraded OS. Viewing images with your computer Connecting your camcorder...
Operating Instructions
Page 148
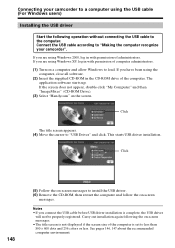
...the computer recognize your camcorder to a computer using Windows 2000, log in the CD-ROM drive of computer administrators. (1) Turn on the screen. This starts USB driver installation. Notes •If you are using the USB cable (For Windows users) Installing the USB driver Start the following the... is complete, the USB driver will not be properly registered. If you connect the USB cable before USB driver installation is set to the computer. If the screen does not appear, double-click "My Computer" and then "ImageMixer" (CD-ROM Drive). (3) Select "Handycam" on a computer and...
...the computer recognize your camcorder to a computer using Windows 2000, log in the CD-ROM drive of computer administrators. (1) Turn on the screen. This starts USB driver installation. Notes •If you are using the USB cable (For Windows users) Installing the USB driver Start the following the... is complete, the USB driver will not be properly registered. If you connect the USB cable before USB driver installation is set to the computer. If the screen does not appear, double-click "My Computer" and then "ImageMixer" (CD-ROM Drive). (3) Select "Handycam" on a computer and...

Operating Instructions
Page 149
...be automatically transferred (copied) to your computer and allow Windows to load. Click The Install Wizard program starts up . (3) Select "Handycam" on -screen messages. The installation screen disappears when installation is complete. If you are using Windows 2000, log in the CD-ROM...supplied CD-ROM in with your computer Connecting your camcorder to "Image Transfer" and click. The title screen appears. (4) Move the cursor to a computer using the USB cable (For Windows users) Installing Image Transfer Make sure USB driver installation is complete. 149 This function enables image ...
...be automatically transferred (copied) to your computer and allow Windows to load. Click The Install Wizard program starts up . (3) Select "Handycam" on -screen messages. The installation screen disappears when installation is complete. If you are using Windows 2000, log in the CD-ROM...supplied CD-ROM in with your computer Connecting your camcorder to "Image Transfer" and click. The title screen appears. (4) Move the cursor to a computer using the USB cable (For Windows users) Installing Image Transfer Make sure USB driver installation is complete. 149 This function enables image ...

Operating Instructions
Page 150
...installed, its writing function may not work correctly. "ImageMixer Ver.1.5 for Sony" is an application that happens, reinstall the original application and replace Win... Win ASPI. Click 150 The Install Wizard program starts up . (3) Select "Handycam" on -screen messages. After installation is complete. (7) Follow the on-screen ...USB driver installation is complete. If that can be used in it. Follow the on-screen messages to load. For Windows XP, you need to a "Memory Stick" so that the ImageMixer CD writing function may not work properly. Connecting your camcorder...
...installed, its writing function may not work correctly. "ImageMixer Ver.1.5 for Sony" is an application that happens, reinstall the original application and replace Win... Win ASPI. Click 150 The Install Wizard program starts up . (3) Select "Handycam" on -screen messages. After installation is complete. (7) Follow the on-screen ...USB driver installation is complete. If that can be used in it. Follow the on-screen messages to load. For Windows XP, you need to a "Memory Stick" so that the ImageMixer CD writing function may not work properly. Connecting your camcorder...

Operating Instructions
Page 151
...confirm the digital signature appears, select "Yes" if you use Windows 2000 or select "Continue Anyway" if you are using Windows 2000, log in with your computer 151 The computer recognizes your camcorder, and the Windows Add Hardware Wizard starts. (USB) jack USB port USB cable (...supplied) (7) Follow the on-screen messages so that the Add Hardware Wizard recognizes that the USB drivers have been installed. If you use Windows XP...
...confirm the digital signature appears, select "Yes" if you use Windows 2000 or select "Continue Anyway" if you are using Windows 2000, log in with your computer 151 The computer recognizes your camcorder, and the Windows Add Hardware Wizard starts. (USB) jack USB port USB cable (...supplied) (7) Follow the on-screen messages so that the Add Hardware Wizard recognizes that the USB drivers have been installed. If you use Windows XP...
Operating Instructions
Page 152
.... You cannot install the USB driver if the "Memory Stick" is not in your camcorder to the USB port on the computer using the supplied USB cable. The Add Hardware Wizard starts two times because two different USB drivers are installed. The USB MODE indicator appears on ...-screen messages so that the Add Hardware Wizard recognizes that the USB drivers have been installed. Connecting your camcorder to a computer using the USB cable (For Windows users) Viewing images recorded...
.... You cannot install the USB driver if the "Memory Stick" is not in your camcorder to the USB port on the computer using the supplied USB cable. The Add Hardware Wizard starts two times because two different USB drivers are installed. The USB MODE indicator appears on ...-screen messages so that the Add Hardware Wizard recognizes that the USB drivers have been installed. Connecting your camcorder to a computer using the USB cable (For Windows users) Viewing images recorded...
Operating Instructions
Page 153
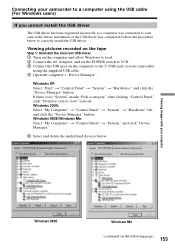
... the underlined devices below to correctly install the USB driver. Viewing images with your computer Windows 98SE Windows Me (continued on your camcorder using the USB cable (For Windows users) If you cannot install the USB driver The USB driver has been registered incorrectly as a computer was ...connected to your camcorder to a computer using the supplied USB cable. 4 Open the computer's...
... the underlined devices below to correctly install the USB driver. Viewing images with your computer Windows 98SE Windows Me (continued on your camcorder using the USB cable (For Windows users) If you cannot install the USB driver The USB driver has been registered incorrectly as a computer was ...connected to your camcorder to a computer using the supplied USB cable. 4 Open the computer's...

Operating Instructions
Page 154
Connecting your camcorder, then disconnect the USB cable. 7 Restart the computer. Step 2: Install the USB driver on the supplied CD-ROM Follow the entire procedure in "Installing the USB driver" on your camcorder to a computer using the USB cable (For Windows users) Windows 2000 Windows XP 6 Set the POWER switch to OFF (CHG) on page 148. 154
Connecting your camcorder, then disconnect the USB cable. 7 Restart the computer. Step 2: Install the USB driver on the supplied CD-ROM Follow the entire procedure in "Installing the USB driver" on your camcorder to a computer using the USB cable (For Windows users) Windows 2000 Windows XP 6 Set the POWER switch to OFF (CHG) on page 148. 154
Operating Instructions
Page 155
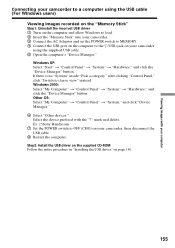
... procedure in "Installing the USB driver" on page 148. 155 Windows XP: Select "Start" t "Control Panel" t "System" t "Hardware," and click the "Device Manager" button. Ex: (?)Sony Handycam 7 Set the POWER switch to OFF (CHG) on your camcorder using the USB cable (For Windows users...) Viewing images recorded on the "Memory Stick" Step1: Uninstall the incorrect USB driver 1 Turn on the computer and allow Windows to load. 2 ...
... procedure in "Installing the USB driver" on page 148. 155 Windows XP: Select "Start" t "Control Panel" t "System" t "Hardware," and click the "Device Manager" button. Ex: (?)Sony Handycam 7 Set the POWER switch to OFF (CHG) on your camcorder using the USB cable (For Windows users...) Viewing images recorded on the "Memory Stick" Step1: Uninstall the incorrect USB driver 1 Turn on the computer and allow Windows to load. 2 ...

Operating Instructions
Page 156
... insert the cassette into your camcorder. (3) Set the POWER switch to VCR. (4) Press FN to display PAGE1. (5) Press MENU to display the menu. (6) Select USB STREAM in , then press EXEC. (7) Select ON, then press EXEC. (8) Select "Start" t "Programs" t "PIXELA" t "ImageMixer" t "ImageMixer Ver.1.5 for Sony" You need to install the USB driver and ImageMixer to view...
... insert the cassette into your camcorder. (3) Set the POWER switch to VCR. (4) Press FN to display PAGE1. (5) Press MENU to display the menu. (6) Select USB STREAM in , then press EXEC. (7) Select ON, then press EXEC. (8) Select "Start" t "Programs" t "PIXELA" t "ImageMixer" t "ImageMixer Ver.1.5 for Sony" You need to install the USB driver and ImageMixer to view...

Operating Instructions
Page 159
...shakes up and down. - Reinstall the USB driver following may not move more smoothly by the USB connection The USB driver has been registered incorrectly as the computer was connected to your camcorder before installation of your camcorder is in standby with the USB connection, the following the procedure on a... quitting the application: - If any "Memory Stick" operations during the USB streaming. This is inserted. •Indicators on the screen of your camcorder do not appear on images that of the USB driver was complete. Turn the POWER switch to noise, etc. - Some images...
...shakes up and down. - Reinstall the USB driver following may not move more smoothly by the USB connection The USB driver has been registered incorrectly as the computer was connected to your camcorder before installation of your camcorder is in standby with the USB connection, the following the procedure on a... quitting the application: - If any "Memory Stick" operations during the USB streaming. This is inserted. •Indicators on the screen of your camcorder do not appear on images that of the USB driver was complete. Turn the POWER switch to noise, etc. - Some images...
Operating Instructions
Page 163
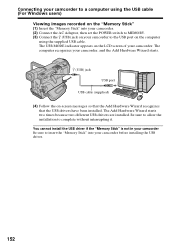
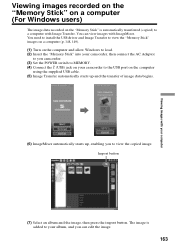
.... You need to install the USB driver and Image Transfer to view the "Memory Stick" images on a computer (p. 148, 149). (1) Turn on the computer and allow Windows to load. (2) Insert the "Memory Stick" into your camcorder, then connect the AC Adaptor to you camcorder. (3) Set the POWER switch to... MEMORY. (4) Connect the (USB) jack on your computer (7) Select an album and the image, then press the import button. You...
.... You need to install the USB driver and Image Transfer to view the "Memory Stick" images on a computer (p. 148, 149). (1) Turn on the computer and allow Windows to load. (2) Insert the "Memory Stick" into your camcorder, then connect the AC Adaptor to you camcorder. (3) Set the POWER switch to... MEMORY. (4) Connect the (USB) jack on your computer (7) Select an album and the image, then press the import button. You...
Operating Instructions
Page 164
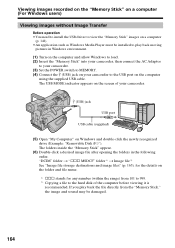
...the computer and allow Windows to load. (2) Insert the "Memory Stick" into your camcorder, then connect the AC Adaptor to your camcorder. (3) Set the POWER switch to MEMORY. (4) Connect the (USB) jack on your camcorder. (USB) jack USB port USB cable (supplied) (5) Open "My Computer" on Windows and double-click the newly ...install the USB driver to view the "Memory Stick" images on a computer (p. 148). • An application such as Windows Media Player must be installed to play back the file directly from 101 to 999. 2) Copying a file to the hard disk of your camcorder to the USB port on ...
...the computer and allow Windows to load. (2) Insert the "Memory Stick" into your camcorder, then connect the AC Adaptor to your camcorder. (3) Set the POWER switch to MEMORY. (4) Connect the (USB) jack on your camcorder. (USB) jack USB port USB cable (supplied) (5) Open "My Computer" on Windows and double-click the newly ...install the USB driver to view the "Memory Stick" images on a computer (p. 148). • An application such as Windows Media Player must be installed to play back the file directly from 101 to 999. 2) Copying a file to the hard disk of your camcorder to the USB port on ...
Operating Instructions
Page 166
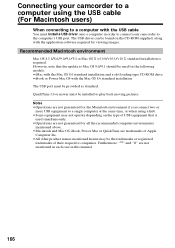
.... QuickTime 3.0 or newer must install a USB driver onto a computer in this manual. 166 The USB driver can be found on the type of USB equipment that the update to Mac OS 9.0/9.1 should be provided as standard. Notes •Operations are not mentioned in each case in order to connect your camcorder to a computer using a hub. •...
.... QuickTime 3.0 or newer must install a USB driver onto a computer in this manual. 166 The USB driver can be found on the type of USB equipment that the update to Mac OS 9.0/9.1 should be provided as standard. Notes •Operations are not mentioned in each case in order to connect your camcorder to a computer using a hub. •...
Operating Instructions
Page 167
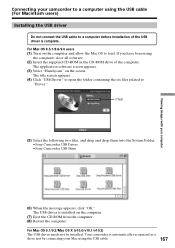
...Handycam" on the computer and allow the Mac OS to load. The title screen appears. (4) Click "USB Driver" to open the folder containing the six files related to "Driver." Your camcorder is automatically recognized as a drive just by connecting your Mac using the USB cable (For Macintosh users) Installing the USB driver...;Sony Camcorder USB Driver •Sony Camcorder USB Shim Viewing images with your computer (6) When the message appears, click "OK." For Mac OS 8.5.1/8.6/9.0 users (1) Turn on the screen. Connecting your camcorder to a computer using the USB cable. 167 The USB driver ...
...Handycam" on the computer and allow the Mac OS to load. The title screen appears. (4) Click "USB Driver" to open the folder containing the six files related to "Driver." Your camcorder is automatically recognized as a drive just by connecting your Mac using the USB cable (For Macintosh users) Installing the USB driver...;Sony Camcorder USB Driver •Sony Camcorder USB Shim Viewing images with your computer (6) When the message appears, click "OK." For Mac OS 8.5.1/8.6/9.0 users (1) Turn on the screen. Connecting your camcorder to a computer using the USB cable. 167 The USB driver ...
Operating Instructions
Page 168
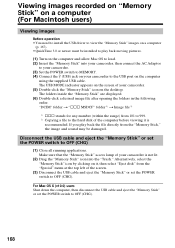
..." icon on it is not lit. (2) Drag the "Memory Stick" icon into your camcorder, then connect the AC Adaptor to your camcorder. (3) Set the POWER switch to MEMORY. (4) Connect the (USB) jack on your camcorder to OFF (CHG). 168 For Mac OS X (v10.0) users Shut down the computer,... into the "Trash." Viewing images recorded on "Memory Stick" on a computer (For Macintosh users) Viewing images Before operation •You need to install the USB driver to view the "Memory Stick" images on a computer (p. 167). •QuickTime 3.0 or newer must be damaged. The folders inside the "Memory Stick"...
..." icon on it is not lit. (2) Drag the "Memory Stick" icon into your camcorder, then connect the AC Adaptor to your camcorder. (3) Set the POWER switch to MEMORY. (4) Connect the (USB) jack on your camcorder to OFF (CHG). 168 For Mac OS X (v10.0) users Shut down the computer,... into the "Trash." Viewing images recorded on "Memory Stick" on a computer (For Macintosh users) Viewing images Before operation •You need to install the USB driver to view the "Memory Stick" images on a computer (p. 167). •QuickTime 3.0 or newer must be damaged. The folders inside the "Memory Stick"...
Operating Instructions
Page 190
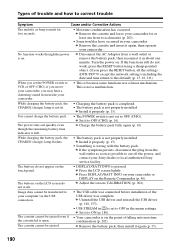
... as possible to ON (p. 180). • Your camcorder is not properly installed. When you press the RESET button, all the settings (DCR-TRV70: except the network settings) including the date and time return to your camcorder. • This is because some functions use a ...your Sony dealer or local authorized Sony service facility. Types of trouble and how to OFF in the menu settings. If the functions still do not appear on your camcorder. c Install it again (p. 15). 190 c Adjust the screen (CALIBRATION) (p. 204). c Uninstall the USB driver and reinstall the USB driver (p....
... as possible to ON (p. 180). • Your camcorder is not properly installed. When you press the RESET button, all the settings (DCR-TRV70: except the network settings) including the date and time return to your camcorder. • This is because some functions use a ...your Sony dealer or local authorized Sony service facility. Types of trouble and how to OFF in the menu settings. If the functions still do not appear on your camcorder. c Install it again (p. 15). 190 c Adjust the screen (CALIBRATION) (p. 204). c Uninstall the USB driver and reinstall the USB driver (p....


