Computer Applications Guide
Page 2
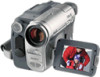
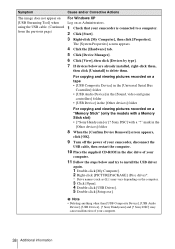
...; For camera operations, read the separate Camera Operations Guide supplied with your camcorder to a Macintosh computer using ImageMixer VCD2 • OS: Mac OS X (v10.1.5 or later) Standard installation is required. Read this must be provided as standard), disc drive 2 Operation is not assured if the above OS has been upgraded. When using a USB cable, you need a CD-R drive to create a Video CD.) When playing pictures recorded on a "Memory Stick" on a computer (only the models with...
...; For camera operations, read the separate Camera Operations Guide supplied with your camcorder to a Macintosh computer using ImageMixer VCD2 • OS: Mac OS X (v10.1.5 or later) Standard installation is required. Read this must be provided as standard), disc drive 2 Operation is not assured if the above OS has been upgraded. When using a USB cable, you need a CD-R drive to create a Video CD.) When playing pictures recorded on a "Memory Stick" on a computer (only the models with...
Computer Applications Guide
Page 14
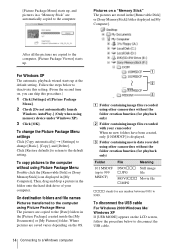
... [USB MODE] appears on the LCD screen, follow the procedure below to the [Date] folders in a "Memory Stick" are stored in the [Removable Disk] or [Sony MemoryStick] folder displayed in the folder onto the hard disk drive of [Picture Package Menu]. 2 Check [Do not automatically launch Windows AutoPlay.] (Only when using Picture Package Menu Double-click the [Removable Disk] or [Sony MemoryStick] icon displayed in [My Computer]. Follow the steps below to disconnect the USB cable. 14 Connecting...
... [USB MODE] appears on the LCD screen, follow the procedure below to the [Date] folders in a "Memory Stick" are stored in the [Removable Disk] or [Sony MemoryStick] folder displayed in the folder onto the hard disk drive of [Picture Package Menu]. 2 Check [Do not automatically launch Windows AutoPlay.] (Only when using Picture Package Menu Double-click the [Removable Disk] or [Sony MemoryStick] icon displayed in [My Computer]. Follow the steps below to disconnect the USB cable. 14 Connecting...

Computer Applications Guide
Page 18
... when connecting the camcorder to select the PLAY/ EDIT mode. Folder functions With [Picture Package Viewer], pictures copied from any folder or memory device. To add comments to a folder Right-click on a Windows computer z Tip • This operation is displayed. If you have selected. The procedure of the screen. If you can play, stop, and pause movies using the buttons at the top of the menu settings varies depending on the model. Movie files You...
... when connecting the camcorder to select the PLAY/ EDIT mode. Folder functions With [Picture Package Viewer], pictures copied from any folder or memory device. To add comments to a folder Right-click on a Windows computer z Tip • This operation is displayed. If you have selected. The procedure of the screen. If you can play, stop, and pause movies using the buttons at the top of the menu settings varies depending on the model. Movie files You...
Computer Applications Guide
Page 24
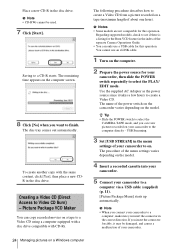
... copy recorded movies on your camcorder to a Video CD using a computer equipped with a disc drive compatible with the same content, click [Yes], then place a new CDR in the disc drive. You cannot use a USB cable for your camcorder to on the computer. 2 Prepare the power source for this operation. z Tip • Slide the POWER switch to select the CAMERA-TAPE mode, and you can only use an i.LINK cable. 1 Turn on . USB Streaming. 3 Set [USB STREAM] in the menu settings...
... copy recorded movies on your camcorder to a Video CD using a computer equipped with a disc drive compatible with the same content, click [Yes], then place a new CDR in the disc drive. You cannot use a USB cable for your camcorder to on the computer. 2 Prepare the power source for this operation. z Tip • Slide the POWER switch to select the CAMERA-TAPE mode, and you can only use an i.LINK cable. 1 Turn on . USB Streaming. 3 Set [USB STREAM] in the menu settings...
Computer Applications Guide
Page 29
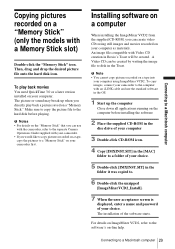
... user acceptance screen is displayed, enter a name and password of your camcorder to the computer with an i.LINK cable and use with the camcorder, refer to the separate Camera Operations Guide supplied with Video CD creation in the Toast. Connecting to a Macintosh computer Copying pictures recorded on a "Memory Stick." Then, drag and drop the desired picture file onto the hard disk icon. Connecting to the hard disk before installing the software 2 Place the supplied CD-ROM in the disc drive...
... user acceptance screen is displayed, enter a name and password of your camcorder to the computer with an i.LINK cable and use with the camcorder, refer to the separate Camera Operations Guide supplied with Video CD creation in the Toast. Connecting to a Macintosh computer Copying pictures recorded on a "Memory Stick." Then, drag and drop the desired picture file onto the hard disk icon. Connecting to the hard disk before installing the software 2 Place the supplied CD-ROM in the disc drive...

Computer Applications Guide
Page 30
... takes a few hours to DVD" (Sony original software) installed. - Other functions Creating a DVD (Direct Access to "Click to DVD") to i.LINK (IEEE1394) connector i.LINK cable (optional) to DV Interface or b Notes • Some models are not compatible for the first time The Direct Access to "Click to DVD" function enables you to copy pictures recorded on a tape to a DVD easily if your camcorder is connected to a computer. For system and operation requirements, visit the following...
... takes a few hours to DVD" (Sony original software) installed. - Other functions Creating a DVD (Direct Access to "Click to DVD") to i.LINK (IEEE1394) connector i.LINK cable (optional) to DV Interface or b Notes • Some models are not compatible for the first time The Direct Access to "Click to DVD" function enables you to copy pictures recorded on a tape to a DVD easily if your camcorder is connected to a computer. For system and operation requirements, visit the following...
Computer Applications Guide
Page 33
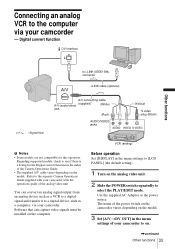
... transfer it to a digital device, such as the power source. The name of the Camera Operations Guide. • The supplied A/V cable varies depending on the analog video unit. 2 Slide the POWER switch repeatedly to select the PLAY/EDIT mode. Use the supplied AC Adaptor as a computer, via your camcorder. Digital convert function DV Interface Other functions to i.LINK (IEEE1394) connector i.LINK cable (optional) : Signal flow A/V connecting cable (supplied)* A/V (audio/video) (White) jack (Red) AUDIO/VIDEO jacks (Yellow) S video plug (Black...
... transfer it to a digital device, such as the power source. The name of the Camera Operations Guide. • The supplied A/V cable varies depending on the analog video unit. 2 Slide the POWER switch repeatedly to select the PLAY/EDIT mode. Use the supplied AC Adaptor as a computer, via your camcorder. Digital convert function DV Interface Other functions to i.LINK (IEEE1394) connector i.LINK cable (optional) : Signal flow A/V connecting cable (supplied)* A/V (audio/video) (White) jack (Red) AUDIO/VIDEO jacks (Yellow) S video plug (Black...
Computer Applications Guide
Page 36
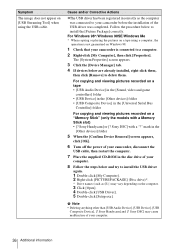
.... Sony Handycam] and [? mark in the [Other devices] folder 5 When the [Confirm Device Removal] screen appears, click [OK]. 6 Turn off the power of your camcorder, disconnect the USB cable, then restart the computer. 7 Place the supplied CD-ROM in the [Universal Serial Bus Controller] folder For copying and viewing pictures recorded on a "Memory Stick" (only the models with a "?" b Note • Deleting anything other than [USB Audio Device], [USB Device], [USB Composite Device], [? For copying and viewing pictures recorded on a tape • [USB Audio Device] in the [Sound, video...
.... Sony Handycam] and [? mark in the [Other devices] folder 5 When the [Confirm Device Removal] screen appears, click [OK]. 6 Turn off the power of your camcorder, disconnect the USB cable, then restart the computer. 7 Place the supplied CD-ROM in the [Universal Serial Bus Controller] folder For copying and viewing pictures recorded on a "Memory Stick" (only the models with a "?" b Note • Deleting anything other than [USB Audio Device], [USB Device], [USB Composite Device], [? For copying and viewing pictures recorded on a tape • [USB Audio Device] in the [Sound, video...
Computer Applications Guide
Page 37
.... 1 Check that your camcorder is connected to delete them. Sony DSC] with a Memory Stick slot) • [? mark in the [Other devices] folder 7 When the [Confirm Device Removal] screen appears, click [OK]. 8 Turn off the power of your camcorder, disconnect the USB cable, then restart the computer. 9 Place the supplied CD-ROM in the [Other devices] folder For copying and viewing pictures recorded on the computer. 3 Click [Open]. 4 Double-click [USB Driver]. 5 Double-click [Setup.exe]. Sony Handycam] or [? Sony...
.... 1 Check that your camcorder is connected to delete them. Sony DSC] with a Memory Stick slot) • [? mark in the [Other devices] folder 7 When the [Confirm Device Removal] screen appears, click [OK]. 8 Turn off the power of your camcorder, disconnect the USB cable, then restart the computer. 9 Place the supplied CD-ROM in the [Other devices] folder For copying and viewing pictures recorded on the computer. 3 Click [Open]. 4 Double-click [USB Driver]. 5 Double-click [Setup.exe]. Sony Handycam] or [? Sony...
Computer Applications Guide
Page 38
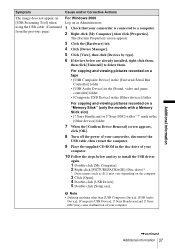
... [Devices by type]. 7 If devices below and try to install the USB driver again. 1 Double-click [My Computer]. 2 Right-click [PICTUREPACKAGE] (Disc drive)*. * Drive names (such as Administrators. 1 Check that your computer. 38 Additional information Sony Handycam] or [? For copying and viewing pictures recorded on a tape • [USB Composite Device] in the [Universal Serial Bus Controller] folder • [USB Audio Device] in the [Sound, video and game controllers] folder • [USB Device] in the disc drive of your camcorder, disconnect the USB cable, then...
... [Devices by type]. 7 If devices below and try to install the USB driver again. 1 Double-click [My Computer]. 2 Right-click [PICTUREPACKAGE] (Disc drive)*. * Drive names (such as Administrators. 1 Check that your computer. 38 Additional information Sony Handycam] or [? For copying and viewing pictures recorded on a tape • [USB Composite Device] in the [Universal Serial Bus Controller] folder • [USB Audio Device] in the [Sound, video and game controllers] folder • [USB Device] in the disc drive of your camcorder, disconnect the USB cable, then...
Camera Operations Guide
Page 3
... Name: SONY Model No.: DCR-TRV460 Responsible Party: Sony Electronics Inc. If this device must be some tiny black points and/ or bright points (white, red, blue, or green in a particular installation. DCR-TRV Serial No. CAUTION You are recorded without any changes or modifications not expressly approved in this manual could void your recordings on the bottom. Notes on recording • Before starting to record, test the recording function to...
... Name: SONY Model No.: DCR-TRV460 Responsible Party: Sony Electronics Inc. If this device must be some tiny black points and/ or bright points (white, red, blue, or green in a particular installation. DCR-TRV Serial No. CAUTION You are recorded without any changes or modifications not expressly approved in this manual could void your recordings on the bottom. Notes on recording • Before starting to record, test the recording function to...
Camera Operations Guide
Page 4
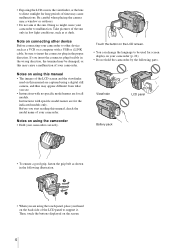
Be careful when placing the camera near a window or outdoors. • Do not aim at dusk. Note on connecting other device such as a VCR or a computer with a USB or i.LINK cable, be sure to insert the connector plug in the following parts. Before you start reading this manual, check the model name of your camcorder to malfunction. Viewfinder LCD panel Battery pack • To ensure a good...
Be careful when placing the camera near a window or outdoors. • Do not aim at dusk. Note on connecting other device such as a VCR or a computer with a USB or i.LINK cable, be sure to insert the connector plug in the following parts. Before you start reading this manual, check the model name of your camcorder to malfunction. Viewfinder LCD panel Battery pack • To ensure a good...

Camera Operations Guide
Page 16
.... Playing time Approximate number of your camcorder, even if its power cord is disconnected from the battery pack when the AC Adaptor is connected to the DC IN jack of minutes available when you use your camcorder in low temperature. • The CHG (charge) lamp flashes during charging, or the battery information will be shorter when you repeatedly record, start/stop, slide the POWER switch to change the power mode, and zoom. Battery...
.... Playing time Approximate number of your camcorder, even if its power cord is disconnected from the battery pack when the AC Adaptor is connected to the DC IN jack of minutes available when you use your camcorder in low temperature. • The CHG (charge) lamp flashes during charging, or the battery information will be shorter when you repeatedly record, start/stop, slide the POWER switch to change the power mode, and zoom. Battery...

Camera Operations Guide
Page 76
... SET REC MODE AUD IO MODE LCD SET OK GSP ( SP ) LP ( LP ) Select to another VCR, via the DV Interface. AUDIO MODE G12BIT 16BIT ( Select to record in the 12-bit mode (2 stereo sounds). ) Select to record in the SP (Standard Play) mode on the STANDARD SET menu. b Note • For DCR-TRV460: You cannot select AUDIO MODE when you can select the items listed below on a cassette. The settings you dub tapes recorded...
... SET REC MODE AUD IO MODE LCD SET OK GSP ( SP ) LP ( LP ) Select to another VCR, via the DV Interface. AUDIO MODE G12BIT 16BIT ( Select to record in the 12-bit mode (2 stereo sounds). ) Select to record in the SP (Standard Play) mode on the STANDARD SET menu. b Note • For DCR-TRV460: You cannot select AUDIO MODE when you can select the items listed below on a cassette. The settings you dub tapes recorded...
Camera Operations Guide
Page 101
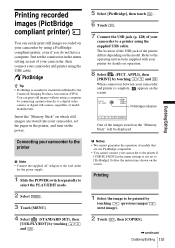
... operating instructions supplied with your printer for the power supply. 1 Slide the POWER switch repeatedly to be displayed. When connection between your camcorder and printer is not set the connection in the printer, and turn on the screen. Just set to the printer if [USB-PLY/EDT] in the menu settings is complete, appears on the screen. You can easily print still images recorded on your camcorder by using the supplied USB cable...
... operating instructions supplied with your printer for the power supply. 1 Slide the POWER switch repeatedly to be displayed. When connection between your camcorder and printer is not set the connection in the printer, and turn on the screen. Just set to the printer if [USB-PLY/EDT] in the menu settings is complete, appears on the screen. You can easily print still images recorded on your camcorder by using the supplied USB cable...
Camera Operations Guide
Page 107
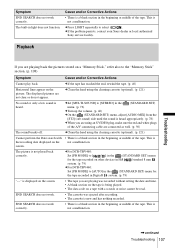
... lines appear on a "Memory Stick," refer also to [STEREO] in Hi8 /standard 8 mm system. (p. 79) cFor DCR-TRV460: Set [PB MODE] to select . cClean the head using an S VIDEO plug, make sure the red and white plugs of the tape. Troubleshooting ,continued Troubleshooting 107 cFor DCR-TRV460: Set [PB MODE] to [ / ] in the (STANDARD SET) menu for the tape recorded in light does not function. The displayed pictures are using the cleaning cassette (optional). (p. 121) Cannot perform the Date search with a scratch...
... lines appear on a "Memory Stick," refer also to [STEREO] in Hi8 /standard 8 mm system. (p. 79) cFor DCR-TRV460: Set [PB MODE] to select . cClean the head using an S VIDEO plug, make sure the red and white plugs of the tape. Troubleshooting ,continued Troubleshooting 107 cFor DCR-TRV460: Set [PB MODE] to [ / ] in the (STANDARD SET) menu for the tape recorded in light does not function. The displayed pictures are using the cleaning cassette (optional). (p. 121) Cannot perform the Date search with a scratch...
Camera Operations Guide
Page 116
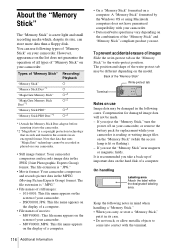
..." technology cannot be recorded or played on the screen of the write-protect tab may be made. - Compensation for replacement while your camcorder, or remove the battery pack for damaged image data will not be damaged in the following cases. It is recommended you eject the "Memory Stick," turn the power off on your camcorder is reading or writing image files on the model. Types of movies: - MOV00001.MPG: This...
..." technology cannot be recorded or played on the screen of the write-protect tab may be made. - Compensation for replacement while your camcorder, or remove the battery pack for damaged image data will not be damaged in the following cases. It is recommended you eject the "Memory Stick," turn the power off on your camcorder is reading or writing image files on the model. Types of movies: - MOV00001.MPG: This...

Camera Operations Guide
Page 133
... Light (NS LIGHT) ..........38, 62 NightShot plus ........ 37 T Tape counter 25 TBC 77 Telephoto See Zoom Time code 25 TITLE 74 TRAIL 41 TV color systems 114 U USB jack 128 USB Streaming 79 USB-CAMERA.......... 79 USB-PLY/EDT .......... 79 Using abroad 114 V Video head 121 Viewfinder 18 Volume (VOLUME)... 46, 49 W Warning indicators.......... 110 Warning messages .......... 110 ,continued Quick Reference 133 Quick Reference KEY 41 M Main sound See MULTI-SOUND Manual focus 39 Memory...
... Light (NS LIGHT) ..........38, 62 NightShot plus ........ 37 T Tape counter 25 TBC 77 Telephoto See Zoom Time code 25 TITLE 74 TRAIL 41 TV color systems 114 U USB jack 128 USB Streaming 79 USB-CAMERA.......... 79 USB-PLY/EDT .......... 79 Using abroad 114 V Video head 121 Viewfinder 18 Volume (VOLUME)... 46, 49 W Warning indicators.......... 110 Warning messages .......... 110 ,continued Quick Reference 133 Quick Reference KEY 41 M Main sound See MULTI-SOUND Manual focus 39 Memory...

Marketing Specifications
Page 1
... video tape to make recording easy even when filming in no light using NightShot Plus infrared system. F E AT U R E S Digital8® Video Recording Digital8 recording format delivers 3X the color bandwidth of the recorded scene. The high-resolution 123K pixels LCD rotates up to MiniDV on 1GB Memory Stick PRO™ Media. i.LINK®* DV Interface (IEEE1394) A high speed bi-directional digital video/audio communication between two compatible devices equipped with Sony's Picture Effect modes. Choose from Black, Mosaic, White...
... video tape to make recording easy even when filming in no light using NightShot Plus infrared system. F E AT U R E S Digital8® Video Recording Digital8 recording format delivers 3X the color bandwidth of the recorded scene. The high-resolution 123K pixels LCD rotates up to MiniDV on 1GB Memory Stick PRO™ Media. i.LINK®* DV Interface (IEEE1394) A high speed bi-directional digital video/audio communication between two compatible devices equipped with Sony's Picture Effect modes. Choose from Black, Mosaic, White...
Marketing Specifications
Page 2
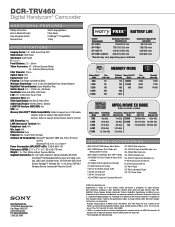
... Light Easy Handycam Button Manual Focus Multi-Language Menu Photo Mode PictBridge™ Compatibility Titling S P E C I F I C AT I O N S Imaging Device: 1/6" 460K Gross Pixel CCD Video Actual: 290K Pixels Still Actual: 290K Pixels F: 1.6-2.4 Focal Distance: 2.5 - 50mm 35mm Conversion: 42 - 840mm (Camera Mode) 42 - 840mm (Memory Mode) Filter Diameter: 37mm Optical Zoom: 20X Digital Zoom: 990X Focusing: Full Range Auto/Manual (Dial) Minimum Illumination: 4 Lux (0 Lux with Memory Select Function MSX-256/512/1G Memory Stick PRO™ Media AC-SQ950D AC Quick Charger for Super Quick batteries...
... Light Easy Handycam Button Manual Focus Multi-Language Menu Photo Mode PictBridge™ Compatibility Titling S P E C I F I C AT I O N S Imaging Device: 1/6" 460K Gross Pixel CCD Video Actual: 290K Pixels Still Actual: 290K Pixels F: 1.6-2.4 Focal Distance: 2.5 - 50mm 35mm Conversion: 42 - 840mm (Camera Mode) 42 - 840mm (Memory Mode) Filter Diameter: 37mm Optical Zoom: 20X Digital Zoom: 990X Focusing: Full Range Auto/Manual (Dial) Minimum Illumination: 4 Lux (0 Lux with Memory Select Function MSX-256/512/1G Memory Stick PRO™ Media AC-SQ950D AC Quick Charger for Super Quick batteries...


