Operating Instructions (primary manual)
Page 2
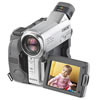
...or disconnect and connect the USB cable again. This Class B digital apparatus complies with advanced features, but at the same time it is subject to the following two conditions: (1) This device may not cause harmful interference, and (2) this Sony Handycam. Congratulations on your purchase of this device must accept any interference... or leaking Lithium-Ion batteries. Operation is very easy to come. Notice If static electricity or electromagnetism causes data transfer to persons. "Memory Stick" (DCR-TRV22/ TRV33 only) This device complies with superior picture and sound quality.
...or disconnect and connect the USB cable again. This Class B digital apparatus complies with advanced features, but at the same time it is subject to the following two conditions: (1) This device may not cause harmful interference, and (2) this Sony Handycam. Congratulations on your purchase of this device must accept any interference... or leaking Lithium-Ion batteries. Operation is very easy to come. Notice If static electricity or electromagnetism causes data transfer to persons. "Memory Stick" (DCR-TRV22/ TRV33 only) This device complies with superior picture and sound quality.
Operating Instructions (primary manual)
Page 4
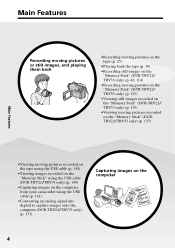
... USB cable (p. 148) •Viewing images recorded on the "Memory Stick" using the USB cable (DCR-TRV22/TRV33 only) (p. 149) •Capturing images on the computer from your camcorder using the USB cable (p. 161) •Converting an analog signal into digital to capture images onto the computer (DCR-TRV22/TRV33 only) (p. 173) Capturing images on the computer 4
... USB cable (p. 148) •Viewing images recorded on the "Memory Stick" using the USB cable (DCR-TRV22/TRV33 only) (p. 149) •Capturing images on the computer from your camcorder using the USB cable (p. 161) •Converting an analog signal into digital to capture images onto the computer (DCR-TRV22/TRV33 only) (p. 173) Capturing images on the computer 4
Operating Instructions (primary manual)
Page 5
... Review (p. 37) •Data code (p. 40) •Tape PB ZOOM* (p. 74)/Memory PB ZOOM* (p. 140) •Zero set memory (p. 75) •Title search (p. 76) •Digital program editing (p. 84, 130*) * DCR-TRV22/TRV33 only Before you start reading this manual and operating your camcorder, check the model number by looking at the bottom of your recordings...
... Review (p. 37) •Data code (p. 40) •Tape PB ZOOM* (p. 74)/Memory PB ZOOM* (p. 140) •Zero set memory (p. 75) •Title search (p. 76) •Digital program editing (p. 84, 130*) * DCR-TRV22/TRV33 only Before you start reading this manual and operating your camcorder, check the model number by looking at the bottom of your recordings...
Operating Instructions (primary manual)
Page 6
...- Tape PB ZOOM (DCR-TRV22/ TRV33 only 74 Quickly locating a scene - Insert editing 95 Audio dubbing 97 Superimposing a title on a cassette with Cassette Memory 101 Making your own titles 103 Labeling a cassette on a cassette with digital effect (DCR-TRV22/TRV33 only 73 Enlarging images ...recorded on tape - End search/Edit search/Rec Review 37 Playback - Digital program editing (on a tape - Display...
...- Tape PB ZOOM (DCR-TRV22/ TRV33 only 74 Quickly locating a scene - Insert editing 95 Audio dubbing 97 Superimposing a title on a cassette with Cassette Memory 101 Making your own titles 103 Labeling a cassette on a cassette with digital effect (DCR-TRV22/TRV33 only 73 Enlarging images ...recorded on tape - End search/Edit search/Rec Review 37 Playback - Digital program editing (on a tape - Display...
Operating Instructions (primary manual)
Page 7
Digital program editing (on "Memory Stick" - Slide show 141 Preventing accidental erasure - DELETE 143 Changing image size - USB Streaming (For Windows users 161 Viewing images recorded on "Memory Stick" on "Memory Stick" - MPEG MOVIE playback .......... 137 Choosing a playback folder 139 Enlarging still images recorded on "Memory... (DCR-TRV22/ TRV33 only 173 Customizing Your Camcorder Changing the menu settings 175 Troubleshooting Types of contents Getting Started "Memory Stick" Operations (DCR-TRV22/TRV33 only) Using "Memory Stick 106 Inserting/Ejecting the "Memory Stick...
Digital program editing (on "Memory Stick" - Slide show 141 Preventing accidental erasure - DELETE 143 Changing image size - USB Streaming (For Windows users 161 Viewing images recorded on "Memory Stick" on "Memory Stick" - MPEG MOVIE playback .......... 137 Choosing a playback folder 139 Enlarging still images recorded on "Memory... (DCR-TRV22/ TRV33 only 173 Customizing Your Camcorder Changing the menu settings 175 Troubleshooting Types of contents Getting Started "Memory Stick" Operations (DCR-TRV22/TRV33 only) Using "Memory Stick 106 Inserting/Ejecting the "Memory Stick...
Operating Instructions (primary manual)
Page 9
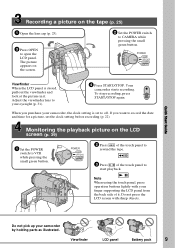
...a picture on the LCD screen (p. 39) 1 Set the POWER switch to VCR while pressing the small green button. Adjust the viewfinder lens to your camcorder by holding parts as illustrated. Do not pick up your eyesight (p. 31). 4 Press START/STOP. To stop recording, press START/STOP again. Monitoring ... clock setting is closed, pull out the viewfinder and look at the picture in it . Your camcorder starts recording. POWER VCR OFF(CHG) CAMERA MEMORY 2 Press of the touch panel to CAMERA while pressing the small green button. The picture appears on the screen. 2 Set the POWER ...
...a picture on the LCD screen (p. 39) 1 Set the POWER switch to VCR while pressing the small green button. Adjust the viewfinder lens to your camcorder by holding parts as illustrated. Do not pick up your eyesight (p. 31). 4 Press START/STOP. To stop recording, press START/STOP again. Monitoring ... clock setting is closed, pull out the viewfinder and look at the picture in it . Your camcorder starts recording. POWER VCR OFF(CHG) CAMERA MEMORY 2 Press of the touch panel to CAMERA while pressing the small green button. The picture appears on the screen. 2 Set the POWER ...
Operating Instructions (primary manual)
Page 10
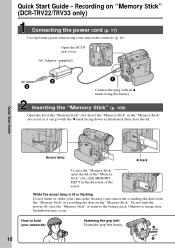
... go with its v mark facing the battery. While the access lamp is lit or flashing Do not shake or strike your camcorder because your camcorder is reading the data from the "Memory Stick" or recording the data on "Memory Stick" (DCR-TRV22/TRV33 only) Connecting the power cord (p. 17) Use the battery pack when using your...
... go with its v mark facing the battery. While the access lamp is lit or flashing Do not shake or strike your camcorder because your camcorder is reading the data from the "Memory Stick" or recording the data on "Memory Stick" (DCR-TRV22/TRV33 only) Connecting the power cord (p. 17) Use the battery pack when using your...
Operating Instructions (primary manual)
Page 11
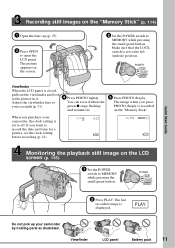
... in it. 4 Press PHOTO lightly. POWER VCR OFF(CHG) CAMERA MEMORY Viewfinder When the LCD panel is displayed. The image when you purchase your camcorder by holding parts as illustrated. Adjust the viewfinder lens to MEMORY while pressing the small green button. Make sure that the LOCK switch... screen. 2 Set the POWER switch to open the LCD panel. POWER VCR OFF(CHG) CAMERA MEMORY 2 Press PLAY. Viewfinder LCD panel Battery pack 11 PLAY Do not pick up your camcorder, the clock setting is set to the left (unlock) position. Quick Start Guide Recording still images...
... in it. 4 Press PHOTO lightly. POWER VCR OFF(CHG) CAMERA MEMORY Viewfinder When the LCD panel is displayed. The image when you purchase your camcorder by holding parts as illustrated. Adjust the viewfinder lens to MEMORY while pressing the small green button. Make sure that the LOCK switch... screen. 2 Set the POWER switch to open the LCD panel. POWER VCR OFF(CHG) CAMERA MEMORY 2 Press PLAY. Viewfinder LCD panel Battery pack 11 PLAY Do not pick up your camcorder, the clock setting is set to the left (unlock) position. Quick Start Guide Recording still images...
Operating Instructions (primary manual)
Page 12
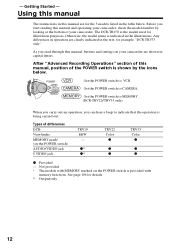
... text, for the 3 models listed in the illustrations. Not provided * The models with memory functions. The DCR-TRV33 is being carried out. Types of differences DCRViewfinder MEMORY mark* (on the POWER switch is shown by looking at the bottom of your camcorder are clearly indicated in capital letters. See page 106 for illustration purposes. As...
... text, for the 3 models listed in the illustrations. Not provided * The models with memory functions. The DCR-TRV33 is being carried out. Types of differences DCRViewfinder MEMORY mark* (on the POWER switch is shown by looking at the bottom of your camcorder are clearly indicated in capital letters. See page 106 for illustration purposes. As...

Operating Instructions (primary manual)
Page 13
Getting Started Using this manual Note on Cassette Memory Your camcorder is based on the country or area. If you forcibly insert the plug, the jack may be damaged and they may result in a malfunction of ... other equipment When you need an NTSC system-based TV. Cassettes with Cassette Memory . Copyright precautions Television programs, films, video tapes, and other video equipment or a computer using the USB cable or i.LINK cable, observe the shape of your camcorder to the copyright laws. Unauthorized recording of such materials may be contrary...
Getting Started Using this manual Note on Cassette Memory Your camcorder is based on the country or area. If you forcibly insert the plug, the jack may be damaged and they may result in a malfunction of ... other equipment When you need an NTSC system-based TV. Cassettes with Cassette Memory . Copyright precautions Television programs, films, video tapes, and other video equipment or a computer using the USB cable or i.LINK cable, observe the shape of your camcorder to the copyright laws. Unauthorized recording of such materials may be contrary...
Operating Instructions (primary manual)
Page 15
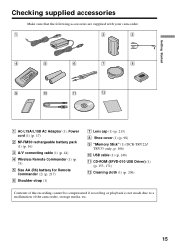
... (1) (p. 75) 5 Size AA (R6) battery for Remote Commander (2) (p. 217) 6 Shoulder strap (1) 7 Lens cap (1) (p. 213) 8 Shoe cover (1) (p. 98) 9 "Memory Stick" (1) (DCR-TRV22/ TRV33 only, p. 106) 0 USB cable (1) (p. 148) qa CD-ROM (SPVD-010 USB Driver) (1) (p. 153, 171) qs Cleaning cloth (1) (p. 206) Contents of the recording cannot... be compensated if recording or playback is not made due to a malfunction of the camcorder...
... (1) (p. 75) 5 Size AA (R6) battery for Remote Commander (2) (p. 217) 6 Shoulder strap (1) 7 Lens cap (1) (p. 213) 8 Shoe cover (1) (p. 98) 9 "Memory Stick" (1) (DCR-TRV22/ TRV33 only, p. 106) 0 USB cable (1) (p. 148) qa CD-ROM (SPVD-010 USB Driver) (1) (p. 153, 171) qs Cleaning cloth (1) (p. 206) Contents of the recording cannot... be compensated if recording or playback is not made due to a malfunction of the camcorder...
Operating Instructions (primary manual)
Page 17
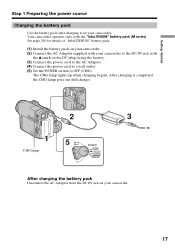
...it for details of "InfoLITHIUM" battery pack. (1) Install the battery pack on your camcorder. (2) Connect the AC Adaptor supplied with your camcorder to OFF (CHG). Your camcorder operates only with the v mark on your camcorder. 17 After charging is completed, the CHG lamp goes out (full charge). 2 ...3 15 CHG lamp POWER VCR OFF(CHG) CAMERA MEMORY After charging the battery pack ...
...it for details of "InfoLITHIUM" battery pack. (1) Install the battery pack on your camcorder. (2) Connect the AC Adaptor supplied with your camcorder to OFF (CHG). Your camcorder operates only with the v mark on your camcorder. 17 After charging is completed, the CHG lamp goes out (full charge). 2 ...3 15 CHG lamp POWER VCR OFF(CHG) CAMERA MEMORY After charging the battery pack ...
Operating Instructions (primary manual)
Page 22
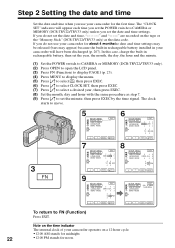
... EXEC RET. Note on the time indicator The internal clock of your camcorder operates on the tape or the "Memory Stick" (DCR-TRV22/TRV33 only) as step 7. (9) Press r/R to CAMERA or MEMORY (DCR-TRV22/TRV33 only) unless you use your camcorder for the first time. EXEC RET. If you do not set the... installed in rechargeable battery, then set the year, the month, the day, the hour and the minute. (1) Set the POWER switch to CAMERA or MEMORY (DCR-TRV22/TRV33 only). (2) Press OPEN to open the LCD panel. (3) Press FN (Function) to display PAGE1 (p. 23). (4) Press MENU to display the menu....
... EXEC RET. Note on the time indicator The internal clock of your camcorder operates on the tape or the "Memory Stick" (DCR-TRV22/TRV33 only) as step 7. (9) Press r/R to CAMERA or MEMORY (DCR-TRV22/TRV33 only) unless you use your camcorder for the first time. EXEC RET. If you do not set the... installed in rechargeable battery, then set the year, the month, the day, the hour and the minute. (1) Set the POWER switch to CAMERA or MEMORY (DCR-TRV22/TRV33 only). (2) Press OPEN to open the LCD panel. (3) Press FN (Function) to display PAGE1 (p. 23). (4) Press MENU to display the menu....
Operating Instructions (primary manual)
Page 23
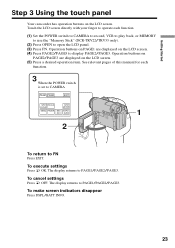
... relevant pages of this manual for each function. (1) Set the POWER switch to CAMERA to record, VCR to play back, or MEMORY to use the "Memory Stick" (DCR-TRV22/TRV33 only). (2) Press OPEN to PAGE1/PAGE2/PAGE3. To cancel settings Press OFF. To make screen indicators disappear Press DSPL/BATT INFO...The display returns to open the LCD panel. (3) Press FN. To execute settings Press OK. Getting Started Step 3 Using the touch panel Your camcorder has operation buttons on the LCD screen. (4) Press PAGE2/PAGE3 to display PAGE2/PAGE3. Touch the LCD screen directly with your finger to operate...
... relevant pages of this manual for each function. (1) Set the POWER switch to CAMERA to record, VCR to play back, or MEMORY to use the "Memory Stick" (DCR-TRV22/TRV33 only). (2) Press OPEN to PAGE1/PAGE2/PAGE3. To cancel settings Press OFF. To make screen indicators disappear Press DSPL/BATT INFO...The display returns to open the LCD panel. (3) Press FN. To execute settings Press OK. Getting Started Step 3 Using the touch panel Your camcorder has operation buttons on the LCD screen. (4) Press PAGE2/PAGE3 to display PAGE2/PAGE3. Touch the LCD screen directly with your finger to operate...

Operating Instructions (primary manual)
Page 24
When using the touch panel, press operation buttons lightly with your camcorder. If the items are not available The color of it. •Do not press the LCD screen with sharp objects such as a pen. •Do ..., PLAY, PB FOLDR, SPOT METER, EXPOSURE SELFTIMER, PLAY, MEM MIX LCD BRT, PLAY, VOL During memory playback PAGE1 PAGE2 PAGE3 MENU, CAM, PB FOLDR, DEL PB ZOOM, CAM, RESIZE*, DATA CODE LCD BRT, CAM, VOL * DCR-TRV33 only Notes •When using the viewfinder You can control the display with the touch panel...
When using the touch panel, press operation buttons lightly with your camcorder. If the items are not available The color of it. •Do not press the LCD screen with sharp objects such as a pen. •Do ..., PLAY, PB FOLDR, SPOT METER, EXPOSURE SELFTIMER, PLAY, MEM MIX LCD BRT, PLAY, VOL During memory playback PAGE1 PAGE2 PAGE3 MENU, CAM, PB FOLDR, DEL PB ZOOM, CAM, RESIZE*, DATA CODE LCD BRT, CAM, VOL * DCR-TRV33 only Notes •When using the viewfinder You can control the display with the touch panel...
Operating Instructions (primary manual)
Page 25
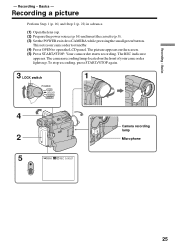
... recording, press START/STOP again. 3 LOCK switch 1 POWER VCR OFF(CHG) CAMERA MEMORY 4 Camera recording lamp 2 Microphone 5 50min REC 0:00:01 25 Recording - This sets your camcorder lights up. The camera recording lamp located on the screen. (5) Press START/STOP. ...Basics - Your camcorder starts recording. Basics - Recording a picture Perform Step 1 (p. 16) and Step 2 (p. 22) in advance. ...
... recording, press START/STOP again. 3 LOCK switch 1 POWER VCR OFF(CHG) CAMERA MEMORY 4 Camera recording lamp 2 Microphone 5 50min REC 0:00:01 25 Recording - This sets your camcorder lights up. The camera recording lamp located on the screen. (5) Press START/STOP. ...Basics - Your camcorder starts recording. Basics - Recording a picture Perform Step 1 (p. 16) and Step 2 (p. 22) in advance. ...
Operating Instructions (primary manual)
Page 26
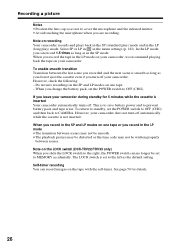
...Self-timer recording You can record images on your camcorder. When you leave your camcorder, we recommend playing back the tape on the...If you record the tape in the LP mode on your camcorder during standby for details. 26 The LOCK switch is not ...switch to the left as the default setting. Note on recording Your camcorder records and plays back in the SP (standard play ) mode....one tape or you are recording. Note on the LOCK switch (DCR-TRV22/TRV33 only) When you slide the LOCK switch to the right, ...off your camcorder. See page 50 for 5 minutes while the cassette is to save ...
...Self-timer recording You can record images on your camcorder. When you leave your camcorder, we recommend playing back the tape on the...If you record the tape in the LP mode on your camcorder during standby for details. 26 The LOCK switch is not ...switch to the left as the default setting. Note on recording Your camcorder records and plays back in the SP (standard play ) mode....one tape or you are recording. Note on the LOCK switch (DCR-TRV22/TRV33 only) When you slide the LOCK switch to the right, ...off your camcorder. See page 50 for 5 minutes while the cassette is to save ...

Operating Instructions (primary manual)
Page 27
... data The recording data (date/time or various settings when recorded) are not recorded on the tape. Remaining battery time Cassette Memory This appears when using the cassette with Cassette Memory. Remaining battery time indicator during recording. You cannot rewrite only the time code later. FN button Press this operation (p. 40). 27...
... data The recording data (date/time or various settings when recorded) are not recorded on the tape. Remaining battery time Cassette Memory This appears when using the cassette with Cassette Memory. Remaining battery time indicator during recording. You cannot rewrite only the time code later. FN button Press this operation (p. 40). 27...

Operating Instructions (primary manual)
Page 30
... the brightness of the LCD screen appears. (3) Adjust the brightness of the LCD screen using - (to dim)/+ (to brighten). (4) Press OK to return to MEMORY (DCR-TRV22/TRV33 only), press FN and select PAGE3. (2) Press LCD BRT. When the POWER switch is set to FN Press EXIT. in in Step 1. 2,3 LCD BRT OK...
... the brightness of the LCD screen appears. (3) Adjust the brightness of the LCD screen using - (to dim)/+ (to brighten). (4) Press OK to return to MEMORY (DCR-TRV22/TRV33 only), press FN and select PAGE3. (2) Press LCD BRT. When the POWER switch is set to FN Press EXIT. in in Step 1. 2,3 LCD BRT OK...
Operating Instructions (primary manual)
Page 32
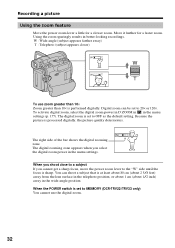
...) away from the lens surface in the telephoto position, or about 1 cm (about 1/2 inch) away in the menu settings (p. 177). Digital zoom can shoot a subject that is set to MEMORY (DCR-TRV22/TRV33 only) You cannot use zoom greater than 10× Zoom greater than 10× is processed... digitally, the picture quality deteriorates. Recording a picture Using the zoom feature Move the power zoom lever a little for a faster zoom. W : Wide-...
...) away from the lens surface in the telephoto position, or about 1 cm (about 1/2 inch) away in the menu settings (p. 177). Digital zoom can shoot a subject that is set to MEMORY (DCR-TRV22/TRV33 only) You cannot use zoom greater than 10× Zoom greater than 10× is processed... digitally, the picture quality deteriorates. Recording a picture Using the zoom feature Move the power zoom lever a little for a faster zoom. W : Wide-...


