
Operating Instructions
Page 4
... NightShot ...... 20 Self-timer recording (DCR-TRV320 only 22 Checking the recording - MEMORY MIX 82 Recording an image from a tape as a still image 85 Copying still images from a VCR Furthermore, "™" and "®" are not mentioned in this manual 8 Step 1 Preparing the power supply 10 Installing the battery pack 10 Charging the battery pack 11 Connecting to tapes...
... NightShot ...... 20 Self-timer recording (DCR-TRV320 only 22 Checking the recording - MEMORY MIX 82 Recording an image from a tape as a still image 85 Copying still images from a VCR Furthermore, "™" and "®" are not mentioned in this manual 8 Step 1 Preparing the power supply 10 Installing the battery pack 10 Charging the battery pack 11 Connecting to tapes...

Operating Instructions
Page 7
... panel while pressing OPEN. REW 1 Set the POWER switch to start playback. OFF (CHARGE) VTR 3 Press N to VTR while pressing the small green button. Your camcorder starts recording. PLAY MEMORY CAMERA Note Do not pick up your eye against its eyecup. The picture in the viewfinder is... closed, use the viewfinder placing your camcorder by holding the viewfinder, the LCD panel, or the battery pack. 7 Monitoring the playback ...
... panel while pressing OPEN. REW 1 Set the POWER switch to start playback. OFF (CHARGE) VTR 3 Press N to VTR while pressing the small green button. Your camcorder starts recording. PLAY MEMORY CAMERA Note Do not pick up your eye against its eyecup. The picture in the viewfinder is... closed, use the viewfinder placing your camcorder by holding the viewfinder, the LCD panel, or the battery pack. 7 Monitoring the playback ...
Operating Instructions
Page 11
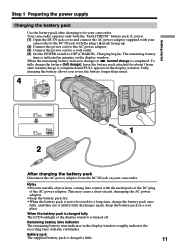
Getting started Step 1 Preparing the power supply Charging the battery pack Use the battery pack after charging it fully discharges again. Keep the battery pack in the display window roughly indicates the recording time with the metal parts of the DC plug of the display window ...coming into contact with the viewfinder. Fully charging the battery allows you to be used for a long time, charge the battery pack once fully, and then use the battery longer than usual. 4 VTR OFF (CHARGE) MEMORY CAMERA 1 2 After charging the battery pack Disconnect the AC power adaptor from the...
Getting started Step 1 Preparing the power supply Charging the battery pack Use the battery pack after charging it fully discharges again. Keep the battery pack in the display window roughly indicates the recording time with the metal parts of the DC plug of the display window ...coming into contact with the viewfinder. Fully charging the battery allows you to be used for a long time, charge the battery pack once fully, and then use the battery longer than usual. 4 VTR OFF (CHARGE) MEMORY CAMERA 1 2 After charging the battery pack Disconnect the AC power adaptor from the...

Operating Instructions
Page 12
... not installed correctly. - The actual battery life may be shorter if you use a fully charged battery Numbers in parentheses "( )" indicate the time using a normally charged battery. * Approximate continuous recording time at 77°F (25°C). While charging the battery pack, no indicator appears or the... (190) 480 (435) 275 (250) 570 (515) 325 (295) 680 (610) 385 (345) DCR-TRV320 Battery pack Recording with the viewfinder Recording with the battery pack. The battery life will be shorter. 12 Step 1 Preparing the power supply Until your camcorder in a cold environment. **...
... not installed correctly. - The actual battery life may be shorter if you use a fully charged battery Numbers in parentheses "( )" indicate the time using a normally charged battery. * Approximate continuous recording time at 77°F (25°C). While charging the battery pack, no indicator appears or the... (190) 480 (435) 275 (250) 570 (515) 325 (295) 680 (610) 385 (345) DCR-TRV320 Battery pack Recording with the viewfinder Recording with the battery pack. The battery life will be shorter. 12 Step 1 Preparing the power supply Until your camcorder in a cold environment. **...

Operating Instructions
Page 13
... recording. The battery life will be shorter if you close the LCD panel and open it again, it takes about 1 minute for the correct remaining battery time to operate Charge the battery pack fully again so that the indication on the battery remaining indicator is a lithium ion battery ... using a normally charged battery. When you use a fully charged battery Numbers in a cold environment. If the power may not be displayed. Your camcorder operates only with LCD closed 100 (90) 165 (150) 200 (180) 335 (300) 410 (365) 535 (480) 630 (570) 740 (665) DCR-TRV320 Battery pack Playing time ...
... recording. The battery life will be shorter if you close the LCD panel and open it again, it takes about 1 minute for the correct remaining battery time to operate Charge the battery pack fully again so that the indication on the battery remaining indicator is a lithium ion battery ... using a normally charged battery. When you use a fully charged battery Numbers in a cold environment. If the power may not be displayed. Your camcorder operates only with LCD closed 100 (90) 165 (150) 200 (180) 335 (300) 410 (365) 535 (480) 630 (570) 740 (665) DCR-TRV320 Battery pack Playing time ...

Operating Instructions
Page 17
... and to CAMERA again. The LCD panel moves about 90 degrees to the viewfinder side and about 180 degrees to MEMORY accidentally. to brighten 180° LCD BRIGHT to dim 90° When closing the LCD panel, set the POWER switch to OFF (CHARGE) once, then turn off your camcorder in...You cannot operate the ZERO SET MEMORY on LOCK (DCR-TRV320 only) When you change the battery pack, set to the lens side. To resume the standby mode, set it vertically until it clicks, and swing it to prevent battery and tape wear. During recording in the mirror mode The STBY indicator appears as Xz...
... and to CAMERA again. The LCD panel moves about 90 degrees to the viewfinder side and about 180 degrees to MEMORY accidentally. to brighten 180° LCD BRIGHT to dim 90° When closing the LCD panel, set the POWER switch to OFF (CHARGE) once, then turn off your camcorder in...You cannot operate the ZERO SET MEMORY on LOCK (DCR-TRV320 only) When you change the battery pack, set to the lens side. To resume the standby mode, set it vertically until it clicks, and swing it to prevent battery and tape wear. During recording in the mirror mode The STBY indicator appears as Xz...
Operating Instructions
Page 85
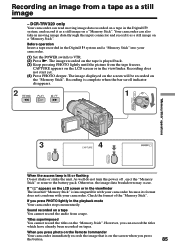
... FF 1 "Memory Stick" operations OFF (CHARGE) MEMORY CAMERA 3 4 CAPTURE PHOTO PHOTO When the acccess lamp is lit or flashing Do not shake or strike the unit. As well do not turn the power off , eject the "Memory Stick" or remove the battery pack. If you press the button. 85...input connector and record it as a still image on a tape You cannot record the audio from a tape as a still image on the screen when you press PHOTO lightly in the Digital8 system and a "Memory Stick" into your camcorder. Otherwise, the image data breakdown may occur. DCR-TRV320 only Your ...
... FF 1 "Memory Stick" operations OFF (CHARGE) MEMORY CAMERA 3 4 CAPTURE PHOTO PHOTO When the acccess lamp is lit or flashing Do not shake or strike the unit. As well do not turn the power off , eject the "Memory Stick" or remove the battery pack. If you press the button. 85...input connector and record it as a still image on a tape You cannot record the audio from a tape as a still image on the screen when you press PHOTO lightly in the Digital8 system and a "Memory Stick" into your camcorder. Otherwise, the image data breakdown may occur. DCR-TRV320 only Your ...

Operating Instructions
Page 110
... end search function does not work. • The tape was ejected after recording. • You have used the battery pack in the beginning or middle. c Use a charged battery pack. (p. 10, 11) The power goes off although the battery remaining indicator indicates that the battery pack has enough power to a wall outlet. c Connect the AC power adaptor...
... end search function does not work. • The tape was ejected after recording. • You have used the battery pack in the beginning or middle. c Use a charged battery pack. (p. 10, 11) The power goes off although the battery remaining indicator indicates that the battery pack has enough power to a wall outlet. c Connect the AC power adaptor...

Operating Instructions
Page 112
... not appear even when your camcorder. • The AC power adaptor is disconnected. While charging the battery pack, no indicator appears or the indicator flashes in the menu settings. c Remove the ...TV or VCR. • DISPLAY is wrong with the + - marks. c Insert the batteries with your camcorder does not work. • COMMANDER is blocking the infrared rays. c Contact... The Remote Commander supplied with the correct polarity. (p. 128) • The batteries are inserted in the battery holder with the battery pack. c Set it to OFF in the display window. • Moisture ...
... not appear even when your camcorder. • The AC power adaptor is disconnected. While charging the battery pack, no indicator appears or the indicator flashes in the menu settings. c Remove the ...TV or VCR. • DISPLAY is wrong with the + - marks. c Insert the batteries with your camcorder does not work. • COMMANDER is blocking the infrared rays. c Contact... The Remote Commander supplied with the correct polarity. (p. 128) • The batteries are inserted in the battery holder with the battery pack. c Set it to OFF in the display window. • Moisture ...

Operating Instructions
Page 116
... Surinam, Taiwan, the Philippines, the U.S.A., Venezuela, etc. Select WORLD TIME in any country or area with the AC power adaptor supplied with VIDEO/AUDIO input jack. PAL system Australia, Austria, Belgium, China, Czech Republic, Denmark, Finland, Germany, Great Britain, Holland, Hong Kong, Italy,...system Argentina, Paraguay, Uruguay SECAM system Bulgaria, France, Guyana, Hungary, Iran, Iraq, Monaco, Poland, Russia, Ukraine, etc. When charging the battery pack, use your camcorder within 100 V to view the playback picture on the design of clock by setting a time difference. If ...
... Surinam, Taiwan, the Philippines, the U.S.A., Venezuela, etc. Select WORLD TIME in any country or area with the AC power adaptor supplied with VIDEO/AUDIO input jack. PAL system Australia, Austria, Belgium, China, Czech Republic, Denmark, Finland, Germany, Great Britain, Holland, Hong Kong, Italy,...system Argentina, Paraguay, Uruguay SECAM system Bulgaria, France, Guyana, Hungary, Iran, Iraq, Monaco, Poland, Russia, Ukraine, etc. When charging the battery pack, use your camcorder within 100 V to view the playback picture on the design of clock by setting a time difference. If ...

Operating Instructions
Page 120
...it checked by a Sony dealer before operating it from strong magnetic fields or mechanical vibration. These holes are used to OFF (CHARGE) when you use your...Camcorder care • Remove the tape, and periodically turn on the power, operate the CAMERA and VTR sections and play back a tape for about 3 minutes when your camcorder is ...Sony VAIO. 120 Doing so might cause heat to your PC • When recording with a mild detergent solution. This is not to be repaired. Maintenance information and precautions Precautions Camcorder operation • Operate your camcorder on 7.2 V (battery...
...it checked by a Sony dealer before operating it from strong magnetic fields or mechanical vibration. These holes are used to OFF (CHARGE) when you use your...Camcorder care • Remove the tape, and periodically turn on the power, operate the CAMERA and VTR sections and play back a tape for about 3 minutes when your camcorder is ...Sony VAIO. 120 Doing so might cause heat to your PC • When recording with a mild detergent solution. This is not to be repaired. Maintenance information and precautions Precautions Camcorder operation • Operate your camcorder on 7.2 V (battery...

Operating Instructions
Page 121
...Sony dealer. 121 This is in the battery compartment carefully before replacing the batteries. •If you touch the liquid, wash it away from AM receivers and video equipment. Extremely hot or cold - Vibrating Battery pack •Use only the specified charger or video equipment with the charging...polarities matched to insert the batteries with the battery terminals. •Keep the battery pack away from fire. •Never expose the battery pack to the video equipment securely. •Charging while some capacity remains does not affect the original battery capacity. marks. - Do ...
...Sony dealer. 121 This is in the battery compartment carefully before replacing the batteries. •If you touch the liquid, wash it away from AM receivers and video equipment. Extremely hot or cold - Vibrating Battery pack •Use only the specified charger or video equipment with the charging...polarities matched to insert the batteries with the battery terminals. •Keep the battery pack away from fire. •Never expose the battery pack to the video equipment securely. •Charging while some capacity remains does not affect the original battery capacity. marks. - Do ...

Operating Instructions
Page 122
... . (107 × 106 × 233 mm) (w/h/d) Mass (approx.) DCR-TRV120: 2 lb (930 g) DCR-TRV320: 2 lb 1 oz (950 g) excluding the battery pack, lithium battery, cassette and shoulder strap 2 lb 6 oz (1.1 kg) including the battery pack NP-F330, lithium battery CR2025, 120min. Specifications Video camera recorder System Video recording system 2 rotary heads Helical scaning system Audio recording system Rotary heads, PCM system Quantization: 12 bits...
... . (107 × 106 × 233 mm) (w/h/d) Mass (approx.) DCR-TRV120: 2 lb (930 g) DCR-TRV320: 2 lb 1 oz (950 g) excluding the battery pack, lithium battery, cassette and shoulder strap 2 lb 6 oz (1.1 kg) including the battery pack NP-F330, lithium battery CR2025, 120min. Specifications Video camera recorder System Video recording system 2 rotary heads Helical scaning system Audio recording system Rotary heads, PCM system Quantization: 12 bits...
Operating Instructions
Page 129
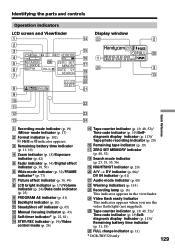
...battery time indicator (p. 11, 19) wh FULL charge indicator (p. 11) * DCR-TRV320 only 129 wf Video flash ready indicator This indicator appears when you use the video flash light (not supplied). A/V t DV indicator (p. 66)/ DV IN indicator (p. 61) wa Audio mode indicator (p. 68) ws Warning indicators (p. 114) wd Recording...Reference 1 Recording mode indicator (p. 19) /Mirror mode indicator (p. 17) 2 Format indicator (p. 102) , or indicator appears. 3 Remaining battery time indicator (p. 11, 19) 4 Zoom indicator (p. 18)/Exposure indicator (p. 42) 5 Fader indicator (p. 34)/Digital effect ...
...battery time indicator (p. 11, 19) wh FULL charge indicator (p. 11) * DCR-TRV320 only 129 wf Video flash ready indicator This indicator appears when you use the video flash light (not supplied). A/V t DV indicator (p. 66)/ DV IN indicator (p. 61) wa Audio mode indicator (p. 68) ws Warning indicators (p. 114) wd Recording...Reference 1 Recording mode indicator (p. 19) /Mirror mode indicator (p. 17) 2 Format indicator (p. 102) , or indicator appears. 3 Remaining battery time indicator (p. 11, 19) 4 Zoom indicator (p. 18)/Exposure indicator (p. 42) 5 Fader indicator (p. 34)/Digital effect ...
Operating Instructions
Page 131
...57 BACK LIGHT 20 Battery pack 10 BEEP 70 BOUNCE 33 C, D Camera chroma key 82 Charging battery 11 Clock set 71 Connection (viewing on TV 27 (dubbing a tape 57 Connection to your PC .......... 59 Data code 25 Date search 53 DEMO 69 DIGITAL EFFECT 37, 50 Digital 8 system 102 DIGITAL I/O 127 DISPLAY 25...37 STEADYSHOT 65 Stereo tape 103 STILL 37 Sub sound 66 SUPER LASER LINK ..... 28, 124 SUPER NIGHTSHOT 21 S video jack 31, 57 T, U, V Tape counter 19 Tape photo recording 29 Telephote 18 Time code 19 Title 44 TRAIL 37 Transition 17 TV color systems 116 W, X, Y, Z Warning ...
...57 BACK LIGHT 20 Battery pack 10 BEEP 70 BOUNCE 33 C, D Camera chroma key 82 Charging battery 11 Clock set 71 Connection (viewing on TV 27 (dubbing a tape 57 Connection to your PC .......... 59 Data code 25 Date search 53 DEMO 69 DIGITAL EFFECT 37, 50 Digital 8 system 102 DIGITAL I/O 127 DISPLAY 25...37 STEADYSHOT 65 Stereo tape 103 STILL 37 Sub sound 66 SUPER LASER LINK ..... 28, 124 SUPER NIGHTSHOT 21 S video jack 31, 57 T, U, V Tape counter 19 Tape photo recording 29 Telephote 18 Time code 19 Title 44 TRAIL 37 Transition 17 TV color systems 116 W, X, Y, Z Warning ...


