
Camera Operations Guide
Page 3
... check the model name of your camcorder. • The illustrations used on connecting other device Before connecting your camcorder to other materials may cause malfunctions. Consult a Sony dealer or an experienced radio/TV technician for a digital device pursuant to Subpart B of Part...contents of your camcorder. Notes on the country/ regions. CCD-TRV128: TRV128 CCD-TRV228: TRV228 CCD-TRV328: TRV328 CCD-TRV428: TRV428 DCR-TRV260: TRV260 DCR-TRV265: TRV265 Instructions with the limits for a Class B digital device, pursuant to an outlet on the model DCR-TRV265. ,continued...
... check the model name of your camcorder. • The illustrations used on connecting other device Before connecting your camcorder to other materials may cause malfunctions. Consult a Sony dealer or an experienced radio/TV technician for a digital device pursuant to Subpart B of Part...contents of your camcorder. Notes on the country/ regions. CCD-TRV128: TRV128 CCD-TRV228: TRV228 CCD-TRV328: TRV328 CCD-TRV428: TRV428 DCR-TRV260: TRV260 DCR-TRV265: TRV265 Instructions with the limits for a Class B digital device, pursuant to an outlet on the model DCR-TRV265. ,continued...

Camera Operations Guide
Page 4
Viewfinder LCD panel Battery pack • Turn the SEL/PUSH EXEC dial to select desired item, then press the dial to be used for screen display on using the camcorder • Hold your camcorder (p. 19). • Do not hold the camcorder by the following illustration. • You can change the language to decide. 4 Notes on your camcorder correctly. • To ensure a good grip, fasten the grip belt as shown in the following parts.
Viewfinder LCD panel Battery pack • Turn the SEL/PUSH EXEC dial to select desired item, then press the dial to be used for screen display on using the camcorder • Hold your camcorder (p. 19). • Do not hold the camcorder by the following illustration. • You can change the language to decide. 4 Notes on your camcorder correctly. • To ensure a good grip, fasten the grip belt as shown in the following parts.
Camera Operations Guide
Page 7
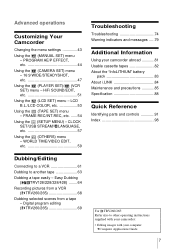
...44 Using the (CAMERA SET) menu - 16:9 WIDE/STEADYSHOT, etc 47 Using the (PLAYER SET)/ (VCR SET) menu - Digital program editing ( TRV260/265 69 For TRV260/265: Refer also to another tape 63 Dubbing a tape easily - WORLD TIME/VIDEO EDIT, etc 59 Troubleshooting Troubleshooting 74 Warning ...Identifying parts and controls 91 Index 98 Dubbing/Editing Connecting to a VCR 61 Dubbing to other operating instructions supplied with your camcorder: • Editing images with your computer cComputer Applications Guide 7 FRAME REC/INT.REC, etc. ......54 Using the (SETUP MENU) ...
...44 Using the (CAMERA SET) menu - 16:9 WIDE/STEADYSHOT, etc 47 Using the (PLAYER SET)/ (VCR SET) menu - Digital program editing ( TRV260/265 69 For TRV260/265: Refer also to another tape 63 Dubbing a tape easily - WORLD TIME/VIDEO EDIT, etc 59 Troubleshooting Troubleshooting 74 Warning ...Identifying parts and controls 91 Index 98 Dubbing/Editing Connecting to a VCR 61 Dubbing to other operating instructions supplied with your camcorder: • Editing images with your computer cComputer Applications Guide 7 FRAME REC/INT.REC, etc. ......54 Using the (SETUP MENU) ...

Camera Operations Guide
Page 8
...-side facing Close the cassette lid after direction of the arrow until it clicks. 2 Insert a cassette into the camcorder. comes out automatically. a Lift up , then push the center the cassette compartment to the camcorder. OPEN/EJECT lever Window-side 8 Quick Start Guide The cassette compartment cassette. To charge the battery, see page...
...-side facing Close the cassette lid after direction of the arrow until it clicks. 2 Insert a cassette into the camcorder. comes out automatically. a Lift up , then push the center the cassette compartment to the camcorder. OPEN/EJECT lever Window-side 8 Quick Start Guide The cassette compartment cassette. To charge the battery, see page...
Camera Operations Guide
Page 9
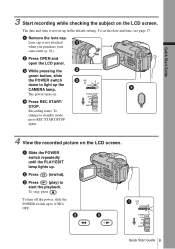
... POWER switch up the CAMERA lamp. To set up . To change to (CHG) OFF. The date and time is not attached when you purchase your camcorder (p. 91).
... POWER switch up the CAMERA lamp. To set up . To change to (CHG) OFF. The date and time is not attached when you purchase your camcorder (p. 91).
Camera Operations Guide
Page 11
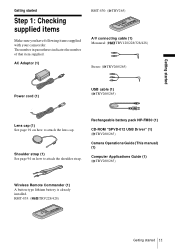
...) (1) Computer Applications Guide (1) ( TRV260/265) Wireless Remote Commander (1) A button-type lithium battery is already installed. RMT-833: ( TRV228/428) Getting started Step 1: Checking supplied items Make sure you have following items supplied with your camcorder. Getting started Getting started 11 AC ...Adaptor (1) RMT-830: ( TRV265) A/V connecting cable (1) Monaural: ( TRV128/228/328/428) Stereo: ( TRV260/265) Power cord (1) USB cable (1) ( TRV260/265) Lens cap (1) See page 91...
...) (1) Computer Applications Guide (1) ( TRV260/265) Wireless Remote Commander (1) A button-type lithium battery is already installed. RMT-833: ( TRV228/428) Getting started Step 1: Checking supplied items Make sure you have following items supplied with your camcorder. Getting started Getting started 11 AC ...Adaptor (1) RMT-830: ( TRV265) A/V connecting cable (1) Monaural: ( TRV128/228/328/428) Stereo: ( TRV260/265) Power cord (1) USB cable (1) ( TRV260/265) Lens cap (1) See page 91...

Camera Operations Guide
Page 12
...the AC Adaptor or battery terminals with any malfunction occurs. 2 Attach the battery pack by attaching the "InfoLITHIUM" battery pack (M series) to your camcorder. DC IN jack Battery pack DC plug Power cord To the wall outlet AC Adaptor 1 Lift up and charging starts. 12 Getting started b Notes ... pack (M series) (p. 83). • Do not short-circuit the DC plug of the arrow until it clicks. 3 With the v mark on your camcorder. The CHG (charge) lamp lights up the viewfinder. This may cause a malfunction. • Use a nearby wall outlet when using the AC Adaptor.
...the AC Adaptor or battery terminals with any malfunction occurs. 2 Attach the battery pack by attaching the "InfoLITHIUM" battery pack (M series) to your camcorder. DC IN jack Battery pack DC plug Power cord To the wall outlet AC Adaptor 1 Lift up and charging starts. 12 Getting started b Notes ... pack (M series) (p. 83). • Do not short-circuit the DC plug of the arrow until it clicks. 3 With the v mark on your camcorder. The CHG (charge) lamp lights up the viewfinder. This may cause a malfunction. • Use a nearby wall outlet when using the AC Adaptor.

Camera Operations Guide
Page 15
... is not attached correctly. - The battery pack is fully discharged. (For Battery information only.) Using an outside power source You can use your camcorder in low temperature. • The CHG (charge) lamp flashes during charging, or the battery information will not lose its power cord is disconnected...the AC Adaptor as shown in following conditions. - To turn off , AC power (house current) is still supplied to it is attached to your camcorder. Connect your camcorder is turned off the power Slide the POWER switch up . • CAMERA mode: To record on a tape. • PLAY/EDIT mode: To...
... is not attached correctly. - The battery pack is fully discharged. (For Battery information only.) Using an outside power source You can use your camcorder in low temperature. • The CHG (charge) lamp flashes during charging, or the battery information will not lose its power cord is disconnected...the AC Adaptor as shown in following conditions. - To turn off , AC power (house current) is still supplied to it is attached to your camcorder. Connect your camcorder is turned off the power Slide the POWER switch up . • CAMERA mode: To record on a tape. • PLAY/EDIT mode: To...

Camera Operations Guide
Page 16
... during recording by setting [BEEP] in the (OTHERS) menu to the desired position. SEL/PUSH EXEC dial Open the LCD panel 90 degrees to the camcorder, then rotate it to [OFF] (p. 59). To adjust the brightness of the LCD panel to meet various recording situations. MENU 3 Turn the SEL/PUSH EXEC...
... during recording by setting [BEEP] in the (OTHERS) menu to the desired position. SEL/PUSH EXEC dial Open the LCD panel 90 degrees to the camcorder, then rotate it to [OFF] (p. 59). To adjust the brightness of the LCD panel to meet various recording situations. MENU 3 Turn the SEL/PUSH EXEC...
Camera Operations Guide
Page 17
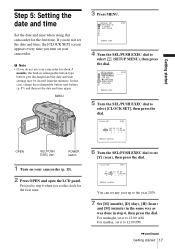
... CLOCK SET STBY Y MD HM 2004 JAN 1 12 : 0 0 AM [MENU] : CANCEL OPEN SEL/PUSH EXEC dial POWER switch 1 Turn on your camcorder. Proceed to step 6 when you turn on your camcorder for the first time. 6 Turn the SEL/PUSH EXEC dial to set any year up to the year 2079. 7 Set [M] (month.... For midnight, set it to 12:00 PM. ,continued Getting started Step 5: Setting the date and time Set the date and time when using this camcorder for the first time. MENU 3 Press MENU. CLOCK SET STBY Y MD HM 2004 JAN 1 12 : 0 0 AM [MENU] : CANCEL You can set [Y] (year), then press ...
... CLOCK SET STBY Y MD HM 2004 JAN 1 12 : 0 0 AM [MENU] : CANCEL OPEN SEL/PUSH EXEC dial POWER switch 1 Turn on your camcorder. Proceed to step 6 when you turn on your camcorder for the first time. 6 Turn the SEL/PUSH EXEC dial to set any year up to the year 2079. 7 Set [M] (month.... For midnight, set it to 12:00 PM. ,continued Getting started Step 5: Setting the date and time Set the date and time when using this camcorder for the first time. MENU 3 Press MENU. CLOCK SET STBY Y MD HM 2004 JAN 1 12 : 0 0 AM [MENU] : CANCEL You can set [Y] (year), then press ...
Camera Operations Guide
Page 18
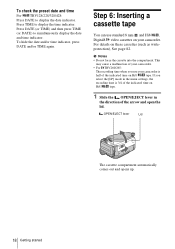
... time on Hi8 tape. 1 Slide the OPEN/EJECT lever in the direction of the indicated time on Hi8 tape. This may cause a malfunction of your camcorder. Press TIME to simultaneously display the date and time indicator. Press DATE (or TIME) and then press TIME (or DATE) to display the time indicator... 82. To check the preset date and time For TRV128/228/328/428: Press DATE to display the date indicator. For details on your camcorder. • For TRV260/265: The recording time when you select the [LP] mode in the menu settings, the recording time is half of the arrow and open...
... time on Hi8 tape. 1 Slide the OPEN/EJECT lever in the direction of the indicated time on Hi8 tape. This may cause a malfunction of your camcorder. Press TIME to simultaneously display the date and time indicator. Press DATE (or TIME) and then press TIME (or DATE) to display the time indicator... 82. To check the preset date and time For TRV128/228/328/428: Press DATE to display the date indicator. For details on your camcorder. • For TRV260/265: The recording time when you select the [LP] mode in the menu settings, the recording time is half of the arrow and open...
Camera Operations Guide
Page 19
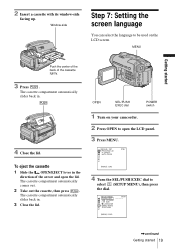
... the center of the back of the arrow and open the LCD panel. 3 Press MENU. OPEN SEL/PUSH EXEC dial POWER switch 1 Turn on your camcorder. 2 Press OPEN to be used on the LCD screen. The cassette compartment automatically slides back in the direction of the cassette lightly. 3 Press . Window-side...
... the center of the back of the arrow and open the LCD panel. 3 Press MENU. OPEN SEL/PUSH EXEC dial POWER switch 1 Turn on your camcorder. 2 Press OPEN to be used on the LCD screen. The cassette compartment automatically slides back in the direction of the cassette lightly. 3 Press . Window-side...

Camera Operations Guide
Page 20
z Tip • Your camcorder offers [ENG [SIMP]] (simplified English) for when you cannot find your native tongue among the options. 20 Getting started SETUP MENU CLOCK SET STBY USB STREAM LTR SIZE ENGLISH LANGUAGE ENG[SIMP] DEMO MODE FRANÇAIS ESPAÑOL PORTUGUÊS [MENU] : END 6 Turn the SEL/PUSH EXEC dial to select [ LANGUAGE], then press the dial. 5 Turn the SEL/PUSH EXEC dial to select the desired language, then press the dial. 7 Press MENU.
z Tip • Your camcorder offers [ENG [SIMP]] (simplified English) for when you cannot find your native tongue among the options. 20 Getting started SETUP MENU CLOCK SET STBY USB STREAM LTR SIZE ENGLISH LANGUAGE ENG[SIMP] DEMO MODE FRANÇAIS ESPAÑOL PORTUGUÊS [MENU] : END 6 Turn the SEL/PUSH EXEC dial to select [ LANGUAGE], then press the dial. 5 Turn the SEL/PUSH EXEC dial to select the desired language, then press the dial. 7 Press MENU.
Camera Operations Guide
Page 21
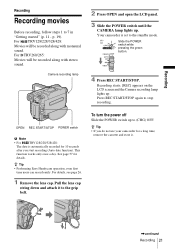
...b Note • For TRV128/228/328/428: The date is set to the grip belt. For TRV260/265: Movies will be recorded along with stereo sound. z Tip • Performing Easy Handycam operation, even first time users can record easily. p. 19). Press REC START/STOP again to (CHG... be recorded along with monaural sound. For details, see page 26. 1 Remove the lens cap. Your camcorder is automatically recorded for 10 seconds after you do not use your camcorder for details. z Tip • If you start recording (Auto date function). Recording Recording Recording movies Before...
...b Note • For TRV128/228/328/428: The date is set to the grip belt. For TRV260/265: Movies will be recorded along with stereo sound. z Tip • Performing Easy Handycam operation, even first time users can record easily. p. 19). Press REC START/STOP again to (CHG... be recorded along with monaural sound. For details, see page 26. 1 Remove the lens cap. Your camcorder is automatically recorded for 10 seconds after you do not use your camcorder for details. z Tip • If you start recording (Auto date function). Recording Recording Recording movies Before...
Camera Operations Guide
Page 22
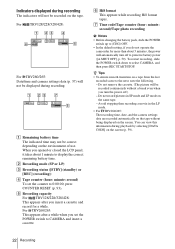
...7 60min SP REC 0:00:00 5 A Remaining battery time The indicated time may not be correct depending on the screen (p. 59). 22 Recording For TRV260/265: This appears after you insert a cassette and record for more than about 1 minute to display the correct remaining battery time. B Recording mode (... while recording Hi8 format tapes. E Recording capacity For TRV128/228/328/428: This appears after a while when you do not operate the camcorder for a while. To restart recording, slide the POWER switch down to select CAMERA, and then press REC START/STOP. Indicators displayed during ...
...7 60min SP REC 0:00:00 5 A Remaining battery time The indicated time may not be correct depending on the screen (p. 59). 22 Recording For TRV260/265: This appears after you insert a cassette and record for more than about 1 minute to display the correct remaining battery time. B Recording mode (... while recording Hi8 format tapes. E Recording capacity For TRV128/228/328/428: This appears after a while when you do not operate the camcorder for a while. To restart recording, slide the POWER switch down to select CAMERA, and then press REC START/STOP. Indicators displayed during ...
Camera Operations Guide
Page 23
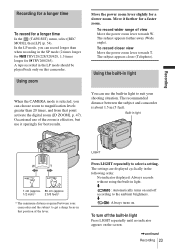
...until no indicator appears on . To record wider range of view Move the power zoom lever towards T. LIGHT Press LIGHT repeatedly to suit your camcorder and the subject to the ambient brightness. In the LP mode, you can record longer than 20 times, and from that position of the ...A tape recorded in the LP mode should be played back only on and off the built-in that point activate the digital zoom ([D ZOOM], p. 47). Move it sparingly for TRV260/265). Using the built-in light When the CAMERA mode is selected, you can choose zoom to magnification levels greater than ...
...until no indicator appears on . To record wider range of view Move the power zoom lever towards T. LIGHT Press LIGHT repeatedly to suit your camcorder and the subject to the ambient brightness. In the LP mode, you can record longer than 20 times, and from that position of the ...A tape recorded in the LP mode should be played back only on and off the built-in that point activate the digital zoom ([D ZOOM], p. 47). Move it sparingly for TRV260/265). Using the built-in light When the CAMERA mode is selected, you can choose zoom to magnification levels greater than ...
Camera Operations Guide
Page 24
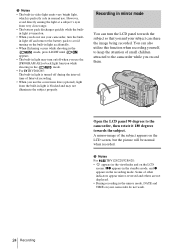
... of Interval recording. • When you use . A mirror-image of small children attracted to the camcorder, then rotate it 180 degrees towards the subject so that you and your camcorder do not use your camcorder, turn on/off when you use the [PROGRAM AE] or back light function while shooting in the... mode. • For TRV260/265: The built-in light is turned off during the interval time of...
... of Interval recording. • When you use . A mirror-image of small children attracted to the camcorder, then rotate it 180 degrees towards the subject so that you and your camcorder do not use your camcorder, turn on/off when you use the [PROGRAM AE] or back light function while shooting in the... mode. • For TRV260/265: The built-in light is turned off during the interval time of...

Camera Operations Guide
Page 25
Tape photo recording ( TRV260/265) You can record the date and/or time displayed on the screen superimposed on the picture. Press DATE (or TIME), then press TIME (or ... date and time indicators recorded manually cannot be deleted. p. 19). Press TIME to record the date. Recording still images - Before recording, follow steps 1 to your camcorder, the clock is not set up yet. Recording Superimposing the date and time on pictures ( TRV128/228/328 /428) You can record still images.
Tape photo recording ( TRV260/265) You can record the date and/or time displayed on the screen superimposed on the picture. Press DATE (or TIME), then press TIME (or ... date and time indicators recorded manually cannot be deleted. p. 19). Press TIME to record the date. Recording still images - Before recording, follow steps 1 to your camcorder, the clock is not set up yet. Recording Superimposing the date and time on pictures ( TRV128/228/328 /428) You can record still images.
Camera Operations Guide
Page 26
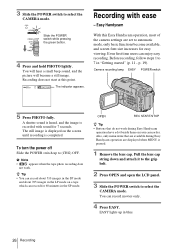
...the SP mode. b Note • appears when the tape photo recording does not work during Easy Handycam operation are displayed when MENU is completed. You can enjoy easy recording. Easy Handycam With this point. 60min CAPTURE The indicator appears. A shutter sound is heard, and the image ... for 60 minutes in blue. 26 Recording Recording does not start at this Easy Handycam operation, most of the camera settings are available during Easy Handycam operation have a dot beside them on your camcorder. Pull the lens cap string down and attach it to the grip belt. 2...
...the SP mode. b Note • appears when the tape photo recording does not work during Easy Handycam operation are displayed when MENU is completed. You can enjoy easy recording. Easy Handycam With this point. 60min CAPTURE The indicator appears. A shutter sound is heard, and the image ... for 60 minutes in blue. 26 Recording Recording does not start at this Easy Handycam operation, most of the camera settings are available during Easy Handycam operation have a dot beside them on your camcorder. Pull the lens cap string down and attach it to the grip belt. 2...
Camera Operations Guide
Page 27
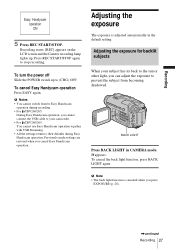
... subject has its back to the sun or other light, you cancel Easy Handycam operation. Adjusting the exposure for backlit subjects When your camcorder. • For TRV260/265: You cannot use Easy Handycam operation together with USB Streaming. • All the settings return to stop ...recording. Recording Easy Handycam operation ON 5 Press REC START/STOP. To turn the power off Slide ...
... subject has its back to the sun or other light, you cancel Easy Handycam operation. Adjusting the exposure for backlit subjects When your camcorder. • For TRV260/265: You cannot use Easy Handycam operation together with USB Streaming. • All the settings return to stop ...recording. Recording Easy Handycam operation ON 5 Press REC START/STOP. To turn the power off Slide ...


