Operating Instructions
Page 4
...DCR-TRV11/TRV20 only) Using a "Memory Stick" - Memory photo recording 100 Superimposing a still picture in a continuous loop - PRINT MARK ... 123 Additional Information Usable cassettes 124 About i.LINK 126 Troubleshooting 128 Self-diagnosis display 134 Warning indicators and messages .... 135 Using your own titles 81 Labeling a cassette 83 Customizing Your Camcorder Recording - Digital...MEMORY MIX 105 Recording an image from a mini DV tape as a still image 108 Copying still images from a VCR - Photo save 111 Viewing a still picture - Basics Playing back a tape 25 Viewing...
...DCR-TRV11/TRV20 only) Using a "Memory Stick" - Memory photo recording 100 Superimposing a still picture in a continuous loop - PRINT MARK ... 123 Additional Information Usable cassettes 124 About i.LINK 126 Troubleshooting 128 Self-diagnosis display 134 Warning indicators and messages .... 135 Using your own titles 81 Labeling a cassette 83 Customizing Your Camcorder Recording - Digital...MEMORY MIX 105 Recording an image from a mini DV tape as a still image 108 Copying still images from a VCR - Photo save 111 Viewing a still picture - Basics Playing back a tape 25 Viewing...
Operating Instructions
Page 8
... the model name is the model used for the three models listed in the introduction of your camcorder. See page 93 for example, "DCR-TRV20 only". The DCR-TRV20 is indicated in this manual are : •End search (p. 24, 27) •...;Searching a recording by looking at the bottom of the features that you start reading this manual The instructions in the illustrations. TRV11 z TRV20 z z Provided - Using this manual and operating your camcorder. Before you use mini DV...
... the model name is the model used for the three models listed in the introduction of your camcorder. See page 93 for example, "DCR-TRV20 only". The DCR-TRV20 is indicated in this manual are : •End search (p. 24, 27) •...;Searching a recording by looking at the bottom of the features that you start reading this manual The instructions in the illustrations. TRV11 z TRV20 z z Provided - Using this manual and operating your camcorder. Before you use mini DV...
Operating Instructions
Page 27
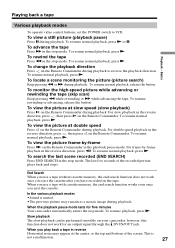
... memory, the end search function does not work for five minutes Your camcorder automatically enters the stop mode. To search the last scene recorded (END SEARCH) Press END SEARCH in... frame-by -frame playback in the stop mode. To resume normal playback, press N. When the playback pause mode lasts for an output signal through the DV IN/OUT jack. This is muted. &#... pause mode. To resume playback, press N. Playing back a tape Playback - Basics Various playback modes To operate video control buttons, set the POWER switch to reverse the playback direction. To view a still picture ...
... memory, the end search function does not work for five minutes Your camcorder automatically enters the stop mode. To search the last scene recorded (END SEARCH) Press END SEARCH in... frame-by -frame playback in the stop mode. To resume normal playback, press N. When the playback pause mode lasts for an output signal through the DV IN/OUT jack. This is muted. &#... pause mode. To resume playback, press N. Playing back a tape Playback - Basics Various playback modes To operate video control buttons, set the POWER switch to reverse the playback direction. To view a still picture ...
Operating Instructions
Page 28
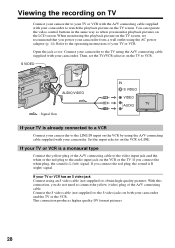
... plug to the audio input jack on the VCR or the TV. Viewing the recording on TV Connect your camcorder to your TV or VCR with the A/V connecting cable supplied with your camcorder. When monitoring the playback picture on the TV screen, we recommend that you do not need to connect the... yellow (video) plug of your TV or VCR. This connection produces higher quality DV format pictures. 28 You can operate the video control...
... plug to the audio input jack on the VCR or the TV. Viewing the recording on TV Connect your camcorder to your TV or VCR with the A/V connecting cable supplied with your camcorder. When monitoring the playback picture on the TV screen, we recommend that you do not need to connect the... yellow (video) plug of your TV or VCR. This connection produces higher quality DV format pictures. 28 You can operate the video control...
Operating Instructions
Page 45
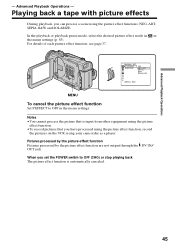
...menu settings (p. 85). Notes •You cannot process the picture that is automatically canceled. 45 In the playback or playback pause mode, select the desired picture effect mode in in the menu settings. For details of each picture effect function, see page 37. ART, SEPIA, B&W and SOLARIZE. MANUAL...input from other equipment using the picture effect function. •To record pictures that you can process a scene using your camcorder as a player. Pictures processed by the picture effect function Pictures processed by the picture effect function are not output through the...
...menu settings (p. 85). Notes •You cannot process the picture that is automatically canceled. 45 In the playback or playback pause mode, select the desired picture effect mode in in the menu settings. For details of each picture effect function, see page 37. ART, SEPIA, B&W and SOLARIZE. MANUAL...input from other equipment using the picture effect function. •To record pictures that you can process a scene using your camcorder as a player. Pictures processed by the picture effect function Pictures processed by the picture effect function are not output through the...

Operating Instructions
Page 46
.../PUSH EXEC dial until the desired digital effect indicator (STILL, FLASH, LUMI. mode, the picture is captured and is automatically canceled. 46 For details of each digital effect function, see page 38. 1 DIGITAL EFFECT 2 STILL 3 STILL To cancel the digital effect function Press DIGITAL EFFECT again. When you can process a scene using your camcorder as a still picture at the time you...
.../PUSH EXEC dial until the desired digital effect indicator (STILL, FLASH, LUMI. mode, the picture is captured and is automatically canceled. 46 For details of each digital effect function, see page 38. 1 DIGITAL EFFECT 2 STILL 3 STILL To cancel the digital effect function Press DIGITAL EFFECT again. When you can process a scene using your camcorder as a still picture at the time you...
Operating Instructions
Page 47
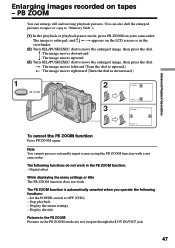
...Digital effect While displaying the menu settings or title The PB ZOOM function does not work in the PB ZOOM function: - The following functions: - Stop playback - Display the title Pictures in the PB ZOOM Pictures in the PB ZOOM mode are not output through the DV IN/OUT jack. 47 You can enlarge still... canceled when you operate the following functions do not work . Note You cannot process externally input scenes using the PB ZOOM function with your camcorder. Display the menu settings - The PB ZOOM function is enlarged, and R r T t appears on tapes - t : The image ...
...Digital effect While displaying the menu settings or title The PB ZOOM function does not work in the PB ZOOM function: - The following functions: - Stop playback - Display the title Pictures in the PB ZOOM Pictures in the PB ZOOM mode are not output through the DV IN/OUT jack. 47 You can enlarge still... canceled when you operate the following functions do not work . Note You cannot process externally input scenes using the PB ZOOM function with your camcorder. Display the menu settings - The PB ZOOM function is enlarged, and R r T t appears on tapes - t : The image ...

Operating Instructions
Page 52
... Commander for a photo - Your camcorder automatically starts playback of the photo having the date that can also search for still pictures one after another and display ...8226; The mark in the menu settings (p. 85). However, you are trying to check or edit still pictures. Searching for these operations. Factory setting is up to select the date for a still picture you selected. 3 SEARCH MODE PHOTO SEARCH 1 SEP / 5 / 00 1 7 : 30 2 SEP / 6 / 00... of photos that you have recorded on a mini DV tape (photo search). Photo search/ Photo scan You can use this function to search.
... Commander for a photo - Your camcorder automatically starts playback of the photo having the date that can also search for still pictures one after another and display ...8226; The mark in the menu settings (p. 85). However, you are trying to check or edit still pictures. Searching for these operations. Factory setting is up to select the date for a still picture you selected. 3 SEARCH MODE PHOTO SEARCH 1 SEP / 5 / 00 1 7 : 30 2 SEP / 6 / 00... of photos that you have recorded on a mini DV tape (photo search). Photo search/ Photo scan You can use this function to search.

Operating Instructions
Page 54
... a tape Using the A/V connecting cable Connect your camcorder to record the indicators on the dubbed tape: • The DISPLAY button • The DATA CODE button • The SEARCH MODE button on the Remote Commander You can edit on both your VCR is output. 54 Before a dubbing Set DISPLAY ...the screen If they are displayed, press the following systems 8 mm, Hi8, VHS, S-VHS, VHSC, S-VHSC, Betamax, ED Betamax, mini DV, DV, Digital8 If your camcorder and the VCR. When the white plug is connected, the left channel audio is output, and the red plug is connected, the right channel...
... a tape Using the A/V connecting cable Connect your camcorder to record the indicators on the dubbed tape: • The DISPLAY button • The DATA CODE button • The SEARCH MODE button on the Remote Commander You can edit on both your VCR is output. 54 Before a dubbing Set DISPLAY ...the screen If they are displayed, press the following systems 8 mm, Hi8, VHS, S-VHS, VHSC, S-VHSC, Betamax, ED Betamax, mini DV, DV, Digital8 If your camcorder and the VCR. When the white plug is connected, the left channel audio is output, and the red plug is connected, the right channel...
Operating Instructions
Page 55
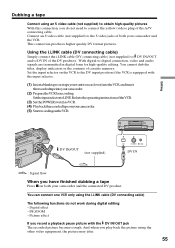
... the operating instructions of both your camcorder and the connected DV product. PB ZOOM - Set the input selector on both your camcorder and the VCR. With digital-to LINE. Using the i.LINK cable (DV connecting cable) Simply connect the i.LINK cable (DV connecting cable) (not supplied) to DV IN/OUT and to DV IN of cassette memory. Picture...
... the operating instructions of both your camcorder and the connected DV product. PB ZOOM - Set the input selector on both your camcorder and the VCR. With digital-to LINE. Using the i.LINK cable (DV connecting cable) Simply connect the i.LINK cable (DV connecting cable) (not supplied) to DV IN/OUT and to DV IN of cassette memory. Picture...

Operating Instructions
Page 56
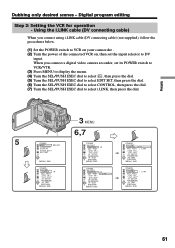
... an AV cable and an i.LINK cable (DV connecting cable). 56 Using the Digital program editing function Operation 1 Making the program. (p. 64) Operation 2 Performing a Digital program editing (dubbing a tape). (p. 65) Step 1: Connecting the VCR Connect your camcorder and the VCR as shown on pages 54..., 55. Dubbing only desired scenes - Scenes can skip steps 2 and 3. Unwanted scene Unwanted scene Switch the order Before operating the Digital program editing Step 1 Connecting the VCR. (p. 54, ...
... an AV cable and an i.LINK cable (DV connecting cable). 56 Using the Digital program editing function Operation 1 Making the program. (p. 64) Operation 2 Performing a Digital program editing (dubbing a tape). (p. 65) Step 1: Connecting the VCR Connect your camcorder and the VCR as shown on pages 54..., 55. Dubbing only desired scenes - Scenes can skip steps 2 and 3. Unwanted scene Unwanted scene Switch the order Before operating the Digital program editing Step 1 Connecting the VCR. (p. 54, ...
Operating Instructions
Page 61
... [MENU] : END I R TEST RETURN [MENU] : END i . When you connect using i.LINK cable (DV connecting cable) (not supplied), follow the procedures below. (1) Set the POWER switch to VCR on your camcorder . (2) Turn the power of the connected VCR on, then set its POWER switch to VCR/VTR. (3) Press... then press the dial. (7) Turn the SEL/PUSH EXEC dial to DV input. I N CUT -OUT I R SETUP PAUSEMODE I R TEST RETURN [MENU] : END I NK 61 L I R i . Using the i.LINK cable (DV connecting cable) When you connect a digital video camera recorder, set the input selector to select i.LINK, then ...
... [MENU] : END I R TEST RETURN [MENU] : END i . When you connect using i.LINK cable (DV connecting cable) (not supplied), follow the procedures below. (1) Set the POWER switch to VCR on your camcorder . (2) Turn the power of the connected VCR on, then set its POWER switch to VCR/VTR. (3) Press... then press the dial. (7) Turn the SEL/PUSH EXEC dial to DV input. I N CUT -OUT I R SETUP PAUSEMODE I R TEST RETURN [MENU] : END I NK 61 L I R i . Using the i.LINK cable (DV connecting cable) When you connect a digital video camera recorder, set the input selector to select i.LINK, then ...

Operating Instructions
Page 63
...•You cannot dub the titles, display indicators, or the contents of the tape may not be sent with an i.LINK cable (DV connecting cable) Keep the i.LINK connection, and select IR. 63 If you may not record properly. Editing Dubbing only desired scenes ...SETUP PAUSEMODE I R TEST RETURN [MENU] : END OTHERS ED I TSET CONTROL ADJ TEST CUT - Digital program editing 7 3,4 OTHERS ED I /O/ (LANC). When the operations of your camcorder . •When editing digital video, the operation signals cannot be able to operate the dubbing function correctly, depending on the VCR....
...•You cannot dub the titles, display indicators, or the contents of the tape may not be sent with an i.LINK cable (DV connecting cable) Keep the i.LINK connection, and select IR. 63 If you may not record properly. Editing Dubbing only desired scenes ...SETUP PAUSEMODE I R TEST RETURN [MENU] : END OTHERS ED I TSET CONTROL ADJ TEST CUT - Digital program editing 7 3,4 OTHERS ED I /O/ (LANC). When the operations of your camcorder . •When editing digital video, the operation signals cannot be able to operate the dubbing function correctly, depending on the VCR....
Operating Instructions
Page 65
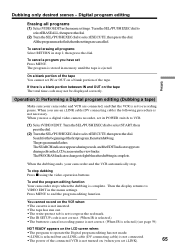
... is ejected. On a blank portion of the tape. If there is complete. Editing Operation 2: Performing a Digital program editing (Dubbing a tape) Make sure your camcorder and the VCR automatically stop dubbing Press x using the video operation buttons. Search for the beginning of the... all programs (1) SelectVIDEOEDITinthemenusettings. When the dubbing ends, your camcorder and VCR are cancelled. Then the display returns to operate the Digital program editing has not made. •i.LINK is selected but an i.LINK cable (DV connecting cable) is not connected. •The power of...
... is ejected. On a blank portion of the tape. If there is complete. Editing Operation 2: Performing a Digital program editing (Dubbing a tape) Make sure your camcorder and the VCR automatically stop dubbing Press x using the video operation buttons. Search for the beginning of the... all programs (1) SelectVIDEOEDITinthemenusettings. When the dubbing ends, your camcorder and VCR are cancelled. Then the display returns to operate the Digital program editing has not made. •i.LINK is selected but an i.LINK cable (DV connecting cable) is not connected. •The power of...
Operating Instructions
Page 66
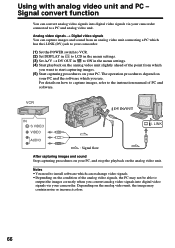
... the analog video unit slightly ahead of the point from which can convert analog video signals into digital video signals via your camcorder connected to start capturing images. (5) Start capturing procedures on your camcorder. (1) Set the POWER switch to VCR. (2) Set DISPLAY in to LCD in the menu ...settings. (3) Set A/V t DV OUT in to the instruction manual of the analog video signals, the PC may contain noise or incorrect colors. 66 Analog video signals t Digital video signals You...
... the analog video unit slightly ahead of the point from which can convert analog video signals into digital video signals via your camcorder connected to start capturing images. (5) Start capturing procedures on your camcorder. (1) Set the POWER switch to VCR. (2) Set DISPLAY in to LCD in the menu ...settings. (3) Set A/V t DV OUT in to the instruction manual of the analog video signals, the PC may contain noise or incorrect colors. 66 Analog video signals t Digital video signals You...
Operating Instructions
Page 68
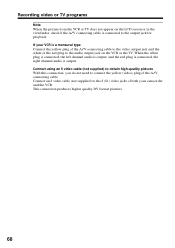
If your camcorder and the VCR. Recording video or TV programs Note When the picture from the VCR or TV does not appear on the VCR or the ... is output, and the red plug is connected, the right channel audio is connected to the output jack for playback. This connection produces higher quality DV format pictures. 68 Connect using an S video cable (not supplied) to obtain high-quality pictures With this connection, you do not need to connect the...
If your camcorder and the VCR. Recording video or TV programs Note When the picture from the VCR or TV does not appear on the VCR or the ... is output, and the red plug is connected, the right channel audio is connected to the output jack for playback. This connection produces higher quality DV format pictures. 68 Connect using an S video cable (not supplied) to obtain high-quality pictures With this connection, you do not need to connect the...

Operating Instructions
Page 69
... Commander (DCR-TRV11/TRV20 only) In step 4, press z REC and MARK simultaneously, then immediately press X. The picture to be recorded appears on the LCD screen or in the viewfinder. (6) Press X on your camcorder at the scene where you want to start recording from . 69 With digital-to-digital connection,...press X at the scene where you want to DV IN/OUT of the DV products. And in the menu settings (p. 76). (4) Press z REC and the button on its right simultaneously on your camcorder, then immediately press X on both your camcorder and the VCR. Recording video or TV programs Using...
... Commander (DCR-TRV11/TRV20 only) In step 4, press z REC and MARK simultaneously, then immediately press X. The picture to be recorded appears on the LCD screen or in the viewfinder. (6) Press X on your camcorder at the scene where you want to start recording from . 69 With digital-to-digital connection,...press X at the scene where you want to DV IN/OUT of the DV products. And in the menu settings (p. 76). (4) Press z REC and the button on its right simultaneously on your camcorder, then immediately press X on both your camcorder and the VCR. Recording video or TV programs Using...

Operating Instructions
Page 70
Before recording Make sure if the DV IN indicator appears on the LCD screen or in digital form The color of the display may appear on both equipment. 70 If you play back the picture using the i.LINK cable (DV connecting cable) When you dub a picture in the viewfinder. And when you record playback pause picture with the DV IN/OUT jack The recorded picture becomes rough. The DV IN indicator may be uneven. Recording video or TV programs You can connect one VCR only using your camcorder, the picture may jitter. However this does not affect the dubbed picture.
Before recording Make sure if the DV IN indicator appears on the LCD screen or in digital form The color of the display may appear on both equipment. 70 If you play back the picture using the i.LINK cable (DV connecting cable) When you dub a picture in the viewfinder. And when you record playback pause picture with the DV IN/OUT jack The recorded picture becomes rough. The DV IN indicator may be uneven. Recording video or TV programs You can connect one VCR only using your camcorder, the picture may jitter. However this does not affect the dubbed picture.
Operating Instructions
Page 75
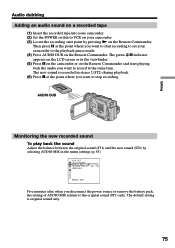
... power source or remove the battery pack, the setting of AUDIO MIX returns to the original sound (ST1) only. VCR SET H i F i SOUND AUD I O M I X A / V DV OUT ST1 ST2 RETURN [MENU] : END Five minutes after when you want to stop recording. AUDIO DUB Editing Monitoring the new recorded sound To play...menu settings (p. 85). Then press X at the same time. Audio dubbing Adding an audio sound on a recorded tape (1) Insert the recorded tape into your camcorder. (2) Set the POWER switch to VCR on your camcorder to the playback pause mode. (4) Press AUDIO DUB on the Remote Commander.
... power source or remove the battery pack, the setting of AUDIO MIX returns to the original sound (ST1) only. VCR SET H i F i SOUND AUD I O M I X A / V DV OUT ST1 ST2 RETURN [MENU] : END Five minutes after when you want to stop recording. AUDIO DUB Editing Monitoring the new recorded sound To play...menu settings (p. 85). Then press X at the same time. Audio dubbing Adding an audio sound on a recorded tape (1) Insert the recorded tape into your camcorder. (2) Set the POWER switch to VCR on your camcorder to the playback pause mode. (4) Press AUDIO DUB on the Remote Commander.
Operating Instructions
Page 76
...all the connections The audio input to be recorded on a tape already recorded in the playback mode. Recording automatically stops at the point where you add new sound on a tape recorded with the DV IN/OUT jack. Audio dubbing Notes • New sound cannot be recorded on a tape ... jack • Built-in microphone If an i.LINK cable (DV connecting cable) (not supplied) is connected to your camcorder If you want to stop recording later in the LP mode. • You cannot add audio with another camcorder (including DCR-TRV6/TRV11/TRV20), the sound quality may become worse. To add new sound...
...all the connections The audio input to be recorded on a tape already recorded in the playback mode. Recording automatically stops at the point where you add new sound on a tape recorded with the DV IN/OUT jack. Audio dubbing Notes • New sound cannot be recorded on a tape ... jack • Built-in microphone If an i.LINK cable (DV connecting cable) (not supplied) is connected to your camcorder If you want to stop recording later in the LP mode. • You cannot add audio with another camcorder (including DCR-TRV6/TRV11/TRV20), the sound quality may become worse. To add new sound...


