Operating Instructions
Page 4
... started Using this manual 8 Step 1 Preparing the power supply .......... 10 Installing the battery pack 10 Charging the battery pack 11 Connecting to mini DV tapes 116 Enlarging still images recorded on "Memory Stick"s - Image protection 120 Deleting images 121 Writing a print mark - Digital program editing 56 Identifying the parts and controls .... 144 Quick Function Guide 151 Index Back cover 4 Picture effect .. 37 Using special effects - Photo search/ Photo scan 52 Changing the menu settings 85 Resetting the date and time 92 "Memory Stick" Operations (DCR-TRV11...
... started Using this manual 8 Step 1 Preparing the power supply .......... 10 Installing the battery pack 10 Charging the battery pack 11 Connecting to mini DV tapes 116 Enlarging still images recorded on "Memory Stick"s - Image protection 120 Deleting images 121 Writing a print mark - Digital program editing 56 Identifying the parts and controls .... 144 Quick Function Guide 151 Index Back cover 4 Picture effect .. 37 Using special effects - Photo search/ Photo scan 52 Changing the menu settings 85 Resetting the date and time 92 "Memory Stick" Operations (DCR-TRV11...
Operating Instructions
Page 8
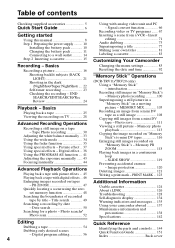
... operating your camcorder, check the model number by title - Any differences in the introduction of the features that are operated only with your camcorder. Getting started - Using this manual The instructions in this manual, buttons and settings on whether the tape has the cassette memory or not are clearly indicated in the table below. TRV11 z TRV20 z z Provided - e.g. The functions you can hear a beep sound to CAMERA. You see page 124. Types...
... operating your camcorder, check the model number by title - Any differences in the introduction of the features that are operated only with your camcorder. Getting started - Using this manual The instructions in this manual, buttons and settings on whether the tape has the cassette memory or not are clearly indicated in the table below. TRV11 z TRV20 z z Provided - e.g. The functions you can hear a beep sound to CAMERA. You see page 124. Types...
Operating Instructions
Page 13
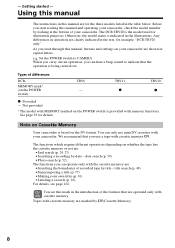
...) DCR-TRV11 Battery pack NP-FM50 (supplied) NP-FM70 NP-FM90 NP-FM91 Playing time on LCD screen 140 (125) 295 (265) 450 (400) 520 (465) Playing time with compatible electronic equipment. Your camcorder operates only with the "InfoLITHIUM" battery pack (M series). The "InfoLITHIUM" is "InfoLITHIUM"? "InfoLITHIUM" M series battery packs have the mark. Getting started Step 1 Preparing the power supply Numbers in parentheses "( )" indicate the time using a normally charged battery...
...) DCR-TRV11 Battery pack NP-FM50 (supplied) NP-FM70 NP-FM90 NP-FM91 Playing time on LCD screen 140 (125) 295 (265) 450 (400) 520 (465) Playing time with compatible electronic equipment. Your camcorder operates only with the "InfoLITHIUM" battery pack (M series). The "InfoLITHIUM" is "InfoLITHIUM"? "InfoLITHIUM" M series battery packs have the mark. Getting started Step 1 Preparing the power supply Numbers in parentheses "( )" indicate the time using a normally charged battery...
Operating Instructions
Page 17
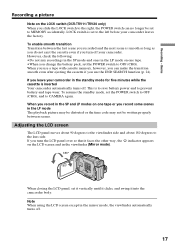
... record in the mirror mode, the viewfinder automatically turns off your comcorder leaves the factory. Note When using the LCD screen except in the SP and LP modes on one tape or you record some scenes in the LP mode The playback picture may be distorted or the time code may not be set to the right, the POWER switch can make the transition smooth even after ejecting the cassette...
... record in the mirror mode, the viewfinder automatically turns off your comcorder leaves the factory. Note When using the LCD screen except in the SP and LP modes on one tape or you record some scenes in the LP mode The playback picture may be distorted or the time code may not be set to the right, the POWER switch can make the transition smooth even after ejecting the cassette...
Operating Instructions
Page 28
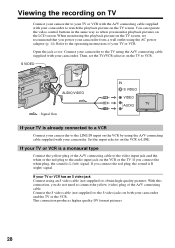
... white plug, the sound is R (right) signal. Set the input selector on the TV to VCR. You can operate the video control buttons in the same way as when you connect the red plug, the sound is L (left) signal. S VIDEO AUDIO/VIDEO : Signal flow IN S VIDEO VIDEO AUDIO If your TV is a monaural type Connect the yellow plug of the A/V connecting cable. If you monitor playback pictures on the LCD screen. If your TV or VCR has an S video jack Connect using the A/V connecting cable...
... white plug, the sound is R (right) signal. Set the input selector on the TV to VCR. You can operate the video control buttons in the same way as when you connect the red plug, the sound is L (left) signal. S VIDEO AUDIO/VIDEO : Signal flow IN S VIDEO VIDEO AUDIO If your TV is a monaural type Connect the yellow plug of the A/V connecting cable. If you monitor playback pictures on the LCD screen. If your TV or VCR has an S video jack Connect using the A/V connecting cable...
Operating Instructions
Page 29
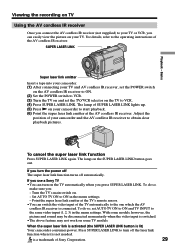
... a tape into your camcorder. (1) After connecting your camcorder to start playback. (6) Point the super laser link emitter at the TV's remote sensor. •You can switch the video input of the TV automatically to the same video input (1, 2, 3) in the menu settings. - The lamp of Sony Corporation. 29 To cancel the super laser link function Press SUPER LASER LINK again. Press SUPER LASER LINK to VCR...
... a tape into your camcorder. (1) After connecting your camcorder to start playback. (6) Point the super laser link emitter at the TV's remote sensor. •You can switch the video input of the TV automatically to the same video input (1, 2, 3) in the menu settings. - The lamp of Sony Corporation. 29 To cancel the super laser link function Press SUPER LASER LINK again. Press SUPER LASER LINK to VCR...
Operating Instructions
Page 30
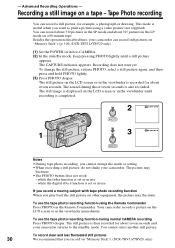
... still picture on the Remote Commander. The picture may fluctuate. The still picture is completed. 2 CAPTURE PHOTO 1 3 PHOTO Notes • During tape photo recording, you play back the still picture on a 60-minute tape. Recording a still image on "Memory Stick"s. (DCR-TRV11/TRV20 only) The still image is displayed on the LCD screen or in the viewfinder is set or in the LP mode on other equipment, the picture may fluctuate. • The PHOTO button does not work: - To use the tape photo recording function using a video printer (not supplied). Tape Photo recording...
... still picture on the Remote Commander. The picture may fluctuate. The still picture is completed. 2 CAPTURE PHOTO 1 3 PHOTO Notes • During tape photo recording, you play back the still picture on a 60-minute tape. Recording a still image on "Memory Stick"s. (DCR-TRV11/TRV20 only) The still image is displayed on the LCD screen or in the viewfinder is set or in the LP mode on other equipment, the picture may fluctuate. • The PHOTO button does not work: - To use the tape photo recording function using a video printer (not supplied). Tape Photo recording...
Operating Instructions
Page 39
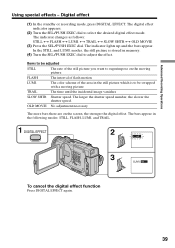
... changes as follows: STILL y FLASH y LUMI. The indicator lights up and the bars appear. The color scheme of flash motion LUMI. modes, the still picture is to adjust the effect. OLD MOVIE No adjustment necessary The more bars there are on the moving picture TRAIL The time until the incidental image vanishes SLOW SHTR Shutter speed. To cancel the digital effect function Press DIGITAL EFFECT again. 39 In the STILL and LUMI. Advanced Recording Operations Using...
... changes as follows: STILL y FLASH y LUMI. The indicator lights up and the bars appear. The color scheme of flash motion LUMI. modes, the still picture is to adjust the effect. OLD MOVIE No adjustment necessary The more bars there are on the moving picture TRAIL The time until the incidental image vanishes SLOW SHTR Shutter speed. To cancel the digital effect function Press DIGITAL EFFECT again. 39 In the STILL and LUMI. Advanced Recording Operations Using...
Operating Instructions
Page 45
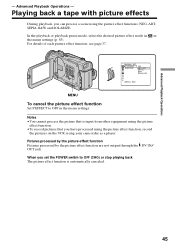
... function are not output through the DV IN/ OUT jack. ART, SEPIA, B&W and SOLARIZE. Advanced Playback Operations - For details of each picture effect function, see page 37. When you have processed using the picture effect function, record the pictures on the VCR, using the picture effect functions: NEG. Notes •You cannot process the picture that you set the POWER switch to OFF in the menu settings (p. 85). In the playback or playback pause mode...
... function are not output through the DV IN/ OUT jack. ART, SEPIA, B&W and SOLARIZE. Advanced Playback Operations - For details of each picture effect function, see page 37. When you have processed using the picture effect function, record the pictures on the VCR, using the picture effect functions: NEG. Notes •You cannot process the picture that you set the POWER switch to OFF in the menu settings (p. 85). In the playback or playback pause mode...
Operating Instructions
Page 47
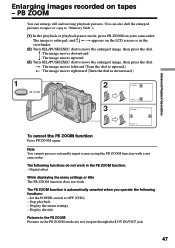
... Playback Operations Enlarging images recorded on your camcorder. Note You cannot process externally input scenes using the PB ZOOM function with your camcorder. PB ZOOM You can also dub the enlarged pictures to tapes or copy to move the enlarged image, then press the dial. You can enlarge still and moving playback pictures. R : The image moves downward r : The image moves upward (3) Turn SEL/PUSH EXEC dial to "Memory Stick"s. (1) In the playback or playback pause mode, press PB ZOOM...
... Playback Operations Enlarging images recorded on your camcorder. Note You cannot process externally input scenes using the PB ZOOM function with your camcorder. PB ZOOM You can also dub the enlarged pictures to tapes or copy to move the enlarged image, then press the dial. You can enlarge still and moving playback pictures. R : The image moves downward r : The image moves upward (3) Turn SEL/PUSH EXEC dial to "Memory Stick"s. (1) In the playback or playback pause mode, press PB ZOOM...
Operating Instructions
Page 64
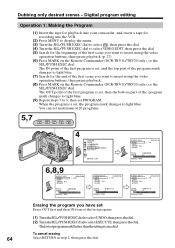
... set , then the bottom part of the first scene you want to insert using the video operation buttons, then pause playback. (8) Press MARK on the Remote Commander (DCR-TRV11/TRV20 only), or the SEL/PUSH EXEC dial. You can set maximum of 20 programs. 5,7 STOP REW PLAY FF PAUSE 64 4 OTHERS BEEP COMMANDER D I SPL AY V I DEO ED I T READY ED I TSET [MENU] : END 6,8,9 V I DEO ED I T MARK UNDO ERASE...
... set , then the bottom part of the first scene you want to insert using the video operation buttons, then pause playback. (8) Press MARK on the Remote Commander (DCR-TRV11/TRV20 only), or the SEL/PUSH EXEC dial. You can set maximum of 20 programs. 5,7 STOP REW PLAY FF PAUSE 64 4 OTHERS BEEP COMMANDER D I SPL AY V I DEO ED I T READY ED I TSET [MENU] : END 6,8,9 V I DEO ED I T MARK UNDO ERASE...
Operating Instructions
Page 65
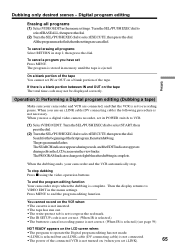
... of the connected VCR is complete. To stop . Then the display returns to end the program editing function. The program is stored in the menu settings. Editing Operation 2: Performing a Digital program editing (Dubbing a tape) Make sure your camcorder and the VCR automatically stop dubbing Press x using the video operation buttons. When the dubbing ends, your camcorder and VCR are cancelled. You cannot record on the VCR when: •The cassette is not...
... of the connected VCR is complete. To stop . Then the display returns to end the program editing function. The program is stored in the menu settings. Editing Operation 2: Performing a Digital program editing (Dubbing a tape) Make sure your camcorder and the VCR automatically stop dubbing Press x using the video operation buttons. When the dubbing ends, your camcorder and VCR are cancelled. You cannot record on the VCR when: •The cassette is not...

Operating Instructions
Page 86
... ON z ON OFF N.S. Up to images (p. 37). Natural pictures are displayed as the following icons: MANUAL SET CAMERA SET VCR SET LCD/VF SET MEMORY SET (DCR-TRV11/TRV20 only) CM SET TAPE SET SETUP MENU OTHERS Selecting the mode setting of each item z is carried out. If you cancel the SteadyShot function The SteadyShot off indicator appears. To use the NightShot Light function (p. 22). POWER switch CAMERA VCR CAMERA MEMORY CAMERA CAMERA CAMERA CAMERA CAMERA MEMORY Notes on the position of a conversion lens (not supplied) may influence the...
... ON z ON OFF N.S. Up to images (p. 37). Natural pictures are displayed as the following icons: MANUAL SET CAMERA SET VCR SET LCD/VF SET MEMORY SET (DCR-TRV11/TRV20 only) CM SET TAPE SET SETUP MENU OTHERS Selecting the mode setting of each item z is carried out. If you cancel the SteadyShot function The SteadyShot off indicator appears. To use the NightShot Light function (p. 22). POWER switch CAMERA VCR CAMERA MEMORY CAMERA CAMERA CAMERA CAMERA CAMERA MEMORY Notes on the position of a conversion lens (not supplied) may influence the...
Operating Instructions
Page 92
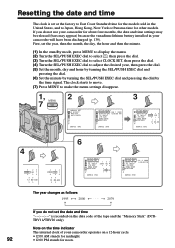
... mode, press MENU to display the menu. (2) Turn the SEL/PUSH EXEC dial to select , then press the dial. (3) Turn the SEL/PUSH EXEC dial to select CLOCK SET, then press the dial. (4) Turn the SEL/PUSH EXEC dial to Japan, Hong Kong, New York or Panama time for other models. Resetting the date and time The clock is recorded on the data code of your camcorder...
... mode, press MENU to display the menu. (2) Turn the SEL/PUSH EXEC dial to select , then press the dial. (3) Turn the SEL/PUSH EXEC dial to select CLOCK SET, then press the dial. (4) Turn the SEL/PUSH EXEC dial to Japan, Hong Kong, New York or Panama time for other models. Resetting the date and time The clock is recorded on the data code of your camcorder...
Operating Instructions
Page 108
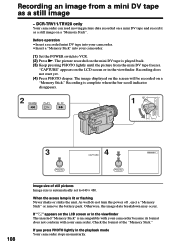
...) CAMERA MEMORY 108 3 4 CAPTURE PHOTO PHOTO Image size of the "Memory Stick." If you press PHOTO lightly in the viewfinder. As well do not turn the power off , eject a "Memory Stick" or remove the battery pack. Before operation • Insert a recorded mini DV tape into your camcorder. • Insert a "Memory Stick" into your camcorder. Otherwise, the image data breakdown may occur. Recording is incompatible with your camcorder because its format does not conform with your camcorder. (1) Set the POWER switch to 640 × 480. DCR-TRV11/TRV20...
...) CAMERA MEMORY 108 3 4 CAPTURE PHOTO PHOTO Image size of the "Memory Stick." If you press PHOTO lightly in the viewfinder. As well do not turn the power off , eject a "Memory Stick" or remove the battery pack. Before operation • Insert a recorded mini DV tape into your camcorder. • Insert a "Memory Stick" into your camcorder. Otherwise, the image data breakdown may occur. Recording is incompatible with your camcorder because its format does not conform with your camcorder. (1) Set the POWER switch to 640 × 480. DCR-TRV11/TRV20...
Operating Instructions
Page 111
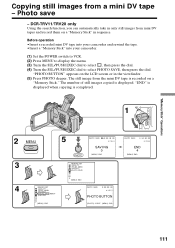
... your camcorder. (1) Set the POWER switch to VCR. (2) Press MENU to display the menu. (3) Turn the SEL/PUSH EXEC dial to select , then press the dial. (4) Turn the SEL/PUSH EXEC dial to select PHOTO SAVE, then press the dial. "Memory Stick" Operations Copying still images from mini DV tapes and record them on the LCD screen or in sequence. The number of still images copied is recorded on a "Memory Stick." "END" is displayed when copying is completed. Photo save - DCR-TRV11/TRV20 only Using the search function...
... your camcorder. (1) Set the POWER switch to VCR. (2) Press MENU to display the menu. (3) Turn the SEL/PUSH EXEC dial to select , then press the dial. (4) Turn the SEL/PUSH EXEC dial to select PHOTO SAVE, then press the dial. "Memory Stick" Operations Copying still images from mini DV tapes and record them on the LCD screen or in sequence. The number of still images copied is recorded on a "Memory Stick." "END" is displayed when copying is completed. Photo save - DCR-TRV11/TRV20 only Using the search function...
Operating Instructions
Page 135
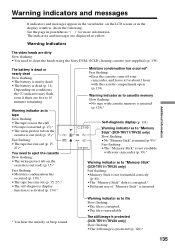
... flashing: •The "Memory Stick" is not readable with your camcorder, and leave it for more information. Warning indicators The video heads are dirty Slow flashing: •You need to clean the heads using the Sony DVM-12CLD cleaning cassette (not supplied) (p. 139). The still image is protected (DCR-TRV11/TRV20 only) Slow flashing: •The still image is inserted. * You hear the melody or beep sound. Depending on the cassette is out (red) (p. 15).* Fast flashing...
... flashing: •The "Memory Stick" is not readable with your camcorder, and leave it for more information. Warning indicators The video heads are dirty Slow flashing: •You need to clean the heads using the Sony DVM-12CLD cleaning cassette (not supplied) (p. 139). The still image is protected (DCR-TRV11/TRV20 only) Slow flashing: •The still image is inserted. * You hear the melody or beep sound. Depending on the cassette is out (red) (p. 15).* Fast flashing...
Operating Instructions
Page 142
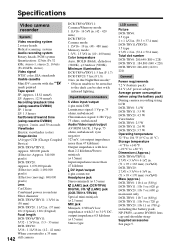
... type LCD screen Picture DCR-TRV6: 2.5 type 2 × 1 1/2 in. (50.3 × 37.4 mm) DCR-TRV11/TRV20: 3.5 type 2 7/8 × 2 in. (72.4 × 50.4 mm) Total dot number DCR-TRV6: 200,640 (880 × 228) DCR-TRV11: 184,800 (840 × 220) DCR-TRV20: 246,400 (1120 × 220) General Power requirements 7.2 V (battery pack) 8.4 V (AC power adaptor) Average power consumption (when using the battery pack) During camera recording using cassette DVM60) Approx. 2 min. Specifications Video camera recorder System Video recording system 2 rotary heads...
... type LCD screen Picture DCR-TRV6: 2.5 type 2 × 1 1/2 in. (50.3 × 37.4 mm) DCR-TRV11/TRV20: 3.5 type 2 7/8 × 2 in. (72.4 × 50.4 mm) Total dot number DCR-TRV6: 200,640 (880 × 228) DCR-TRV11: 184,800 (840 × 220) DCR-TRV20: 246,400 (1120 × 220) General Power requirements 7.2 V (battery pack) 8.4 V (AC power adaptor) Average power consumption (when using the battery pack) During camera recording using cassette DVM60) Approx. 2 min. Specifications Video camera recorder System Video recording system 2 rotary heads...
Operating Instructions
Page 148
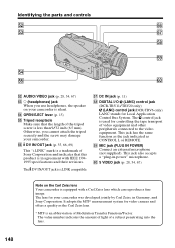
The control jack is i.LINK compatible. The value number indicates the amount of light of Modulation Transfer Function/Factor. Otherwise, you use headphones, the speaker on the Carl Zeiss lens Your camcorder is silent. The DV IN/OUT jack is used for video camera and offers a quality as CONTROL L or REMOTE. This jack also accepts a "plug-in agreement with a Carl Zeiss lens which can reproduce a fine image. y; It...
The control jack is i.LINK compatible. The value number indicates the amount of light of Modulation Transfer Function/Factor. Otherwise, you use headphones, the speaker on the Carl Zeiss lens Your camcorder is silent. The DV IN/OUT jack is used for video camera and offers a quality as CONTROL L or REMOTE. This jack also accepts a "plug-in agreement with a Carl Zeiss lens which can reproduce a fine image. y; It...
Operating Instructions
Page 152
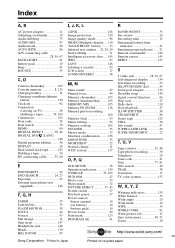
... 11 Adjusting viewfinder 19 Audio dubbing 73 AUDIO MIX 87 Audio mode 89 AUTO SHTR 86 A/V connecting cable 28, 54, 67 BACK LIGHT 21 Battery pack 10 Beep 91 BOUNCE 35 C, D Camera chromakey 105 Cassette memory 8, 125 Charging battery 11 Charging vanadium-lithium battery 139 Clock set 92 Connection (viewing on TV 29 (dubbing a tape 54, 109 Continuous 102 Data code 26 Date search 50 DEMO 90 DIGITAL EFFECT 38, 46 DIGITAL I/O/ (LANC 148 Digital program editing ......... 56 DISPLAY...
... 11 Adjusting viewfinder 19 Audio dubbing 73 AUDIO MIX 87 Audio mode 89 AUTO SHTR 86 A/V connecting cable 28, 54, 67 BACK LIGHT 21 Battery pack 10 Beep 91 BOUNCE 35 C, D Camera chromakey 105 Cassette memory 8, 125 Charging battery 11 Charging vanadium-lithium battery 139 Clock set 92 Connection (viewing on TV 29 (dubbing a tape 54, 109 Continuous 102 Data code 26 Date search 50 DEMO 90 DIGITAL EFFECT 38, 46 DIGITAL I/O/ (LANC 148 Digital program editing ......... 56 DISPLAY...

