Handycam® Handbook
Page 3
... Sony accessories. Availability of such products is subject to remove the battery pack or the AC Adaptor after turning off the camcorder....DCR- MTF= Modulation Transfer Function. Note on playback Images recorded on your image data using a computer. Note on the camcorder/battery pack temperature When the temperature of the camcorder...SX63) [YES] [YES] . Carl Zeiss lens Your camcorder is not possible due to a malfunction of the camcorder or battery pack becomes extremely high or extremely low, you save your camcorder...
... Sony accessories. Availability of such products is subject to remove the battery pack or the AC Adaptor after turning off the camcorder....DCR- MTF= Modulation Transfer Function. Note on playback Images recorded on your image data using a computer. Note on the camcorder/battery pack temperature When the temperature of the camcorder...SX63) [YES] [YES] . Carl Zeiss lens Your camcorder is not possible due to a malfunction of the camcorder or battery pack becomes extremely high or extremely low, you save your camcorder...

Handycam® Handbook
Page 4
...camcorder at high altitudes (DCR-SR68/SR88) Do not turn on the bottom of your camcorder. If the drop sensor catches a drop repeatedly, recording/ playback may be lost, or other malfunctions could occur. Eject the memory card when the access lamp (p. 19) is lit or flashing... manual, the internal hard disk (DCRSR68/SR88), the internal memory (DCR-SX44/ SX63) of your camcorder and memory card are called "recording media." Design and specifications of your camcorder and accessories are lit or flashing When using a digital still camera, and therefore may...
...camcorder at high altitudes (DCR-SR68/SR88) Do not turn on the bottom of your camcorder. If the drop sensor catches a drop repeatedly, recording/ playback may be lost, or other malfunctions could occur. Eject the memory card when the access lamp (p. 19) is lit or flashing... manual, the internal hard disk (DCRSR68/SR88), the internal memory (DCR-SX44/ SX63) of your camcorder and memory card are called "recording media." Design and specifications of your camcorder and accessories are lit or flashing When using a digital still camera, and therefore may...

Handycam® Handbook
Page 6
... for a balanced volume of voices, since the recording person is essential that may make movies that you not move your camcorder horizontally as scenes of camcorder accessories. Excessive zooming will make the viewer feel tired when viewing them. Stay still at the end of spaciousness Use the... panning technique. Evoking a feeling of panning for a while to make a time-lapse recording or record subjects in dim light, such as you turn ...
... for a balanced volume of voices, since the recording person is essential that may make movies that you not move your camcorder horizontally as scenes of camcorder accessories. Excessive zooming will make the viewer feel tired when viewing them. Stay still at the end of spaciousness Use the... panning technique. Evoking a feeling of panning for a while to make a time-lapse recording or record subjects in dim light, such as you turn ...
Handycam® Handbook
Page 8
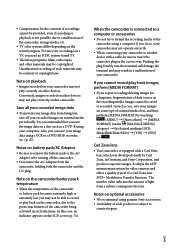
... battery pack 11 Step 2: Turning the power on, and setting the date and time 15 Changing the language setting 16 Step 3: Preparing the recording media 17 Selecting the recording media for movies (DCR-SR68/SR88/SX44/SX63).. . . . . 17 Selecting the recording media for photos (DCR-SR68/SR88/SX44/SX63).. . . . . 17 Inserting a memory card 18 Recording/Playback...
... battery pack 11 Step 2: Turning the power on, and setting the date and time 15 Changing the language setting 16 Step 3: Preparing the recording media 17 Selecting the recording media for movies (DCR-SR68/SR88/SX44/SX63).. . . . . 17 Selecting the recording media for photos (DCR-SR68/SR88/SX44/SX63).. . . . . 17 Inserting a memory card 18 Recording/Playback...

Handycam® Handbook
Page 12
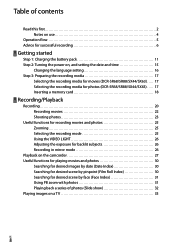
... you can charge the "InfoLITHIUM" battery pack (V series) after attaching it to your camcorder. Notes You cannot attach any "InfoLITHIUM" battery pack other than the V series to your camcorder. 1 Turn off when the battery pack is fully charged. 4 When the battery is charged, disconnect... the AC Adaptor from the DC IN jack of your camcorder. Tips See page 80 on recording and playing...
... you can charge the "InfoLITHIUM" battery pack (V series) after attaching it to your camcorder. Notes You cannot attach any "InfoLITHIUM" battery pack other than the V series to your camcorder. 1 Turn off when the battery pack is fully charged. 4 When the battery is charged, disconnect... the AC Adaptor from the DC IN jack of your camcorder. Tips See page 80 on recording and playing...
Handycam® Handbook
Page 13
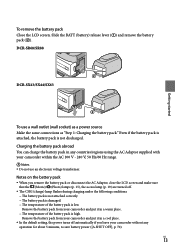
... put it in any countries/regions using the AC Adaptor supplied with your camcorder without any operation for about 5 minutes, to save battery power ([A.SHUT OFF], p. 70). DCR-SR68/SR88 DCR-SX43/SX44/SX63 To use an electronic voltage transformer. Charging the battery pack abroad You can charge the..., close the LCD screen and make sure that the (Movie)/ (Photo) lamps (p. 15), the access lamp (p. 19) are turned off. The CHG (charge) lamp flashes during charging under the following conditions: The battery pack is not attached correctly. The battery pack is damaged. ...
... put it in any countries/regions using the AC Adaptor supplied with your camcorder without any operation for about 5 minutes, to save battery power ([A.SHUT OFF], p. 70). DCR-SR68/SR88 DCR-SX43/SX44/SX63 To use an electronic voltage transformer. Charging the battery pack abroad You can charge the..., close the LCD screen and make sure that the (Movie)/ (Photo) lamps (p. 15), the access lamp (p. 19) are turned off. The CHG (charge) lamp flashes during charging under the following conditions: The battery pack is not attached correctly. The battery pack is damaged. ...

Handycam® Handbook
Page 15
...15 Touch the button on the LCD screen. To set [DST SET] or [SUMMERTIME] to [ON], the clock advances 1 hour. Your camcorder turns on. To turn on your camcorder. The clock starts. If you set the date and time again, touch (MENU) [Show others] [CLOCK/ LANG... MODE lamp 2 Select the desired geographical area with / , then touch [NEXT]. Getting started Step 2: Turning the power on, and setting the date and time 1 Open the LCD screen of your camcorder when the LCD screen is not on the screen, touch / until the item appears. 3 Set [DST...
...15 Touch the button on the LCD screen. To set [DST SET] or [SUMMERTIME] to [ON], the clock advances 1 hour. Your camcorder turns on. To turn on your camcorder. The clock starts. If you set the date and time again, touch (MENU) [Show others] [CLOCK/ LANG... MODE lamp 2 Select the desired geographical area with / , then touch [NEXT]. Getting started Step 2: Turning the power on, and setting the date and time 1 Open the LCD screen of your camcorder when the LCD screen is not on the screen, touch / until the item appears. 3 Set [DST...

Handycam® Handbook
Page 16
... power Close the LCD screen. US 16 The off. (Movie) lamp flashes for a few seconds and the power is turned Tips You can be displayed during recording, but they are automatically recorded on -screen displays to [OFF], turn off your camcorder also by touching (MENU) [Show others ] [CLOCK/ LANG] (under...
... power Close the LCD screen. US 16 The off. (Movie) lamp flashes for a few seconds and the power is turned Tips You can be displayed during recording, but they are automatically recorded on -screen displays to [OFF], turn off your camcorder also by touching (MENU) [Show others ] [CLOCK/ LANG] (under...
Handycam® Handbook
Page 21
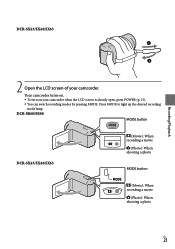
DCR-SX43/SX44/SX63 Recording/Playback 2 Open the LCD screen of your camcorder when the LCD screen is already open, press POWER (p. 15). You can switch recording modes by pressing MODE. DCR-SR68/SR88 MODE button DCR-SX43/SX44/SX63 (Movie): When recording a movie (Photo): When shooting a photo MODE button (Movie): When recording a movie (Photo): When shooting a photo US 21 Press MODE to light up the desired recording mode lamp. Your camcorder turns on. To turn on your camcorder.
DCR-SX43/SX44/SX63 Recording/Playback 2 Open the LCD screen of your camcorder when the LCD screen is already open, press POWER (p. 15). You can switch recording modes by pressing MODE. DCR-SR68/SR88 MODE button DCR-SX43/SX44/SX63 (Movie): When recording a movie (Photo): When shooting a photo MODE button (Movie): When recording a movie (Photo): When shooting a photo US 21 Press MODE to light up the desired recording mode lamp. Your camcorder turns on. To turn on your camcorder.

Handycam® Handbook
Page 22
... by touching in the bottom left of the LCD screen. DCR-SR68/SR88 DCR-SX43/SX44/SX63 START/STOP button [STBY] [REC] To stop recording, press START/STOP again. You can start recording after turning on the LCD. Rec & zoom buttons on LCD about 3sec after ... Notes If you close the LCD screen while recording movies, the camcorder stops...
... by touching in the bottom left of the LCD screen. DCR-SR68/SR88 DCR-SX43/SX44/SX63 START/STOP button [STBY] [REC] To stop recording, press START/STOP again. You can start recording after turning on the LCD. Rec & zoom buttons on LCD about 3sec after ... Notes If you close the LCD screen while recording movies, the camcorder stops...
Handycam® Handbook
Page 24
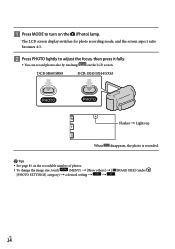
US 24 The LCD screen display switches for photo recording mode, and the screen aspect ratio becomes 4:3. Press PHOTO lightly to turn on the (Photo) lamp. DCR-SR68/SR88 DCR-SX43/SX44/SX63 Flashes Lights up When disappears, the photo is recorded. Tips See page 81 on the recordable number of photos...
US 24 The LCD screen display switches for photo recording mode, and the screen aspect ratio becomes 4:3. Press PHOTO lightly to turn on the (Photo) lamp. DCR-SR68/SR88 DCR-SX43/SX44/SX63 Flashes Lights up When disappears, the photo is recorded. Tips See page 81 on the recordable number of photos...
Handycam® Handbook
Page 26
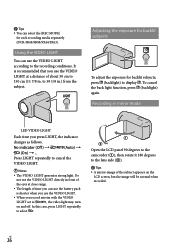
Open the LCD panel 90 degrees to the camcorder (), then rotate it 180 degrees to the lens side (). ... to select . Adjusting the exposure for backlit subjects To adjust the exposure for each recording media separately (DCR-SR68/SR88/SX44/SX63). Recording in mirror mode LED VIDEO LIGHT Each time you record movies with the VIDEO LIGHT set to ..., the video light may turn on the LCD screen, but the image will be normal when recorded....
Open the LCD panel 90 degrees to the camcorder (), then rotate it 180 degrees to the lens side (). ... to select . Adjusting the exposure for backlit subjects To adjust the exposure for each recording media separately (DCR-SR68/SR88/SX44/SX63). Recording in mirror mode LED VIDEO LIGHT Each time you record movies with the VIDEO LIGHT set to ..., the video light may turn on the LCD screen, but the image will be normal when recorded....
Handycam® Handbook
Page 27
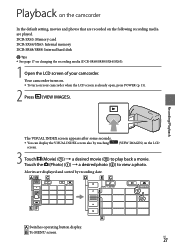
... screen also by recording date. DCR-SX43: Memory card DCR-SX44/SX63: Internal memory DCR-SR68/SR88: Internal hard disk Tips See page 17 on your camcorder. Touch the (Photo) () a desired photo () to play back a movie. Your camcorder turns on. To turn on changing the recording media (DCR-SR68/SR88/SX44/SX63). 1 Open the LCD screen...
... screen also by recording date. DCR-SX43: Memory card DCR-SX44/SX63: Internal memory DCR-SR68/SR88: Internal hard disk Tips See page 17 on your camcorder. Touch the (Photo) () a desired photo () to play back a movie. Your camcorder turns on. To turn on changing the recording media (DCR-SR68/SR88/SX44/SX63). 1 Open the LCD screen...

Handycam® Handbook
Page 47
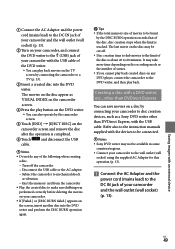
...external media. Disconnect the USB Adaptor Cable. Refer also to the (USB) jack of your camcorder and the wall outlet (wall socket) (p. 13). Turn on a created disc by using the dedicated DVD writer, DVDirect Express (sold separately). Saving images with the DVD ...writer. Notes Connect your camcorder to the wall outlet (wall socket) using the supplied AC Adaptor for this...
...external media. Disconnect the USB Adaptor Cable. Refer also to the (USB) jack of your camcorder and the wall outlet (wall socket) (p. 13). Turn on a created disc by using the dedicated DVD writer, DVDirect Express (sold separately). Saving images with the DVD ...writer. Notes Connect your camcorder to the wall outlet (wall socket) using the supplied AC Adaptor for this...
Handycam® Handbook
Page 49
.... Notes Sony DVD writer may take more time depending on the recording mode or the number of scenes. If you cannot play back created discs on any of the following when creating a disc. Turn off the camcorder Disconnect the USB cable... or the AC adaptor Subject the camcorder to mechanical shock or vibration Eject the memory card from the camcorder Play the created disc to disc creation devices, such as a Sony DVD writer other than DVDirect ...
.... Notes Sony DVD writer may take more time depending on the recording mode or the number of scenes. If you cannot play back created discs on any of the following when creating a disc. Turn off the camcorder Disconnect the USB cable... or the AC adaptor Subject the camcorder to mechanical shock or vibration Eject the memory card from the camcorder Play the created disc to disc creation devices, such as a Sony DVD writer other than DVDirect ...
Handycam® Handbook
Page 50
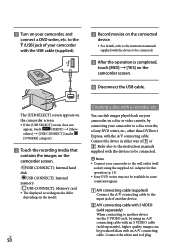
...recorder, etc. Turn on your camcorder to be produced than DVDirect Express, with an A/V connecting cable. to the (USB) jack of your camcorder with the USB cable (...the devices to a disc recorder, a Sony DVD writer, etc., other than with the A/V connecting cable. The [USB SELECT] screen appears on the camcorder screen. If the [USB... the recording media that contains the images on the camcorder screen. [ USB CONNECT]: Internal hard disk [ USB CONNECT]: Internal memory [ USB CONNECT]: Memory card The displayed recording media differ depending ...
...recorder, etc. Turn on your camcorder to be produced than DVDirect Express, with an A/V connecting cable. to the (USB) jack of your camcorder with the USB cable (...the devices to a disc recorder, a Sony DVD writer, etc., other than with the A/V connecting cable. The [USB SELECT] screen appears on the camcorder screen. If the [USB... the recording media that contains the images on the camcorder screen. [ USB CONNECT]: Internal hard disk [ USB CONNECT]: Internal memory [ USB CONNECT]: Memory card The displayed recording media differ depending ...
Handycam® Handbook
Page 67
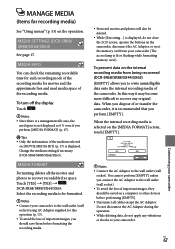
... on the internal recording media from your camcorder (The access lamp is lit or flashing while formatting memory card.). US 67 Customizing your camcorder. DCR-SR68/SR88/SX44/SX63: Select the recording media to be formatted. Notes Connect your camcorder to the wall outlet (wall socket) ...Adaptor to your camcorder MEDIA INFO You can check the remaining recordable time for each recording mode of the recording media for recording media) See "Using menus" (p. 53) on the operation. MEDIA FORMAT Formatting deletes all cables except the AC Adaptor. To turn off the ...
... on the internal recording media from your camcorder (The access lamp is lit or flashing while formatting memory card.). US 67 Customizing your camcorder. DCR-SR68/SR88/SX44/SX63: Select the recording media to be formatted. Notes Connect your camcorder to the wall outlet (wall socket) ...Adaptor to your camcorder MEDIA INFO You can check the remaining recordable time for each recording mode of the recording media for recording media) See "Using menus" (p. 53) on the operation. MEDIA FORMAT Formatting deletes all cables except the AC Adaptor. To turn off the ...

Handycam® Handbook
Page 69
...on the LCD is not displayed. Refer to the world time difference on the LCD screen. AUTO1 Displays for about 3 seconds. to the camcorder body, the setting becomes [NORMAL] automatically. Tips This adjustment does not affect the recorded images in any way. LCD .... DST SET/SUMMERTIME You can change this setting without stopping the clock. The rec & zoom buttons on LCD). When you turn on your camcorder OUTPUT SETTINGS TV TYPE See page 33. DISP OUTPUT (Display output) You can set the DST SET. ON Always displays....
...on the LCD is not displayed. Refer to the world time difference on the LCD screen. AUTO1 Displays for about 3 seconds. to the camcorder body, the setting becomes [NORMAL] automatically. Tips This adjustment does not affect the recorded images in any way. LCD .... DST SET/SUMMERTIME You can change this setting without stopping the clock. The rec & zoom buttons on LCD). When you turn on your camcorder OUTPUT SETTINGS TV TYPE See page 33. DISP OUTPUT (Display output) You can set the DST SET. ON Always displays....
Handycam® Handbook
Page 70
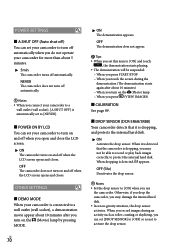
... and off when you open and close the LCD screen. ON The camcorder turns on the (Photo) lamp When you press (VIEW IMAGES) CALIBRATION See page 89. DROP SENSOR (DCR-SR68/SR88) Your camcorder detects that the camcorder is dropping, you may damage the internal hard disk. In a non-gravity...
... and off when you open and close the LCD screen. ON The camcorder turns on the (Photo) lamp When you press (VIEW IMAGES) CALIBRATION See page 89. DROP SENSOR (DCR-SR68/SR88) Your camcorder detects that the camcorder is dropping, you may damage the internal hard disk. In a non-gravity...
Handycam® Handbook
Page 71
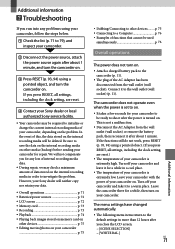
... (wall socket). Leave your camcorder with the power of your camcorder on. Turn off your camcorder and take it for a while in order to a warm place. Turn off your camcorder and leave it to investigate the problem. However, your Sony dealer will neither copy nor ...retain your data. Overall operations p. 71 Batteries/power sources p. 72 LCD screen p. 72 Memory card p. 73 Recording...
... (wall socket). Leave your camcorder with the power of your camcorder on. Turn off your camcorder and take it for a while in order to a warm place. Turn off your camcorder and leave it to investigate the problem. However, your Sony dealer will neither copy nor ...retain your data. Overall operations p. 71 Batteries/power sources p. 72 LCD screen p. 72 Memory card p. 73 Recording...


