
Operating Guide
Page 6
...or leaking Lithium-Ion batteries. and CANADA RECYCLING LITHIUM-ION BATTERIES Lithium-Ion batteries are recyclable. Disconnect the AC Adaptor from the wall outlet (wall socket) immediately if any interference received, including interference that can burst, cause a fire or even chemical burns...Sony battery charger or a device that may cause undesired operation. CAUTION Battery pack If the battery pack is an internationally recognized safety organization. For customers in the U.S.A. Use the nearby wall outlet (wall socket) when using your camcorder. AC Adaptor Do not use the AC Adaptor ...
...or leaking Lithium-Ion batteries. and CANADA RECYCLING LITHIUM-ION BATTERIES Lithium-Ion batteries are recyclable. Disconnect the AC Adaptor from the wall outlet (wall socket) immediately if any interference received, including interference that can burst, cause a fire or even chemical burns...Sony battery charger or a device that may cause undesired operation. CAUTION Battery pack If the battery pack is an internationally recognized safety organization. For customers in the U.S.A. Use the nearby wall outlet (wall socket) when using your camcorder. AC Adaptor Do not use the AC Adaptor ...

Operating Guide
Page 12
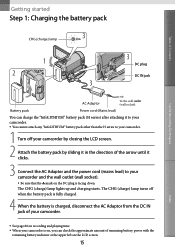
... 1: Charging the battery pack CHG lamp DC plug DC IN jack AC Adaptor To the wall outlet (wall socket) Battery pack Power cord (Mains lead) You can charge the "InfoLITHIUM" battery pack (H series) after attaching it to your camcorder. You cannot attach any "InfoLITHIUM" battery pack other than the... the battery pack is fully charged. 4 When the battery is charged, disconnect the AC Adaptor from the DC IN jack of the arrow until it in the direction of your camcorder and the wall outlet (wall socket). Be sure that the mark on charging, recording and playing ...
... 1: Charging the battery pack CHG lamp DC plug DC IN jack AC Adaptor To the wall outlet (wall socket) Battery pack Power cord (Mains lead) You can charge the "InfoLITHIUM" battery pack (H series) after attaching it to your camcorder. You cannot attach any "InfoLITHIUM" battery pack other than the... the battery pack is fully charged. 4 When the battery is charged, disconnect the AC Adaptor from the DC IN jack of the arrow until it in the direction of your camcorder and the wall outlet (wall socket). Be sure that the mark on charging, recording and playing ...
Operating Guide
Page 13
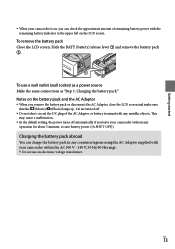
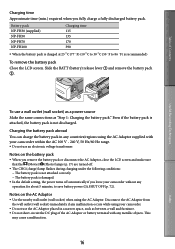
... (Photo) lamps (p. 14) are turned off automatically if you can charge the battery pack in any countries/regions using the AC Adaptor supplied with your camcorder without any metallic objects. To remove the battery pack Close the LCD screen. US 13 To use an electronic voltage transformer. Charging ... can check the approximate amount of the AC Adaptor or battery terminal with the remaining battery indicator at the upper left on , you leave your camcorder within the AC 100 V - 240 V, 50 Hz/60 Hz range. Do not use a wall outlet (wall socket) as a power source Make the same...
... (Photo) lamps (p. 14) are turned off automatically if you can charge the battery pack in any countries/regions using the AC Adaptor supplied with your camcorder without any metallic objects. To remove the battery pack Close the LCD screen. US 13 To use an electronic voltage transformer. Charging ... can check the approximate amount of the AC Adaptor or battery terminal with the remaining battery indicator at the upper left on , you leave your camcorder within the AC 100 V - 240 V, 50 Hz/60 Hz range. Do not use a wall outlet (wall socket) as a power source Make the same...

Operating Guide
Page 23
... (Red) VCRs or TVs Playback (Yellow) :Signal flow A/V Remote Connector Set the input selector of the TV to the input your camcorder (p. 20). You can be connected to. For details, refer to the instruction manuals supplied with the TV. Connect your... the input jack of the TV. Play back movies and photos on a TV Connect your camcorder to the wall outlet (wall socket) using the supplied AC Adaptor for this operation (p. 13). Connect the white and red plugs (left/right audio) and the S VIDEO plug (S VIDEO channel) of the A/V ...
... (Red) VCRs or TVs Playback (Yellow) :Signal flow A/V Remote Connector Set the input selector of the TV to the input your camcorder (p. 20). You can be connected to. For details, refer to the instruction manuals supplied with the TV. Connect your... the input jack of the TV. Play back movies and photos on a TV Connect your camcorder to the wall outlet (wall socket) using the supplied AC Adaptor for this operation (p. 13). Connect the white and red plugs (left/right audio) and the S VIDEO plug (S VIDEO channel) of the A/V ...
Operating Guide
Page 26
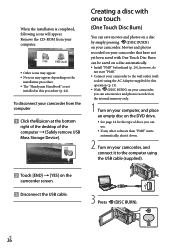
.... Install "PMB" beforehand (p. 24), however, do not start "PMB." Connect your camcorder to the computer using the USB cable (supplied). 3 Press (DISC BURN). To disconnect your camcorder, and connect it to the wall outlet (wall socket) using the AC Adaptor supplied for this procedure (p. 44). Creating a disc with One Touch Disc Burn can...
.... Install "PMB" beforehand (p. 24), however, do not start "PMB." Connect your camcorder to the computer using the USB cable (supplied). 3 Press (DISC BURN). To disconnect your camcorder, and connect it to the wall outlet (wall socket) using the AC Adaptor supplied for this procedure (p. 44). Creating a disc with One Touch Disc Burn can...
Operating Guide
Page 27
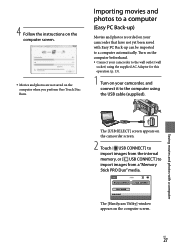
... are not saved on the computer screen. The [Handycam Utility] window appears on the computer when you perform One Touch Disc Burn. Turn on the camcorder screen. 2 Touch [ USB CONNECT] to import images from a "Memory Stick PRO Duo" media. US 27 Importing movies and photos to a computer .... Saving movies and photos with Easy PC Back-up ) Movies and photos recorded on your camcorder, and connect it to the computer using the supplied AC Adaptor for this operation (p. 13). 1 Turn on your camcorder that have not yet been saved with a computer The [USB SELECT] screen appears on the...
... are not saved on the computer screen. The [Handycam Utility] window appears on the computer when you perform One Touch Disc Burn. Turn on the camcorder screen. 2 Touch [ USB CONNECT] to import images from a "Memory Stick PRO Duo" media. US 27 Importing movies and photos to a computer .... Saving movies and photos with Easy PC Back-up ) Movies and photos recorded on your camcorder, and connect it to the computer using the supplied AC Adaptor for this operation (p. 13). 1 Turn on your camcorder that have not yet been saved with a computer The [USB SELECT] screen appears on the...

Operating Guide
Page 33
... to be connected. 4 After the operation is described here. Connect your camcorder to the wall outlet (wall socket) using the supplied AC Adaptor for this operation (p. 13). Sony DVD writer may not be available in some countries/regions. 1 Turn on your camcorder, and connect a DVD writer, etc., to the (USB) jack of your...
... to be connected. 4 After the operation is described here. Connect your camcorder to the wall outlet (wall socket) using the supplied AC Adaptor for this operation (p. 13). Sony DVD writer may not be available in some countries/regions. 1 Turn on your camcorder, and connect a DVD writer, etc., to the (USB) jack of your...

Operating Guide
Page 34
... cable. If you connect the S VIDEO plug only, you want to dub before starting the operation (p. 37). Connect your camcorder to the instruction manuals supplied with the A/V connecting cable. US 34 A/V Remote Connector Input S VIDEO (Yellow) VIDEO (Yellow) (White...images played back on your camcorder to a disc or video cassette, by connecting your camcorder to a disc recorder, a Sony DVD writer other than with S VIDEO (sold separately). Connect your camcorder to the wall outlet (wall socket) using the supplied AC Adaptor for this operation (p. ...
... cable. If you connect the S VIDEO plug only, you want to dub before starting the operation (p. 37). Connect your camcorder to the instruction manuals supplied with the A/V connecting cable. US 34 A/V Remote Connector Input S VIDEO (Yellow) VIDEO (Yellow) (White...images played back on your camcorder to a disc or video cassette, by connecting your camcorder to a disc recorder, a Sony DVD writer other than with S VIDEO (sold separately). Connect your camcorder to the wall outlet (wall socket) using the supplied AC Adaptor for this operation (p. ...

Operating Guide
Page 36
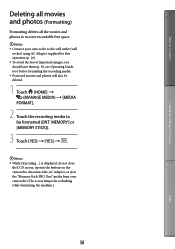
... movies and photos You can free media space by deleting movies and photos from your camcorder to the wall outlet (wall socket) using the AC Adaptor supplied for this operation (p. 13). To avoid the loss of important images, you want to be formatted ([INT...at one time In step 2, touch [ DELETE] [ DELETE ALL] [YES] [YES] . While [Executing...] is lit or flashing while formatting the medium.) US 36 MEMORY] or [MEMORY STICK]). Touch [YES] [YES] . 4 Touch [YES] . &#...
... movies and photos You can free media space by deleting movies and photos from your camcorder to the wall outlet (wall socket) using the AC Adaptor supplied for this operation (p. 13). To avoid the loss of important images, you want to be formatted ([INT...at one time In step 2, touch [ DELETE] [ DELETE ALL] [YES] [YES] . While [Executing...] is lit or flashing while formatting the medium.) US 36 MEMORY] or [MEMORY STICK]). Touch [YES] [YES] . 4 Touch [YES] . &#...
Operating Guide
Page 45
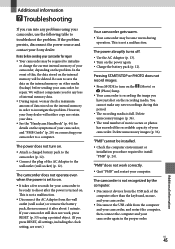
...wall outlet (wall socket) or remove the battery pack, then reconnect it after about 1 minute. Delete unnecessary images (p. 36). The total number of movie scenes or photos has exceeded the recordable capacity of your camcorder, and "PMB Guide" (p. 28) on connecting your Sony dealer. The power abruptly turns off. Use the AC Adaptor... (p. 13). Turn on the symptoms of your camcorder for repair Your camcorder may be ...
...wall outlet (wall socket) or remove the battery pack, then reconnect it after about 1 minute. Delete unnecessary images (p. 36). The total number of movie scenes or photos has exceeded the recordable capacity of your camcorder, and "PMB Guide" (p. 28) on connecting your Sony dealer. The power abruptly turns off. Use the AC Adaptor... (p. 13). Turn on the symptoms of your camcorder for repair Your camcorder may be ...
Operating Guide
Page 48
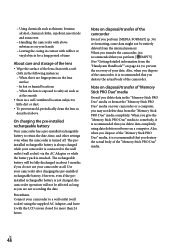
...rechargeable battery. When you give the "Memory Stick PRO Duo" media to a wall outlet (wall socket) using the supplied AC Adaptor, and leave it is recommended that you destroy the actual body of the camcorder Even if you may not delete data from the "Handycam Handbook"" on disposal/... memory. US 48 The preinstalled rechargeable battery is always charged while your camcorder is connected to prevent the recovery of the camcorder. Note on page 44.) to the wall outlet (wall socket) via the AC Adaptor or while the battery pack is recommended that you delete data completely using...
...rechargeable battery. When you give the "Memory Stick PRO Duo" media to a wall outlet (wall socket) using the supplied AC Adaptor, and leave it is recommended that you destroy the actual body of the camcorder Even if you may not delete data from the "Handycam Handbook"" on disposal/... memory. US 48 The preinstalled rechargeable battery is always charged while your camcorder is connected to prevent the recovery of the camcorder. Note on page 44.) to the wall outlet (wall socket) via the AC Adaptor or while the battery pack is recommended that you delete data completely using...
Handycam® Handbook
Page 15
...lamp Table of Contents DC plug DC IN jack Useful Recording Techniques AC Adaptor To the wall outlet (wall socket) Battery pack Power cord (Mains lead) You can check the approximate amount of the arrow until it to your camcorder. You cannot attach any "InfoLITHIUM" battery pack other than ...pack is fully charged. 4 When the battery is charged, disconnect the AC Adaptor from the DC IN jack of your camcorder. See page 88 on recording and playing time. When your camcorder and the wall outlet (wall socket). Be sure that the mark on the LCD ...
...lamp Table of Contents DC plug DC IN jack Useful Recording Techniques AC Adaptor To the wall outlet (wall socket) Battery pack Power cord (Mains lead) You can check the approximate amount of the arrow until it to your camcorder. You cannot attach any "InfoLITHIUM" battery pack other than ...pack is fully charged. 4 When the battery is charged, disconnect the AC Adaptor from the DC IN jack of your camcorder. See page 88 on recording and playing time. When your camcorder and the wall outlet (wall socket). Be sure that the mark on the LCD ...
Handycam® Handbook
Page 16
... This may cause a malfunction. 16 Index Table of the AC Adaptor or battery terminal with your camcorder. Do not use a wall outlet (wall socket) as a power source Make the same connections as between a wall and furniture. Do not short-circuit the DC plug ...wall outlet (wall socket) when using the AC Adaptor supplied with any metallic objects. Notes on the battery pack When you remove the battery pack or disconnect the AC Adaptor, close the LCD screen and make sure that the (Movie)/ (Photo) lamps (p. 17) are turned off. The CHG (charge) lamp flashes...
... This may cause a malfunction. 16 Index Table of the AC Adaptor or battery terminal with your camcorder. Do not use a wall outlet (wall socket) as a power source Make the same connections as between a wall and furniture. Do not short-circuit the DC plug ...wall outlet (wall socket) when using the AC Adaptor supplied with any metallic objects. Notes on the battery pack When you remove the battery pack or disconnect the AC Adaptor, close the LCD screen and make sure that the (Movie)/ (Photo) lamps (p. 17) are turned off. The CHG (charge) lamp flashes...

Handycam® Handbook
Page 39
...cable with an A/V connecting cable. For details, refer to the instruction manuals supplied with the TV. Connect your camcorder to a TV with the A/V connecting cable (, supplied) or an A/V connecting cable with an S VIDEO cable (... will be produced than with S VIDEO . The yellow plug connection is not necessary. Connect your camcorder to the wall outlet (wall socket) using an A/V connecting cable with an S VIDEO cable (sold separately). Connect the white and ... another device via the S VIDEO jack, by using the supplied AC Adaptor for this operation (p. 16).
...cable with an A/V connecting cable. For details, refer to the instruction manuals supplied with the TV. Connect your camcorder to a TV with the A/V connecting cable (, supplied) or an A/V connecting cable with an S VIDEO cable (... will be produced than with S VIDEO . The yellow plug connection is not necessary. Connect your camcorder to the wall outlet (wall socket) using an A/V connecting cable with an S VIDEO cable (sold separately). Connect the white and ... another device via the S VIDEO jack, by using the supplied AC Adaptor for this operation (p. 16).

Handycam® Handbook
Page 44
... recording date of the movie to be dubbed, and mark it with . DB F.] [MEMORY STICK]. Connect your camcorder to the wall outlet (wall socket) using the supplied AC Adaptor to prevent your camcorder from the internal memory to "Memory Stick PRO Duo" media Dubbing movies You can select multiple movies. You cannot select...
... recording date of the movie to be dubbed, and mark it with . DB F.] [MEMORY STICK]. Connect your camcorder to the wall outlet (wall socket) using the supplied AC Adaptor to prevent your camcorder from the internal memory to "Memory Stick PRO Duo" media Dubbing movies You can select multiple movies. You cannot select...

Handycam® Handbook
Page 45
... mark with . Index e 45 Insert "Memory Stick PRO Duo" media into your camcorder before the operation. Notes Connect your camcorder to the wall outlet (wall socket) using the supplied AC Adaptor to prevent your camcorder from the internal memory of the camcorder to be copied, then touch . Touch to return to the previous screen. [COPY...
... mark with . Index e 45 Insert "Memory Stick PRO Duo" media into your camcorder before the operation. Notes Connect your camcorder to the wall outlet (wall socket) using the supplied AC Adaptor to prevent your camcorder from the internal memory of the camcorder to be copied, then touch . Touch to return to the previous screen. [COPY...

Handycam® Handbook
Page 52
...a disc by For details, refer to disc creation devices, such as a Sony DVD writer other than DVDirect Express, with the USB cable is about 20 to 60 minutes. Index connecting your camcorder to a Sony DVD writer with the USB cable. If playback is completed, touch [END] ...into the DVD writer and touch (DISC BURN) again. Turn on your camcorder, and connect a DVD writer, etc., to the (USB) jack of your camcorder to the wall outlet (wall socket) using the supplied AC Adaptor for any of the following when creating a disc. Turn off . ...
...a disc by For details, refer to disc creation devices, such as a Sony DVD writer other than DVDirect Express, with the USB cable is about 20 to 60 minutes. Index connecting your camcorder to a Sony DVD writer with the USB cable. If playback is completed, touch [END] ...into the DVD writer and touch (DISC BURN) again. Turn on your camcorder, and connect a DVD writer, etc., to the (USB) jack of your camcorder to the wall outlet (wall socket) using the supplied AC Adaptor for any of the following when creating a disc. Turn off . ...

Handycam® Handbook
Page 53
If you connect the S VIDEO plug only, you want to dub before starting the operation (p. 55). Sony DVD writer may not be produced than DVDirect Express, etc., with an S VIDEO cable. Table of Contents Useful Recording Techniques ... an A/V connecting cable with an S VIDEO cable (sold separately), higher quality images can dub images played back on your camcorder on your camcorder to the wall outlet (wall socket) using the supplied AC Adaptor for this operation (p. 16). A/V connecting cable (supplied) Connect the A/V connecting cable to the instruction manuals supplied...
If you connect the S VIDEO plug only, you want to dub before starting the operation (p. 55). Sony DVD writer may not be produced than DVDirect Express, etc., with an S VIDEO cable. Table of Contents Useful Recording Techniques ... an A/V connecting cable with an S VIDEO cable (sold separately), higher quality images can dub images played back on your camcorder on your camcorder to the wall outlet (wall socket) using the supplied AC Adaptor for this operation (p. 16). A/V connecting cable (supplied) Connect the A/V connecting cable to the instruction manuals supplied...
Handycam® Handbook
Page 58
... or [MEMORY STICK]). 3 Touch [YES] [YES] . Notes While [Executing...] is lit or flashing while formatting the medium.). 58 Index Table of important images, you should save them (p. 50, see Operating Guide too) before formatting the recording ... lamp is displayed, do not close the LCD screen, operate the buttons on the camcorder, disconnect the AC Adaptor, or eject the "Memory Stick PRO Duo" media from your camcorder to the wall outlet (wall socket) using AC Adaptor supplied for this operation (p. 16). To avoid the loss of Contents Useful...
... or [MEMORY STICK]). 3 Touch [YES] [YES] . Notes While [Executing...] is lit or flashing while formatting the medium.). 58 Index Table of important images, you should save them (p. 50, see Operating Guide too) before formatting the recording ... lamp is displayed, do not close the LCD screen, operate the buttons on the camcorder, disconnect the AC Adaptor, or eject the "Memory Stick PRO Duo" media from your camcorder to the wall outlet (wall socket) using AC Adaptor supplied for this operation (p. 16). To avoid the loss of Contents Useful...
Handycam® Handbook
Page 59
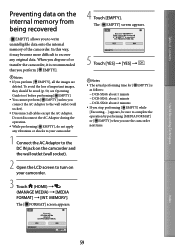
...camcorder. Index 59 Do not disconnect the AC Adaptor during the operation. While performing [ EMPTY], do not apply any original data. MEMORY]. The [ FORMAT] screen appears. 4 Touch [EMPTY]. In this way, it is as follows: DCR-SX40: about 1 minute DCR-SX41: about 1 minute DCR...] [INT. Table of Contents Useful Recording Techniques Preventing data on your camcorder. 1 Connect the AC Adaptor to the DC IN jack on the camcorder and the wall outlet (wall socket). 2 Open the LCD screen to turn on the internal memory from being ...
...camcorder. Index 59 Do not disconnect the AC Adaptor during the operation. While performing [ EMPTY], do not apply any original data. MEMORY]. The [ FORMAT] screen appears. 4 Touch [EMPTY]. In this way, it is as follows: DCR-SX40: about 1 minute DCR-SX41: about 1 minute DCR...] [INT. Table of Contents Useful Recording Techniques Preventing data on your camcorder. 1 Connect the AC Adaptor to the DC IN jack on the camcorder and the wall outlet (wall socket). 2 Open the LCD screen to turn on the internal memory from being ...


