Operating Guide
Page 8
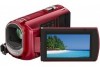
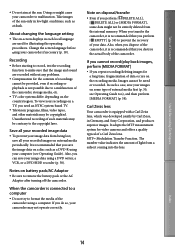
.... However, there may be sure to make sure the image and sound are recorded without any of the following when the (Movie)/ (Photo) lamps (p. 14) or the access lamp (p. 38) are lit or flashing. Pushing the plug forcibly into the terminal will find the "Handycam ...Handbook" (PDF) on the supplied CD-ROM (p. 44). The screenshots are from the camcorder When connecting your camcorder to a malfunction of the camcorder, recording media, etc. TV ...
.... However, there may be sure to make sure the image and sound are recorded without any of the following when the (Movie)/ (Photo) lamps (p. 14) or the access lamp (p. 38) are lit or flashing. Pushing the plug forcibly into the terminal will find the "Handycam ...Handbook" (PDF) on the supplied CD-ROM (p. 44). The screenshots are from the camcorder When connecting your camcorder to a malfunction of the camcorder, recording media, etc. TV ...

Operating Guide
Page 14
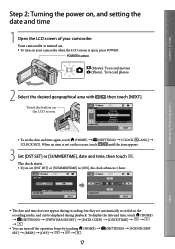
...hour. The date and time does not appear during recording, but they are automatically recorded on the recording media, and can turn on your camcorder. POWER button (Movie): To record movies (Photo): To record photos 2 Select the desired geographical area with / , then touch [NEXT]. To ... setting the date and time 1 Open the LCD screen of your camcorder when the LCD screen is open, press POWER. Your camcorder is not on . To turn off the operation beeps by touching (HOME) (SETTINGS) [SOUND/DISP SET] [BEEP] [OFF US 14 When...
...hour. The date and time does not appear during recording, but they are automatically recorded on the recording media, and can turn on your camcorder. POWER button (Movie): To record movies (Photo): To record photos 2 Select the desired geographical area with / , then touch [NEXT]. To ... setting the date and time 1 Open the LCD screen of your camcorder when the LCD screen is open, press POWER. Your camcorder is not on . To turn off the operation beeps by touching (HOME) (SETTINGS) [SOUND/DISP SET] [BEEP] [OFF US 14 When...

Operating Guide
Page 21
Your camcorder starts playing the selected movie. Previous Volume adjustment To stop To fast-reverse Next OPTION MENU To fast-forward To pause/play back movies slowly. &#... (HOME) (SETTINGS) [VIEW IMAGES SET] [DATA CODE] a desired setting To adjust the sound volume of movies While playing back movies, touch adjust with / . You can adjust the sound volume from the selected movie reaches the last movie, the screen returns to the VISUAL INDEX screen...
Your camcorder starts playing the selected movie. Previous Volume adjustment To stop To fast-reverse Next OPTION MENU To fast-forward To pause/play back movies slowly. &#... (HOME) (SETTINGS) [VIEW IMAGES SET] [DATA CODE] a desired setting To adjust the sound volume of movies While playing back movies, touch adjust with / . You can adjust the sound volume from the selected movie reaches the last movie, the screen returns to the VISUAL INDEX screen...

Operating Guide
Page 34
Select the recording media that contains movies you will hear no sound. The yellow plug (video) connection is not necessary. US 34 A/V Remote...a recorder, etc. Refer also to the instruction manuals supplied with the devices to a disc recorder, a Sony DVD writer other than with the A/V connecting cable. You can be connected. Connect the device in the ... device. If your recording device has an input selector, set it to the input mode. 2 Connect your camcorder to the recording device (a disc recorder, etc.) with the A/V connecting cable (supplied) or an A/V connecting...
Select the recording media that contains movies you will hear no sound. The yellow plug (video) connection is not necessary. US 34 A/V Remote...a recorder, etc. Refer also to the instruction manuals supplied with the devices to a disc recorder, a Sony DVD writer other than with the A/V connecting cable. You can be connected. Connect the device in the ... device. If your recording device has an input selector, set it to the input mode. 2 Connect your camcorder to the recording device (a disc recorder, etc.) with the A/V connecting cable (supplied) or an A/V connecting...
Operating Guide
Page 42
... Displays the detailed recording data during Easy Handycam operation. Sets whether or not the camcorder is turned on the TV screen or not. WIDE SELECT Sets the horizontal to ...shutter speed automatically. p. 15 GENERAL SET DEMO MODE Sets whether the demonstration appears or not. DIGITAL ZOOM p. 17 STEADYSHOT p. 17 AUTO SLW SHUTTR....... CLOCK/ LANG CLOCK SET p. 14 AREA SET p.... recording time of the LCD screen. LCD BL LEVEL Adjusts the backlight of the LCD screen. SOUND/DISP SET VOLUME p. 21 BEEP p. 14 LCD BRIGHT Adjusts the brightness of the LCD screen....
... Displays the detailed recording data during Easy Handycam operation. Sets whether or not the camcorder is turned on the TV screen or not. WIDE SELECT Sets the horizontal to ...shutter speed automatically. p. 15 GENERAL SET DEMO MODE Sets whether the demonstration appears or not. DIGITAL ZOOM p. 17 STEADYSHOT p. 17 AUTO SLW SHUTTR....... CLOCK/ LANG CLOCK SET p. 14 AREA SET p.... recording time of the LCD screen. LCD BL LEVEL Adjusts the backlight of the LCD screen. SOUND/DISP SET VOLUME p. 21 BEEP p. 14 LCD BRIGHT Adjusts the brightness of the LCD screen....

Operating Guide
Page 43
...to the type of focus. tab FADER Fades scenes in focus with directional sound relative to the zoom setting. TELE MACRO Shoots a subject in or out. SCENE SELECTION......... tab BLT-IN ZOOM MIC.......... SLIDE SHOW SET Sets the repetition option for the seleted subject simultaneously.... SPOT FOCUS Focuses on a subject you touch on the OPTION MENU only. MICREF LEVEL Sets the microphone level. EXPOSURE Adjusts the brightness of your camcorder tab SPOT ...
...to the type of focus. tab FADER Fades scenes in focus with directional sound relative to the zoom setting. TELE MACRO Shoots a subject in or out. SCENE SELECTION......... tab BLT-IN ZOOM MIC.......... SLIDE SHOW SET Sets the repetition option for the seleted subject simultaneously.... SPOT FOCUS Focuses on a subject you touch on the OPTION MENU only. MICREF LEVEL Sets the microphone level. EXPOSURE Adjusts the brightness of your camcorder tab SPOT ...
Handycam® Handbook
Page 4
...scene by face (Face Index 35 Searching for desired images by date (Date Index 36 Using PB zoom with photos 37 Playing back a series of photos (Slide show 38 Playing images on a TV 39...(Formatting 58 Preventing data on the internal memory from being recovered 59 Customizing your camcorder MOVIE SETTINGS (Items for recording movies 60 PHOTO SETTINGS (Items for recording photos 64 VIEW IMAGES ...SET (Items to customize the display 66 SOUND/DISP SET (Items to adjust the sound and the screen 68 OUTPUT SETTINGS (Items for when connected to a TV 70...
...scene by face (Face Index 35 Searching for desired images by date (Date Index 36 Using PB zoom with photos 37 Playing back a series of photos (Slide show 38 Playing images on a TV 39...(Formatting 58 Preventing data on the internal memory from being recovered 59 Customizing your camcorder MOVIE SETTINGS (Items for recording movies 60 PHOTO SETTINGS (Items for recording photos 64 VIEW IMAGES ...SET (Items to customize the display 66 SOUND/DISP SET (Items to adjust the sound and the screen 68 OUTPUT SETTINGS (Items for when connected to a TV 70...

Handycam® Handbook
Page 11
p. 84 (SETTINGS) category MOVIE SETTINGS REC MODE WIDE SELECT DIGITAL ZOOM STEADYSHOT AUTO SLW SHUTTR GUIDEFRAME REMAINING SET FACE SET* PHOTO SETTINGS IMAGE SIZE* FILE NO. AUTO SLW SHUTTR GUIDEFRAME VIEW IMAGES SET DATA CODE SOUND/DISP SET VOLUME* BEEP* LCD BRIGHT LCD BL LEVEL LCD COLOR OUTPUT SETTINGS TV TYPE DISP OUTPUT...
p. 84 (SETTINGS) category MOVIE SETTINGS REC MODE WIDE SELECT DIGITAL ZOOM STEADYSHOT AUTO SLW SHUTTR GUIDEFRAME REMAINING SET FACE SET* PHOTO SETTINGS IMAGE SIZE* FILE NO. AUTO SLW SHUTTR GUIDEFRAME VIEW IMAGES SET DATA CODE SOUND/DISP SET VOLUME* BEEP* LCD BRIGHT LCD BL LEVEL LCD COLOR OUTPUT SETTINGS TV TYPE DISP OUTPUT...

Handycam® Handbook
Page 12
List of Contents [SOUND/DISP SET] is changed to [SOUND SETTINGS] during Easy Handycam operation. * You can set this item during Easy Handycam operation. tab SPOT MTR/FCS SPOT METER SPOT FOCUS TELE MACRO EXPOSURE ... SHOW p. 38 SLIDE SHOW SET p. 38 Useful Recording Techniques Index 12 p. 74 p. 74 p. 75 p. 75 p. 76 p. 76 p. 77 p. 78 tab FADER p. 79 tab BLT-IN ZOOM MIC MICREF LEVEL SELF-TIMER p. 79 p. 80 p. 80 The tab depends on the OPTION MENU only.
List of Contents [SOUND/DISP SET] is changed to [SOUND SETTINGS] during Easy Handycam operation. * You can set this item during Easy Handycam operation. tab SPOT MTR/FCS SPOT METER SPOT FOCUS TELE MACRO EXPOSURE ... SHOW p. 38 SLIDE SHOW SET p. 38 Useful Recording Techniques Index 12 p. 74 p. 74 p. 75 p. 75 p. 76 p. 76 p. 77 p. 78 tab FADER p. 79 tab BLT-IN ZOOM MIC MICREF LEVEL SELF-TIMER p. 79 p. 80 p. 80 The tab depends on the OPTION MENU only.
Handycam® Handbook
Page 14
... 59) to format the media of a Carl Zeiss lens. Carl Zeiss lens Your camcorder is recommended that the image and sound are used for video cameras and offers a quality typical of the camcorder using your data. Change the screen language before using your image data using a DVD...camcorder, it is recommended that you can save your recordings on the country/region. Images cannot be provided, even if recording or playback is connected to a computer Do not try to prevent the recovery of light from being lost, save the image data on -screen displays in Germany, and Sony...
... 59) to format the media of a Carl Zeiss lens. Carl Zeiss lens Your camcorder is recommended that the image and sound are used for video cameras and offers a quality typical of the camcorder using your data. Change the screen language before using your image data using a DVD...camcorder, it is recommended that you can save your recordings on the country/region. Images cannot be provided, even if recording or playback is connected to a computer Do not try to prevent the recovery of light from being lost, save the image data on -screen displays in Germany, and Sony...
Handycam® Handbook
Page 17
... To turn off the operation beeps by touching (HOME) (SETTINGS) [SOUND/DISP SET] [BEEP] [OFF 17 Index When an item is not on the recording media, and can turn on your camcorder. The clock starts. If you set the date and time again, touch (HOME... touch [NEXT]. Table of Contents Useful Recording Techniques Step 2: Turning the power on, and setting the date and time 1 Open the LCD screen of your camcorder when the LCD screen is open, press POWER. To display the date and time, touch (HOME) (SETTINGS) [VIEW IMAGES SET] ...
... To turn off the operation beeps by touching (HOME) (SETTINGS) [SOUND/DISP SET] [BEEP] [OFF 17 Index When an item is not on the recording media, and can turn on your camcorder. The clock starts. If you set the date and time again, touch (HOME... touch [NEXT]. Table of Contents Useful Recording Techniques Step 2: Turning the power on, and setting the date and time 1 Open the LCD screen of your camcorder when the LCD screen is open, press POWER. To display the date and time, touch (HOME) (SETTINGS) [VIEW IMAGES SET] ...
Handycam® Handbook
Page 19
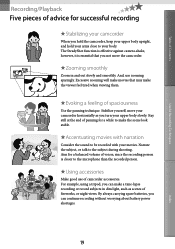
... Techniques Recording/Playback Five pieces of advice for successful recording Stabilizing your camcorder When you hold the camcorder, keep your upper body upright, and hold your arms close to make the scene look stable. Zooming smoothly Zoom in dim light, such as you can make the viewer feel tired... when viewing them. Accentuating movies with narration Consider the sound to be recorded with your...
... Techniques Recording/Playback Five pieces of advice for successful recording Stabilizing your camcorder When you hold the camcorder, keep your upper body upright, and hold your arms close to make the scene look stable. Zooming smoothly Zoom in dim light, such as you can make the viewer feel tired... when viewing them. Accentuating movies with narration Consider the sound to be recorded with your...

Handycam® Handbook
Page 30
...58320; SteadyShot may also be recorded. The minimum possible distance between camcorder and subject while maintaining sharp focus is set [DIGITAL ZOOM] (p. 61) if you move your finger on the power zoom lever. Adjusting the exposure for backlit subjects To adjust the exposure for backlit ... (backlight) again. 30 Index If you want to zoom to keep your finger off the power zoom lever, the operation sound of view Close view (Wide angle) (Telephoto) Move the power zoom lever slightly for a slower zoom. Table of Contents Useful Recording Techniques Wider range of ...
...58320; SteadyShot may also be recorded. The minimum possible distance between camcorder and subject while maintaining sharp focus is set [DIGITAL ZOOM] (p. 61) if you move your finger on the power zoom lever. Adjusting the exposure for backlit subjects To adjust the exposure for backlit ... (backlight) again. 30 Index If you want to zoom to keep your finger off the power zoom lever, the operation sound of view Close view (Wide angle) (Telephoto) Move the power zoom lever slightly for a slower zoom. Table of Contents Useful Recording Techniques Wider range of ...

Handycam® Handbook
Page 33
... (HOME) (SETTINGS) [VIEW IMAGES SET] [DATA CODE] a desired setting To adjust the sound volume of Contents Your camcorder starts playing the selected movie. Table of movies While playing back movies, touch adjust with / You can adjust the... sound volume from the selected movie reaches the last movie, the screen returns to the VISUAL INDEX screen. ...
... (HOME) (SETTINGS) [VIEW IMAGES SET] [DATA CODE] a desired setting To adjust the sound volume of Contents Your camcorder starts playing the selected movie. Table of movies While playing back movies, touch adjust with / You can adjust the... sound volume from the selected movie reaches the last movie, the screen returns to the VISUAL INDEX screen. ...

Handycam® Handbook
Page 53
...Insert the recording media in the recording device. If your recording device has an input selector, set it on your camcorder to a disc recorder, a Sony DVD writer other than with an A/V connecting cable. Index 53 If you connect the S VIDEO plug only, you want ...VIDEO channel) of or . Select the recording medium that contains movies you will hear no sound. Connect the device in some countries/regions. Notes Connect your camcorder to the wall outlet (wall socket) using an A/V connecting cable with an S VIDEO cable (sold separately)....
...Insert the recording media in the recording device. If your recording device has an input selector, set it on your camcorder to a disc recorder, a Sony DVD writer other than with an A/V connecting cable. Index 53 If you connect the S VIDEO plug only, you want ...VIDEO channel) of or . Select the recording medium that contains movies you will hear no sound. Connect the device in some countries/regions. Notes Connect your camcorder to the wall outlet (wall socket) using an A/V connecting cable with an S VIDEO cable (sold separately)....

Handycam® Handbook
Page 68
...setting ON OFF A melody sounds when you select [BRIGHT], battery life is slightly reduced during recording. 68 Index Brightens the LCD screen. Notes When you connect your camcorder to adjust the sound and the screen) The default settings are marked with... . Steps (HOME) (SETTINGS) [SOUND/DISP SET] [LCD BL LEVEL] a desired setting ...
...setting ON OFF A melody sounds when you select [BRIGHT], battery life is slightly reduced during recording. 68 Index Brightens the LCD screen. Notes When you connect your camcorder to adjust the sound and the screen) The default settings are marked with... . Steps (HOME) (SETTINGS) [SOUND/DISP SET] [LCD BL LEVEL] a desired setting ...

Handycam® Handbook
Page 69
LCD COLOR You can adjust the color of Contents If you open the LCD panel 180 degrees to face the screen outside and close the LCD panel to the camcorder body, the setting becomes [NORMAL] automatically. Tips This adjustment does not affect the recorded images in any way. Steps (HOME) (SETTINGS) [SOUND/DISP SET] [LCD COLOR] intensity)/ (higher intensity (lower Tips This adjustment does not affect the recorded images in any way. Table of the LCD screen. Useful Recording Techniques Index 69
LCD COLOR You can adjust the color of Contents If you open the LCD panel 180 degrees to face the screen outside and close the LCD panel to the camcorder body, the setting becomes [NORMAL] automatically. Tips This adjustment does not affect the recorded images in any way. Steps (HOME) (SETTINGS) [SOUND/DISP SET] [LCD COLOR] intensity)/ (higher intensity (lower Tips This adjustment does not affect the recorded images in any way. Table of the LCD screen. Useful Recording Techniques Index 69

Handycam® Handbook
Page 79
...To cancel the fader before starting the operation, touch [OFF]. Tips When you zoom in /out with [ONE PUSH], if the lighting conditions changed by bringing your camcorder outdoors from inside the house, or vice versa, you need to redo the [ONE PUSH] procedure ...to readjust the white balance. Steps In recording mode, (OPTION) [BLT-IN ZOOM MIC] a desired setting OFF The microphone does not record sound following zooming ...
...To cancel the fader before starting the operation, touch [OFF]. Tips When you zoom in /out with [ONE PUSH], if the lighting conditions changed by bringing your camcorder outdoors from inside the house, or vice versa, you need to redo the [ONE PUSH] procedure ...to readjust the white balance. Steps In recording mode, (OPTION) [BLT-IN ZOOM MIC] a desired setting OFF The microphone does not record sound following zooming ...

Handycam® Handbook
Page 80
... In recording mode, (OPTION) [MICREF LEVEL] a desired setting NORMAL LOW ( ) Records various ambient sounds, converting them into the appropriate level. Steps In recording mode, (OPTION) [SELF-TIMER] a desired setting ...; OFF ON ( ) Cancels the self-timer. Select [LOW] when you want to record an exciting and powerful sound in a concert hall, etc. (This setting is recorded after about 10 seconds. To cancel the recording, touch [RESET]. Starts the self-...
... In recording mode, (OPTION) [MICREF LEVEL] a desired setting NORMAL LOW ( ) Records various ambient sounds, converting them into the appropriate level. Steps In recording mode, (OPTION) [SELF-TIMER] a desired setting ...; OFF ON ( ) Cancels the self-timer. Select [LOW] when you want to record an exciting and powerful sound in a concert hall, etc. (This setting is recorded after about 10 seconds. To cancel the recording, touch [RESET]. Starts the self-...
Handycam® Handbook
Page 84
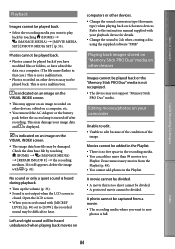
is indicated on an image on the VISUAL INDEX screen. This may damage your camcorder Unable to edit. Unable to edit because of the condition of Contents Useful Recording Techniques Playback Images cannot be played back or the "Memory .... Turn up the volume (p. 33). Sound is not output when the LCD screen is not recognized. The device may not be divided. Playing back images stored on "Memory Stick PRO Duo" media on other devices, edited on a computer. (The file name flashes in that is no free space in...
is indicated on an image on the VISUAL INDEX screen. This may damage your camcorder Unable to edit. Unable to edit because of the condition of Contents Useful Recording Techniques Playback Images cannot be played back or the "Memory .... Turn up the volume (p. 33). Sound is not output when the LCD screen is not recognized. The device may not be divided. Playing back images stored on "Memory Stick PRO Duo" media on other devices, edited on a computer. (The file name flashes in that is no free space in...

