
Operating Guide
Page 7
...camcorder. Doing so may damage the hard disk drive of your camcorder • The hard disk of the camcorder may not be recognized, or recording or playback may also be possible. About language setting • The on-screen displays in each local language are from the camcorder. - Notes on use • The camcorder.... In addition to "Handycam Handbook" (PDF). 7 About this manual • The LCD screens and indicators shown in this manual were taken with a digital still camera, and may look different from what you may be able to format the hard disk of your image data ...
...camcorder. Doing so may damage the hard disk drive of your camcorder • The hard disk of the camcorder may not be recognized, or recording or playback may also be possible. About language setting • The on-screen displays in each local language are from the camcorder. - Notes on use • The camcorder.... In addition to "Handycam Handbook" (PDF). 7 About this manual • The LCD screens and indicators shown in this manual were taken with a digital still camera, and may look different from what you may be able to format the hard disk of your image data ...

Operating Guide
Page 13
... the desired language. Changing the language setting You can be displayed during recording, but they are automatically recorded on the hard disc, and can change the on (Still) lamp, the screen aspect ratio is changed to show messages in the direction of the arrow until the respective lamp lights up. When you.... (Movie): To record movies (Still): To record still images • When you turn the POWER switch repeatedly in a specified language. POWER switch When using the camcorder for the first time, the [CLOCK SET] screen appears on the LCD...
... the desired language. Changing the language setting You can be displayed during recording, but they are automatically recorded on the hard disc, and can change the on (Still) lamp, the screen aspect ratio is changed to show messages in the direction of the arrow until the respective lamp lights up. When you.... (Movie): To record movies (Still): To record still images • When you turn the POWER switch repeatedly in a specified language. POWER switch When using the camcorder for the first time, the [CLOCK SET] screen appears on the LCD...
Operating Guide
Page 14
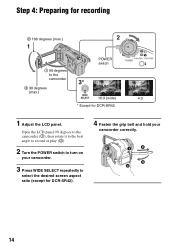
Open the LCD panel 90 degrees to the camcorder (1), then rotate it to the best angle to record or play (2). 2 Turn the POWER switch to select the desired screen aspect ratio (except for DCR-SR42. 1 Adjust the LCD panel. Step 4: Preparing for recording 2 180 degrees (max.) 1 90 degrees to the camcorder POWER switch 2 90 degrees (max.) 16:9 (wide) 4:3 * Except for DCR-SR42). 4 Fasten the grip belt and hold your camcorder. 3 Press WIDE SELECT repeatedly to turn on your camcorder correctly. 14
Open the LCD panel 90 degrees to the camcorder (1), then rotate it to the best angle to record or play (2). 2 Turn the POWER switch to select the desired screen aspect ratio (except for DCR-SR42. 1 Adjust the LCD panel. Step 4: Preparing for recording 2 180 degrees (max.) 1 90 degrees to the camcorder POWER switch 2 90 degrees (max.) 16:9 (wide) 4:3 * Except for DCR-SR42). 4 Fasten the grip belt and hold your camcorder. 3 Press WIDE SELECT repeatedly to turn on your camcorder correctly. 14

Operating Guide
Page 16
... being written onto the hard disk or "Memory Stick Duo." DCR-SR42/SR62: approx. 10 hours and 50 minutes DCR-SR82: approx. 21 hours and 40 minutes DCR-SR200/SR300: approx. 14 hours and 30 minutes To record still images on the "Memory Stick Duo" (1GB) are followings (with recording mode [SP]); Your camcorder returns to save...
... being written onto the hard disk or "Memory Stick Duo." DCR-SR42/SR62: approx. 10 hours and 50 minutes DCR-SR82: approx. 21 hours and 40 minutes DCR-SR200/SR300: approx. 14 hours and 30 minutes To record still images on the "Memory Stick Duo" (1GB) are followings (with recording mode [SP]); Your camcorder returns to save...
Operating Guide
Page 17
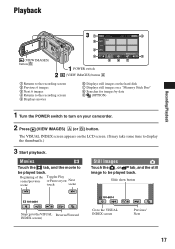
... the VISUAL Reverse/Forward INDEX screen) Go to turn on your camcorder. 2 Press (VIEW IMAGES) A (or B) button. Playback Recording/Playback (VIEW IMAGES) button B POWER switch (VIEW IMAGES) button A 1 Returns to the recording screen 2 Previous 6 images 3 Next 6 images 4 Returns to the recording screen 5 Displays movies 6 Displays still images on the hard disk 7 Displays still images on a "Memory...
... the VISUAL Reverse/Forward INDEX screen) Go to turn on your camcorder. 2 Press (VIEW IMAGES) A (or B) button. Playback Recording/Playback (VIEW IMAGES) button B POWER switch (VIEW IMAGES) button A 1 Returns to the recording screen 2 Previous 6 images 3 Next 6 images 4 Returns to the recording screen 5 Displays movies 6 Displays still images on the hard disk 7 Displays still images on a "Memory...
Operating Guide
Page 18
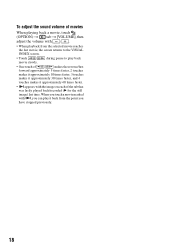
... When playing back a movie, touch (OPTION) t tab t [VOLUME], then adjust the volume with / . • When playback from the selected movie reaches the last movie, the screen returns to the VISUAL INDEX screen. • Touch / during pause to play it back from the point you have stopped previously. 18
... When playing back a movie, touch (OPTION) t tab t [VOLUME], then adjust the volume with / . • When playback from the selected movie reaches the last movie, the screen returns to the VISUAL INDEX screen. • Touch / during pause to play it back from the point you have stopped previously. 18

Operating Guide
Page 20
...tripod screw. The accessory can be less than 5.5 mm (7/32 in.)) to the tripod receptacle using the flash. 9 LCD screen To record in mirror mode, open the LCD screen 90 degrees to the camcorder (1), then rotate it 180 degrees to the lens side (2). DC IN jack wa Interface connector qa BACK LIGHT button...the power is set the NIGHTSHOT switch to 5 times the original size (Playback zoom). • When you touch the screen during playback zoom, the point you can switch the screen display when you operate the POWER switch on . qd EASY button See page 16. ql RESET button To initialize the ...
...tripod screw. The accessory can be less than 5.5 mm (7/32 in.)) to the tripod receptacle using the flash. 9 LCD screen To record in mirror mode, open the LCD screen 90 degrees to the camcorder (1), then rotate it 180 degrees to the lens side (2). DC IN jack wa Interface connector qa BACK LIGHT button...the power is set the NIGHTSHOT switch to 5 times the original size (Playback zoom). • When you touch the screen during playback zoom, the point you can switch the screen display when you operate the POWER switch on . qd EASY button See page 16. ql RESET button To initialize the ...
Operating Guide
Page 26
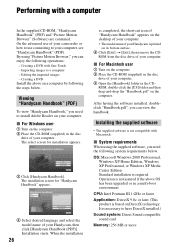
...Editing the imported images - The select screen for "Handycam Handbook" appears. 4 Select desired language and select the model name of your Handycam, then click [Handycam Handbook (PDF)]. Performing with One Touch - The installation screen for installation appears. 3 Click [Handycam Handbook]. Importing images to install Adobe Reader... the disc drive of your computer. On the advanced use of your Handycam is based on the computer. 2 Place the CD-ROM (supplied) in the disc drive of your computer. 3 Open the [Handbook] folder in the disc drive of your camcorder or how...
...Editing the imported images - The select screen for "Handycam Handbook" appears. 4 Select desired language and select the model name of your Handycam, then click [Handycam Handbook (PDF)]. Performing with One Touch - The installation screen for installation appears. 3 Click [Handycam Handbook]. Importing images to install Adobe Reader... the disc drive of your computer. On the advanced use of your Handycam is based on the computer. 2 Place the CD-ROM (supplied) in the disc drive of your computer. 3 Open the [Handbook] folder in the disc drive of your camcorder or how...

Operating Guide
Page 27
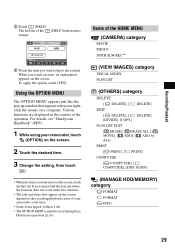
... the power saving function of your computer using the supplied USB cable, then click [Next] on the connection confirmation screen. Recording/Playback Hard disk: Available free hard disk space for installation required: Approximately 600 MB (for creating a DVD, 5 GB or more may be required) Display...from movies, resulting in the disc drive of the computer. x Installing software You need to restart it to your Windows computer before installing the software. 3 Place the supplied CD-ROM in uneven playback. Provide the camcorder and the Handycam Station, and a USB cable beforehand...
... the power saving function of your computer using the supplied USB cable, then click [Next] on the connection confirmation screen. Recording/Playback Hard disk: Available free hard disk space for installation required: Approximately 600 MB (for creating a DVD, 5 GB or more may be required) Display...from movies, resulting in the disc drive of the computer. x Installing software You need to restart it to your Windows computer before installing the software. 3 Place the supplied CD-ROM in uneven playback. Provide the camcorder and the Handycam Station, and a USB cable beforehand...

Operating Guide
Page 28
... as [ ] (Picture Motion Browser), appear on -screen instructions to install the software. To see "Handycam Handbook" (PDF). q; qa Remove the CD-ROM from the disc drive of each item on the computer, you can change...Handycam Handbook" (PDF). 1 Turn on your computer. • For disconnecting the USB cable, see the explanation of the function of your camcorder, then press (HOME) A (or B). 2 Touch the desired setup item. 3 Follow the guide on the screen for your convenience. If the installation screen appears, follow the instructions to complete the installation. http://www.sony...
... as [ ] (Picture Motion Browser), appear on -screen instructions to install the software. To see "Handycam Handbook" (PDF). q; qa Remove the CD-ROM from the disc drive of each item on the computer, you can change...Handycam Handbook" (PDF). 1 Turn on your computer. • For disconnecting the USB cable, see the explanation of the function of your camcorder, then press (HOME) A (or B). 2 Touch the desired setup item. 3 Follow the guide on the screen for your convenience. If the installation screen appears, follow the instructions to complete the installation. http://www.sony...
Operating Guide
Page 29
...button turns orange. 3 Touch the item you want is not on the screen. When you want to know the content. Recording/Playback 2 Touch (HELP). For details, see "Handycam Handbook" (PDF). 1 While using your camcorder at the time. • Some items appear without a tab. •...; The OPTION MENU cannot be used during Easy Handycam operation (p.16). The bottom of your camcorder, touch (OPTION) on the screen. 2 Touch the desired item. ...
...button turns orange. 3 Touch the item you want is not on the screen. When you want to know the content. Recording/Playback 2 Touch (HELP). For details, see "Handycam Handbook" (PDF). 1 While using your camcorder at the time. • Some items appear without a tab. •...; The OPTION MENU cannot be used during Easy Handycam operation (p.16). The bottom of your camcorder, touch (OPTION) on the screen. 2 Touch the desired item. ...

Operating Guide
Page 31
... and contact your Sony dealer will be required to investigate the problem. This is displayed. The power abruptly turns off. • When approximately 5 minutes have just shot on Easy Handycam operation, refer to save the data on the internal hard disk (see "Handycam Handbook" (PDF)) on other media (backup) before sending your camcorder for a while, then...
... and contact your Sony dealer will be required to investigate the problem. This is displayed. The power abruptly turns off. • When approximately 5 minutes have just shot on Easy Handycam operation, refer to save the data on the internal hard disk (see "Handycam Handbook" (PDF)) on other media (backup) before sending your camcorder for a while, then...

Operating Guide
Page 32
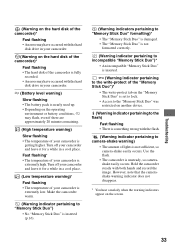
...are grayed out. • There are some functions you turn on your camcorder while the lens cover is unreadable. 32 For details, see "Handycam Handbook" (PDF). Self-diagnosis display/Warning indicators If indicators appear on the LCD screen, check the following. Use an "InfoLITHIUM" battery pack (p.11). •... from "E." 101-0001 (Warning indicator pertaining to files) Slow flashing • The file is damaged. • The file is closed (DCR-SR42/ SR62/SR82). • When you cannot activate simultaneously. Inform them of the Handycam Station or your Sony dealer or local authorized...
...are grayed out. • There are some functions you turn on your camcorder while the lens cover is unreadable. 32 For details, see "Handycam Handbook" (PDF). Self-diagnosis display/Warning indicators If indicators appear on the LCD screen, check the following. Use an "InfoLITHIUM" battery pack (p.11). •... from "E." 101-0001 (Warning indicator pertaining to files) Slow flashing • The file is damaged. • The file is closed (DCR-SR42/ SR62/SR82). • When you cannot activate simultaneously. Inform them of the Handycam Station or your Sony dealer or local authorized...
Operating Guide
Page 33
... pack is nearly used up. • Depending on the operating environment or battery conditions, E may have occurred with the hard disk drive in your camcorder. (Warning on the hard disk of the camcorder)* Fast flashing • The hard disk of the camcorder is fully recorded. • An error may flash, even if there are approximately 20 minutes remaining. (High temperature...")* • The write-protect tab on the "Memory Stick Duo" is set to lock. • Access to the "Memory Stick Duo" was restricted on the screen. 33
... pack is nearly used up. • Depending on the operating environment or battery conditions, E may have occurred with the hard disk drive in your camcorder. (Warning on the hard disk of the camcorder)* Fast flashing • The hard disk of the camcorder is fully recorded. • An error may flash, even if there are approximately 20 minutes remaining. (High temperature...")* • The write-protect tab on the "Memory Stick Duo" is set to lock. • Access to the "Memory Stick Duo" was restricted on the screen. 33
Operating Guide
Page 34
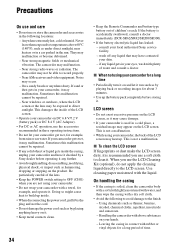
... use or store the camcorder and accessories in your camcorder, it may malfunction. wash off any liquid that may have it checked by a Sony dealer before storing it is not a malfunction. • While using your camcorder is soiled, clean the camcorder body with a soft .... This is accidentally swallowed, consult a doctor immediately (DCR-SR62/SR82/SR200/SR300). • If the battery electrolytic liquid has leaked: - x To clean the LCD screen If fingerprints or dust make the LCD screen dirty, it . Handling the camcorder with a dry soft cloth. • Avoid the following...
... use or store the camcorder and accessories in your camcorder, it may malfunction. wash off any liquid that may have it checked by a Sony dealer before storing it is not a malfunction. • While using your camcorder is soiled, clean the camcorder body with a soft .... This is accidentally swallowed, consult a doctor immediately (DCR-SR62/SR82/SR200/SR300). • If the battery electrolytic liquid has leaked: - x To clean the LCD screen If fingerprints or dust make the LCD screen dirty, it . Handling the camcorder with a dry soft cloth. • Avoid the following...
Operating Guide
Page 37
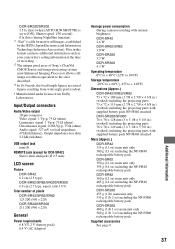
...FH40 attached DCR-SR200/SR300 76 × 78 × 128 mm (3 × 3 1/8 × 5 1/8 in.) (w×h×d) including the projecting parts 76 × 78 × 149 mm (3 × 3 1/8 × 5 7/8 in this format can have additional information such as your camcorder's setting ...) (during NightShot function) *1 "Exif" is a file format for DCR-SR42) Stereo mini-minijack (Ø 2.5 mm) LCD screen Picture DCR-SR42 6.2 cm (2.5 type) DCR-SR62/SR82/SR200/SR300 6.9 cm (2.7 type, aspect ratio 16:9) Total number of Sony's ClearVid CMOS Sensor and image processing system (new Enhanced Imaging Processor)...
...FH40 attached DCR-SR200/SR300 76 × 78 × 128 mm (3 × 3 1/8 × 5 1/8 in.) (w×h×d) including the projecting parts 76 × 78 × 149 mm (3 × 3 1/8 × 5 7/8 in this format can have additional information such as your camcorder's setting ...) (during NightShot function) *1 "Exif" is a file format for DCR-SR42) Stereo mini-minijack (Ø 2.5 mm) LCD screen Picture DCR-SR42 6.2 cm (2.5 type) DCR-SR62/SR82/SR200/SR300 6.9 cm (2.7 type, aspect ratio 16:9) Total number of Sony's ClearVid CMOS Sensor and image processing system (new Enhanced Imaging Processor)...


