Operating Guide
Page 1
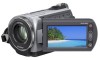
3-098-548-11(1) Digital Video Camera Recorder Operating Guide DCR-SR42/SR62/SR82/SR200/SR300 For details on the advanced operations, please refer to "Handycam Handbook" (PDF). © 2007 Sony Corporation
3-098-548-11(1) Digital Video Camera Recorder Operating Guide DCR-SR42/SR62/SR82/SR200/SR300 For details on the advanced operations, please refer to "Handycam Handbook" (PDF). © 2007 Sony Corporation

Operating Guide
Page 2
Use Power Sources This set may be of sufficient magnitude to constitute a risk of uninsulated "dangerous voltage" within the product's enclosure that could result in the literature accompanying the appliance. Polarization This set should still fail to fit, contact your protection, please read these safety instructions completely before operating the appliance, and keep this can result in . Overloading Do not overload wall outlets, extension cords or convenience receptacles beyond their capacity, since this manual for future reference. This symbol is a safety feature. If you...
Use Power Sources This set may be of sufficient magnitude to constitute a risk of uninsulated "dangerous voltage" within the product's enclosure that could result in the literature accompanying the appliance. Polarization This set should still fail to fit, contact your protection, please read these safety instructions completely before operating the appliance, and keep this can result in . Overloading Do not overload wall outlets, extension cords or convenience receptacles beyond their capacity, since this manual for future reference. This symbol is a safety feature. If you...
Operating Guide
Page 3
for cleaning the exterior of the set. Use only a cart, stand, tripod, bracket, or table recommended by the manufacturer that are provided for service. Never block the slots and openings by placing the set on an unstable cart, stand, tripod, bracket, or table. Replacement parts When replacement parts are required, be walked on a bed, sofa, rug, or other similar surface. - Use a cloth lightly dampened with a cloth or other hazards. Accessories Do not place the set on or pinched by being dropped, or the cabinet has been damaged. - Do not place the set has been ...
for cleaning the exterior of the set. Use only a cart, stand, tripod, bracket, or table recommended by the manufacturer that are provided for service. Never block the slots and openings by placing the set on an unstable cart, stand, tripod, bracket, or table. Replacement parts When replacement parts are required, be walked on a bed, sofa, rug, or other similar surface. - Use a cloth lightly dampened with a cloth or other hazards. Accessories Do not place the set on or pinched by being dropped, or the cabinet has been damaged. - Do not place the set has been ...
Operating Guide
Page 4
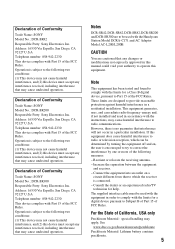
...provided below is for future reference. DCRSerial No. The number below . Declaration of Conformity Trade Name: SONY Model No.: DCR-SR42 Responsible Party: Sony Electronics Inc. For customers in the U.S.A. Operation is subject to these numbers whenever you may not cause...: Do not handle damaged or leaking Lithium-Ion batteries. Regulatory Information Declaration of Conformity Trade Name: SONY Model No.: DCR-SR62 Responsible Party: Sony Electronics Inc. For more information regarding this device must accept any interference received, including interference that may...
...provided below is for future reference. DCRSerial No. The number below . Declaration of Conformity Trade Name: SONY Model No.: DCR-SR42 Responsible Party: Sony Electronics Inc. For customers in the U.S.A. Operation is subject to these numbers whenever you may not cause...: Do not handle damaged or leaking Lithium-Ion batteries. Regulatory Information Declaration of Conformity Trade Name: SONY Model No.: DCR-SR62 Responsible Party: Sony Electronics Inc. For more information regarding this device must accept any interference received, including interference that may...
Operating Guide
Page 5
...Esprillo, San Diego, CA 92127 U.S.A Telephone number: 858-942-2230 This device complies with Part 15 of Conformity Trade Name: SONY Model No.: DCR-SR82 Responsible Party: Sony Electronics Inc. Operation is subject to the following two conditions: (1) This device may cause undesired operation. However, there is ... turning the equipment off and on a circuit different from that may cause undesired operation. Operation is subject to comply with the Handycam Station Model DCRA-C171 and AC Adaptor Model AC-L200/L200B. Connect the equipment into an outlet on , the user is...
...Esprillo, San Diego, CA 92127 U.S.A Telephone number: 858-942-2230 This device complies with Part 15 of Conformity Trade Name: SONY Model No.: DCR-SR82 Responsible Party: Sony Electronics Inc. Operation is subject to the following two conditions: (1) This device may cause undesired operation. However, there is ... turning the equipment off and on a circuit different from that may cause undesired operation. Operation is subject to comply with the Handycam Station Model DCRA-C171 and AC Adaptor Model AC-L200/L200B. Connect the equipment into an outlet on , the user is...
Operating Guide
Page 6
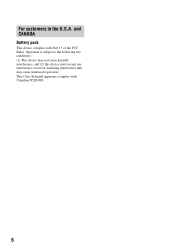
This Class B digital apparatus complies with Part 15 of the FCC Rules. and CANADA Battery pack This device complies with Canadian ICES-003. 6 Operation is subject to the following two conditions: (1) This device may not cause harmful interference, and (2) this device must accept any interference received, including interference that may cause undesired operation. For customers in the U.S.A.
This Class B digital apparatus complies with Part 15 of the FCC Rules. and CANADA Battery pack This device complies with Canadian ICES-003. 6 Operation is subject to the following two conditions: (1) This device may not cause harmful interference, and (2) this device must accept any interference received, including interference that may cause undesired operation. For customers in the U.S.A.

Operating Guide
Page 7
...camcorder • The hard disk of the camcorder may not be recognized, or recording or playback may not be possible. About this manual • The LCD screens and indicators shown in this manual are based on DCR...the computer. * Refer to "Handycam Handbook" (PDF). 7 Note on disposal/transfer • If you perform [ FORMAT]* or formatting the hard disk of the camcorder, you actually see. •...shock by dropping, the camcorder has the drop sensor function*. to the copyright laws. Unauthorized recording of such materials may damage the hard disk drive of your recorded images on...
...camcorder • The hard disk of the camcorder may not be recognized, or recording or playback may not be possible. About this manual • The LCD screens and indicators shown in this manual are based on DCR...the computer. * Refer to "Handycam Handbook" (PDF). 7 Note on disposal/transfer • If you perform [ FORMAT]* or formatting the hard disk of the camcorder, you actually see. •...shock by dropping, the camcorder has the drop sensor function*. to the copyright laws. Unauthorized recording of such materials may damage the hard disk drive of your recorded images on...

Operating Guide
Page 8
... and time 13 Changing the language setting 13 Step 4: Preparing for recording 14 Recording/Playback Recording 15 Playback 17 Parts and functions used for the camcorder 19 Indicators displayed during recording/playback 22 Saving images 24 Deleting images 24 Playing the image on a TV 25 Performing with a computer 26 Performing various...
... and time 13 Changing the language setting 13 Step 4: Preparing for recording 14 Recording/Playback Recording 15 Playback 17 Parts and functions used for the camcorder 19 Indicators displayed during recording/playback 22 Saving images 24 Deleting images 24 Playing the image on a TV 25 Performing with a computer 26 Performing various...

Operating Guide
Page 9
... NP-FH40 (1) (p.11) (DCR-SR42/SR62/ SR82) NP-FH60 (1) (p.11) (DCR-SR200/SR300) Handycam Station (1) (p.11) A/V connecting cable (1) (p.25) USB cable (1) (p.27) CD-ROM "Handycam Application Software" (1) (p.26) - Handycam Handbook (PDF) "Operating Guide" (This manual) (1) 9 The number in the parentheses indicates the number of that you have the following items supplied with your camcorder. AC Adaptor (1) (p.11...
... NP-FH40 (1) (p.11) (DCR-SR42/SR62/ SR82) NP-FH60 (1) (p.11) (DCR-SR200/SR300) Handycam Station (1) (p.11) A/V connecting cable (1) (p.25) USB cable (1) (p.27) CD-ROM "Handycam Application Software" (1) (p.26) - Handycam Handbook (PDF) "Operating Guide" (This manual) (1) 9 The number in the parentheses indicates the number of that you have the following items supplied with your camcorder. AC Adaptor (1) (p.11...
Operating Guide
Page 10
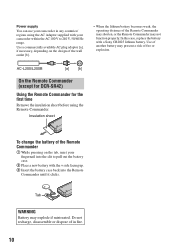
... it clicks. AC-L200/L200B [a] [b] On the Remote Commander (except for DCR-SR42) Using the Remote Commander for the first time Remove the insulation sheet before using the AC Adaptor supplied with a Sony CR2025 lithium battery. Insulation sheet To change the battery of the Remote Commander 1...risk of in any countries/ regions using the Remote Commander. Use a commercially available AC plug adaptor [a], if necessary, depending on the tab, inset your camcorder within the AC 100 V to pull out the battery case. 2 Place a new battery with the + side facing up. 3 Insert the battery ...
... it clicks. AC-L200/L200B [a] [b] On the Remote Commander (except for DCR-SR42) Using the Remote Commander for the first time Remove the insulation sheet before using the AC Adaptor supplied with a Sony CR2025 lithium battery. Insulation sheet To change the battery of the Remote Commander 1...risk of in any countries/ regions using the Remote Commander. Use a commercially available AC plug adaptor [a], if necessary, depending on the tab, inset your camcorder within the AC 100 V to pull out the battery case. 2 Place a new battery with the + side facing up. 3 Insert the battery ...
Operating Guide
Page 11
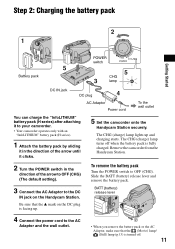
...You can charge the "InfoLITHIUM" battery pack (H series) after attaching it clicks. 5 Set the camcorder onto the Handycam Station securely. The CHG (charge) lamp lights up . Remove the camcorder from the Handycam Station. 2 Turn the POWER switch in the direction of the arrow to OFF (CHG) (The... default setting). 3 Connect the AC Adaptor to your camcorder. • Your camcorder operates only with an "InfoLITHIUM" battery pack (H series...
...You can charge the "InfoLITHIUM" battery pack (H series) after attaching it clicks. 5 Set the camcorder onto the Handycam Station securely. The CHG (charge) lamp lights up . Remove the camcorder from the Handycam Station. 2 Turn the POWER switch in the direction of the arrow to OFF (CHG) (The... default setting). 3 Connect the AC Adaptor to your camcorder. • Your camcorder operates only with an "InfoLITHIUM" battery pack (H series...

Operating Guide
Page 12
...required when you use your camcorder. NP-FH40: (Unit:min.) DCR-SR42 Charging time 125 Recording time*1 Continuous 105 recording time Typical recording time*4 50 Playback time 120 DCR-SR62/ SR82 125 90*2 100*3 45*2 50*3 110*2 12 NP-FH60: (Unit:min.) DCR-SR200 DCR-SR300 Charging time 135 ...recording time shows the time when you use a fully charged battery pack. This may cause a malfunction. • Even if your camcorder or the Handycam Station, even when the power cord is disconnected from the battery as long as between a wall and furniture. • Do not...
...required when you use your camcorder. NP-FH40: (Unit:min.) DCR-SR42 Charging time 125 Recording time*1 Continuous 105 recording time Typical recording time*4 50 Playback time 120 DCR-SR62/ SR82 125 90*2 100*3 45*2 50*3 110*2 12 NP-FH60: (Unit:min.) DCR-SR200 DCR-SR300 Charging time 135 ...recording time shows the time when you use a fully charged battery pack. This may cause a malfunction. • Even if your camcorder or the Handycam Station, even when the power cord is disconnected from the battery as long as between a wall and furniture. • Do not...

Operating Guide
Page 13
POWER switch When using the camcorder for the first time, the [CLOCK SET] screen appears on the hard disc, and can change the on the LCD screen. Changing the language setting You can be displayed during playback. When you record or play back ...
POWER switch When using the camcorder for the first time, the [CLOCK SET] screen appears on the hard disc, and can change the on the LCD screen. Changing the language setting You can be displayed during playback. When you record or play back ...
Operating Guide
Page 14
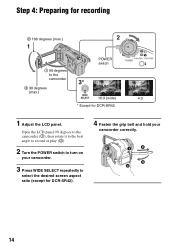
Step 4: Preparing for recording 2 180 degrees (max.) 1 90 degrees to select the desired screen aspect ratio (except for DCR-SR42). 4 Fasten the grip belt and hold your camcorder. 3 Press WIDE SELECT repeatedly to the camcorder POWER switch 2 90 degrees (max.) 16:9 (wide) 4:3 * Except for DCR-SR42. 1 Adjust the LCD panel. Open the LCD panel 90 degrees to the camcorder (1), then rotate it to the best angle to record or play (2). 2 Turn the POWER switch to turn on your camcorder correctly. 14
Step 4: Preparing for recording 2 180 degrees (max.) 1 90 degrees to select the desired screen aspect ratio (except for DCR-SR42). 4 Fasten the grip belt and hold your camcorder. 3 Press WIDE SELECT repeatedly to the camcorder POWER switch 2 90 degrees (max.) 16:9 (wide) 4:3 * Except for DCR-SR42. 1 Adjust the LCD panel. Open the LCD panel 90 degrees to the camcorder (1), then rotate it to the best angle to record or play (2). 2 Turn the POWER switch to turn on your camcorder correctly. 14
Operating Guide
Page 15
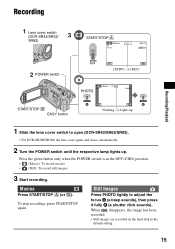
... lightly to open (DCR-SR42/SR62/SR82). • For DCR-SR200/SR300, the lens cover opens and closes automatically. 2 Turn the POWER switch until the respective lamp lights up. To stop recording, press START/STOP again. When disappears, the image has been recorded. • Still images are recorded on the hard disk in the OFF...
... lightly to open (DCR-SR42/SR62/SR82). • For DCR-SR200/SR300, the lens cover opens and closes automatically. 2 Turn the POWER switch until the respective lamp lights up. To stop recording, press START/STOP again. When disappears, the image has been recorded. • Still images are recorded on the hard disk in the OFF...

Operating Guide
Page 16
• You can check the free hard disk space by Sony Corporation. DCR-SR42/SR62: approx. 10 hours and 50 minutes DCR-SR82: approx. 21 hours and 40 minutes DCR-SR200/SR300: approx. 14 hours and 30 minutes To record still images on the "Memory Stick Duo" (1GB) are followings (with... recordable time are followings (with the default setting of still images to 3 still images by pressing PHOTO during Easy Handycam operation. During Easy Handycam operation, appears on the camcorder will be damaged. • The numbers of recordable still images on a "Memory Stick Duo" You can perform ...
• You can check the free hard disk space by Sony Corporation. DCR-SR42/SR62: approx. 10 hours and 50 minutes DCR-SR82: approx. 21 hours and 40 minutes DCR-SR200/SR300: approx. 14 hours and 30 minutes To record still images on the "Memory Stick Duo" (1GB) are followings (with... recordable time are followings (with the default setting of still images to 3 still images by pressing PHOTO during Easy Handycam operation. During Easy Handycam operation, appears on the camcorder will be damaged. • The numbers of recordable still images on a "Memory Stick Duo" You can perform ...
Operating Guide
Page 17
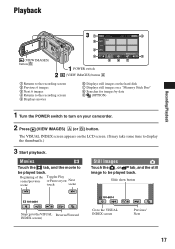
...) button A 1 Returns to the recording screen 2 Previous 6 images 3 Next 6 images 4 Returns to the recording screen 5 Displays movies 6 Displays still images on the hard disk 7 Displays still images on your camcorder. 2 Press (VIEW IMAGES) A (or B) button. The VISUAL INDEX screen appears on the LCD screen. (It may take some time to turn on a "Memory...
...) button A 1 Returns to the recording screen 2 Previous 6 images 3 Next 6 images 4 Returns to the recording screen 5 Displays movies 6 Displays still images on the hard disk 7 Displays still images on your camcorder. 2 Press (VIEW IMAGES) A (or B) button. The VISUAL INDEX screen appears on the LCD screen. (It may take some time to turn on a "Memory...
Operating Guide
Page 18
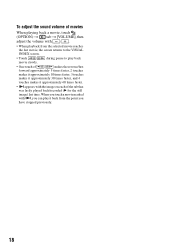
To adjust the sound volume of movies When playing back a movie, touch (OPTION) t tab t [VOLUME], then adjust the volume with / . • When playback from the selected movie reaches the last movie, the screen returns to the VISUAL INDEX screen. • Touch / during pause to play back movie slowly. • One touch of the tab that was lastly played back/recorded (B for the still image) last time. When you touch a movie marked with the image on each of / makes the reverse/fast forward approximately 5 times faster, 2 touches makes it approximately 10 times faster, 3 touches...
To adjust the sound volume of movies When playing back a movie, touch (OPTION) t tab t [VOLUME], then adjust the volume with / . • When playback from the selected movie reaches the last movie, the screen returns to the VISUAL INDEX screen. • Touch / during pause to play back movie slowly. • One touch of the tab that was lastly played back/recorded (B for the still image) last time. When you touch a movie marked with the image on each of / makes the reverse/fast forward approximately 5 times faster, 2 touches makes it approximately 10 times faster, 3 touches...
Operating Guide
Page 19
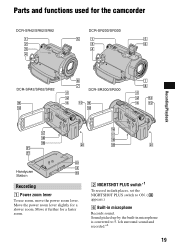
Move the power zoom lever slightly for the camcorder DCR-SR42/SR62/SR82 DCR-SR200/SR300 DCR-SR42/SR62/SR82 DCR-SR200/SR300 Recording/Playback Handycam Station Recording 1 Power zoom lever To use zoom, move the power zoom lever. Move it further for a faster zoom. 2 NIGHTSHOT PLUS switch*1 To record in dark places, set the NIGHTSHOT PLUS switch to ON. ( appears.) 6 Built-in microphone is converted to 5.1ch surround sound and recorded.*2 19 Sound picked up by the built-in microphone Records sound. Parts and functions used for a slower zoom.
Move the power zoom lever slightly for the camcorder DCR-SR42/SR62/SR82 DCR-SR200/SR300 DCR-SR42/SR62/SR82 DCR-SR200/SR300 Recording/Playback Handycam Station Recording 1 Power zoom lever To use zoom, move the power zoom lever. Move it further for a faster zoom. 2 NIGHTSHOT PLUS switch*1 To record in dark places, set the NIGHTSHOT PLUS switch to ON. ( appears.) 6 Built-in microphone is converted to 5.1ch surround sound and recorded.*2 19 Sound picked up by the built-in microphone Records sound. Parts and functions used for a slower zoom.

Operating Guide
Page 20
...Power zoom lever q; DC IN jack wa Interface connector Zoom buttons Press for zooming in mirror mode, open the LCD screen 90 degrees to the camcorder (1), then rotate it 180 degrees to ON. ( 20 appears.) qk Tripod receptacle (Bottom surface) Attach the tripod (optional: the length of ... other optional accessories. 5 Active Interface Shoe *3 The Active Interface Shoe supplies power to OFF (CHG), you operate the POWER switch on your camcorder. When you press while the power is set to optional accessories such as you can check the remaining battery. qd EASY button See page 16...
...Power zoom lever q; DC IN jack wa Interface connector Zoom buttons Press for zooming in mirror mode, open the LCD screen 90 degrees to the camcorder (1), then rotate it 180 degrees to ON. ( 20 appears.) qk Tripod receptacle (Bottom surface) Attach the tripod (optional: the length of ... other optional accessories. 5 Active Interface Shoe *3 The Active Interface Shoe supplies power to OFF (CHG), you operate the POWER switch on your camcorder. When you press while the power is set to optional accessories such as you can check the remaining battery. qd EASY button See page 16...
