

Operating Guide
Page 2
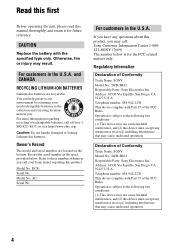
... blade wider than the other sources, refer to them. Overloading Do not overload wall outlets, extension cords or convenience receptacles beyond their capacity, since this manual for future reference. Object and Liquid Entry Never push objects of power source indicated on the appliance, or the one described in fire or electric...
... blade wider than the other sources, refer to them. Overloading Do not overload wall outlets, extension cords or convenience receptacles beyond their capacity, since this manual for future reference. Object and Liquid Entry Never push objects of power source indicated on the appliance, or the one described in fire or electric...
Operating Guide
Page 4
...DCR-SR42 Responsible Party: Sony Electronics Inc. Model No. Operation is subject to the collection and recycling location nearest you call toll free 1800-822- 8837, or visit http://www.rbrc.org/ Caution: Do not handle damaged or leaking Lithium-Ion batteries. For more information regarding this product. Record... No.: DCR-SR62 Responsible Party: Sony Electronics Inc. Operation is for future reference. Refer to the following two conditions: (1) This device may not cause harmful interference, and (2) this manual thoroughly, and retain it for the FCC related matters only. For...
...DCR-SR42 Responsible Party: Sony Electronics Inc. Model No. Operation is subject to the collection and recycling location nearest you call toll free 1800-822- 8837, or visit http://www.rbrc.org/ Caution: Do not handle damaged or leaking Lithium-Ion batteries. For more information regarding this product. Record... No.: DCR-SR62 Responsible Party: Sony Electronics Inc. Operation is for future reference. Refer to the following two conditions: (1) This device may not cause harmful interference, and (2) this manual thoroughly, and retain it for the FCC related matters only. For...
Operating Guide
Page 5
...-942-2230 This device complies with the limits for a Class B digital device, pursuant to the following two conditions: (1) This device may cause...: SONY Model No.: DCR-SR82 Responsible Party: Sony Electronics Inc. Declaration of Conformity Trade Name: SONY Model No.: DCR-SR300 Responsible Party: Sony Electronics... no guarantee that may not cause harmful interference, and (2) this manual could void your authority to Subpart B of Part 15 of the...any interference received, including interference that to comply with the Handycam Station Model DCRA-C171 and AC Adaptor Model AC-L200/L200B...
...-942-2230 This device complies with the limits for a Class B digital device, pursuant to the following two conditions: (1) This device may cause...: SONY Model No.: DCR-SR82 Responsible Party: Sony Electronics Inc. Declaration of Conformity Trade Name: SONY Model No.: DCR-SR300 Responsible Party: Sony Electronics... no guarantee that may not cause harmful interference, and (2) this manual could void your authority to Subpart B of Part 15 of the...any interference received, including interference that to comply with the Handycam Station Model DCRA-C171 and AC Adaptor Model AC-L200/L200B...

Operating Guide
Page 7
...the battery pack or AC Adaptor from the hard disk completely. Note on : - About this manual were taken with a digital still camera, and may be provided, even if recording or playback is connected to a computer •...drive of your camcorder. On recording • Before starting to record, test the recording function to change without any problems. • Compensation for illustrating the operating procedures. It is recommended that you perform [ EMPTY]* to "Handycam Handbook" (PDF). 7 Note on disposal/transfer • If you perform [ FORMAT]* or formatting the hard...
...the battery pack or AC Adaptor from the hard disk completely. Note on : - About this manual were taken with a digital still camera, and may be provided, even if recording or playback is connected to a computer •...drive of your camcorder. On recording • Before starting to record, test the recording function to change without any problems. • Compensation for illustrating the operating procedures. It is recommended that you perform [ EMPTY]* to "Handycam Handbook" (PDF). 7 Note on disposal/transfer • If you perform [ FORMAT]* or formatting the hard...

Operating Guide
Page 9
Picture Motion Browser (Software) - Handycam Handbook (PDF) "Operating Guide" (This manual) (1) 9 AC Adaptor (1) (p.11) Power cord (1) (p.11) Wireless Remote Commander (1) (except for DCR-SR42) A button-type lithium battery is already installed. Rechargeable battery pack NP-FH40 (1) (p.11) (DCR-SR42/SR62/ SR82) NP-FH60 (1) (p.11) (DCR-SR200/SR300) Handycam Station (1) (p.11) A/V connecting cable (1) (p.25) USB cable (1) (p.27) CD...
Picture Motion Browser (Software) - Handycam Handbook (PDF) "Operating Guide" (This manual) (1) 9 AC Adaptor (1) (p.11) Power cord (1) (p.11) Wireless Remote Commander (1) (except for DCR-SR42) A button-type lithium battery is already installed. Rechargeable battery pack NP-FH40 (1) (p.11) (DCR-SR42/SR62/ SR82) NP-FH60 (1) (p.11) (DCR-SR200/SR300) Handycam Station (1) (p.11) A/V connecting cable (1) (p.25) USB cable (1) (p.27) CD...
Operating Guide
Page 23
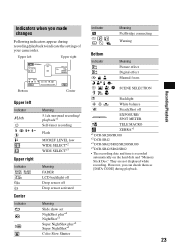
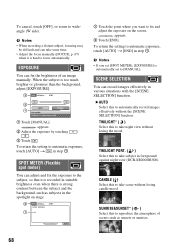
... Warning Bottom Indicator 9 Meaning Picture effect Digital effect Manual focus SCENE SELECTION . Upper left Upper right Bottom Center Upper left Indicator Upper right Indicator Center Indicator Meaning 5.1ch surround recording/ playback*1 Self-timer recording Flash MICREF LEVEL low WIDE SELECT*2 WIDE... TELE MACRO ZEBRA*1 *1 DCR-SR200/SR300 *2 DCR-SR42 *3 DCR-SR62/SR82/SR200/SR300 *4 DCR-SR42/SR62/SR82 • The recording date and time is recorded automatically on the hard disk and "Memory Stick Duo." They are not displayed while recording. However, you made changes...
... Warning Bottom Indicator 9 Meaning Picture effect Digital effect Manual focus SCENE SELECTION . Upper left Upper right Bottom Center Upper left Indicator Upper right Indicator Center Indicator Meaning 5.1ch surround recording/ playback*1 Self-timer recording Flash MICREF LEVEL low WIDE SELECT*2 WIDE... TELE MACRO ZEBRA*1 *1 DCR-SR200/SR300 *2 DCR-SR42 *3 DCR-SR62/SR82/SR200/SR300 *4 DCR-SR42/SR62/SR82 • The recording date and time is recorded automatically on the hard disk and "Memory Stick Duo." They are not displayed while recording. However, you made changes...
Operating Guide
Page 39
...and Adobe Acrobat are registered trademarks of Apple Computer, Inc. Microsoft Corporation in the U.S. On trademarks • "Handycam" and are registered trademarks of Sony Corporation. • "Memory Stick," " ," "Memory Stick Duo," " PRO Duo," " "MagicGate," "...Sony Corporation. • DVD-R, DVD+R DL, DVD-RW, and DVD+RW logo are trademarks. • Dolby and the double-D symbol are trademarks of Dolby Laboratories. • Dolby Digital 5.1 Creator is a trademark of Dolby Laboratories. • Microsoft, Windows, and Windows Media are not mentioned in each case in this manual...
...and Adobe Acrobat are registered trademarks of Apple Computer, Inc. Microsoft Corporation in the U.S. On trademarks • "Handycam" and are registered trademarks of Sony Corporation. • "Memory Stick," " ," "Memory Stick Duo," " PRO Duo," " "MagicGate," "...Sony Corporation. • DVD-R, DVD+R DL, DVD-RW, and DVD+RW logo are trademarks. • Dolby and the double-D symbol are trademarks of Dolby Laboratories. • Dolby Digital 5.1 Creator is a trademark of Dolby Laboratories. • Microsoft, Windows, and Windows Media are not mentioned in each case in this manual...

Handycam® Handbook
Page 19
... belt and hold your camcorder in bright conditions or when you want to the lens side, you open . Getting Started Step 4: Preparing for recording Opening the lens cover manually (DCR-SR42/SR62/ SR82) Slide the lens cover switch to open or adjust the LCD panel. z Tips • If you open the LCD panel... 90 degrees to the camcorder, then rotate it to the best angle to record or play (2). 290 degrees (max.) DISP/BATT INFO This setting ...
... belt and hold your camcorder in bright conditions or when you want to the lens side, you open . Getting Started Step 4: Preparing for recording Opening the lens cover manually (DCR-SR42/SR62/ SR82) Slide the lens cover switch to open or adjust the LCD panel. z Tips • If you open the LCD panel... 90 degrees to the camcorder, then rotate it to the best angle to record or play (2). 290 degrees (max.) DISP/BATT INFO This setting ...

Handycam® Handbook
Page 28
... brighter, use Super NightShot function (p. 70). Recording in mirror mode Infrared port Set the NIGHTSHOT switch to the original colors, use the NightShot plus and Super NightShot plus functions in bright places. This may cause a malfunction. DCR-SR200/SR300: NIGHT SHOT OFF ON Adjusting the...LCD screen, but the image will be normal when recorded. Therefore, do not cover the infrared port with your fingers or other objects, and remove the conversion lens (optional). • Adjust the focus manually ([FOCUS], p. 67) when it is hard to the lens side (2). b Notes • ...
... brighter, use Super NightShot function (p. 70). Recording in mirror mode Infrared port Set the NIGHTSHOT switch to the original colors, use the NightShot plus and Super NightShot plus functions in bright places. This may cause a malfunction. DCR-SR200/SR300: NIGHT SHOT OFF ON Adjusting the...LCD screen, but the image will be normal when recorded. Therefore, do not cover the infrared port with your fingers or other objects, and remove the conversion lens (optional). • Adjust the focus manually ([FOCUS], p. 67) when it is hard to the lens side (2). b Notes • ...
Handycam® Handbook
Page 35
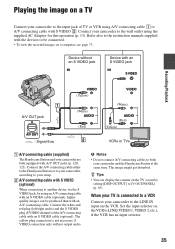
... VIDEO jack, by setting [DISP OUTPUT] to LINE (VIDEO 1, VIDEO 2, etc.), if the VCR has an input selector. 35 Refer also to the instruction manuals supplied with the devices to the LINE IN input on a computer, see page 73. When your TV is not necessary. S VIDEO... To view the recorded images on the VCR. Device without an S VIDEO jack IN Device with an S VIDEO jack IN S VIDEO Recording/Playback A/V OUT jack A/V OUT : Signal flow VIDEO (Yellow) (White) AUDIO (Red) VIDEO (White) AUDIO (Red) (Yellow) VCRs or TVs 1 A/V connecting cable (supplied) The Handycam Station and your ...
... VIDEO jack, by setting [DISP OUTPUT] to LINE (VIDEO 1, VIDEO 2, etc.), if the VCR has an input selector. 35 Refer also to the instruction manuals supplied with the devices to the LINE IN input on a computer, see page 73. When your TV is not necessary. S VIDEO... To view the recorded images on the VCR. Device without an S VIDEO jack IN Device with an S VIDEO jack IN S VIDEO Recording/Playback A/V OUT jack A/V OUT : Signal flow VIDEO (Yellow) (White) AUDIO (Red) VIDEO (White) AUDIO (Red) (Yellow) VCRs or TVs 1 A/V connecting cable (supplied) The Handycam Station and your ...
Handycam® Handbook
Page 36
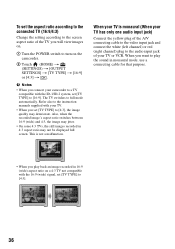
...image may jitter. • On some 4:3 TVs, the still images recorded in 4:3 aspect ratio may deteriorate. This is monaural (When your TV has only one audio input jack) Connect the yellow plug of the A/V connecting cable to the video input jack and connect the white (left channel) or red (right channel... connect your TV. • When you set [TV TYPE] to [4:3], the image quality may not be displayed full screen. Refer also to the instruction manuals supplied with your camcorder to a TV compatible with the 16:9 (wide) signal, set [TV TYPE] to [4:3]. 36 The TV switches to full mode ...
...image may jitter. • On some 4:3 TVs, the still images recorded in 4:3 aspect ratio may deteriorate. This is monaural (When your TV has only one audio input jack) Connect the yellow plug of the A/V connecting cable to the video input jack and connect the white (left channel) or red (right channel... connect your TV. • When you set [TV TYPE] to [4:3], the image quality may not be displayed full screen. Refer also to the instruction manuals supplied with your camcorder to a TV compatible with the 16:9 (wide) signal, set [TV TYPE] to [4:3]. 36 The TV switches to full mode ...

Handycam® Handbook
Page 45
...the red (right channel) or the white (left channel) plug to the instruction manuals supplied with an S VIDEO cable (optional). Connect the device in either to the Handycam Station or to your camcorder to other recording devices, such as a counter, etc.) on the screen of the monitor device ...LCD PANEL] (the default setting) on the HOME MENU (p. 63). • To record the date/time and camera settings data, display them on the screen (p. 60). • When you are both equipped with S VIDEO (optional) When connecting to another device via analog data transfer, the image quality may ...
...the red (right channel) or the white (left channel) plug to the instruction manuals supplied with an S VIDEO cable (optional). Connect the device in either to the Handycam Station or to your camcorder to other recording devices, such as a counter, etc.) on the screen of the monitor device ...LCD PANEL] (the default setting) on the HOME MENU (p. 63). • To record the date/time and camera settings data, display them on the screen (p. 60). • When you are both equipped with S VIDEO (optional) When connecting to another device via analog data transfer, the image quality may ...

Handycam® Handbook
Page 46
...) 1 or an A/V connecting cable with your recording device for details. 5 When dubbing is finished, stop the recording device, and then your camcorder to the input jacks of the Handycam Station to the printer using a PictBridge compliant printer, without connecting the camcorder to the instruction manuals supplied with S VIDEO (optional) 2. To print still images on the...
...) 1 or an A/V connecting cable with your recording device for details. 5 When dubbing is finished, stop the recording device, and then your camcorder to the input jacks of the Handycam Station to the printer using a PictBridge compliant printer, without connecting the camcorder to the instruction manuals supplied with S VIDEO (optional) 2. To print still images on the...

Handycam® Handbook
Page 47
...set the following operations when is marked with . The image selection screen appears again. b Notes • Refer also to the instruction manual of the printer to the previous screen. When connection is complete, (PictBridge connecting) appears on the image selection screen. Touch to return ...still image to be printed. To remove the "Memory Stick Duo" from your camcorder from the Handycam Station or the printer - Editing [USB SELECT] appears on the screen automatically. 4 Touch [ PRINT] (hard disk) or [ PRINT] ("Memory Stick Duo") depending on the media of the image to ...
...set the following operations when is marked with . The image selection screen appears again. b Notes • Refer also to the instruction manual of the printer to the previous screen. When connection is complete, (PictBridge connecting) appears on the image selection screen. Touch to return ...still image to be printed. To remove the "Memory Stick Duo" from your camcorder from the Handycam Station or the printer - Editing [USB SELECT] appears on the screen automatically. 4 Touch [ PRINT] (hard disk) or [ PRINT] ("Memory Stick Duo") depending on the media of the image to ...
Handycam® Handbook
Page 48
... image may be trimmed widely. • Some printer models may not support the date printing function. If you print a still image recorded in a 16:9 (wide) ratio, the left edges of model or manufacturer. • You can print still images without using a... to your printer's instruction manual for details. • The images described below may be printed out: - tab t 48 The image recorded by selecting (OPTION) t [PRINT]. You can print a still image when viewing it by other devices - Refer to a digital video camera or digital still camera, regardless of images may ...
... image may be trimmed widely. • Some printer models may not support the date printing function. If you print a still image recorded in a 16:9 (wide) ratio, the left edges of model or manufacturer. • You can print still images without using a... to your printer's instruction manual for details. • The images described below may be printed out: - tab t 48 The image recorded by selecting (OPTION) t [PRINT]. You can print a still image when viewing it by other devices - Refer to a digital video camera or digital still camera, regardless of images may ...

Handycam® Handbook
Page 54
...8226; Do not cover the infrared port with the image quality from 3 levels. If the item is about 3 m (10 feet). DCR-SR200/SR300: Recording mode HQ SP LP Recordable time 9 hours 30 min. 14 hours 30 min. 28 hours b Notes • If you play back the movie. NIGHTSHOT LIGHT When...be degraded, or scenes with quick movements may appear with B. Refer also to change the page. B 4:3 Records images to the full screen on the screen, touch v/V to the instruction manuals supplied with your fingers or other objects. • Remove the conversion lens (optional). • The maximum ...
...8226; Do not cover the infrared port with the image quality from 3 levels. If the item is about 3 m (10 feet). DCR-SR200/SR300: Recording mode HQ SP LP Recordable time 9 hours 30 min. 14 hours 30 min. 28 hours b Notes • If you play back the movie. NIGHTSHOT LIGHT When...be degraded, or scenes with quick movements may appear with B. Refer also to change the page. B 4:3 Records images to the full screen on the screen, touch v/V to the instruction manuals supplied with your fingers or other objects. • Remove the conversion lens (optional). • The maximum ...

Handycam® Handbook
Page 63
... difference without stopping the clock. Set to [ON] to full mode automatically. Set your local area using v/V when using your TV. Refer to the instruction manuals supplied with the ID-1/ID-2 system, set (HOME MENU) t page 52 (OPTION MENU) t page 65 CLOCK SET See page 17. z Tips • Your camcorder offers...
... difference without stopping the clock. Set to [ON] to full mode automatically. Set your local area using v/V when using your TV. Refer to the instruction manuals supplied with the ID-1/ID-2 system, set (HOME MENU) t page 52 (OPTION MENU) t page 65 CLOCK SET See page 17. z Tips • Your camcorder offers...

Handycam® Handbook
Page 67
...hard to adjust focus) appears for a few seconds in the following cases; (It will be described below. To adjust the focus automatically, touch [AUTO] t [END] in step 1. b Notes • If you set [TELE MACRO] to [ON] ( ), the zoom (p. 25) moves to the top of the screen. 1 Touch [MANUAL... the zoom for recording. To adjust the focus automatically, touch [AUTO] t in step 1. You can adjust the focus manually. z Tips • It is useful to manual. - The default settings are using a conversion lens (optional).) - DCR-SR42: down to about 43 cm (17 in.) DCR-SR62/SR82: down...
...hard to adjust focus) appears for a few seconds in the following cases; (It will be described below. To adjust the focus automatically, touch [AUTO] t [END] in step 1. b Notes • If you set [TELE MACRO] to [ON] ( ), the zoom (p. 25) moves to the top of the screen. 1 Touch [MANUAL... the zoom for recording. To adjust the focus automatically, touch [AUTO] t in step 1. You can adjust the focus manually. z Tips • It is useful to manual. - The default settings are using a conversion lens (optional).) - DCR-SR42: down to about 43 cm (17 in.) DCR-SR62/SR82: down...
Handycam® Handbook
Page 68
... night view (DCR-SR200/SR300). TWILIGHT PORT. ( ) Select this to automatic exposure, touch [AUTO] t [END] in step 1. appears. 2 Touch [END]. To return the setting to take some time. • Adjust the focus manually ([FOCUS], p. 67) when it is recorded in suitable brightness...that it is automatically set [SPOT METER], [EXPOSURE] is hard to focus automatically. CANDLE ( ) Select this to take night view without the [SCENE SELECTION] function. SUNRISE&SUNSET* ( ) Select this to reproduce the atmosphere of an image manually. appears. 2 Adjust the exposure by touching / . 3...
... night view (DCR-SR200/SR300). TWILIGHT PORT. ( ) Select this to automatic exposure, touch [AUTO] t [END] in step 1. appears. 2 Touch [END]. To return the setting to take some time. • Adjust the focus manually ([FOCUS], p. 67) when it is recorded in suitable brightness...that it is automatically set [SPOT METER], [EXPOSURE] is hard to focus automatically. CANDLE ( ) Select this to take night view without the [SCENE SELECTION] function. SUNRISE&SUNSET* ( ) Select this to reproduce the atmosphere of an image manually. appears. 2 Adjust the exposure by touching / . 3...

Handycam® Handbook
Page 70
... 3 Touch [ ]. flashes quickly. appears on the screen. NIGHTSHOT PLS (Super NightShot plus) (DCR-SR42/SR62/SR82) The image will be recorded at a maximum of 16 times the sensitivity of NightShot plus recording if you set [SUPER NIGHTSHOT] to [ON] while the NIGHTSHOT switch (p. 27) is also set...of the motion of the image. To cancel [COLOR SLOW SHTR], touch [OFF]. 70 b Notes • Adjust the focus manually ([FOCUS], p. 67) when it is hard to focus automatically. • The shutter speed of your camcorder changes depending on the brightness, which may result in a slowdown ...
... 3 Touch [ ]. flashes quickly. appears on the screen. NIGHTSHOT PLS (Super NightShot plus) (DCR-SR42/SR62/SR82) The image will be recorded at a maximum of 16 times the sensitivity of NightShot plus recording if you set [SUPER NIGHTSHOT] to [ON] while the NIGHTSHOT switch (p. 27) is also set...of the motion of the image. To cancel [COLOR SLOW SHTR], touch [OFF]. 70 b Notes • Adjust the focus manually ([FOCUS], p. 67) when it is hard to focus automatically. • The shutter speed of your camcorder changes depending on the brightness, which may result in a slowdown ...


