Operating Guide
Page 6
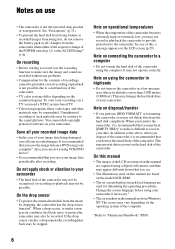
... It may be contrary to "Handycam Handbook" (PDF). 6 This may damage the hard disk drive of this manual are based on the model DCR-SR80. • The on the countries/regions. You cannot dub copyright protected software on your recordings on the LCD screen (p.29). In case of your ... camcorder, you see. • The illustrations used for the contents of recordings cannot be recorded. Change the screen language before using your camcorder • The hard disk of the camcorder becomes extremely high or extremely low, you may not record or playback the camcorder to provide ...
... It may be contrary to "Handycam Handbook" (PDF). 6 This may damage the hard disk drive of this manual are based on the model DCR-SR80. • The on the countries/regions. You cannot dub copyright protected software on your recordings on the LCD screen (p.29). In case of your ... camcorder, you see. • The illustrations used for the contents of recordings cannot be recorded. Change the screen language before using your camcorder • The hard disk of the camcorder becomes extremely high or extremely low, you may not record or playback the camcorder to provide ...
Operating Guide
Page 12
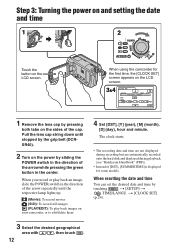
... minute. The clock starts. • The recording date and time are not displayed during recording but are automatically recorded onto the hard disk and displayed during playback (see "Handycam Handbook" (PDF)). • Instead of the arrow while pressing the green button in the center. Pull the lens cap string ... date and time by pressing both tabs on the sides of the arrow repeatedly until stopped by the grip belt (DCRSR40). 2 Turn on the LCD screen. 3&4 CLOCK SET AREA26 GMT -5.0 New york , Bogota DST OFF DATE 2006 Y JAN M 1D 12 00 AM OK 1 Remove the lens cap by touching ...
... minute. The clock starts. • The recording date and time are not displayed during recording but are automatically recorded onto the hard disk and displayed during playback (see "Handycam Handbook" (PDF)). • Instead of the arrow while pressing the green button in the center. Pull the lens cap string ... date and time by pressing both tabs on the sides of the arrow repeatedly until stopped by the grip belt (DCRSR40). 2 Turn on the LCD screen. 3&4 CLOCK SET AREA26 GMT -5.0 New york , Bogota DST OFF DATE 2006 Y JAN M 1D 12 00 AM OK 1 Remove the lens cap by touching ...
Operating Guide
Page 13
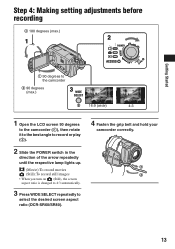
...before recording 2 180 degrees (max.) 1 2 Getting Started 1 90 degrees to the camcorder 2 90 degrees (max.) 3 16:9 (wide) 4:3 1 Open the LCD screen 90 degrees to the camcorder (1), then rotate it to the best angle to record or play (2). 2 Slide the POWER switch in the direction of the ... up. (Movie):To record movies (Still):To record still images • When you turn on (Still), the screen aspect ratio is changed to 4:3 automatically. 3 Press WIDE SELECT repeatedly to select the desired screen aspect ratio (DCR-SR60/SR80). 4 Fasten the grip belt and hold your camcorder correctly. 13
...before recording 2 180 degrees (max.) 1 2 Getting Started 1 90 degrees to the camcorder 2 90 degrees (max.) 3 16:9 (wide) 4:3 1 Open the LCD screen 90 degrees to the camcorder (1), then rotate it to the best angle to record or play (2). 2 Slide the POWER switch in the direction of the ... up. (Movie):To record movies (Still):To record still images • When you turn on (Still), the screen aspect ratio is changed to 4:3 automatically. 3 Press WIDE SELECT repeatedly to select the desired screen aspect ratio (DCR-SR60/SR80). 4 Fasten the grip belt and hold your camcorder correctly. 13
Operating Guide
Page 15
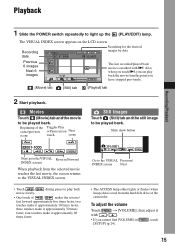
... Touch (Movie) tab and the movie to the VISUAL Previous/ INDEX screen Next • The ACCESS lamp either lights or flashes when image data is marked with / . • If you cannot find [VOLUME] in [SETUP] (p.24). , touch ...; Touch / movie slowly. Still Images Touch (Still) tab and the still image to the VISUAL Reverse/Forward INDEX screen) When playback from the hard disk drive of the Toggles Play scene/previous or Pause as you have stopped previously. (Movie) tab (Still) tab (Playlist) tab 2 Start playback. Beginning of the camcorder. ...
... Touch (Movie) tab and the movie to the VISUAL Previous/ INDEX screen Next • The ACCESS lamp either lights or flashes when image data is marked with / . • If you cannot find [VOLUME] in [SETUP] (p.24). , touch ...; Touch / movie slowly. Still Images Touch (Still) tab and the still image to the VISUAL Reverse/Forward INDEX screen) When playback from the hard disk drive of the Toggles Play scene/previous or Pause as you have stopped previously. (Movie) tab (Still) tab (Playlist) tab 2 Start playback. Beginning of the camcorder. ...
Operating Guide
Page 16
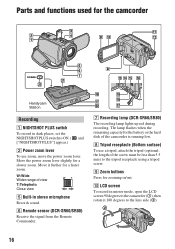
... for the battery or the hard disk of the camcorder is running low. 8 Tripod receptacle (Bottom surface) To use zoom, move the power zoom lever. W:Wide Wider range of view T:Telephoto Close view 5 Built-in stereo microphone Records sound. 6 Remote sensor (DCR-SR60/SR80) Receive the signal... lens side (2). 16 LCD screen To record in mirror mode, open the LCD screen 90 degrees to the camcorder (1), then rotate it further for a faster zoom. Move the power zoom lever slightly for a slower zoom. Parts and functions used for the camcorder Handycam Station Recording 1 NIGHTSHOT PLUS...
... for the battery or the hard disk of the camcorder is running low. 8 Tripod receptacle (Bottom surface) To use zoom, move the power zoom lever. W:Wide Wider range of view T:Telephoto Close view 5 Built-in stereo microphone Records sound. 6 Remote sensor (DCR-SR60/SR80) Receive the signal... lens side (2). 16 LCD screen To record in mirror mode, open the LCD screen 90 degrees to the camcorder (1), then rotate it further for a faster zoom. Move the power zoom lever slightly for a slower zoom. Parts and functions used for the camcorder Handycam Station Recording 1 NIGHTSHOT PLUS...

Operating Guide
Page 17
...magnify images from the speaker while playing back. qk A/V (audio/video) jack Connect with the USB cable. 17 Recording/Playback During Easy Handycam operation, you want to 5 times the original size (Playback zoom). 1 Play back the image you may not use the camcorder with simple operation.../SR80) Open when using Active Interface Shoe. 4 Active Interface Shoe (DCR-SR60/SR80) The Active Interface Shoe supplies power to optional accessories such as you want to the instructions on the LCD screen. 3 Touch the portion you operate the POWER switch on the camcorder. ws (USB) jack ...
...magnify images from the speaker while playing back. qk A/V (audio/video) jack Connect with the USB cable. 17 Recording/Playback During Easy Handycam operation, you want to 5 times the original size (Playback zoom). 1 Play back the image you may not use the camcorder with simple operation.../SR80) Open when using Active Interface Shoe. 4 Active Interface Shoe (DCR-SR60/SR80) The Active Interface Shoe supplies power to optional accessories such as you want to the instructions on the LCD screen. 3 Touch the portion you operate the POWER switch on the camcorder. ws (USB) jack ...
Operating Guide
Page 19
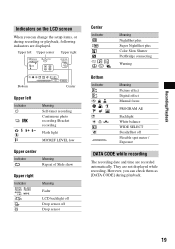
..., you can check them as [DATA CODE] during recording or playback, following indicators are displayed. They are recorded automatically. Recording/Playback Indicators on the LCD screen When you can change the setup items, or during playback. 19 Upper left Upper center Upper right 60min STBY 00:01:00 [60min] Bottom P-MENU...
..., you can check them as [DATA CODE] during recording or playback, following indicators are displayed. They are recorded automatically. Recording/Playback Indicators on the LCD screen When you can change the setup items, or during playback. 19 Upper left Upper center Upper right 60min STBY 00:01:00 [60min] Bottom P-MENU...
Operating Guide
Page 20
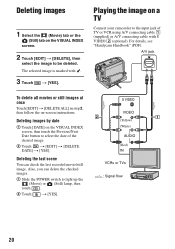
...TVs : Signal flow 20 Playing the image on a TV Connect your camcorder to be deleted. Deleting images by date 1 Touch [DATE] on the VISUAL INDEX screen, then touch the Previous/Next Date button to light up the (Movie) or (Still) lamp, then touch . 2 Touch t [YES]. Deleting the last ... VCR using A/V connecting cable 1 (supplied) or A/V connecting cable with . 3 Touch t [YES]. The selected image is marked with S VIDEO 2 (optional). For details, see "Handycam Handbook" (PDF). A/V jack To delete all movies or still images at once Touch [EDIT] t [DELETE ALL] in step 2, then follow the on...
...TVs : Signal flow 20 Playing the image on a TV Connect your camcorder to be deleted. Deleting images by date 1 Touch [DATE] on the VISUAL INDEX screen, then touch the Previous/Next Date button to light up the (Movie) or (Still) lamp, then touch . 2 Touch t [YES]. Deleting the last ... VCR using A/V connecting cable 1 (supplied) or A/V connecting cable with . 3 Touch t [YES]. The selected image is marked with S VIDEO 2 (optional). For details, see "Handycam Handbook" (PDF). A/V jack To delete all movies or still images at once Touch [EDIT] t [DELETE ALL] in step 2, then follow the on...
Operating Guide
Page 21
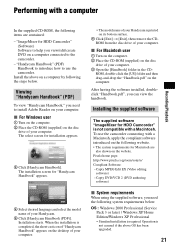
...Reader on your computer. The select screen for "Handycam Handbook" appears. 4 Select desired language and select the model name of your Handycam. 5 Click [Handycam Handbook (PDF)]. ROM, double-click the [US] folder and then drag-and-drop the "Handbook.pdf" on the disc drive of your computer. 3 Open ...the [Handbook] folder in the CD- Pixela home page: http://www.pixela.co.jp/oem/sony/e/ Compliant Software:...
...Reader on your computer. The select screen for "Handycam Handbook" appears. 4 Select desired language and select the model name of your Handycam. 5 Click [Handycam Handbook (PDF)]. ROM, double-click the [US] folder and then drag-and-drop the "Handbook.pdf" on the disc drive of your computer. 3 Open ...the [Handbook] folder in the CD- Pixela home page: http://www.pixela.co.jp/oem/sony/e/ Compliant Software:...
Operating Guide
Page 22
... recommended) • The camcorder is based on DirectX technology. Disc Drive : A DVD writable drive • Operations are not guaranteed on the disc drive of USB1.1 (USB full speed). When you agree, then click [Next]. The select screen for installation appears. 4 Click [ImageMixer for installation. • Close... Windows XP Home Edition / Professional Edition: 256 MB or more (512 MB or more recommended) Hard Disk : Available memory required for installation: 300 MB or more Available free hard disk space for operations required: 14 GB or more (for dual layer DVD system, 28 GB or ...
... recommended) • The camcorder is based on DirectX technology. Disc Drive : A DVD writable drive • Operations are not guaranteed on the disc drive of USB1.1 (USB full speed). When you agree, then click [Next]. The select screen for installation appears. 4 Click [ImageMixer for installation. • Close... Windows XP Home Edition / Professional Edition: 256 MB or more (512 MB or more recommended) Hard Disk : Available memory required for installation: 300 MB or more Available free hard disk space for operations required: 14 GB or more (for dual layer DVD system, 28 GB or ...

Operating Guide
Page 23
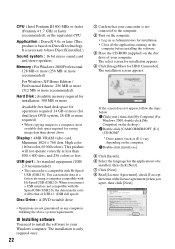
qs If the [Installing Microsoft ® DirectX ®] screen is checked, then click [Finish]. If not, skip to save the software, then click [Next]. 2Click [...the installation, the shortcut icons for [ImageMixer for HDD Camcorder" starts. qf Remove the CD-ROM from the disc drive of your computer. 23 Recording/Playback qa Click [Install] on the desktop of your computer. The installation for "ImageMixer...restart my computer now.] is displayed, follow the steps below to Install the Program] screen. The computer turns off once, then starts up again automatically (Restart).
qs If the [Installing Microsoft ® DirectX ®] screen is checked, then click [Finish]. If not, skip to save the software, then click [Next]. 2Click [...the installation, the shortcut icons for [ImageMixer for HDD Camcorder" starts. qf Remove the CD-ROM from the disc drive of your computer. 23 Recording/Playback qa Click [Install] on the desktop of your computer. The installation for "ImageMixer...restart my computer now.] is displayed, follow the steps below to Install the Program] screen. The computer turns off once, then starts up again automatically (Restart).
Operating Guide
Page 24
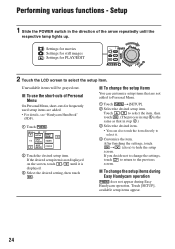
... hide the setup screen. Unavailable items will be grayed out. Touch / to the previous screen. x To use the short-cuts of the arrow repeatedly until it is the same as that are added. • For details, see "Handycam Handbook" (PDF). 1 Touch . 60min STBY SETUP EXPOSURE SPOT FOCUS FADER SPOT METER FOCUS 2 Touch the...
... hide the setup screen. Unavailable items will be grayed out. Touch / to the previous screen. x To use the short-cuts of the arrow repeatedly until it is the same as that are added. • For details, see "Handycam Handbook" (PDF). 1 Touch . 60min STBY SETUP EXPOSURE SPOT FOCUS FADER SPOT METER FOCUS 2 Touch the...
Operating Guide
Page 25
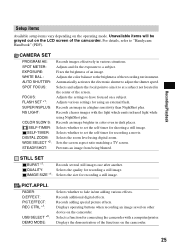
... saved on other device on the camcorder. 25 Unavailable items will be grayed out on the LCD screen of the functions on the camcorder. Adjusts and fix the exposure to "Handycam Handbook" (PDF). Selects the size for recording a still image. Selects and adjusts the focal point... to aim it to have focused on the operating mode. Records an image brighter in color even in /out adding various effects. Fixes the brightness of the screen. Automatically...
... saved on other device on the camcorder. 25 Unavailable items will be grayed out on the LCD screen of the functions on the camcorder. Adjusts and fix the exposure to "Handycam Handbook" (PDF). Selects the size for recording a still image. Selects and adjusts the focal point... to aim it to have focused on the operating mode. Records an image brighter in color even in /out adding various effects. Fixes the brightness of the screen. Automatically...
Operating Guide
Page 26
...AC Adaptor connected to show a display such as a counter on the LCD screen or on the hard disk drive from the camcorder. DISPLAY: Selects a number of a movie. Displays free hard disk space of an image output from being recovered. - Deactivates the camcorder when ... INFO: DROP SENSOR: EMPTY HDD: Initializes the hard disk drive. LCD SET: TV TYPE *1: Sets various settings for a movie recording. STANDARD SET REC MODE: Selects image quality of thumbnails on the LCD screen. *1 DCR-SR60/SR80 *2 DCR-SR40 *3 [USB SELECT] appears automatically when your camcorder...
...AC Adaptor connected to show a display such as a counter on the LCD screen or on the hard disk drive from the camcorder. DISPLAY: Selects a number of a movie. Displays free hard disk space of an image output from being recovered. - Deactivates the camcorder when ... INFO: DROP SENSOR: EMPTY HDD: Initializes the hard disk drive. LCD SET: TV TYPE *1: Sets various settings for a movie recording. STANDARD SET REC MODE: Selects image quality of thumbnails on the LCD screen. *1 DCR-SR60/SR80 *2 DCR-SR40 *3 [USB SELECT] appears automatically when your camcorder...
Operating Guide
Page 28
... operate the camcorder, turn it off the camcorder and take it to a warm place. Turn off , taking it for a while, then turn on the hard disk of the camcorder. The recording stops. • The temperature of your camcorder and leave it to light up the (Movie) or the (Still) lamp .... The beep sounds for a while in a cool place. • Some problems have just shot on the camcorder. Turn off and on the LCD screen. • The hard disk of your camcorder again. 28 Setup items are grayed out. • You cannot select grayed out items in a cool place. • The temperature ...
... operate the camcorder, turn it off the camcorder and take it to a warm place. Turn off , taking it for a while, then turn on the hard disk of the camcorder. The recording stops. • The temperature of your camcorder and leave it to light up the (Movie) or the (Still) lamp .... The beep sounds for a while in a cool place. • Some problems have just shot on the camcorder. Turn off and on the LCD screen. • The hard disk of your camcorder again. 28 Setup items are grayed out. • You cannot select grayed out items in a cool place. • The temperature ...
Operating Guide
Page 29
...to the DC IN jack of the Handycam Station or your camcorder is extremely low. Fast flashing* • The temperature of the camcorder)* Fast flashing • An error may have occurred with the hard disk drive in a cool place. Contact your ...screen, check the following. Warning indicators Troubleshooting Self-diagnosis display/Warning indicators If indicators appear on the hard disk of the camcorder)* Fast flashing • The hard disk of the camcorder is not an "InfoLITHIUM" battery pack. If your camcorder and leave it and operate your Sony dealer or local authorized Sony...
...to the DC IN jack of the Handycam Station or your camcorder is extremely low. Fast flashing* • The temperature of the camcorder)* Fast flashing • An error may have occurred with the hard disk drive in a cool place. Contact your ...screen, check the following. Warning indicators Troubleshooting Self-diagnosis display/Warning indicators If indicators appear on the hard disk of the camcorder)* Fast flashing • The hard disk of the camcorder is not an "InfoLITHIUM" battery pack. If your camcorder and leave it and operate your Sony dealer or local authorized Sony...

Operating Guide
Page 30
However, note that the camerashake warning indicator does not disappear. * You hear a melody when the warning indicators appear on the screen. 30 Use the flash. • The camcorder is not sufficient, so camera-shake easily occurs. (Warning indicator pertaining to camera-shake warning)* • The amount of lights is unsteady, so camerashake easily occurs. Hold the camcorder steady with both hands and record the image.
However, note that the camerashake warning indicator does not disappear. * You hear a melody when the warning indicators appear on the screen. 30 Use the flash. • The camcorder is not sufficient, so camera-shake easily occurs. (Warning indicator pertaining to camera-shake warning)* • The amount of lights is unsteady, so camerashake easily occurs. Hold the camcorder steady with both hands and record the image.
Operating Guide
Page 31
...camcorder may malfunction or become deformed. - Sometimes this malfunction cannot be exposed to temperatures above 60°C (140°F), such as by a Sony dealer before storing it may cause a malfunction of your camcorder. • If your camcorder, the back of water and consult with a ...sea water. consult with a doctor immediately (DCR-SR60/SR80). • If the battery electrolytic liquid has leaked, - x To clean the LCD screen If fingerprints or dust make the LCD screen dirty, use the cleaning cloth (optional) to the LCD screen. Near strong radio waves or radiation. Be ...
...camcorder may malfunction or become deformed. - Sometimes this malfunction cannot be exposed to temperatures above 60°C (140°F), such as by a Sony dealer before storing it may cause a malfunction of your camcorder. • If your camcorder, the back of water and consult with a ...sea water. consult with a doctor immediately (DCR-SR60/SR80). • If the battery electrolytic liquid has leaked, - x To clean the LCD screen If fingerprints or dust make the LCD screen dirty, use the cleaning cloth (optional) to the LCD screen. Near strong radio waves or radiation. Be ...
Operating Guide
Page 34
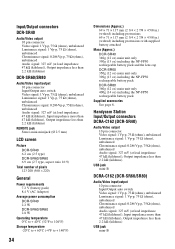
...)), Input impedance more than 47 kΩ (kilohms), Output impedance less than 2.2 kΩ (kilohms) USB jack mini-B Handycam Station Input/Output connectors DCRA-C162 (DCR-SR40) Audio/Video output 10 pin connector Video signal: 1 Vp-p, 75 Ω (ohms), unbalanced Luminance signal: 1 Vp-p,... than 47 kΩ (kilohms), Output impedance less than 2.2 kΩ (kilohms) REMOTE jack Stereo mini-minijack (Ø 2.5 mm) LCD screen Picture DCR-SR40 6.2 cm (2.5 type) DCR-SR60/SR80 6.9 cm (2.7 type, aspect ratio 16:9) Total number of pixels 123 200 (560 × 220) General Power requirements 7.2 ...
...)), Input impedance more than 47 kΩ (kilohms), Output impedance less than 2.2 kΩ (kilohms) USB jack mini-B Handycam Station Input/Output connectors DCRA-C162 (DCR-SR40) Audio/Video output 10 pin connector Video signal: 1 Vp-p, 75 Ω (ohms), unbalanced Luminance signal: 1 Vp-p,... than 47 kΩ (kilohms), Output impedance less than 2.2 kΩ (kilohms) REMOTE jack Stereo mini-minijack (Ø 2.5 mm) LCD screen Picture DCR-SR40 6.2 cm (2.5 type) DCR-SR60/SR80 6.9 cm (2.7 type, aspect ratio 16:9) Total number of pixels 123 200 (560 × 220) General Power requirements 7.2 ...


