
MovieShaker v3.1 Operating Instructions
Page 8
Check the remaining battery charge before exporting. Also, use with the hard disk drive connected using the device, and then restart MovieShaker. • Because large amounts of memory are ... to malfunction. To capture from or export files to MICROMV devices, see "Configuring your computer into System Suspend mode or the System Hibernation mode. • Digital recording is not possible if the audio source is not installed on your computer, you need to install it. • Do not uninstall QuickTime. • Do...
Check the remaining battery charge before exporting. Also, use with the hard disk drive connected using the device, and then restart MovieShaker. • Because large amounts of memory are ... to malfunction. To capture from or export files to MICROMV devices, see "Configuring your computer into System Suspend mode or the System Hibernation mode. • Digital recording is not possible if the audio source is not installed on your computer, you need to install it. • Do not uninstall QuickTime. • Do...
MovieShaker v3.1 Operating Instructions
Page 18
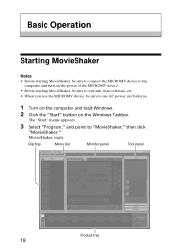
The "Start" menu appears. 3 Select "Program," and point to use AC power, not batteries. 1 Turn on the computer and load Windows. 2 Click the "Start" button on the power of the MICROMV device. • Before starting MovieShaker, be sure to ...
The "Start" menu appears. 3 Select "Program," and point to use AC power, not batteries. 1 Turn on the computer and load Windows. 2 Click the "Start" button on the power of the MICROMV device. • Before starting MovieShaker, be sure to ...
MovieShaker v3.1 Operating Instructions
Page 44
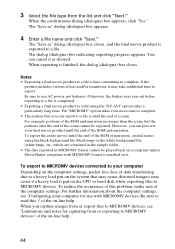
... (dialogue) box appears. 4 Enter a file name and click "Save." For further information about the computer settings, see "Limitations and notes for use AC power, not batteries. Otherwise, the battery may take additional time to a file is finished, the dialog (dialogue) box closes. When the confirmation dialog (dialogue) box appears, click "Yes."
... (dialogue) box appears. 4 Enter a file name and click "Save." For further information about the computer settings, see "Limitations and notes for use AC power, not batteries. Otherwise, the battery may take additional time to a file is finished, the dialog (dialogue) box closes. When the confirmation dialog (dialogue) box appears, click "Yes."
Operating Instructions
Page 2
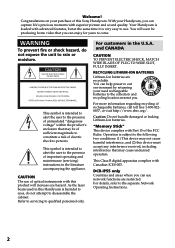
... that may be producing home video that may cause undesired operation. Caution: Do not handle damaged or leaking Lithium-Ion batteries. For details, refer to ...rain or moisture. You will increase eye hazard. WARNING To prevent fire or shock hazard, do not attempt to qualified personnel only. For customers in this Sony Handycam. This Class B digital...you can use network functions are recyclable. RECYCLING LITHIUM-ION BATTERIES Lithium-Ion batteries are restricted. DCR-IP55 only Countries and areas where you can enjoy for years...
... that may be producing home video that may cause undesired operation. Caution: Do not handle damaged or leaking Lithium-Ion batteries. For details, refer to ...rain or moisture. You will increase eye hazard. WARNING To prevent fire or shock hazard, do not attempt to qualified personnel only. For customers in this Sony Handycam. This Class B digital...you can use network functions are recyclable. RECYCLING LITHIUM-ION BATTERIES Lithium-Ion batteries are restricted. DCR-IP55 only Countries and areas where you can enjoy for years...

Operating Instructions
Page 6
... Tape PB ZOOM 77 Searching for a scene - Recording on a tape 10 - DATE SEARCH 84 Editing Dubbing a tape 85 Recording video or TV programs 88 Superimposing a title 92 Making... Recording on a "Memory Stick 12 Getting started Using this manual 14 Checking supplied accessories 16 Step 1 Preparing the power supply ........ 17 Installing the battery pack 17 Charging the battery...back a tape with digital effects .... 76 Enlarging images recorded on TV 47 Advanced Recording Operations Recording still images in the dark - BACK LIGHT 37 Shooting in CAMERA mode ... 49 ...
... Tape PB ZOOM 77 Searching for a scene - Recording on a tape 10 - DATE SEARCH 84 Editing Dubbing a tape 85 Recording video or TV programs 88 Superimposing a title 92 Making... Recording on a "Memory Stick 12 Getting started Using this manual 14 Checking supplied accessories 16 Step 1 Preparing the power supply ........ 17 Installing the battery pack 17 Charging the battery...back a tape with digital effects .... 76 Enlarging images recorded on TV 47 Advanced Recording Operations Recording still images in the dark - BACK LIGHT 37 Shooting in CAMERA mode ... 49 ...
Operating Instructions
Page 7
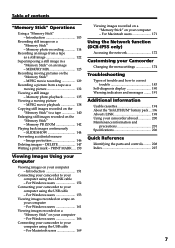
DELETE 147 Writing a print mark - For Macintosh users 171 Using the Network function (DCR-IP55 only) Accessing the network 172 Customising your Camcorder Changing the menu settings 174 Troubleshooting Types of contents "Memory Stick" ...recording 114 Recording an image from a tape as a still image 122 Superimposing a still image in a "Memory Stick" on the "Memory Stick" - Table of trouble and how to correct trouble 183 Self-diagnosis display 190 Warning indicators and messages ........ 191 Additional Information Usable cassettes 194 About the "InfoLITHIUM" battery...
DELETE 147 Writing a print mark - For Macintosh users 171 Using the Network function (DCR-IP55 only) Accessing the network 172 Customising your Camcorder Changing the menu settings 174 Troubleshooting Types of contents "Memory Stick" ...recording 114 Recording an image from a tape as a still image 122 Superimposing a still image in a "Memory Stick" on the "Memory Stick" - Table of trouble and how to correct trouble 183 Self-diagnosis display 190 Warning indicators and messages ........ 191 Additional Information Usable cassettes 194 About the "InfoLITHIUM" battery...

Operating Instructions
Page 10
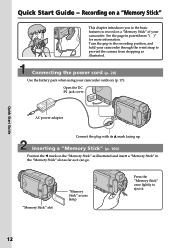
Cassette window OPEN/EJECT 10 Cassette compartment Connecting the power cord (p. 20) Use the battery pack when using your camcorder through the wrist strap to prevent the camera from dropping as illustrated. Insert the cassette in a straight line deeply into the cassette compartment. Turn the grip to.... AC power adaptor Connect the plug with the cassette window facing out. 4 Press the cassette compartment lightly to the recording position, and hold your camcorder outdoors (p. 17). Quick Start Guide Quick Start Guide - After the cassette compartment goes down completely, close...
Cassette window OPEN/EJECT 10 Cassette compartment Connecting the power cord (p. 20) Use the battery pack when using your camcorder through the wrist strap to prevent the camera from dropping as illustrated. Insert the cassette in a straight line deeply into the cassette compartment. Turn the grip to.... AC power adaptor Connect the plug with the cassette window facing out. 4 Press the cassette compartment lightly to the recording position, and hold your camcorder outdoors (p. 17). Quick Start Guide Quick Start Guide - After the cassette compartment goes down completely, close...

Operating Instructions
Page 11
... When the LCD panel is not set up yet. Your camcorder starts recording. Monitoring the playback picture on the LCD screen. 1 Remove the lens cap. 2 Turn the grip to your camcorder by the LCD panel, the battery pack, the flash or the jack cover. Do not press the LCD... panel to CAMERA. Note When using the touch panel, press operation buttons lightly with sharp objects other than the stylus supplied (DCR-IP55 only). 11 START/STOP When you purchase your thumb or the supplied stylus (DCR-IP55 only) supporting the LCD screen from the rear of it. To stop recording, press START...
... When the LCD panel is not set up yet. Your camcorder starts recording. Monitoring the playback picture on the LCD screen. 1 Remove the lens cap. 2 Turn the grip to your camcorder by the LCD panel, the battery pack, the flash or the jack cover. Do not press the LCD... panel to CAMERA. Note When using the touch panel, press operation buttons lightly with sharp objects other than the stylus supplied (DCR-IP55 only). 11 START/STOP When you purchase your thumb or the supplied stylus (DCR-IP55 only) supporting the LCD screen from the rear of it. To stop recording, press START...
Operating Instructions
Page 12
..." (p. 104) Position the b mark on a "Memory Stick" of your camcorder. Turn the grip to the recording position, and hold your camcorder outdoors (p. 17). Connecting the power cord (p. 20) Use the battery pack when using your camcorder through the wrist strap to eject it can go. "Memory Stick" slot "Memory... Stick" access lamp Press the "Memory Stick" once lightly to prevent the camera from dropping as it . 12 See the page ...
..." (p. 104) Position the b mark on a "Memory Stick" of your camcorder. Turn the grip to the recording position, and hold your camcorder outdoors (p. 17). Connecting the power cord (p. 20) Use the battery pack when using your camcorder through the wrist strap to eject it can go. "Memory Stick" slot "Memory... Stick" access lamp Press the "Memory Stick" once lightly to prevent the camera from dropping as it . 12 See the page ...

Operating Instructions
Page 13
...panel is closed, use the viewfinder. The last recorded image is not set up your eyesight (p. 33). 3 Set the POWER switch to MEMORY/ NETWORK (DCR-IP55 only). Adjust the viewfinder lens to your camcorder by the LCD panel, the battery pack, the flash or the jack cover. ...set the clock setting before recording (p. 22). 1 Remove the lens cap. 2 Turn the grip to the recording position, and hold your camcorder, the clock setting is displayed. Quick Start Guide Recording a still image on the camcorder to open the LCD panel. CAMERA MEMORY/ NET- If you can record a still image. 6 Press...
...panel is closed, use the viewfinder. The last recorded image is not set up your eyesight (p. 33). 3 Set the POWER switch to MEMORY/ NETWORK (DCR-IP55 only). Adjust the viewfinder lens to your camcorder by the LCD panel, the battery pack, the flash or the jack cover. ...set the clock setting before recording (p. 22). 1 Remove the lens cap. 2 Turn the grip to the recording position, and hold your camcorder, the clock setting is displayed. Quick Start Guide Recording a still image on the camcorder to open the LCD panel. CAMERA MEMORY/ NET- If you can record a still image. 6 Press...

Operating Instructions
Page 16
... (1) (p. 17, 18) 3 A/V connecting cable (1) (p. 47, 85) 4 Wireless Remote Commander (1) (p. 212) 5 Size AA (R6) batteries for MICROMV) (1) (p. 152) qa Battery terminal cover (1) (p. 17) qs Cleaning cloth (1) (p. 202) qd Stylus (1) (DCR-IP55 only) Contents of the recording cannot be compensated if recording or playback is not made due to a malfunction of the camcorder, storage media, etc. 16 CD...
... (1) (p. 17, 18) 3 A/V connecting cable (1) (p. 47, 85) 4 Wireless Remote Commander (1) (p. 212) 5 Size AA (R6) batteries for MICROMV) (1) (p. 152) qa Battery terminal cover (1) (p. 17) qs Cleaning cloth (1) (p. 202) qd Stylus (1) (DCR-IP55 only) Contents of the recording cannot be compensated if recording or playback is not made due to a malfunction of the camcorder, storage media, etc. 16 CD...
Operating Instructions
Page 17
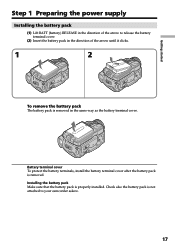
... started Step 1 Preparing the power supply Installing the battery pack (1) Lift BATT (battery) RELEASE in the direction of the arrow until it clicks. 1 2 To remove the battery pack The battery pack is removed. Battery terminal cover To protect the battery terminals, install the battery terminal cover after the battery pack is removed in the same way as the...
... started Step 1 Preparing the power supply Installing the battery pack (1) Lift BATT (battery) RELEASE in the direction of the arrow until it clicks. 1 2 To remove the battery pack The battery pack is removed. Battery terminal cover To protect the battery terminals, install the battery terminal cover after the battery pack is removed in the same way as the...
Operating Instructions
Page 18
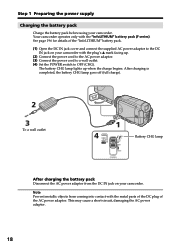
... the DC IN jack on your camcorder. This may cause a short-circuit, damaging the AC power adaptor. 18 Step 1 Preparing the power supply Charging the battery pack Charge the battery pack before using your camcorder. See page 196 for details of the AC power adaptor. WORK VCR (CHG) OFF ON MODE POWER... metallic objects from the DC IN jack on your camcorder with the plug's v mark facing up when the charge begins. After charging is completed, the battery CHG lamp goes off (full charge). 2 3 To a wall outlet 1 4 CAMERA MEMORY/ NET-
... the DC IN jack on your camcorder. This may cause a short-circuit, damaging the AC power adaptor. 18 Step 1 Preparing the power supply Charging the battery pack Charge the battery pack before using your camcorder. See page 196 for details of the AC power adaptor. WORK VCR (CHG) OFF ON MODE POWER... metallic objects from the DC IN jack on your camcorder with the plug's v mark facing up when the charge begins. After charging is completed, the battery CHG lamp goes off (full charge). 2 3 To a wall outlet 1 4 CAMERA MEMORY/ NET-
Operating Instructions
Page 19
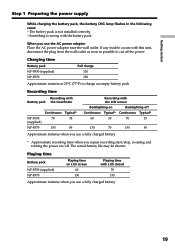
... from the wall outlet as soon as possible to charge an empty battery pack Recording time Recording with Battery pack the viewfinder Continuous Typical* NP-FF50 70 35 (supplied) NP-FF70 155 85 Recording with the LCD screen Backlighting on Backlighting off Continuous Typical* Continuous Typical... 85 Approximate minutes when you use a fully charged battery * Approximate recording time when you repeat recording start/stop, zooming and turning the power on LCD screen 60 130 Playing time with the battery pack. Playing time Battery pack NP-FF50 (supplied) NP-FF70 Playing time ...
... from the wall outlet as soon as possible to charge an empty battery pack Recording time Recording with Battery pack the viewfinder Continuous Typical* NP-FF50 70 35 (supplied) NP-FF70 155 85 Recording with the LCD screen Backlighting on Backlighting off Continuous Typical* Continuous Typical... 85 Approximate minutes when you use a fully charged battery * Approximate recording time when you repeat recording start/stop, zooming and turning the power on LCD screen 60 130 Playing time with the battery pack. Playing time Battery pack NP-FF50 (supplied) NP-FF70 Playing time ...
Operating Instructions
Page 20
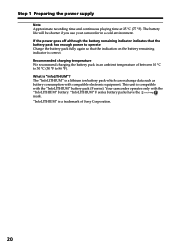
... in a cold environment. Your camcorder operates only with the "InfoLITHIUM" battery. The battery life will be shorter if you use your camcorder in an ambient temperature of Sony Corporation. 20 Step 1 Preparing the power supply Note Approximate recording time and continuous playing time at 25 °C (77 °F). What is a trademark of between 10...
... in a cold environment. Your camcorder operates only with the "InfoLITHIUM" battery. The battery life will be shorter if you use your camcorder in an ambient temperature of Sony Corporation. 20 Step 1 Preparing the power supply Note Approximate recording time and continuous playing time at 25 °C (77 °F). What is a trademark of between 10...

Operating Instructions
Page 21
... cannot use your camcorder for a long time, we recommend that the battery pack cannot supply any power if the power cord is connected to the DC IN jack, even when the ... priority." This may cause a short-circuit, damaging the AC power adaptor. Notes •The AC power adaptor can supply power even if the battery pack is attached to your camcorder with the plug's v mark facing up. (2) Connect the power cord to the AC power adaptor. (3) Connect... connected to a wall outlet, even if the camcorder itself has been turned off. This means that you use a car battery with the camcorder. 21
... cannot use your camcorder for a long time, we recommend that the battery pack cannot supply any power if the power cord is connected to the DC IN jack, even when the ... priority." This may cause a short-circuit, damaging the AC power adaptor. Notes •The AC power adaptor can supply power even if the battery pack is attached to your camcorder with the plug's v mark facing up. (2) Connect the power cord to the AC power adaptor. (3) Connect... connected to a wall outlet, even if the camcorder itself has been turned off. This means that you use a car battery with the camcorder. 21

Operating Instructions
Page 22
... settings. The clock starts to CAMERA or MEMORY/ NETWORK (DCR-IP55 only) unless you set the minute, then press EXEC by the time signal. If you do not use your camcorder will be released (bars may appear) because the built-in rechargeable battery installed in daylight saving time or... not, then press EXEC. (8) Press r/R to select the year, then press EXEC. (9) Set the month, day and hour with the same procedure as step 8. (10) Press r/R to CAMERA or MEMORY/NETWORK (DCR-IP55 only). Step 2 Setting the...
... settings. The clock starts to CAMERA or MEMORY/ NETWORK (DCR-IP55 only) unless you set the minute, then press EXEC by the time signal. If you do not use your camcorder will be released (bars may appear) because the built-in rechargeable battery installed in daylight saving time or... not, then press EXEC. (8) Press r/R to select the year, then press EXEC. (9) Set the month, day and hour with the same procedure as step 8. (10) Press r/R to CAMERA or MEMORY/NETWORK (DCR-IP55 only). Step 2 Setting the...
Operating Instructions
Page 30
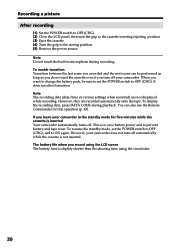
... built-in the standby mode for this operation (p. 43). Note The recording data (date/time or various settings when recorded) are recorded automatically onto the tape. The battery life when you want to change the battery pack, be performed as long as you do not eject the cassette...Commander for five minutes while the cassette is slightly shorter than the shooting time using the LCD screen The battery time is inserted Your camcorder automatically turns off. Recording a picture After recording (1) Set the POWER switch to OFF (CHG). (2) Close the LCD panel, then turn off automatically...
... built-in the standby mode for this operation (p. 43). Note The recording data (date/time or various settings when recorded) are recorded automatically onto the tape. The battery life when you want to change the battery pack, be performed as long as you do not eject the cassette...Commander for five minutes while the cassette is slightly shorter than the shooting time using the LCD screen The battery time is inserted Your camcorder automatically turns off. Recording a picture After recording (1) Set the POWER switch to OFF (CHG). (2) Close the LCD panel, then turn off automatically...
Operating Instructions
Page 32
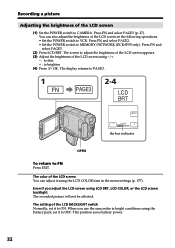
... in the following operations. • Set the POWER switch to VCR. The display returns to MEMORY/NETWORK (DCR-IP55 only). The setting of the LCD screen in the menu settings (p. 177). Press FN and select PAGE2. ... in bright conditions using LCD BRT, LCD COLOR, or the LCD screen backlight The recorded picture will not be affected. This position saves battery power. 32 Recording a picture Adjusting the brightness of the LCD screen using -/+. - : to dim ... EXIT. When you adjust the LCD screen using the battery pack, set it to OFF. LCD BRT + the bar indicator OPEN To return to...
... in the following operations. • Set the POWER switch to VCR. The display returns to MEMORY/NETWORK (DCR-IP55 only). The setting of the LCD screen in the menu settings (p. 177). Press FN and select PAGE2. ... in bright conditions using LCD BRT, LCD COLOR, or the LCD screen backlight The recorded picture will not be affected. This position saves battery power. 32 Recording a picture Adjusting the brightness of the LCD screen using -/+. - : to dim ... EXIT. When you adjust the LCD screen using the battery pack, set it to OFF. LCD BRT + the bar indicator OPEN To return to...
Operating Instructions
Page 33
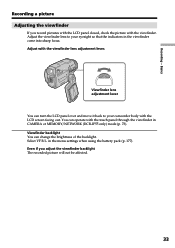
Adjust the viewfinder lens to your eyesight so that the indicators in the viewfinder come into sharp focus. in CAMERA or MEMORY/NETWORK (DCR-IP55 only) mode (p. 73). Viewfinder backlight You can operate with the LCD screen facing out. Viewfinder lens adjustment lever You ... the touch panel through the viewfinder in the menu settings when using the battery pack (p. 177). Even if you record pictures with the LCD panel closed, check the picture with the viewfinder lens adjustment lever. Recording - Adjust with the viewfinder. Select VF B.L. You can change the brightness...
Adjust the viewfinder lens to your eyesight so that the indicators in the viewfinder come into sharp focus. in CAMERA or MEMORY/NETWORK (DCR-IP55 only) mode (p. 73). Viewfinder backlight You can operate with the LCD screen facing out. Viewfinder lens adjustment lever You ... the touch panel through the viewfinder in the menu settings when using the battery pack (p. 177). Even if you record pictures with the LCD panel closed, check the picture with the viewfinder lens adjustment lever. Recording - Adjust with the viewfinder. Select VF B.L. You can change the brightness...


