
Operating Instructions
Page 4
... still images, and playing them back •Recording moving pictures on tapes (p. 29) •Playing back tapes (p. 42) •Recording still images on the "Memory Stick"s (p. 49, 114) •Recording moving pictures on the "Memory Stick"s (p. 129) •Viewing still images recorded on the "Memory Stick"s (p. 135) &#...8226;Viewing moving pictures on the "Memory Stick"s (p. 138) Main Features •Viewing moving pictures recorded on tapes using the USB cable (p. 161) •Capturing images on your camcorder using the i.LINK cable (p. 152) (The i.LINK of...
... still images, and playing them back •Recording moving pictures on tapes (p. 29) •Playing back tapes (p. 42) •Recording still images on the "Memory Stick"s (p. 49, 114) •Recording moving pictures on the "Memory Stick"s (p. 129) •Viewing still images recorded on the "Memory Stick"s (p. 135) &#...8226;Viewing moving pictures on the "Memory Stick"s (p. 138) Main Features •Viewing moving pictures recorded on tapes using the USB cable (p. 161) •Capturing images on your camcorder using the i.LINK cable (p. 152) (The i.LINK of...
Operating Instructions
Page 5
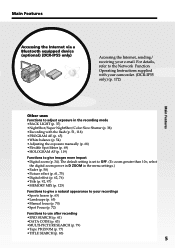
... 125) Functions to give images more impact •Digital zoom (p. 34). Main Features Accessing the Internet via a Bluetooth equipped device (optional) (DCR-IP55 only) Accessing the Internet, sending/ receiving your recordings •Sports lesson (p. 65) •Landscape (p. ...65) •Manual focus (p. 70) •Spot Focus (p. 72) Functions to use after recording •END SEARCH (p. 41) •DATA CODE (p. 43) •MULTI-PICTURE SEARCH (p. 79) •Tape...
... 125) Functions to give images more impact •Digital zoom (p. 34). Main Features Accessing the Internet via a Bluetooth equipped device (optional) (DCR-IP55 only) Accessing the Internet, sending/ receiving your recordings •Sports lesson (p. 65) •Landscape (p. ...65) •Manual focus (p. 70) •Spot Focus (p. 72) Functions to use after recording •END SEARCH (p. 41) •DATA CODE (p. 43) •MULTI-PICTURE SEARCH (p. 79) •Tape...

Operating Instructions
Page 6
... - Table of recorded tape by date - BACK LIGHT 37 Shooting in CAMERA mode ... 49 Adjusting the white balance manually ... 54 Using the wide mode 56 Using the fader function 58 Using special effects - MULTI-PICTURE SEARCH 79 Searching the boundaries of contents Main Features 4 Introduction - DATE SEARCH 84 Editing Dubbing a tape 85 Recording video or TV...
... - Table of recorded tape by date - BACK LIGHT 37 Shooting in CAMERA mode ... 49 Adjusting the white balance manually ... 54 Using the wide mode 56 Using the fader function 58 Using special effects - MULTI-PICTURE SEARCH 79 Searching the boundaries of contents Main Features 4 Introduction - DATE SEARCH 84 Editing Dubbing a tape 85 Recording video or TV...
Operating Instructions
Page 7
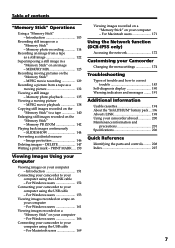
... your computer - Memory PB ZOOM 142 Playing back images continuously - Image protection 146 Deleting images - MPEG movie recording 129 Recording a picture from a tape as a moving picture - For Macintosh users 171 Using the Network function (DCR-IP55 only) Accessing the network 172 Customising your computer using the USB cable - For Windows users 166 Connecting your camcorder...
... your computer - Memory PB ZOOM 142 Playing back images continuously - Image protection 146 Deleting images - MPEG movie recording 129 Recording a picture from a tape as a moving picture - For Macintosh users 171 Using the Network function (DCR-IP55 only) Accessing the network 172 Customising your computer using the USB cable - For Windows users 166 Connecting your camcorder...

Operating Instructions
Page 8
... the network (DCR-IP55 only) function. CAMERA Use this mode when you play back or edit an image in a "Memory Stick." VCR Use this mode when you record on a "Memory Stick," or play back or edit an image recorded on a tape. Introduction - NETWORK: Use this mode when you record on a tape or "Memory Stick". 8 MEMORY/NETWORK (DCR-IP55) MEMORY: Use...
... the network (DCR-IP55 only) function. CAMERA Use this mode when you play back or edit an image in a "Memory Stick." VCR Use this mode when you record on a "Memory Stick," or play back or edit an image recorded on a tape. Introduction - NETWORK: Use this mode when you record on a tape or "Memory Stick". 8 MEMORY/NETWORK (DCR-IP55) MEMORY: Use...

Operating Instructions
Page 10
... camcorder. Connecting the power cord (p. 20) Use the battery pack when using your camcorder through the wrist strap to prevent the camera from dropping as illustrated. Turn the grip to close the lid until it with its v mark facing up. Insert the cassette ... with the cassette window facing out. 4 Press the cassette compartment lightly to the recording position, and hold your camcorder outdoors (p. 17). After the cassette compartment goes down completely, close . Recording on a tape This chapter introduces you to the basic features to the cassette inserting/ ejecting position...
... camcorder. Connecting the power cord (p. 20) Use the battery pack when using your camcorder through the wrist strap to prevent the camera from dropping as illustrated. Turn the grip to close the lid until it with its v mark facing up. Insert the cassette ... with the cassette window facing out. 4 Press the cassette compartment lightly to the recording position, and hold your camcorder outdoors (p. 17). After the cassette compartment goes down completely, close . Recording on a tape This chapter introduces you to the basic features to the cassette inserting/ ejecting position...

Operating Instructions
Page 11
...clock setting before recording (p. 22). CAMERA MEMORY/ NET- Monitoring the playback picture on the camcorder to the recording position, and hold your thumb or the supplied stylus (DCR-IP55 only) supporting the LCD screen from the rear of the touch panel to CAMERA. To stop recording, press START/ ...STOP again. Do not press the LCD screen with your camcorder through the wrist strap. 5 Press START/ STOP. Your camcorder starts recording. WORK VCR (CHG) OFF ON MODE POWER 2 Press of the touch panel to rewind the tape....
...clock setting before recording (p. 22). CAMERA MEMORY/ NET- Monitoring the playback picture on the camcorder to the recording position, and hold your thumb or the supplied stylus (DCR-IP55 only) supporting the LCD screen from the rear of the touch panel to CAMERA. To stop recording, press START/ ...STOP again. Do not press the LCD screen with your camcorder through the wrist strap. 5 Press START/ STOP. Your camcorder starts recording. WORK VCR (CHG) OFF ON MODE POWER 2 Press of the touch panel to rewind the tape....
Operating Instructions
Page 14
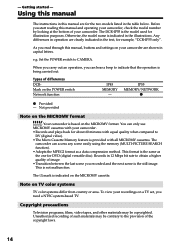
...in the text, for DVD (digital versatile disc). e.g. Set the POWER switch to DV (digital video). •The Micro Cassette Memory feature is indicated in capital letters. This is the same as a data compression method. You can only use MICROMV cassettes with your recordings on a TV set, you... can access any scene easily using the memory (MULTI-PICTURE SEARCH function). •Adopts the MPEG2 format as the one for example, "DCR-IP55 only". This format is not malfunction. The DCR-IP55 is based on the MICROMV ...
...in the text, for DVD (digital versatile disc). e.g. Set the POWER switch to DV (digital video). •The Micro Cassette Memory feature is indicated in capital letters. This is the same as a data compression method. You can only use MICROMV cassettes with your recordings on a TV set, you... can access any scene easily using the memory (MULTI-PICTURE SEARCH function). •Adopts the MPEG2 format as the one for example, "DCR-IP55 only". This format is not malfunction. The DCR-IP55 is based on the MICROMV ...

Operating Instructions
Page 23
... for noon. 23 Getting started Step 2 Setting the date and time The year changes as the data code. When using your camcorder operates on the tape or the "Memory Stick" as follows: 2000 2002 2079 To return to the local time (p. 24). If you do not set the date and time...
... for noon. 23 Getting started Step 2 Setting the date and time The year changes as the data code. When using your camcorder operates on the tape or the "Memory Stick" as follows: 2000 2002 2079 To return to the local time (p. 24). If you do not set the date and time...
Operating Instructions
Page 27
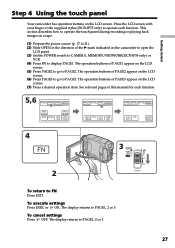
.... (3) Set the POWER switch to CAMERA, MEMORY/NETWORK(DCR-IP55 only) or VCR. (4) Press FN to display PAGE1. To cancel settings Press OFF. To execute settings Press EXEC or OK. This section describes how to operate the touch panel during recording or playing back images on a tape. (1) Prepare the power source (p. ... (CHG) OFF ON MODE POWER To return to PAGE1, 2 or 3. 27 Press the LCD screen with your finger or the supplied stylus (DCR-IP55 only) to operate each function. 5,6 PAGE1 PAGE2 PAGE3 EXIT SPOT FOCUS MENU FADER SPOT METER END EXPOSCH SURE PAGE1 PAGE2 PAGE3 EXIT SELF TITLE ...
.... (3) Set the POWER switch to CAMERA, MEMORY/NETWORK(DCR-IP55 only) or VCR. (4) Press FN to display PAGE1. To cancel settings Press OFF. To execute settings Press EXEC or OK. This section describes how to operate the touch panel during recording or playing back images on a tape. (1) Prepare the power source (p. ... (CHG) OFF ON MODE POWER To return to PAGE1, 2 or 3. 27 Press the LCD screen with your finger or the supplied stylus (DCR-IP55 only) to operate each function. 5,6 PAGE1 PAGE2 PAGE3 EXIT SPOT FOCUS MENU FADER SPOT METER END EXPOSCH SURE PAGE1 PAGE2 PAGE3 EXIT SELF TITLE ...
Operating Instructions
Page 30
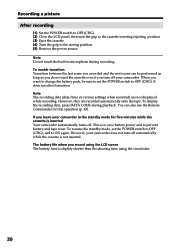
The battery life when you turn off . Note The recording data (date/time or various settings when recorded) are recorded automatically onto the tape. To display the recording data, press DATA CODE during recording. This is slightly shorter than the shooting time using the LCD screen The battery time is to ...save battery power and to prevent battery and tape wear. To enable transition Transition between the last scene you recorded and the next scene can also use the Remote Commander for five minutes while the cassette is ...
The battery life when you turn off . Note The recording data (date/time or various settings when recorded) are recorded automatically onto the tape. To display the recording data, press DATA CODE during recording. This is slightly shorter than the shooting time using the LCD screen The battery time is to ...save battery power and to prevent battery and tape wear. To enable transition Transition between the last scene you recorded and the next scene can also use the Remote Commander for five minutes while the cassette is ...
Operating Instructions
Page 36
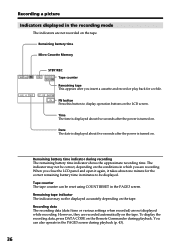
...and open it again, it takes about five seconds after you are not recorded on the tape. Recording data The recording data (date/time or various settings when recorded) are recorded automatically on the tape. Remaining tape indicator The indicator may not be reset using COUNT RESET in the PAGE3 screen...is displayed about one minute for a while. The indicator may not be displayed. To display the recording data, press DATA CODE on the LCD screen. Tape counter The tape counter can also operate in the PAGE3 screen during playback (p. 43). 36 Remaining battery time Micro ...
...and open it again, it takes about five seconds after you are not recorded on the tape. Recording data The recording data (date/time or various settings when recorded) are recorded automatically on the tape. Remaining tape indicator The indicator may not be reset using COUNT RESET in the PAGE3 screen...is displayed about one minute for a while. The indicator may not be displayed. To display the recording data, press DATA CODE on the LCD screen. Tape counter The tape counter can also operate in the PAGE3 screen during playback (p. 43). 36 Remaining battery time Micro ...

Operating Instructions
Page 42
... OFF ON MODE POWER 3 1 6,7 FN OK VOL + The bar indicator To return to PAGE1. 4 5 2 CAMERA MEMORY/ NET- If you close the LCD panel, you can monitor the recorded tape etc. The display returns to FN Press EXIT. The screen for the volume adjustment appears. 3 Press -/+ to adjust the...You can also control playback using the Remote Commander. (1) Prepare the power source and insert the recorded tape. (2) Set the POWER switch to VCR. (3) Slide OPEN in the viewfinder. Playing back a tape You can monitor the playback picture in the direction of the B mark to open the LCD...
... OFF ON MODE POWER 3 1 6,7 FN OK VOL + The bar indicator To return to PAGE1. 4 5 2 CAMERA MEMORY/ NET- If you close the LCD panel, you can monitor the recorded tape etc. The display returns to FN Press EXIT. The screen for the volume adjustment appears. 3 Press -/+ to adjust the...You can also control playback using the Remote Commander. (1) Prepare the power source and insert the recorded tape. (2) Set the POWER switch to VCR. (3) Slide OPEN in the viewfinder. Playing back a tape You can monitor the playback picture in the direction of the B mark to open the LCD...

Operating Instructions
Page 43
... indicators appear, press DSPL/TOUCH PANEL or DISPLAY again. Follow the steps below to the camcorder body with the LCD screen facing out. Playing back a tape When monitoring on for a long time Your camcorder gets warm. When you leave the power on the LCD screen You can turn the LCD panel... FN and select PAGE3. (2) Press DATA CODE. To display the screen indicators - Display function Press DSPL/TOUCH PANEL on your camcorder or DISPLAY on the tape but also the recording data (date/time or various settings when recorded) (Data code). Using the data code function Your camcorder automatically...
... indicators appear, press DSPL/TOUCH PANEL or DISPLAY again. Follow the steps below to the camcorder body with the LCD screen facing out. Playing back a tape When monitoring on for a long time Your camcorder gets warm. When you leave the power on the LCD screen You can turn the LCD panel... FN and select PAGE3. (2) Press DATA CODE. To display the screen indicators - Display function Press DSPL/TOUCH PANEL on your camcorder or DISPLAY on the tape but also the recording data (date/time or various settings when recorded) (Data code). Using the data code function Your camcorder automatically...

Operating Instructions
Page 44
... being played back. - The tape was recorded by a camcorder without the date and time set. Remaining battery time indicator during playback The indicator shows the approximate continuous playback time. The display ...settings 40min B AUTO 60 AWB F1.8 9dB 0:00:23 [a] [b] [c] [d] [e] [f] Various settings Various settings shows the camcorder's recording information at the time of the tape is unreadable due to tape damage or noise. - A blank portion of recording. Playing back a tape Using the Remote Commander Press DATA CODE on the Remote Commander: date/time y no indicator Not...
... being played back. - The tape was recorded by a camcorder without the date and time set. Remaining battery time indicator during playback The indicator shows the approximate continuous playback time. The display ...settings 40min B AUTO 60 AWB F1.8 9dB 0:00:23 [a] [b] [c] [d] [e] [f] Various settings Various settings shows the camcorder's recording information at the time of the tape is unreadable due to tape damage or noise. - A blank portion of recording. Playing back a tape Using the Remote Commander Press DATA CODE on the Remote Commander: date/time y no indicator Not...

Operating Instructions
Page 45
...playback) Press SLOW on the Remote Commander in stop mode. Playback - To fastforward the tape • Press in stop mode. Basics Playing back a tape Various playback modes To operate video control buttons, set the POWER switch to VCR. To view a still image (playback pause...) • Press during playback. To resume normal playback, press PLAY. To search the last scene recorded (END SEARCH) Press...
...playback) Press SLOW on the Remote Commander in stop mode. Playback - To fastforward the tape • Press in stop mode. Basics Playing back a tape Various playback modes To operate video control buttons, set the POWER switch to VCR. To view a still image (playback pause...) • Press during playback. To resume normal playback, press PLAY. To search the last scene recorded (END SEARCH) Press...

Operating Instructions
Page 46
Playing back a tape Video control buttons on the Remote Commander. 46 To resume playback, press or PLAY on the LCD screen To play back or pause a tape To stop a tape To rewind a tape To fastforward a tape When the playback pause mode lasts for five minutes Your camcorder automatically enters the stop mode.
Playing back a tape Video control buttons on the Remote Commander. 46 To resume playback, press or PLAY on the LCD screen To play back or pause a tape To stop a tape To rewind a tape To fastforward a tape When the playback pause mode lasts for five minutes Your camcorder automatically enters the stop mode.
Operating Instructions
Page 50
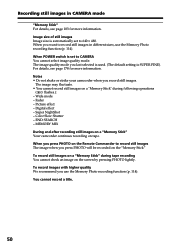
...Memory Photo recording function (p. 114). Digital effect - When you press PHOTO will be recorded on the "Memory Stick" To record still images on the screen by pressing PHOTO lightly. The image may fluctuate. • You cannot record still images on a "Memory Stick" during tape recording You cannot...END SEARCH - MEMORY MIX During and after recording still images on a "Memory Stick" Your camcorder continues recording on the Remote Commander to CAMERA You cannot select image quality mode. When POWER switch is set to record still images in CAMERA mode "Memory Stick" For details, see...
...Memory Photo recording function (p. 114). Digital effect - When you press PHOTO will be recorded on the "Memory Stick" To record still images on the screen by pressing PHOTO lightly. The image may fluctuate. • You cannot record still images on a "Memory Stick" during tape recording You cannot...END SEARCH - MEMORY MIX During and after recording still images on a "Memory Stick" Your camcorder continues recording on the Remote Commander to CAMERA You cannot select image quality mode. When POWER switch is set to record still images in CAMERA mode "Memory Stick" For details, see...

Operating Instructions
Page 53
... cannot cancel the self-timer recording using the Remote Commander. You can record still images with a beep. Before operation Insert a "Memory Stick" into your camcorder is set to the tape You cannot use the Remote Commander for this operation. During recording to OFF (CHG) or...while your camcorder. (1) In the recording standby mode, press FN and select PAGE2. (2) Press SELFTIMER. Advanced Recording Operations Recording still images in the standby mode. The POWER switch is in CAMERA mode Self-timer recording You can also use self-timer recording. 53 The (self-timer) ...
... cannot cancel the self-timer recording using the Remote Commander. You can record still images with a beep. Before operation Insert a "Memory Stick" into your camcorder is set to the tape You cannot use the Remote Commander for this operation. During recording to OFF (CHG) or...while your camcorder. (1) In the recording standby mode, press FN and select PAGE2. (2) Press SELFTIMER. Advanced Recording Operations Recording still images in the standby mode. The POWER switch is in CAMERA mode Self-timer recording You can also use self-timer recording. 53 The (self-timer) ...
Operating Instructions
Page 75
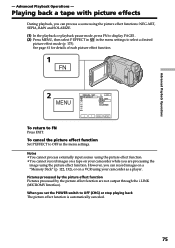
... return to OFF in the menu settings to OFF (CHG) or stop playing back The picture effect function is automatically canceled. 75 When you can record images on a "Memory Stick" (p. 122, 132), or on your camcorder as a player. To cancel the picture effect function Set P EFFECT to FN ... output through the i.LINK (MICROMV Interface). Notes • You cannot process externally input scenes using the picture effect function. • You cannot record images on a tape on a VCR using the picture effect function. Advanced Playback Operations - ART SEPIA B&W SOLARIZE EXEC RET.
... return to OFF in the menu settings to OFF (CHG) or stop playing back The picture effect function is automatically canceled. 75 When you can record images on a "Memory Stick" (p. 122, 132), or on your camcorder as a player. To cancel the picture effect function Set P EFFECT to FN ... output through the i.LINK (MICROMV Interface). Notes • You cannot process externally input scenes using the picture effect function. • You cannot record images on a tape on a VCR using the picture effect function. Advanced Playback Operations - ART SEPIA B&W SOLARIZE EXEC RET.


